Getting Started With WLED on ESP8266
Setting Up WLED On ESP8266 With WS2812 LEDs
Let’s start out with why I made this tutorial…
Before I learned about WLED, I used these SYLVANIA SMART+ ZigBee Color Changing LEDs as my LED strip of choice with my SmartThings setup.
I had them installed under all of my cabinets and behind all of my TVs. They look very good and are really reliable.
The downside of the SYLVANIA LEDs is that they are not individually addressable. The whole strip needs to be the same color from end to end.
I wanted to be able to make the LEDs do patterns and scan back and forth. That is how I got started down this rabbit hole.
I’ve never played with microcontrollers in my life. I come from the well documented world of Raspberry Pi.
I am making this tutorial because I had so much trouble finding information on this subject when I started with this project. I’ll do my best to save you some work if you are new, like I was.
I’m not saying there is a lack of documentation for microcontrollers. It just seemed like every tutorial or guide that I read made the assumption that I had previous knowledge.
It was a very confusing process.
If you are already familiar with setting up WLED and the ESP8266, you can check out the following posts.
- LED Kits With WLED Pre-Installed
- WLED Christmas Lights
- Automating WLED With SmartThings and webCoRE
- Homelab Server Rack With WLED
- Using WLED To Monitor Internet Data Usage
If you aren’t familiar with WLED, keep reading. I’ll start with the parts list and then I’ll move onto teaching you what I’ve learned.
Parts Used For Project
| Part | Comment | Link |
|---|---|---|
| ESP8266 Dev Board | This board will allow us to connect via WiFi and output a digital signal to our LEDs. These boards are fairly inexpensive. So you might as well get a couple because you are going to be hooked after you build your first project. | ESP8266 Module Development Board |
| WS2812B LED Strip | 16.4 feet of individually addressable RGB LEDs. 150 or 300 LEDs per strip. This brand has been very reliable for my projects. | 16.4ft WS2812B Individually Addressable RGB LED Strip Light |
| Jumper Wires | For this tutorial, you really only need 3 of these. If you don’t have any at home already, you might as well buy a larger pack to get you started. | 80 Piece Jumper Wires |
| Micro USB Data Cable | You probably already have a Micro USB cable laying around your house. The important thing is to make sure that it is capable of transferring data. We are going to use this cable to install firmware first and then later to power our board. Some of these cables are only meant for charging and don’t even have all pins hooked up, making data transfer impossible. | Micro USB Data Cable |
| USB Wall Charger | This USB port will output 5V and up to 2.4 Amps. More on this later… | USB Wall Charger 2.4 Amp |
Getting Started
Again, I am going to assume you know nothing about this subject. I’ll try to explain everything from the beginning.
What Is WLED?
WLED is open source software. It was written by an awesome developer named Aircoookie.
WLED was written to run on ESP8266 and ESP32 microcontrollers to help with controlling “NeoPixel” (WS2812B, WS2811, SK6812, APA102) LEDs.
When installed on a microcontroller such as the ESP8266, WLED runs a web server that can be controlled by an iOS or Android app, API, MQTT, Blynk, Alexa and a quite a few other ways.
WLED is the new kid on the block when it comes to controlling LEDs but the popular opinion seems to be that it is the best and will continue getting better.
What Is An ESP8266?
Having no previous experience with microcontrollers, this is where I encountered the most confusion. I’ll do my best to explain what I’ve learned and wait for someone on the internet to tell me I’m wrong. I’ll continue to update this post as I am corrected by people on the internet.
When searching for “ESP8266” on Google, you will see terms like ESP8266, NodeMCU, ESP32 ESP8266 SOC, ESP8266 Module and others. Here is my interpretation of these terms and what they are.
| Name | Description |
|---|---|
| ESP8266 | The term ESP8266 means a lot of different things to a lot of different people. Most commonly, I have seen it mean “a development board containing the ESP8266 microcontroller”. |
| NodeMCU | NodeMCU is the name of the firmware that originally ran on the ESP8266. More recently, it now supports the ESP32. The problem I’ve come across is that some companies have built boards using the ESP8266 and marketed them as “NodeMCU” boards. |
| ESP32 | The ESP32 is the successor to the ESP8266. Because the ESP32 is newer, I’ve found more support and a bigger community for the ESP8266. From what I’ve seen touted, the main advantage of the ESP32 over the ESP8266 is Bluetooth. The ESP32 does cost more than the ESP8266. |
| ESP8266 SOC | At it’s lowest level, the ESP8266 is an SOC (System on Chip). This is really just the chip. It does not include the antenna or anything else. |
| ESP8266 Module | The ESP8266 Module is just the part of the development board that controls WiFi. You will find this attached to ESP8266 development boards. It generally consists of the SoC, SoC housing and board and possibly an antenna. Not necessary at all for this tutorial but here is a list of different ESP8266 Modules if you are interested. |
| ESP8266 Dev Board | An ESP8266 dev board is what we want. It includes the ESP8266 Module/SOC and other things depending on the manufacturer. ESP8266 dev boards make things easier by including pinouts for GPIO pins and components that allow for easy programming. I chose this ESP8266 Module Development Board because I could easily use it with jumper wires and powered by USB. |
Now that you understand all that, let’s move onto flashing the WLED software onto our ESP8266 board.
How To Install WLED On ESP8266
The software I used to flash my ESP8266 is called NodeMCU PyFlasher. Thanks to marcelstoer for building it.
Checkout this NodeMCU PyFlasher releases section.
You can see that there is a .dmg if you are using MacOS and a .exe if you are using Windows. Download and install whatever is appropriate for your computer and lets move on.
Now that we have a utility to flash our ESP8266, we need some firmware. Head over to the WLED Releases Section.
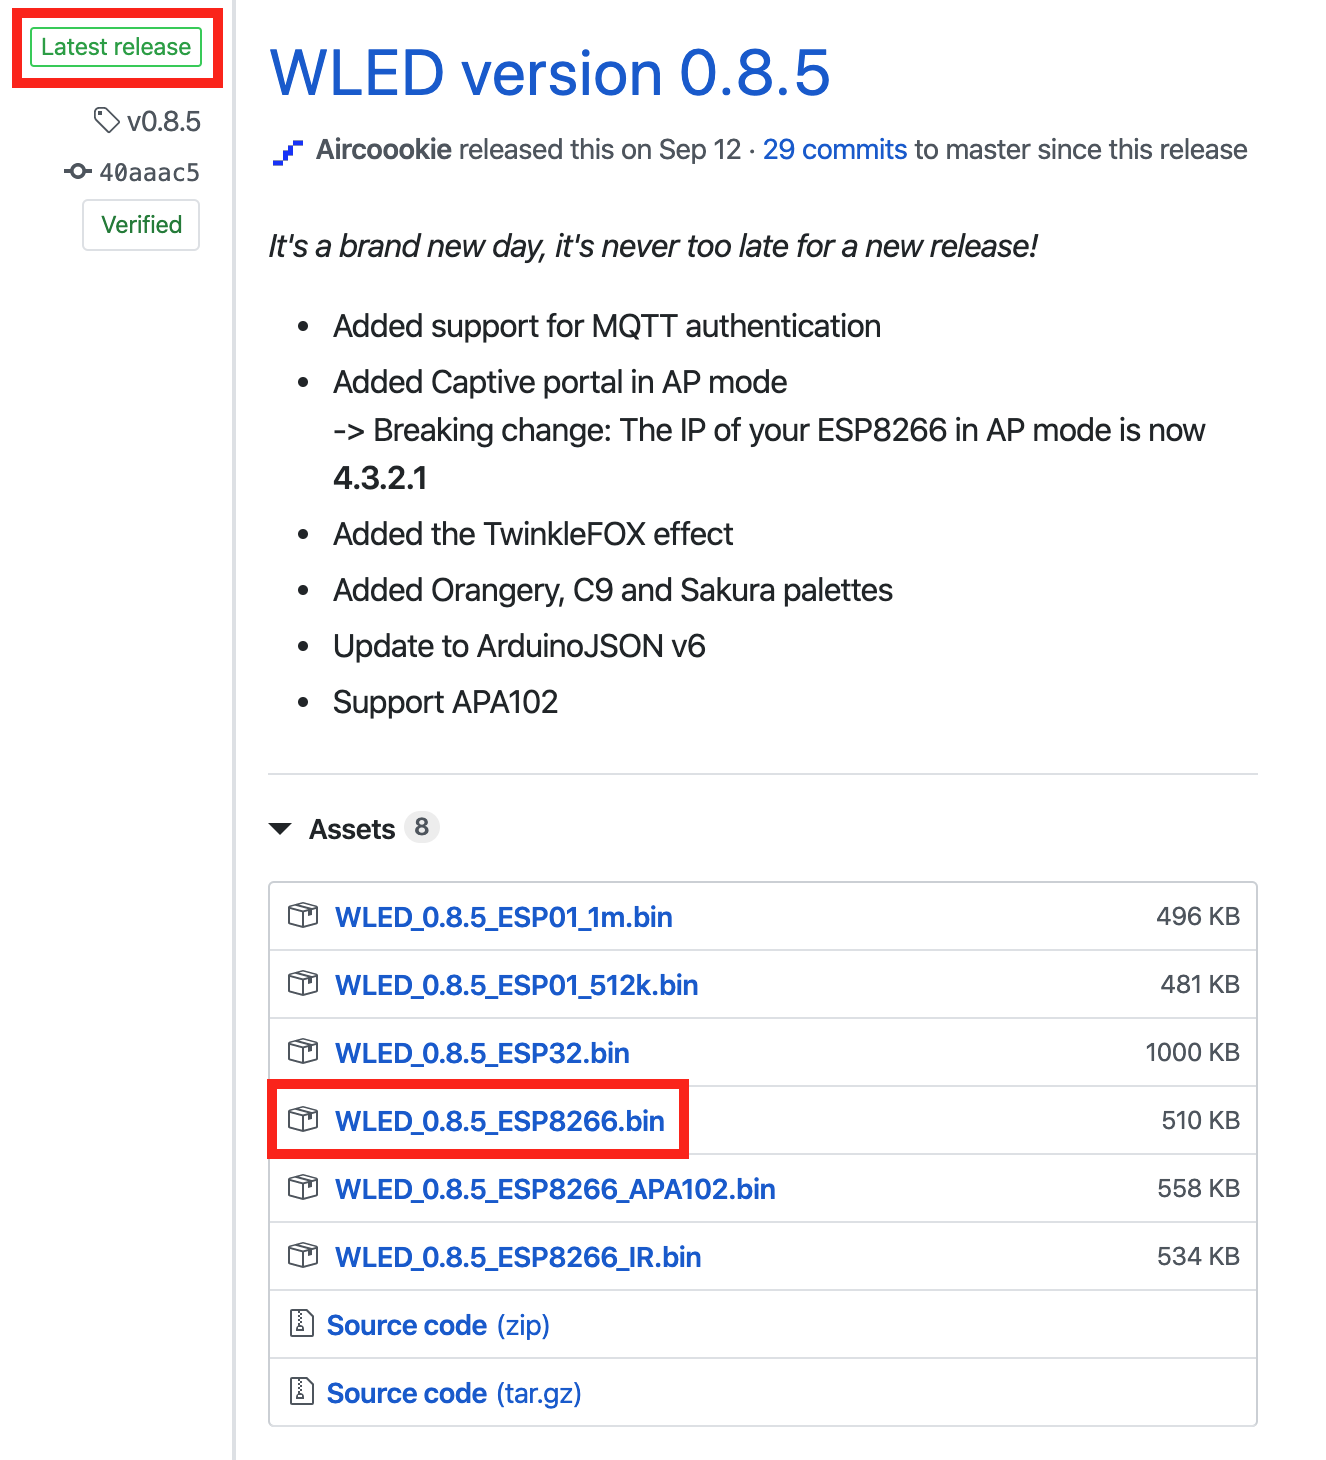
Make sure you get the version that says Latest release.
When picking what bin to download from the Assets section, choose the filename that says WLED_<version-number>_ESP8266.bin. This version will work with the ESP8266 that I’ve linked above. I don’t know much about the others.
Next, connect your ESP8266 to your computer with a micro USB cable and open NodeMCU PyFlasher.
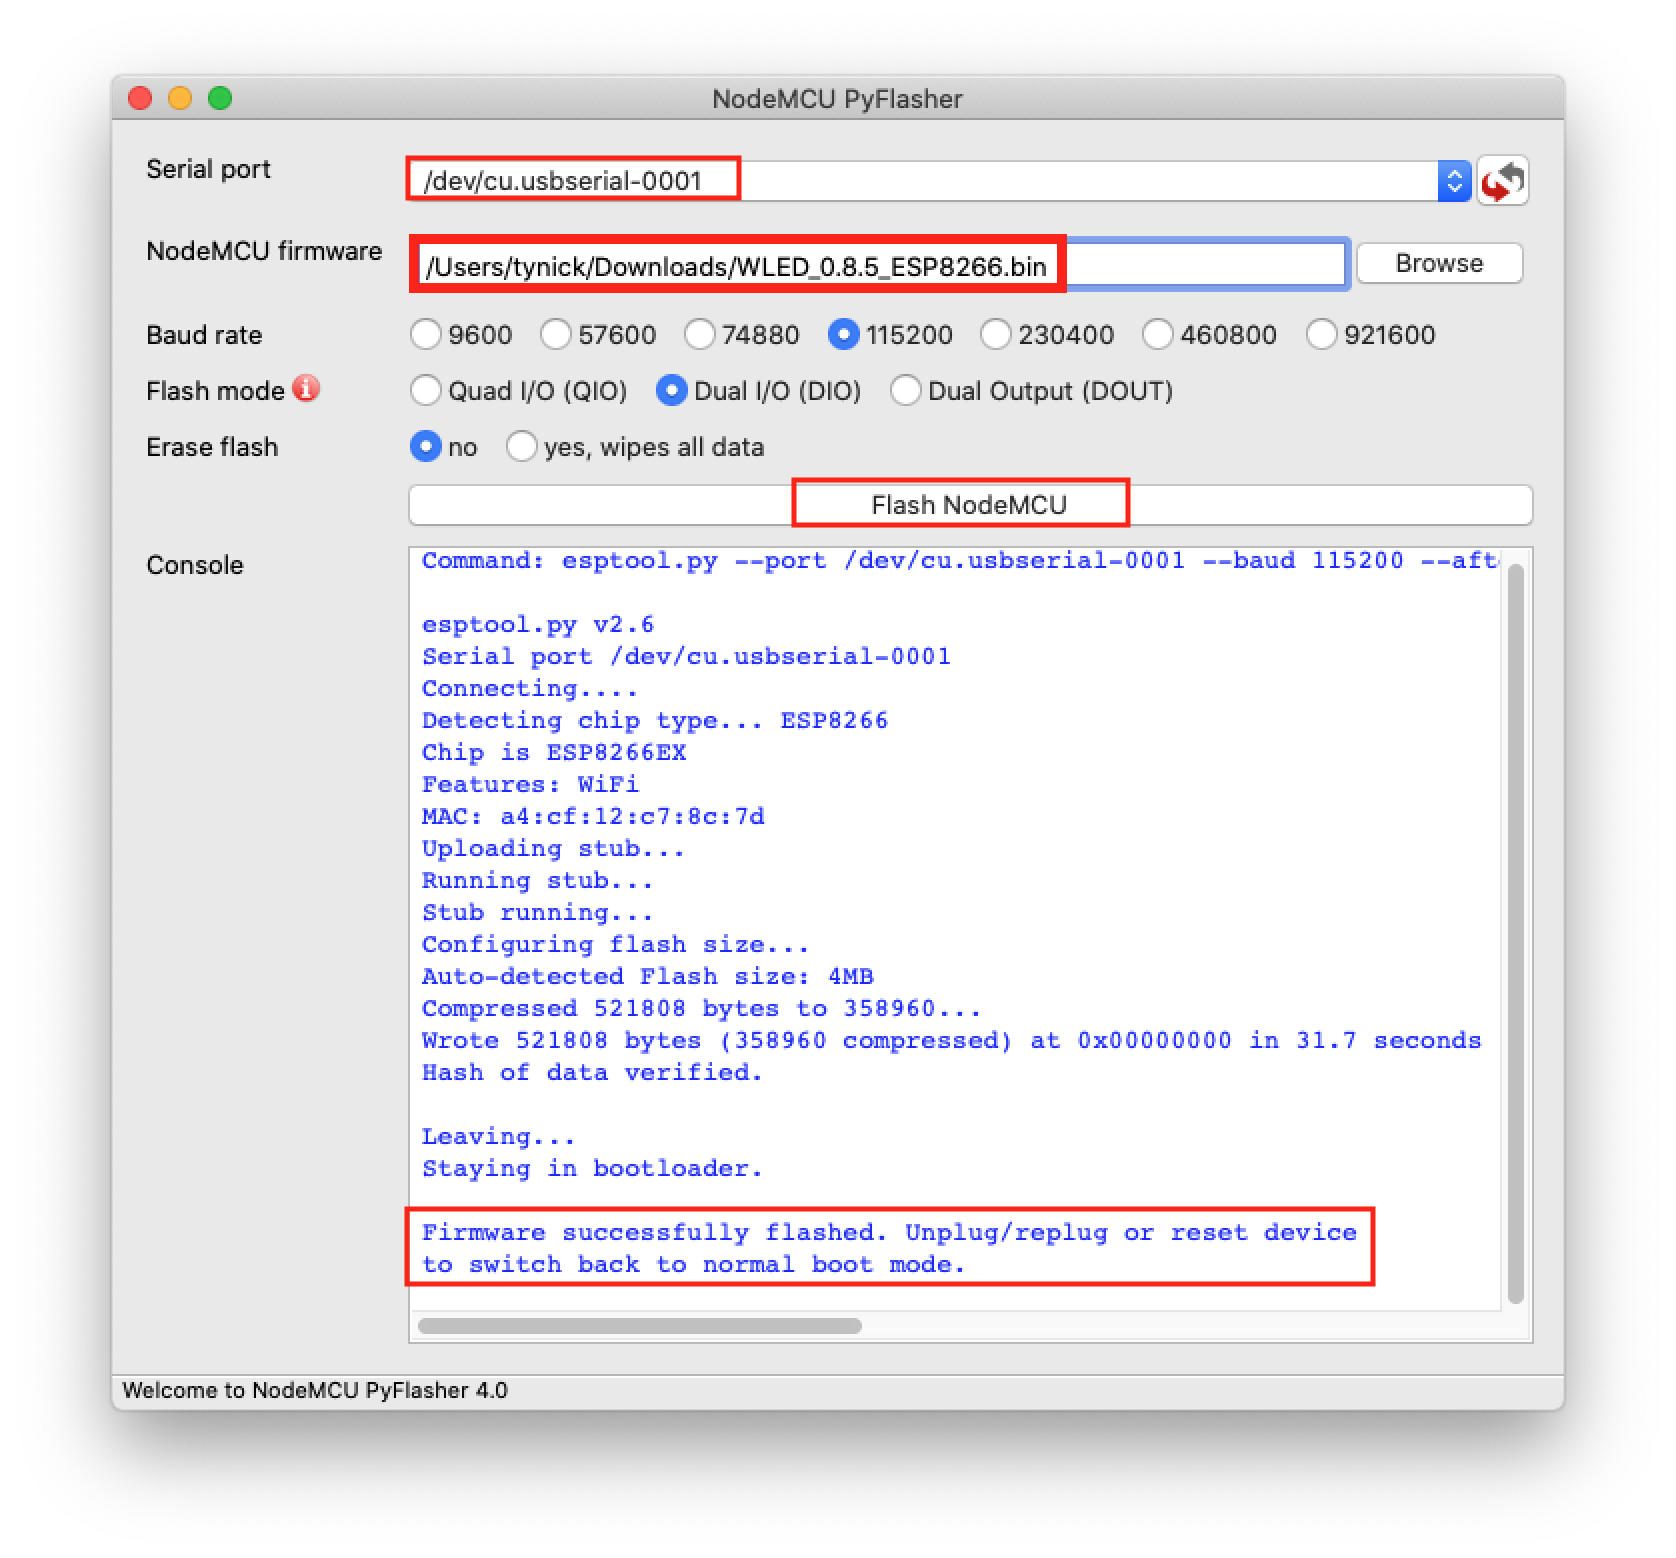
Select the USB device for Serial port.
Select the .bin we downloaded earlier for NodeMCU firmware.
Press Flash NodeMCU and cross your fingers.
If all goes well, you should see a success message below after 30-60 seconds.
If you have trouble with the above steps, please verify that your micro USB cable is capable of transferring data. I also had an issue on a MacBook where I needed to disable Bluetooth before my USB device would show up under the Serial port list.
You should now have WLED installed on your ESP8266. Lets connect some LEDs and then get it configured!
How To Connect LEDs To ESP8266
In this tutorial, we will not be using an external power supply to power our LEDs.
When the ESP8266 is powered via USB, the Vin pin will output 5V. If you have a big enough USB block powering your ESP8266 via the USB port, you can get away with running a small amount of 5V LEDs.
I personally have used the Vin pin on projects to run anywhere from 12 to 100 LEDs. I used a 2.4A charging block for both of these projects. I wouldn’t suggest running much more than I have. You’ll probably start to notice a degradation in LED output.
With all of that said, lets get some LEDs hooked up to an ESP8266.
Feel free to use jumper wires or solder directly to the pins if you are handy.
Disconnect power from the ESP8266 before you connect any wires to the pins.
| Wire Color | Summary | Pin |
|---|---|---|
| Red | 5V Power | Vin |
| Black | Ground | GND |
| Green | Digital out. The D4 pin tells the LEDs what to do. | D4 |
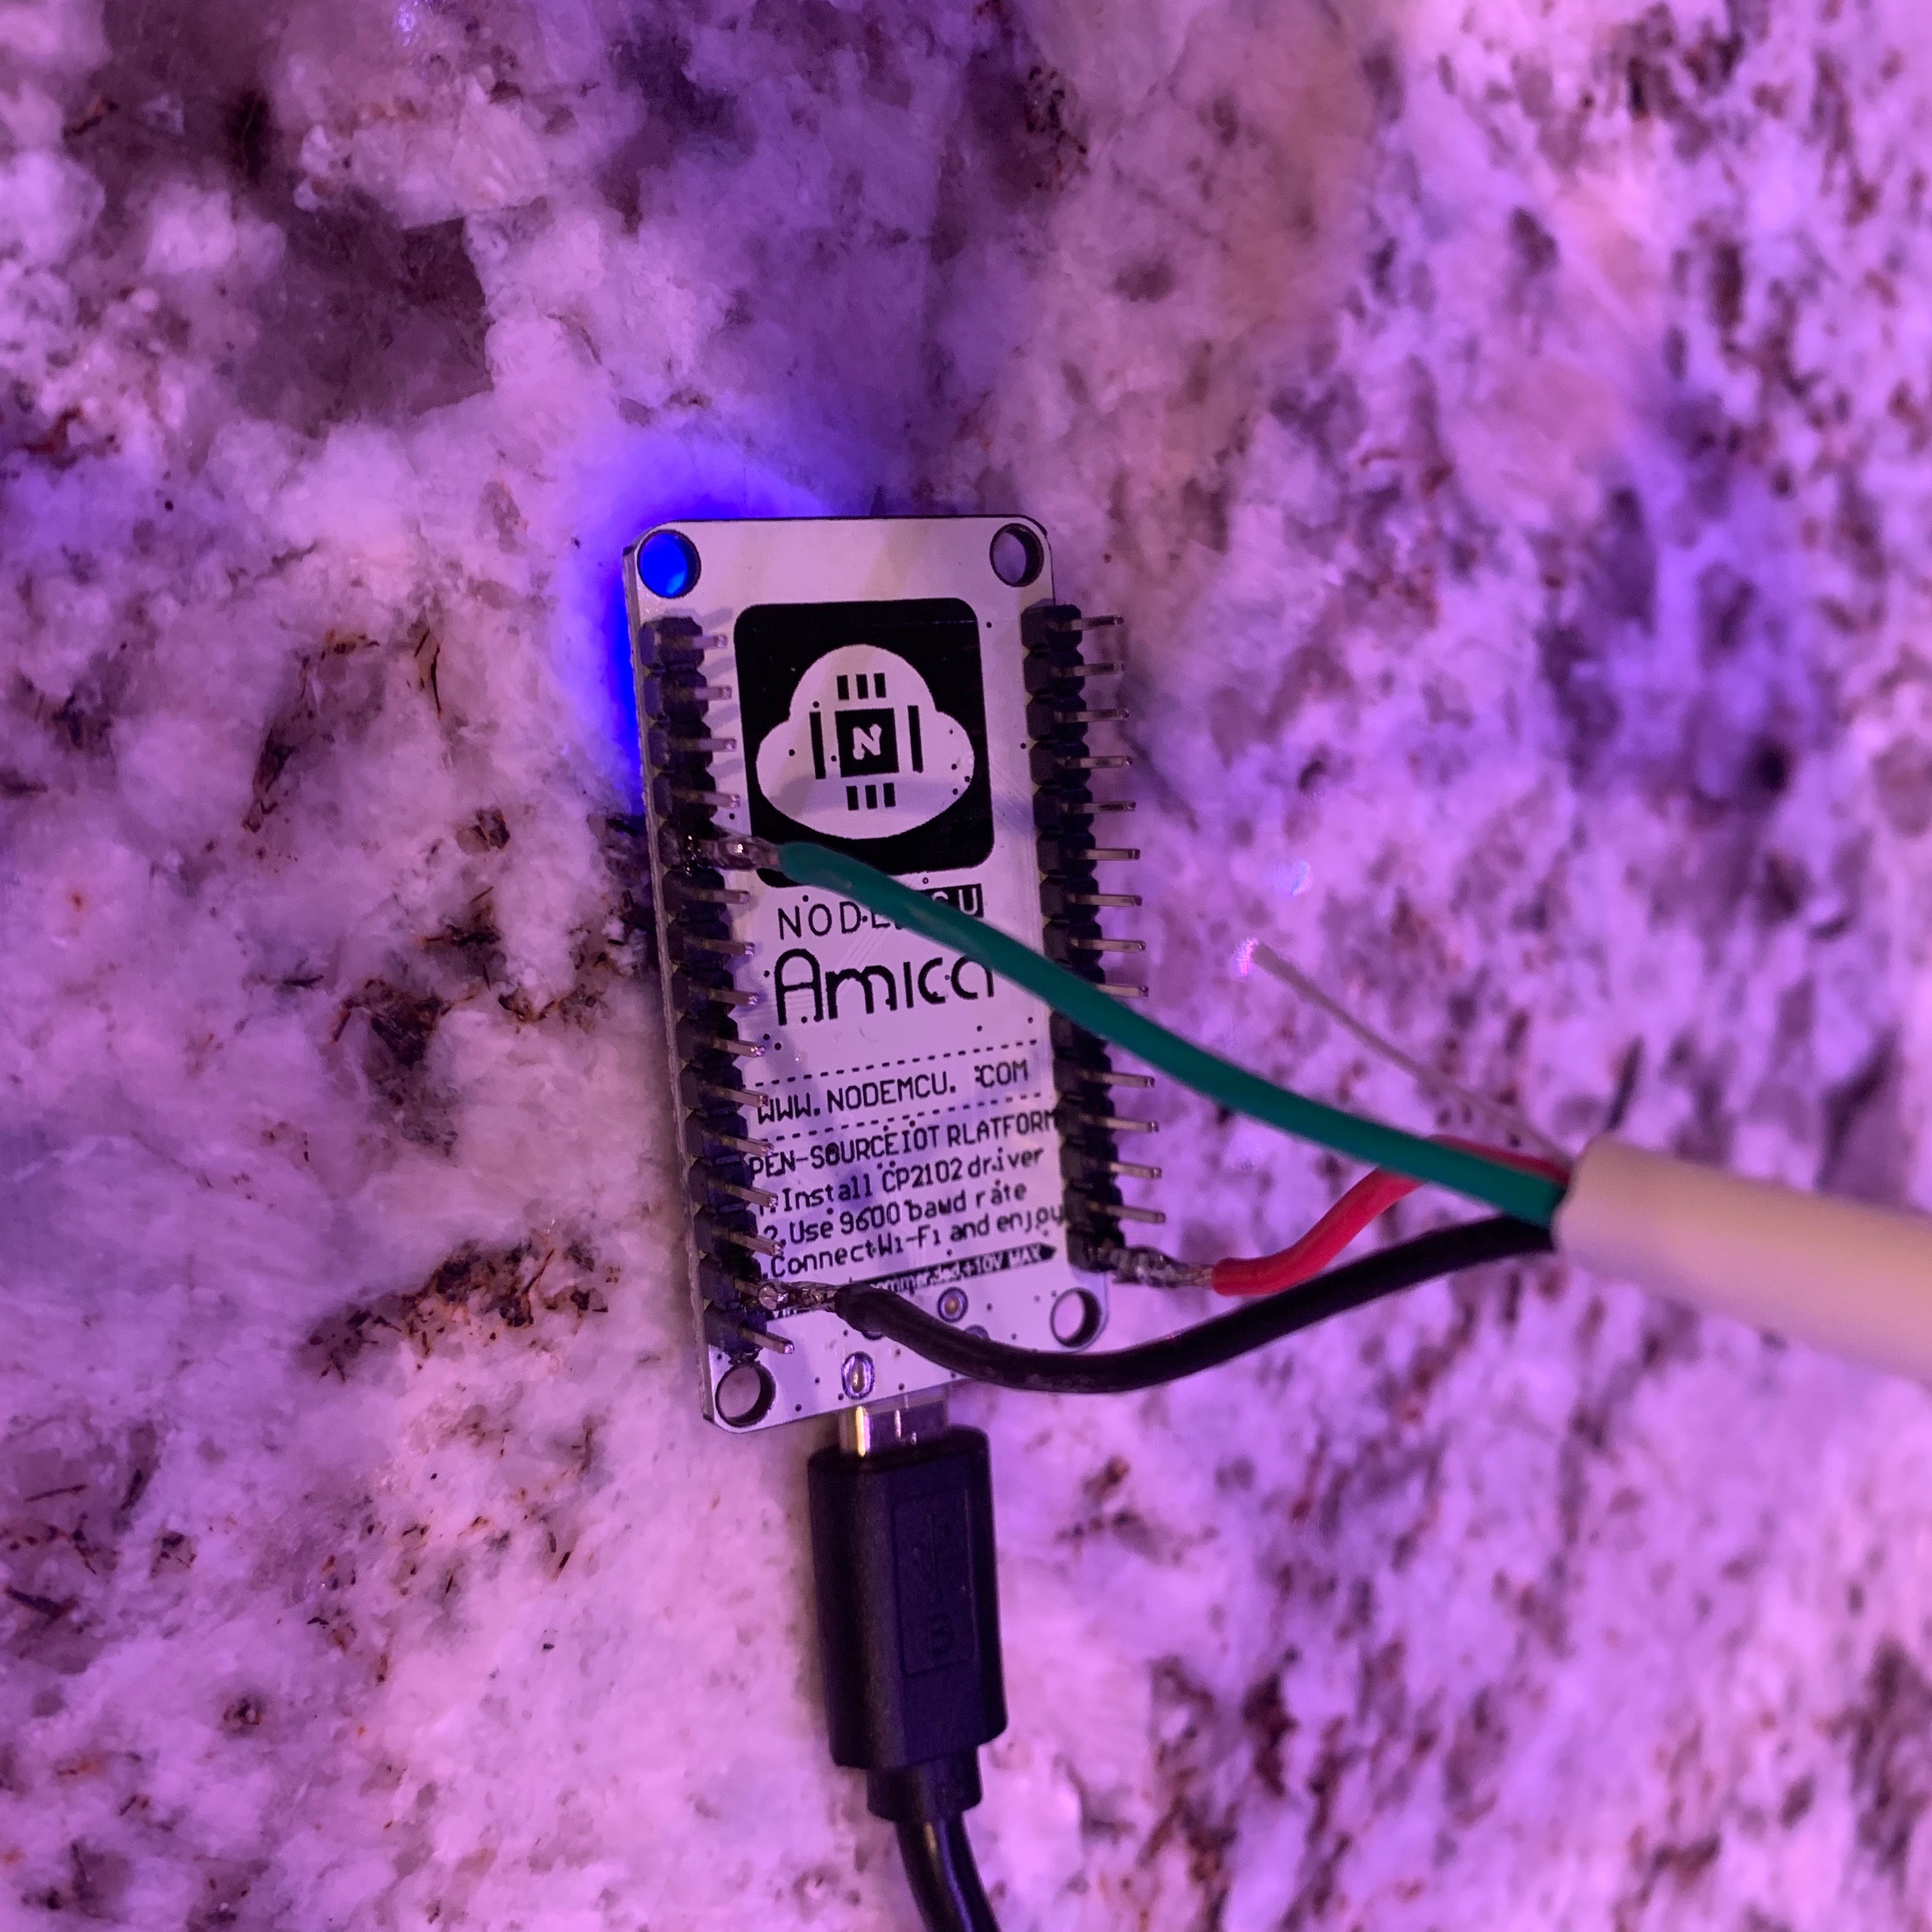
After these pins are connected, plug your USB power back in and you should hopefully see some lights.
How To Configure WLED
There is so much you can do with WLED. I am going to run you through the basic setup so you can get started. After that feel free to play with all of the options and toys it has built in.
Now that the ESP8266 is flashed with WLED and powered on, we can connect to the built in access point that it broadcasts by default.
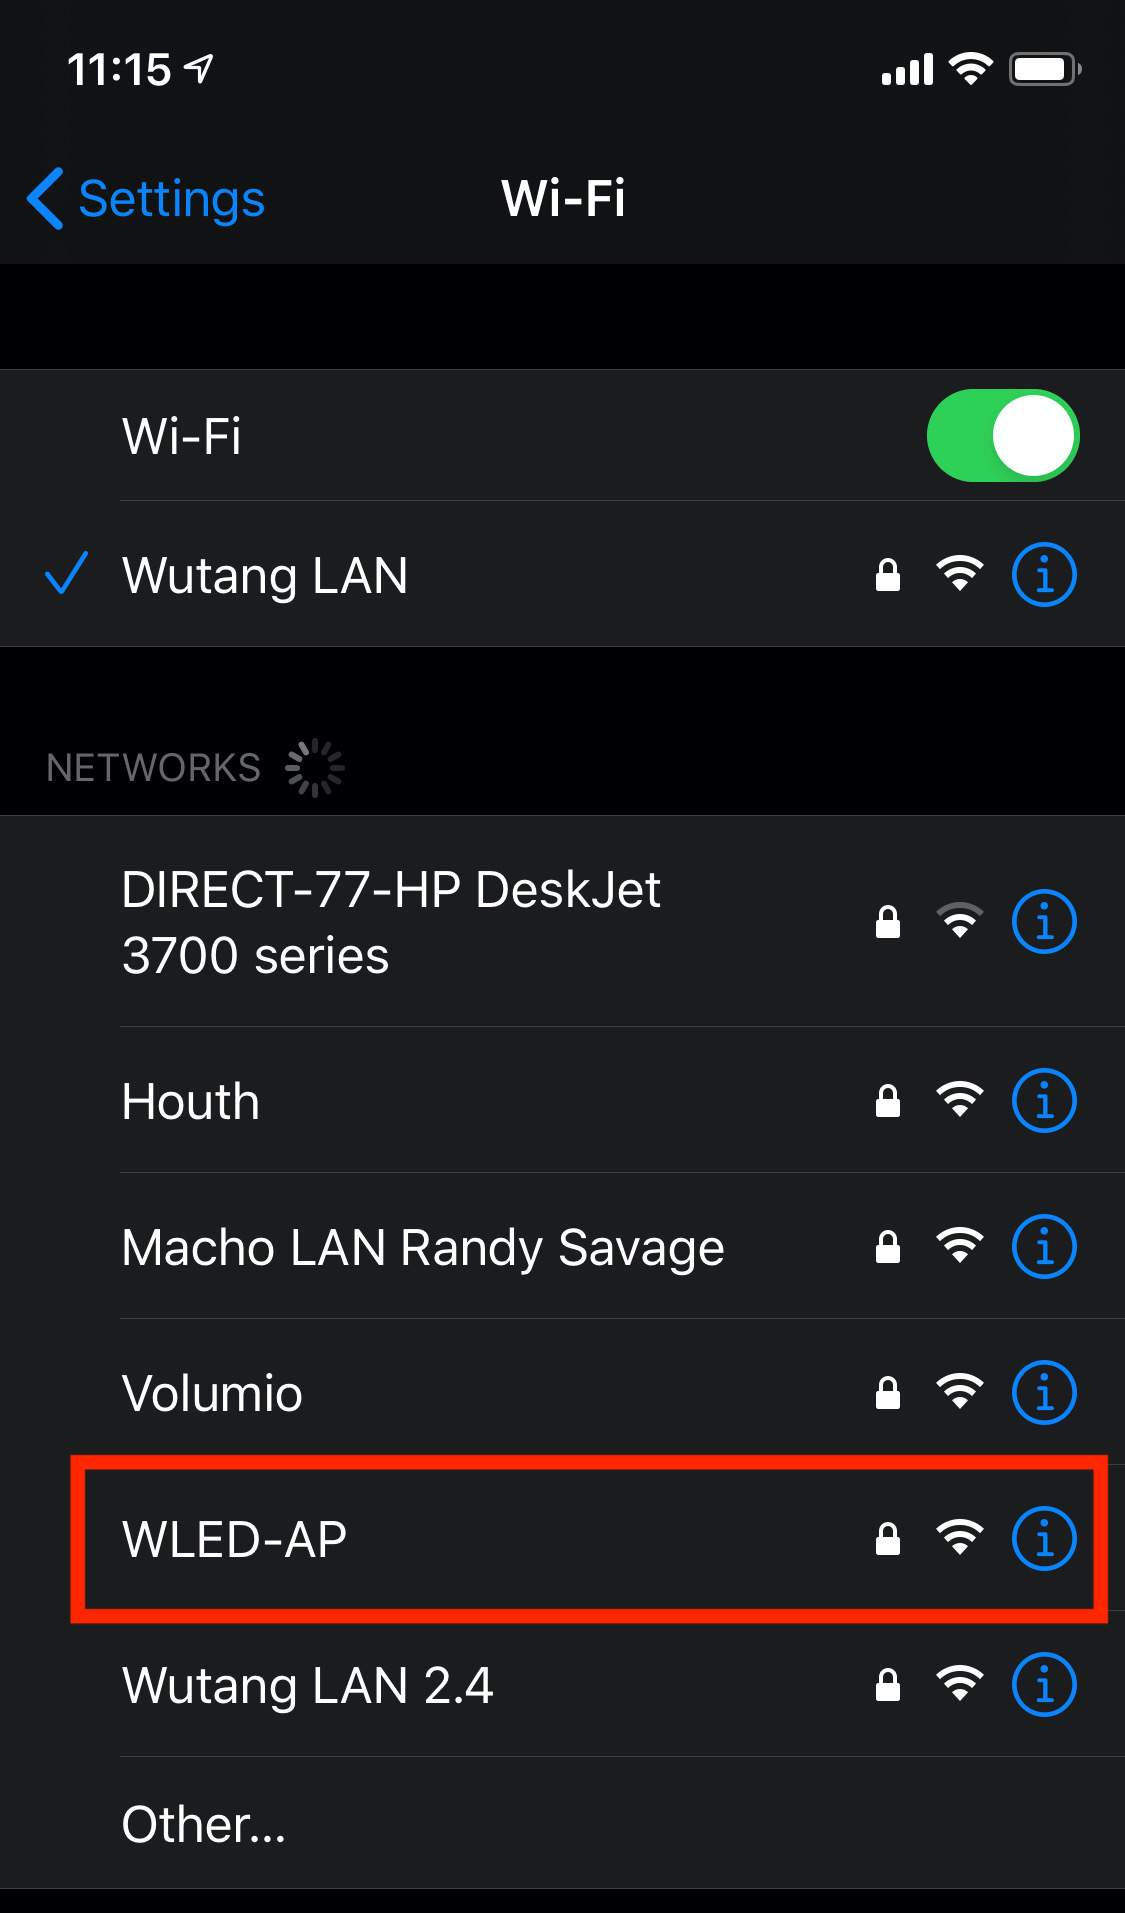
View nearby WiFi networks on your phone. You should see an SSID with the name WLED-AP.
Connect to the WLED-AP network using the password wled1234 and you should be greeted with a captive portal.

Once connected to the access point, you have the option to configure the ESP8266 to connect to your local WiFi or you can just start controlling the LEDs.
I suggest connecting the controller to your WiFi network. This will prevent you from needing to connect to a new access point anytime you want to make a change to your LEDs.
Select WIFI SETTINGS.
If you have a pretty basic network, just enter your SSID, password and then press Save & Reboot.
When your ESP8266 reboots, it should automatically connect to your WiFi network.
WLED Phone App
Now that we have a working WLED device, we can now download the WLED app.
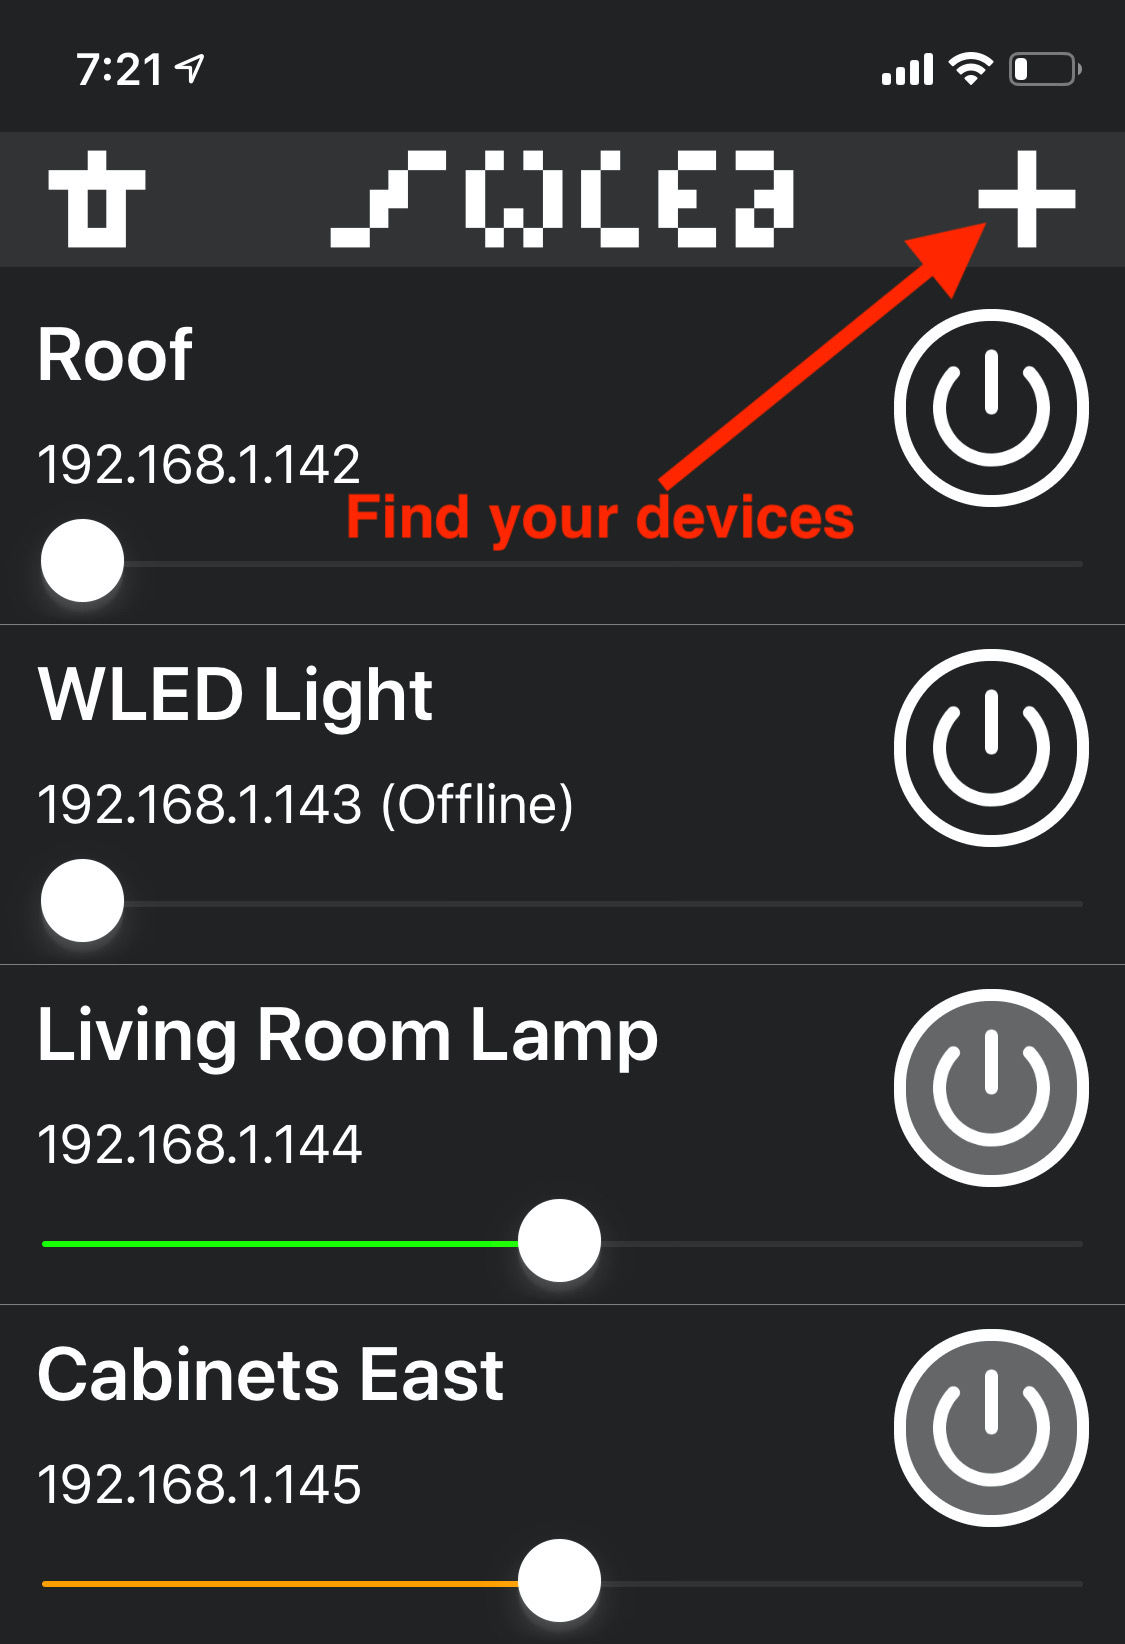
While your phone is connected to the same network as your ESP8266, open the WLED app and press the + button in the top right corner.
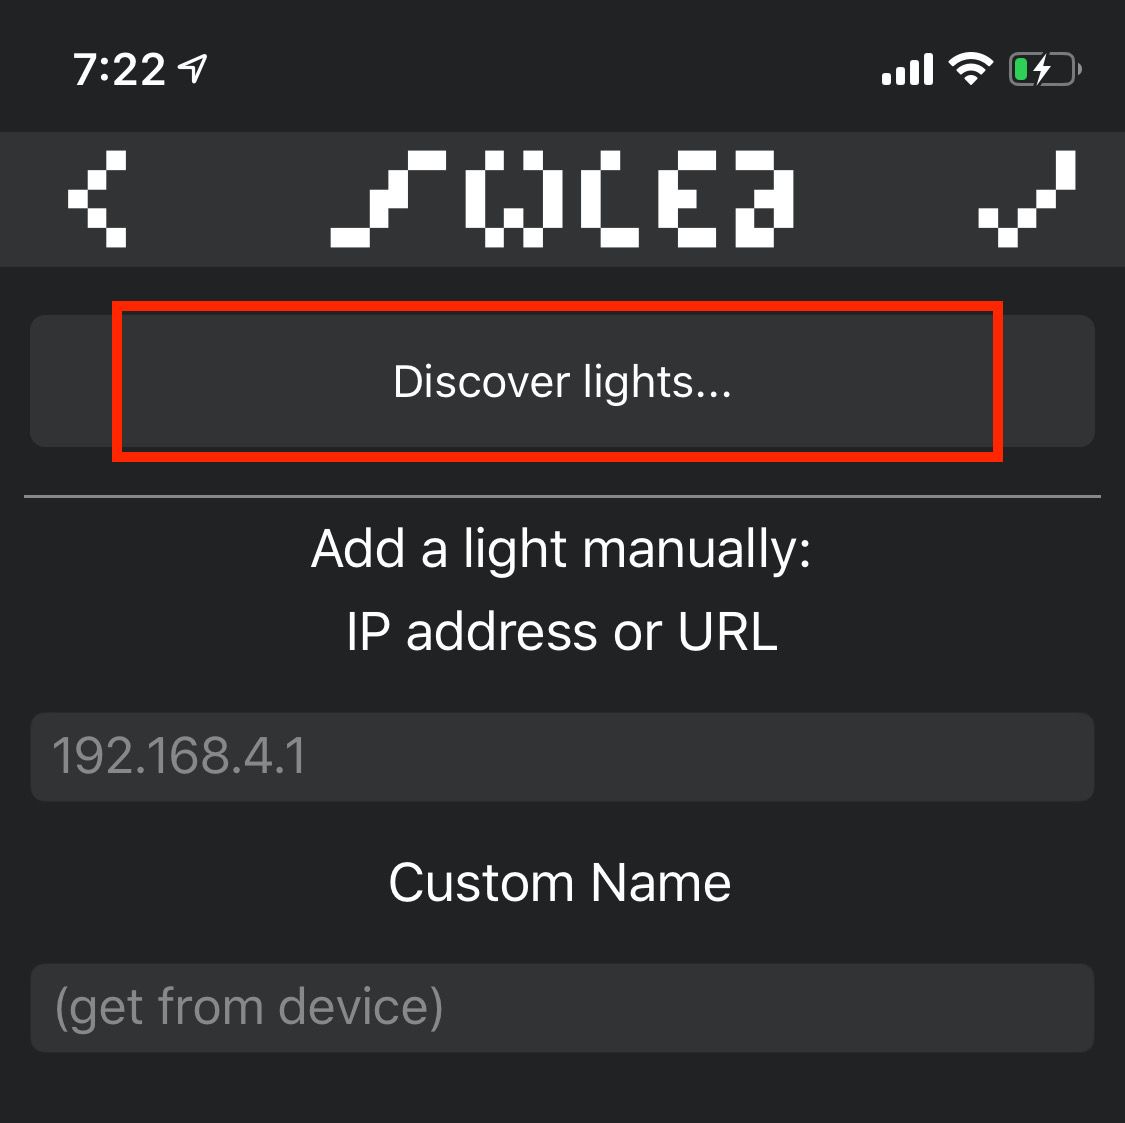
Now touch the Discover Lights button.
This will try to locate any devices running WLED on the same network your phone is on.
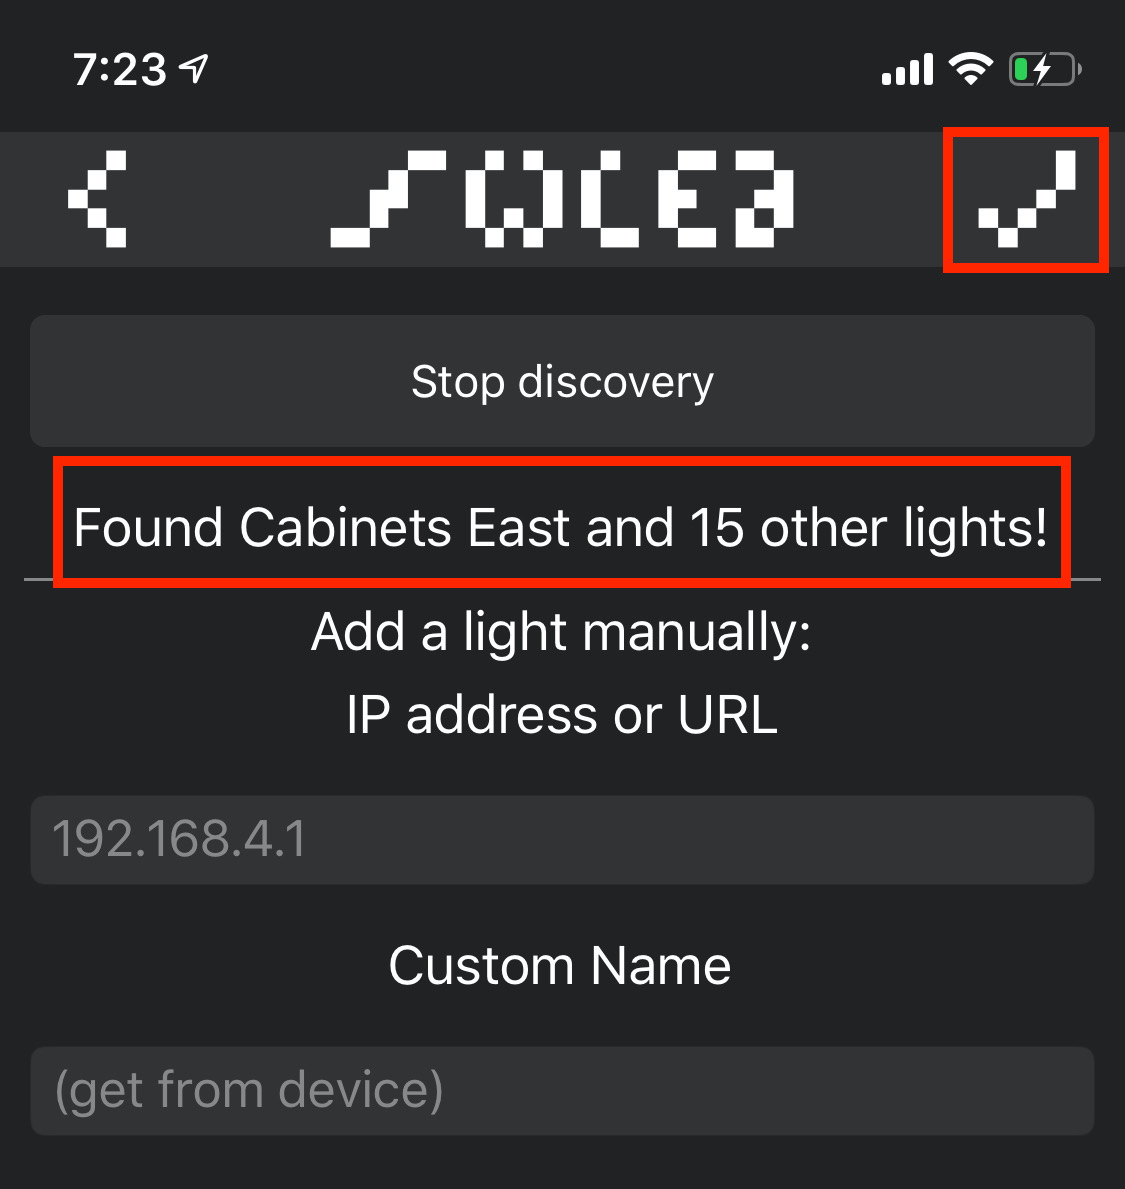
With any luck, the WLED app will find your newly configured lights and you can touch the checkmark in the top right.
Once you find your lights, feel free to play with the app. There are so many colors and patterns you can run through. The WLED creator did a great job.
Here is some app FAQ/troubleshooting information from the creator if you experience issues.
Automating WLED With SmartThings And webCoRE
For the people that are also running SmartThings and webCoRE, I’ve made a separate tutorial for you.
You can learn how to turn WLED lights on and off automatically with SmartThings and webCoRE in this post.
Go Build Something
That should be enough to get your started with the ESP8266, WS2812 LEDs and WLED.
It’s really easy and cheap to make something look cool with these. Checkout the related posts at the top of this page to see some of the things I’ve done.
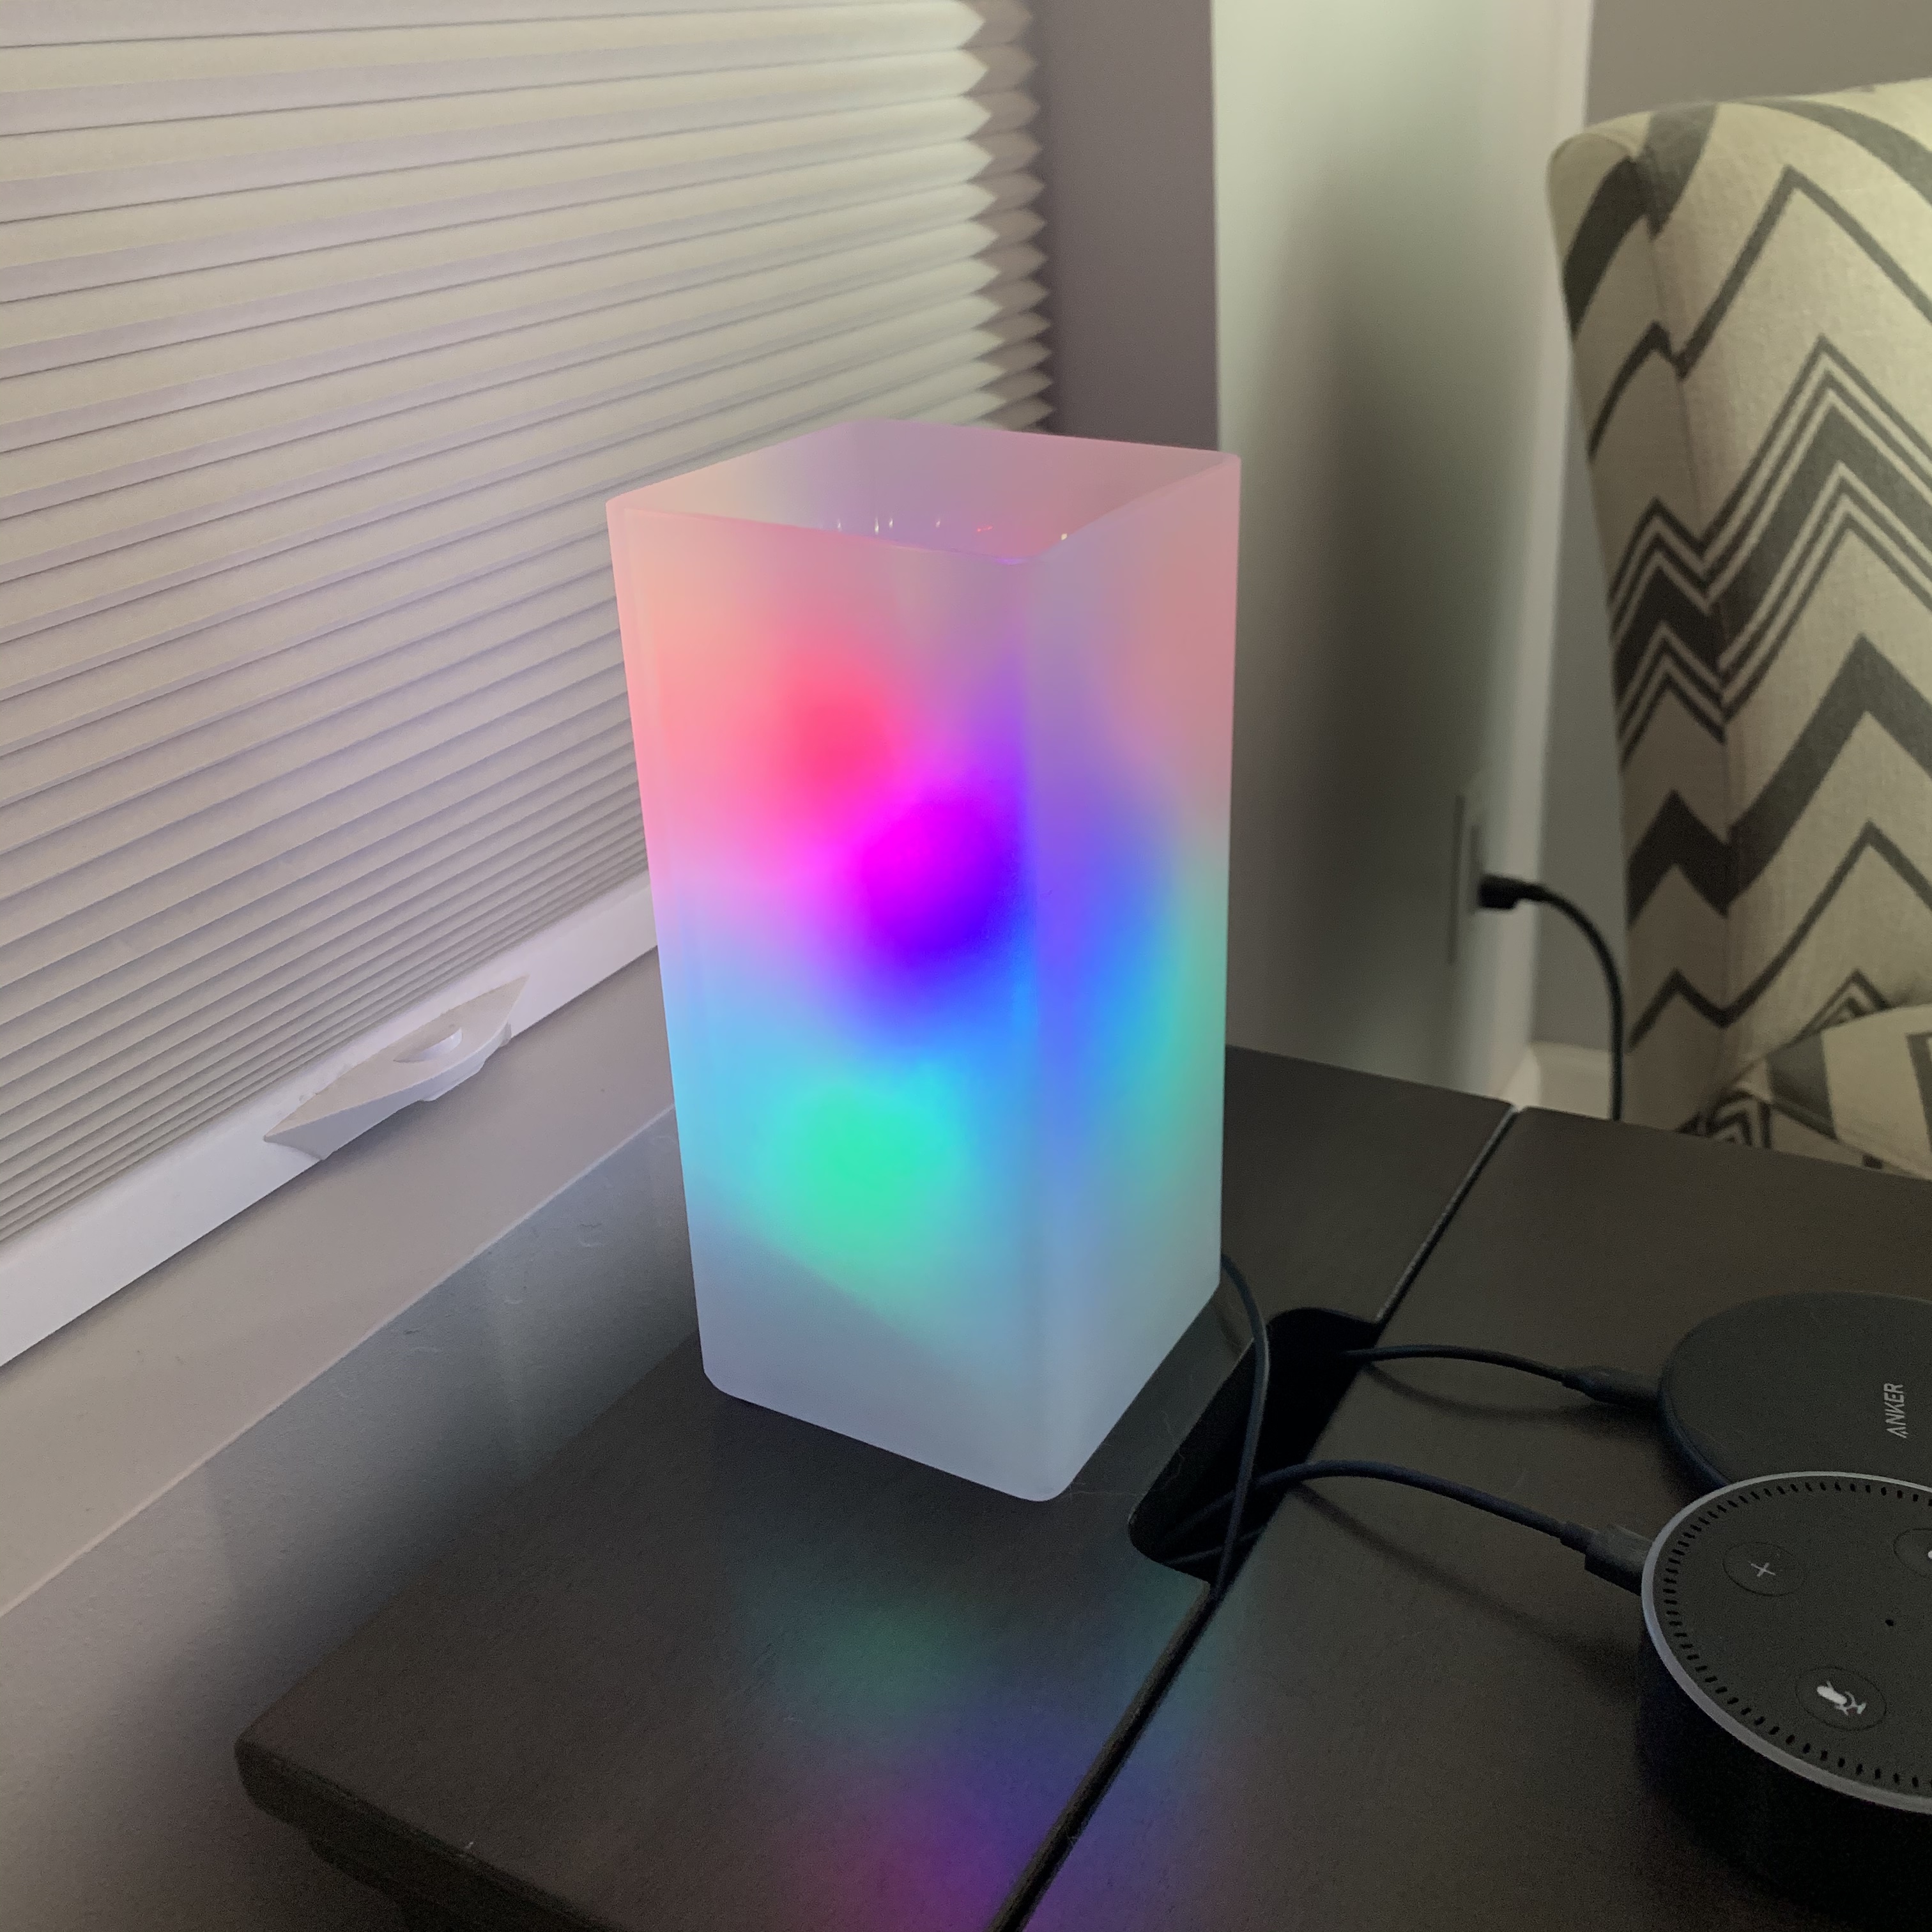
Here is a small lamp project I did last weekend.
Just a small IKEA GRÖNÖ Lamp with frosted glass.
I ripped all the internals out and replaced them with a dowel rod that I cut to size and painted black.
After painting it black I wrapped the dowel rod with WS2812 LEDs and zip tied them on.
I ran the USB cable through the same channel that the previous power cord was using.
Plug it in and it works!
Below is what it looks like inside. It’s not super pretty but it doesn’t matter because of the frosted glass.
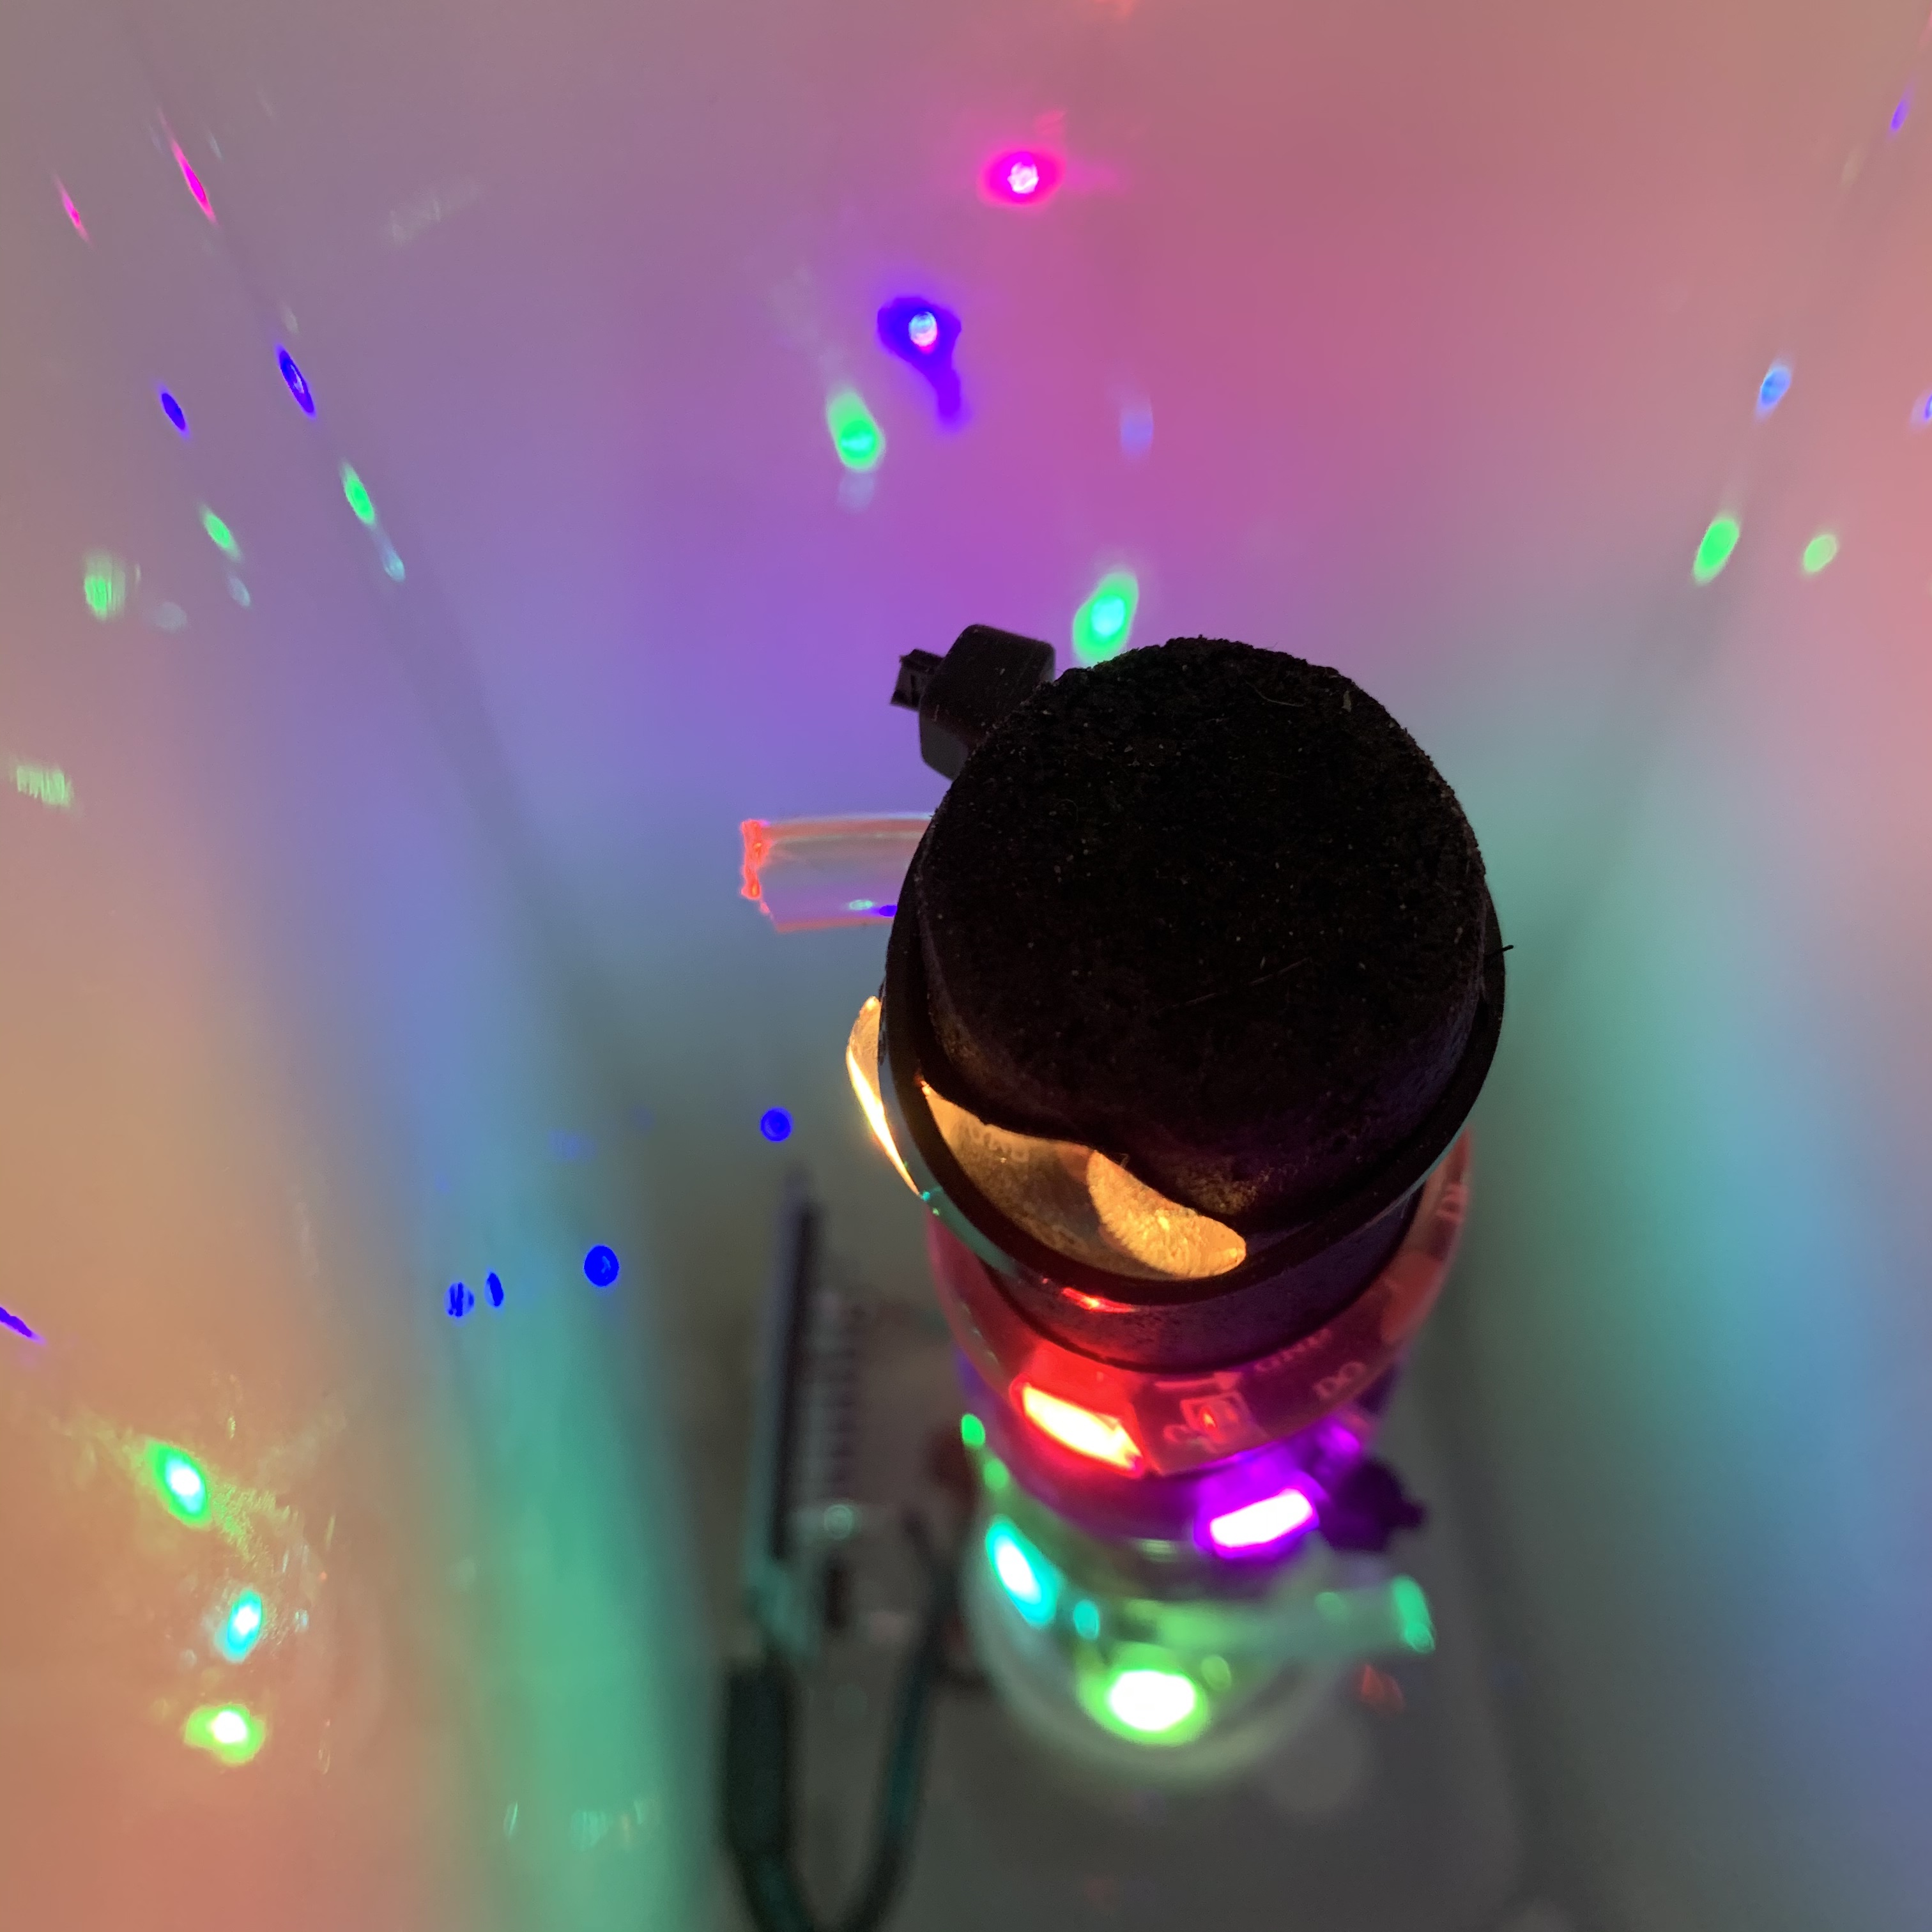
Inside of WLED lamp.
As usual, let me know if you have any issues with this tutorial.
Subscribe to my mailing list below or follow me on Twitter to be notified when I post.
Twitter is best if you have any questions
You can also Buy Me A Coffee to help keep me going! To be honest, I’ll probably buy a well whiskey with the money instead.