Automating WLED With SmartThings And webCoRE
Hopefully you’ve already read my tutorial on getting started with WLED on ESP8266. If not go check it out. This post will probably make a lot more sense.
Automating WLED With SmartThings And webCoRE
Now that you’ve got WLED working at your house and you’ve been controlling them with the WLED app, you probably want to know how to get SmartThings to turn your LEDs on and off automatically.
This tutorial assumes that you already have WLED setup on ESP8266, you are running SmartThings and you have webCoRE configured and working already.
For those that don’t know, SmartThings is a home automation platform and webCoRE is a rule engine for SmartThings.
Let’s get started adding WLED to webCoRE and SmartThings…
WLED JSON API
One of the things that makes WLED great is all of the interfaces it has. The one we are going to be using for this tutorial is the WLED JSON API.
This interface allows us to make HTTP GET and HTTP POST requests to the web server running on the ESP8266 to manipulate WLED.
I may add other requests later on but for now I am just going to teach you how to simply turn WLED on and off.
Making An HTTP POST request to WLED
Before we even touch SmartThings or webCoRE, you should learn the basics of how to make the HTTP request manually.
We are going to use a tool called curl to do that.
curl supports many protocols but for our purposes, all we really care about is HTTP.
First you need to know the IP address of the WLED instance we want to turn off and on.
The easiest non-technical way to get your IP address is just open the WLED app. It will show the IPs for each WLED instance.
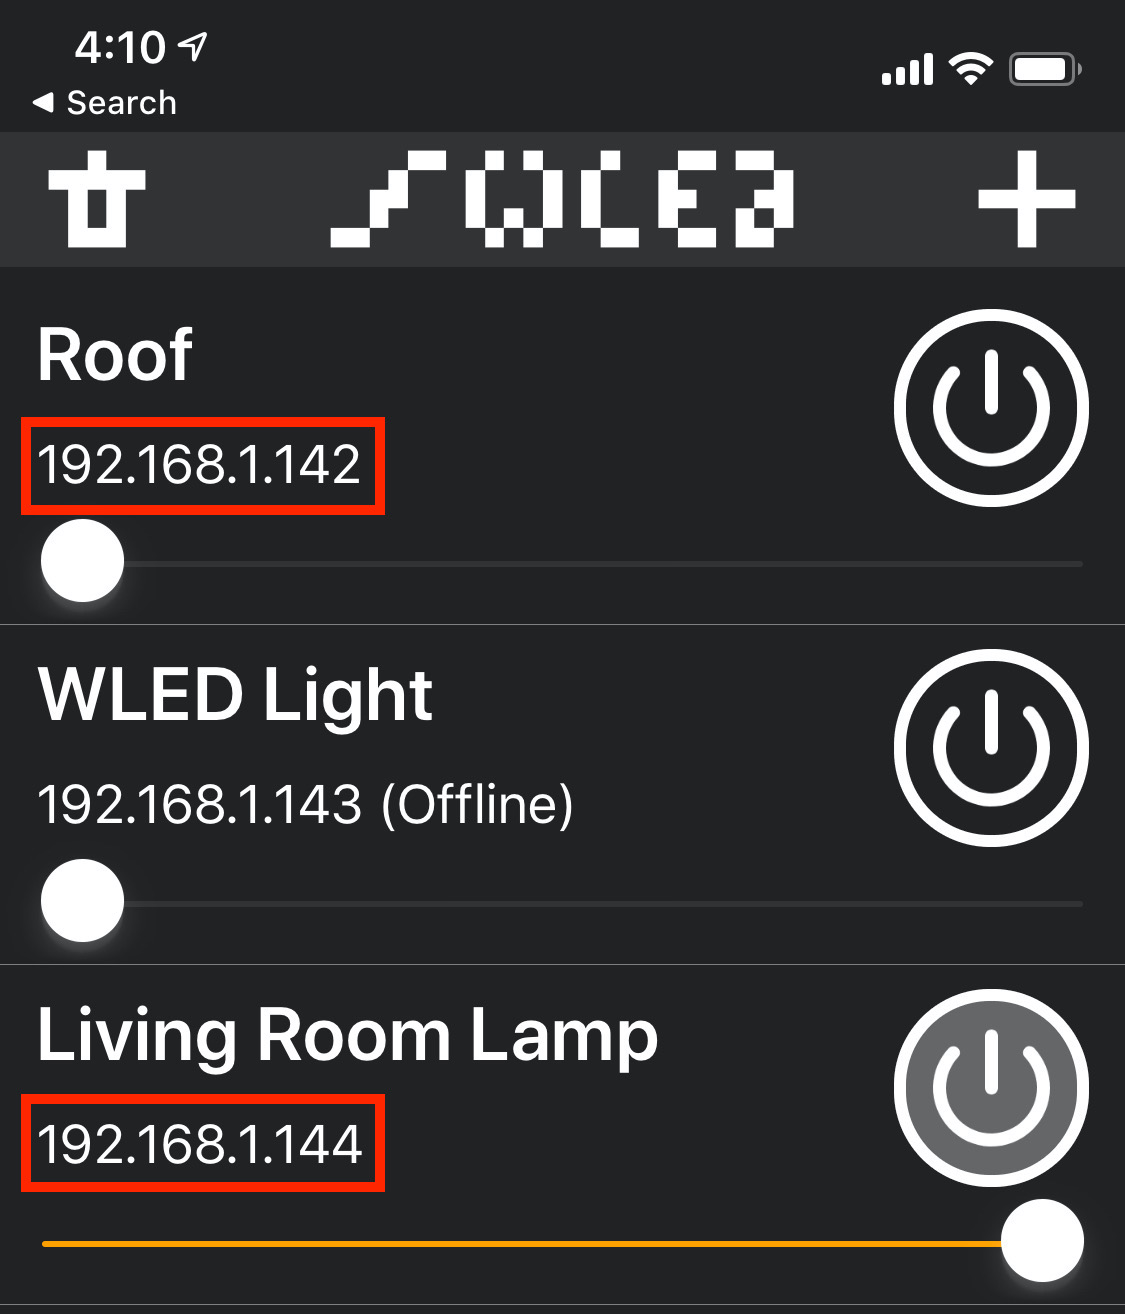
Grab your IPs for later and let’s move on.
To test our curl requests, we need a terminal window. I’m using a Mac. Linux will obviously have this too.
If you are using Windows, this StackExchange post recommends installing Git for Windows to get curl installed but I don’t personally have any experience with that.
Here is the full command we are going to run in your terminal…
curl -X POST -H "Content-Type: application/json" -d {"on":false} 192.168.1.144/json/state
It looks complicated but here is a high level breakdown of what is happening in the command.
We are making a POST request with a content type of application/json. A POST request simply means we are overwriting existing data with new data.
-d {"on":false} is our payload. This is the data we are overwriting. Meaning, turn the value to false.
We are sending that payload to the /json/state endpoint at 192.168.1.144.
Below is an example of me running the command.
[tynick@mac-mini ~]$ curl -X POST -H "Content-Type: application/json" -d {"on":false} 192.168.1.144/json/state
{"success":true}
[tynick@mac-mini ~]$
We got a {"success":true} response from the web server and the LEDs just turned off!
To tell WLED to turn the lights on, you would simply change the payload to {"on":true}. Like so…
curl -X POST -H "Content-Type: application/json" -d {"on":true} 192.168.1.144/json/state
Now that we’ve figured out how to make requests manually, we can move on to adding WLED to webCoRE.
Configuring WLED In webCoRE
Once you’ve loaded up the webCoRE Dashboard, start by creating a new piston.
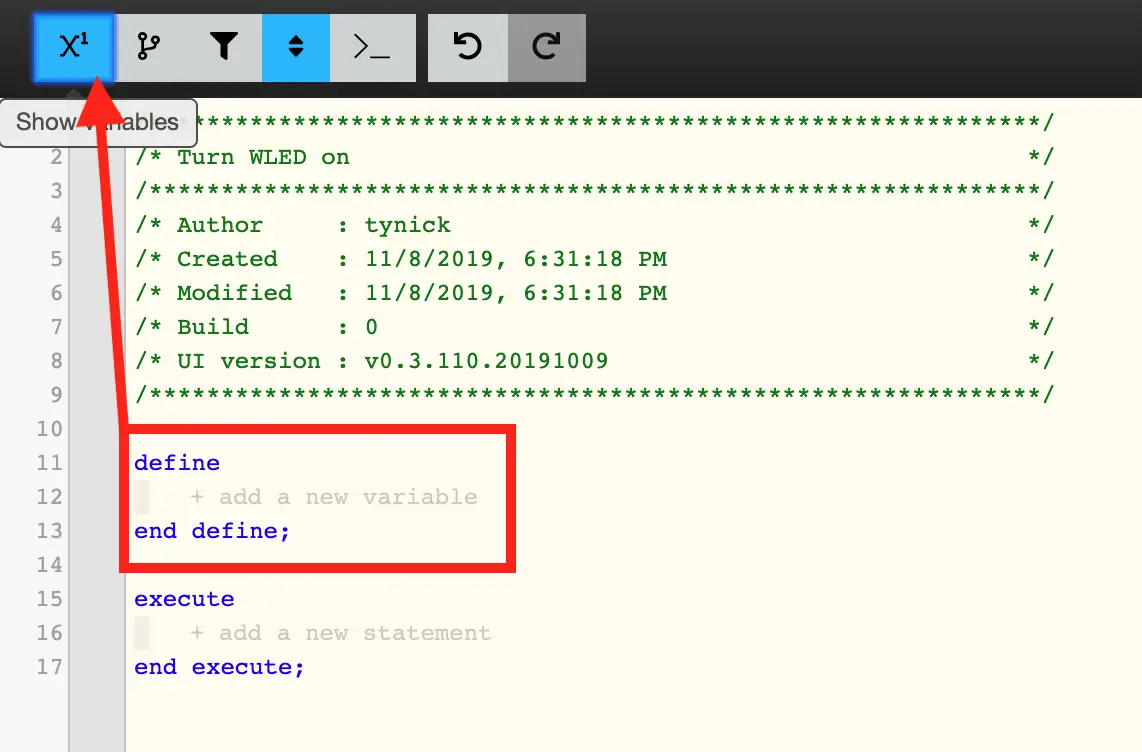
The first thing we need to add to the piston is a variable.
To add a variable, you need to click the button in the top right that says Show variables.
You should see a new section populate in the piston.
Once that is done, click + add a new variable inside our new variable code block.
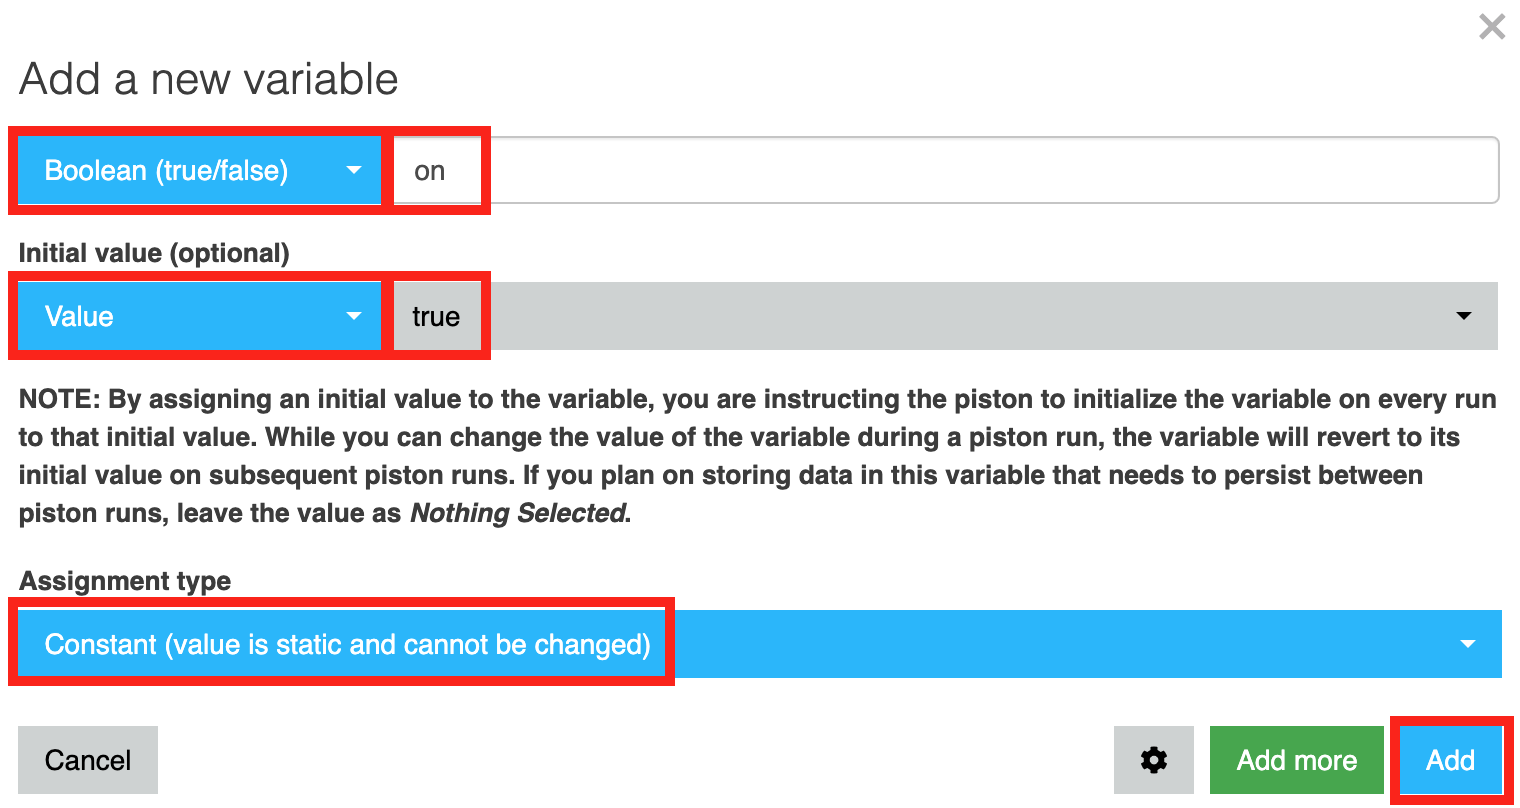
Configure the new variable as I have in the screenshot above.
Be sure to fill in everything outlined in red and then click Add in the bottom left corner.
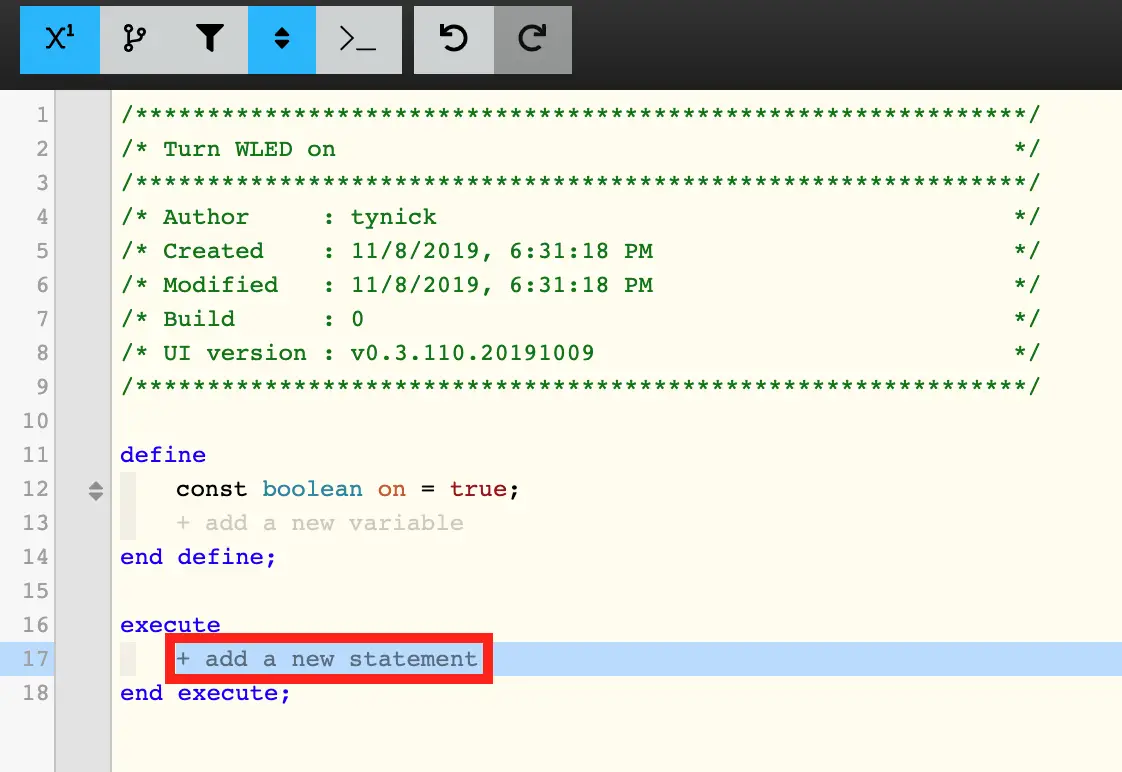
After you’ve added the variable, your piston should look like the screenshot above.
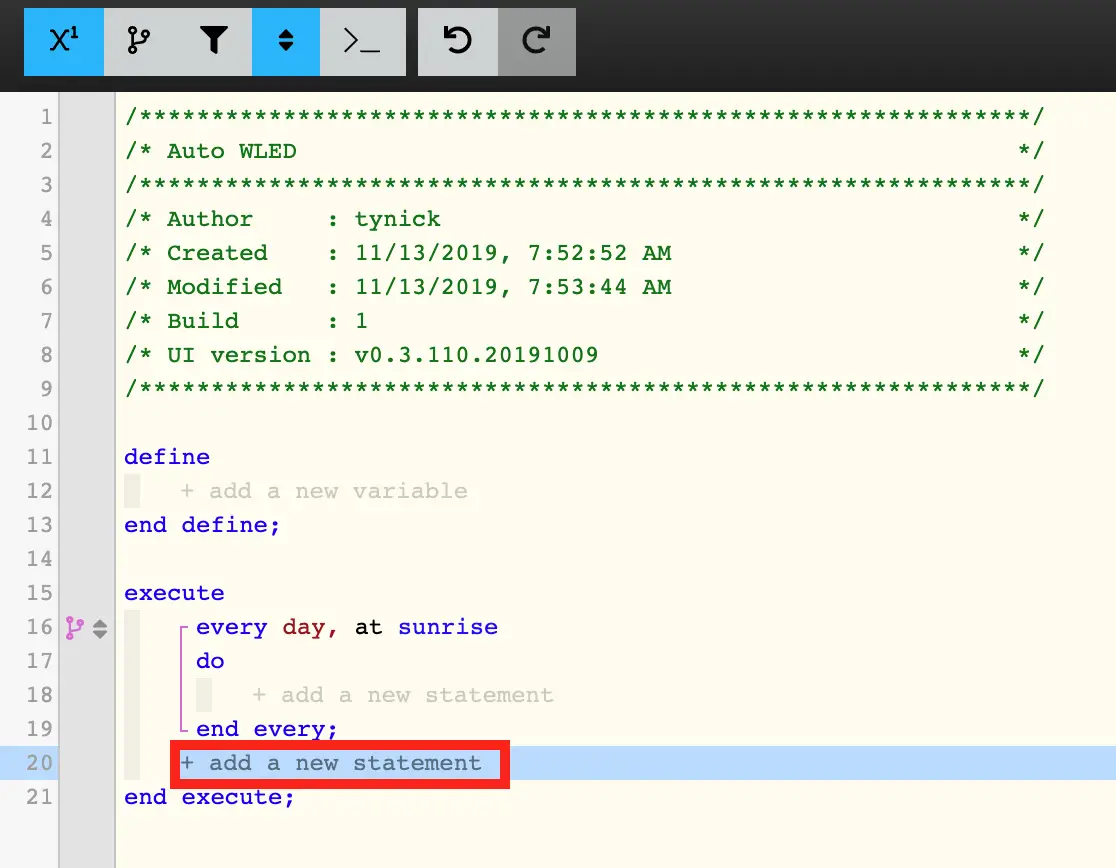
Now click + add new statement inside the execute code block.
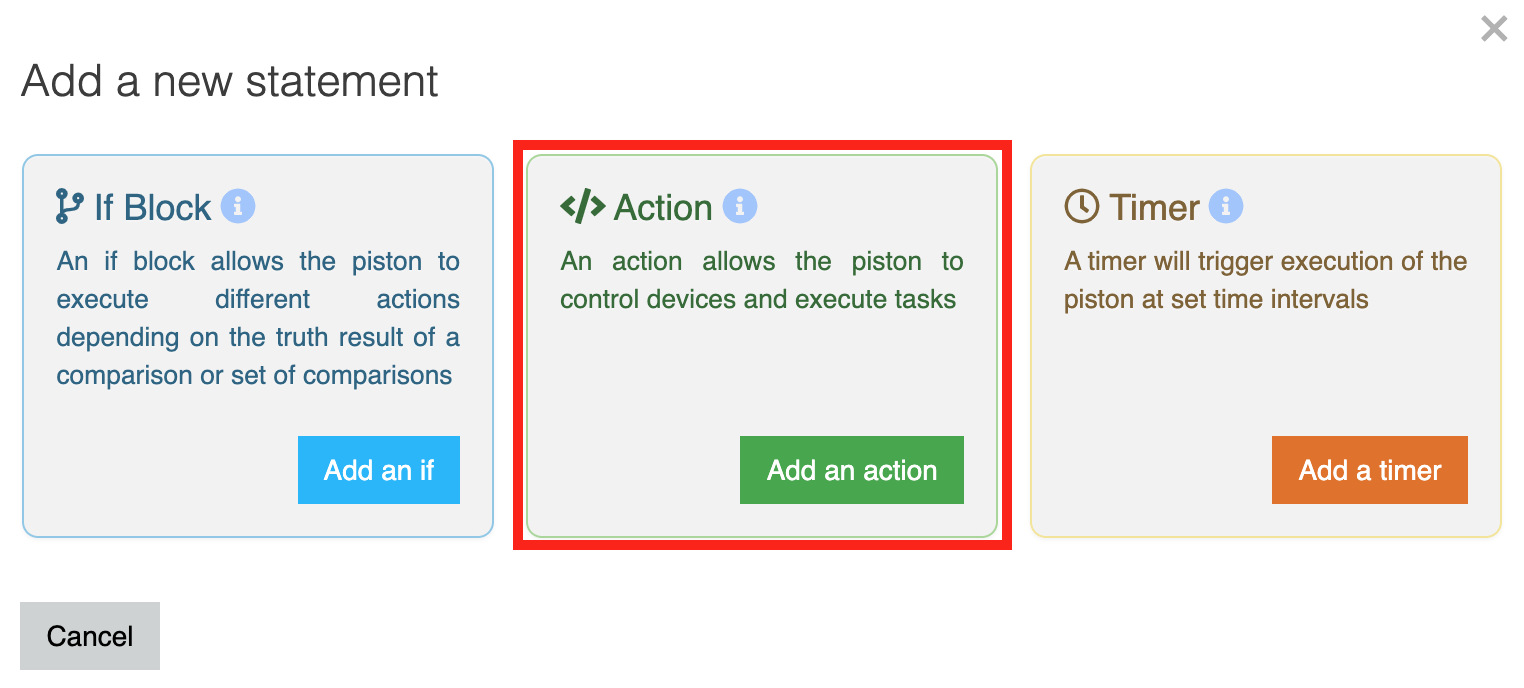
The new statement will be an Action. Select the middle option as outlined in the screenshot above.
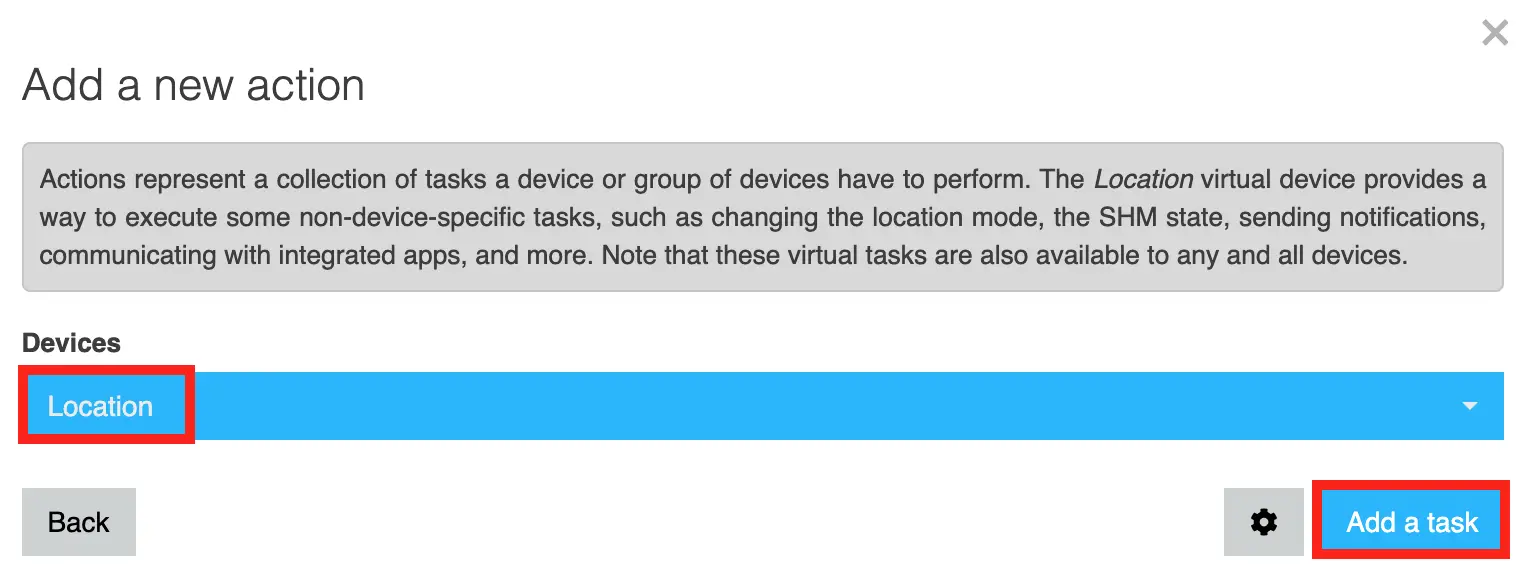
Select Location from the dropdown and then click Add a Task.
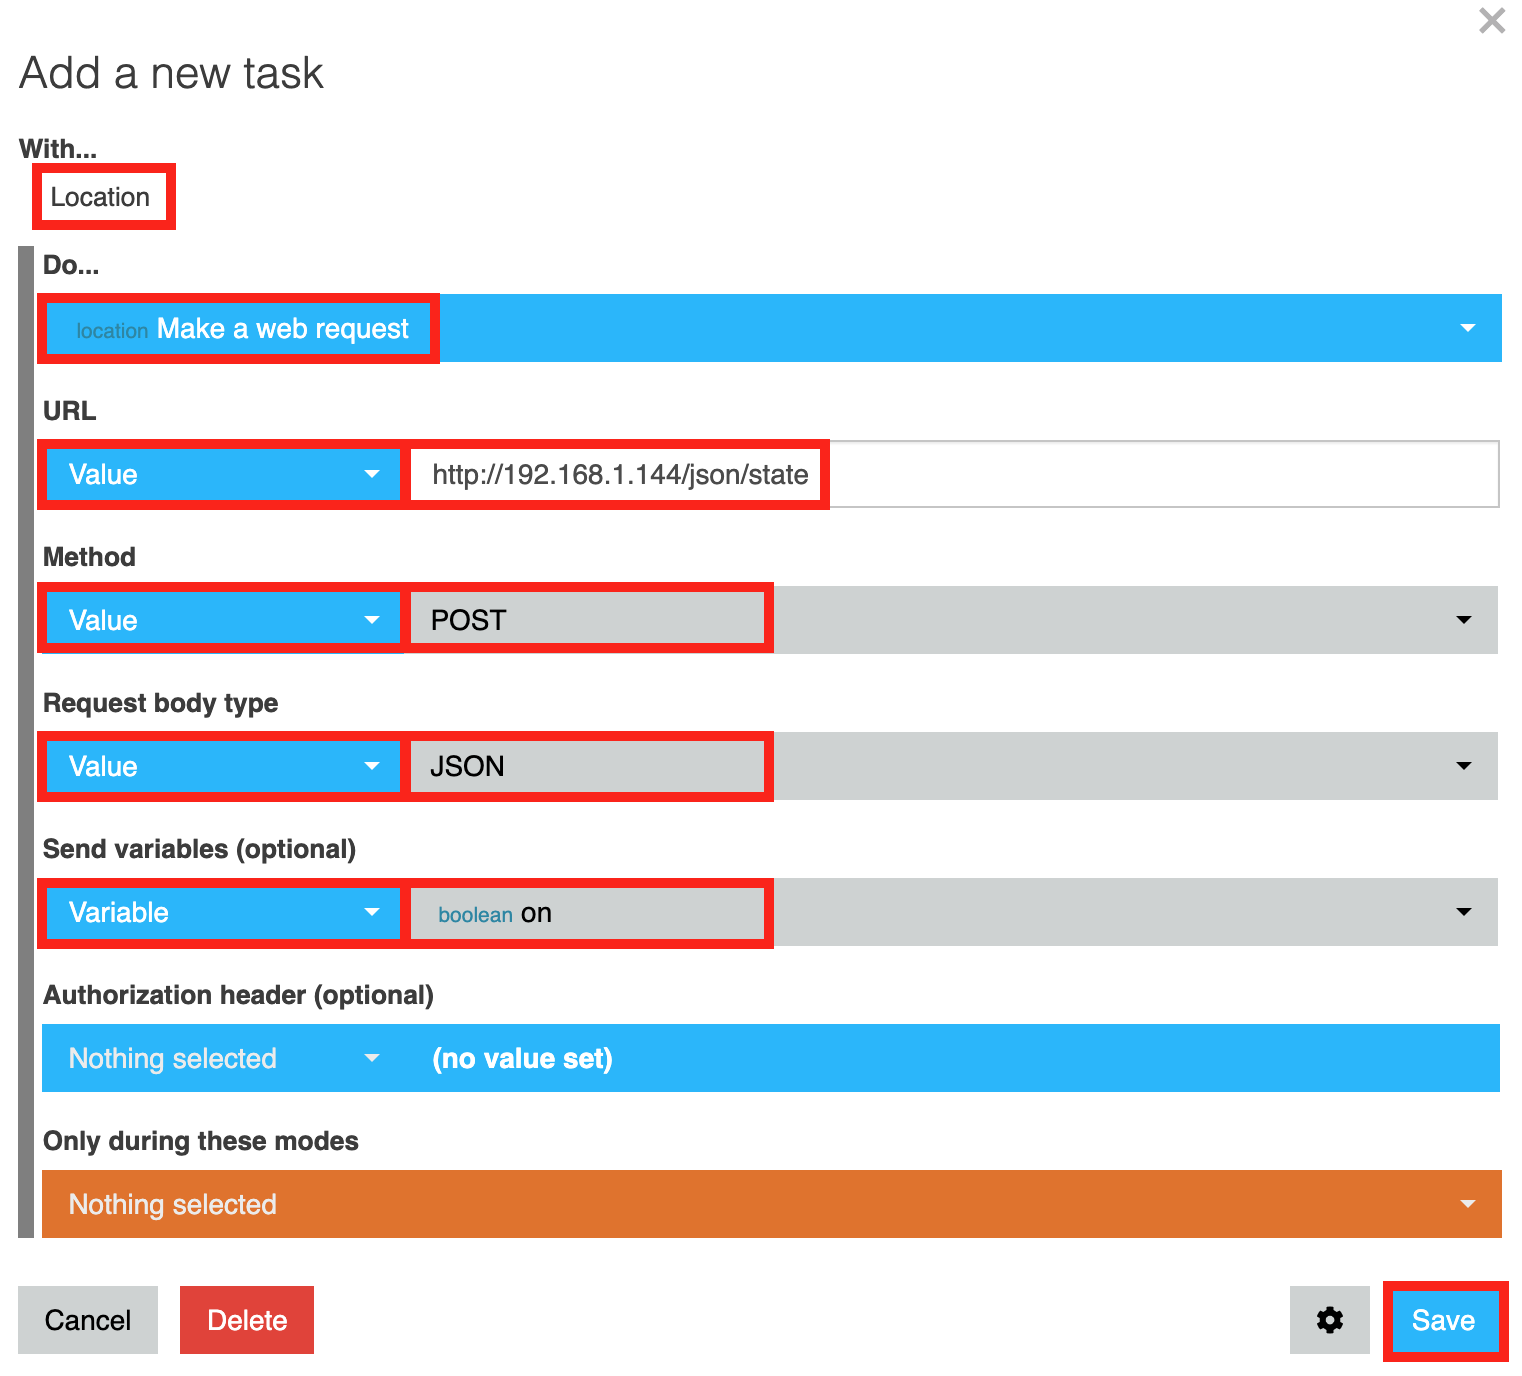
This is where we configure the actual HTTP request in webCoRE.
Be sure to fill everything out as I have outlined in red.
Make sure you change the IP address from 192.168.1.144 to whatever the IP address of your WLED/ESP8266 is.
Then click Save.
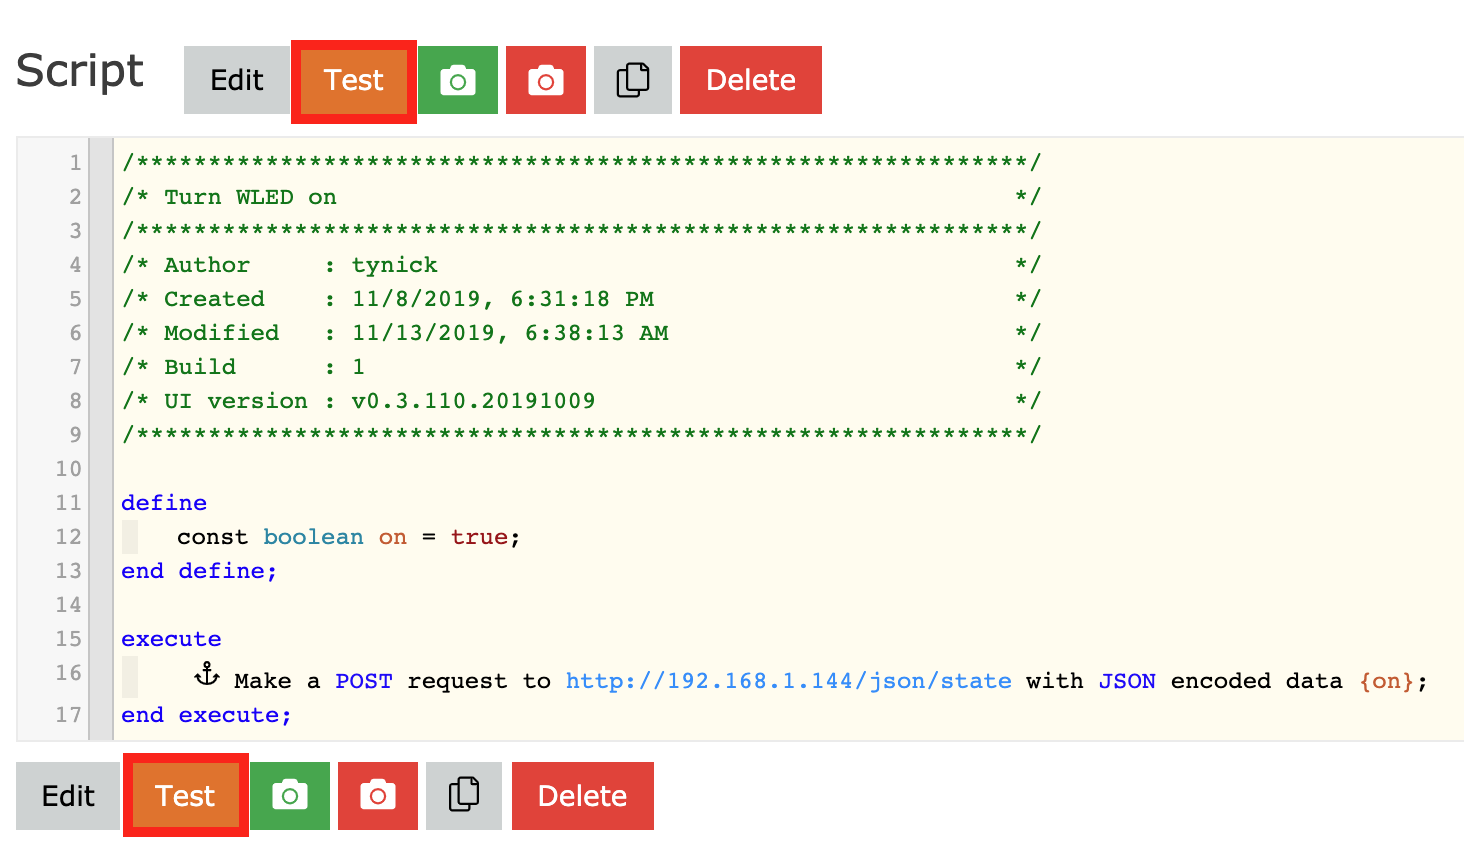
The code in your webCoRE piston should look identical to the one above with the exception of the IP address.
If everything is correct, you should be able to click one of those Test buttons and your light will turn on!
Now that we can turn on our WLED lights with webCoRE, we need a new piston to turn them off.
To do that we just need to duplicate the first piston and change the boolean value of the new piston to false.
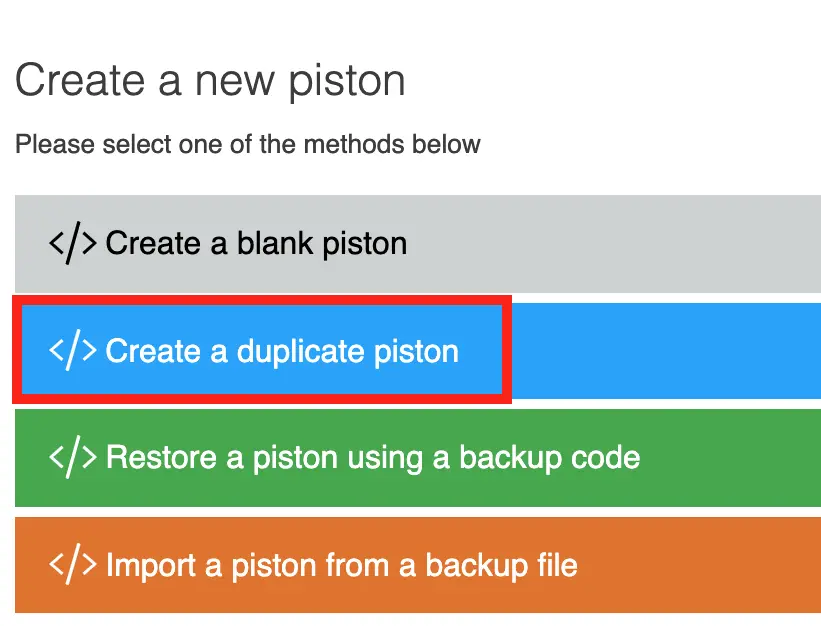
Create a new webCoRE piston and select Create a duplicate piston.
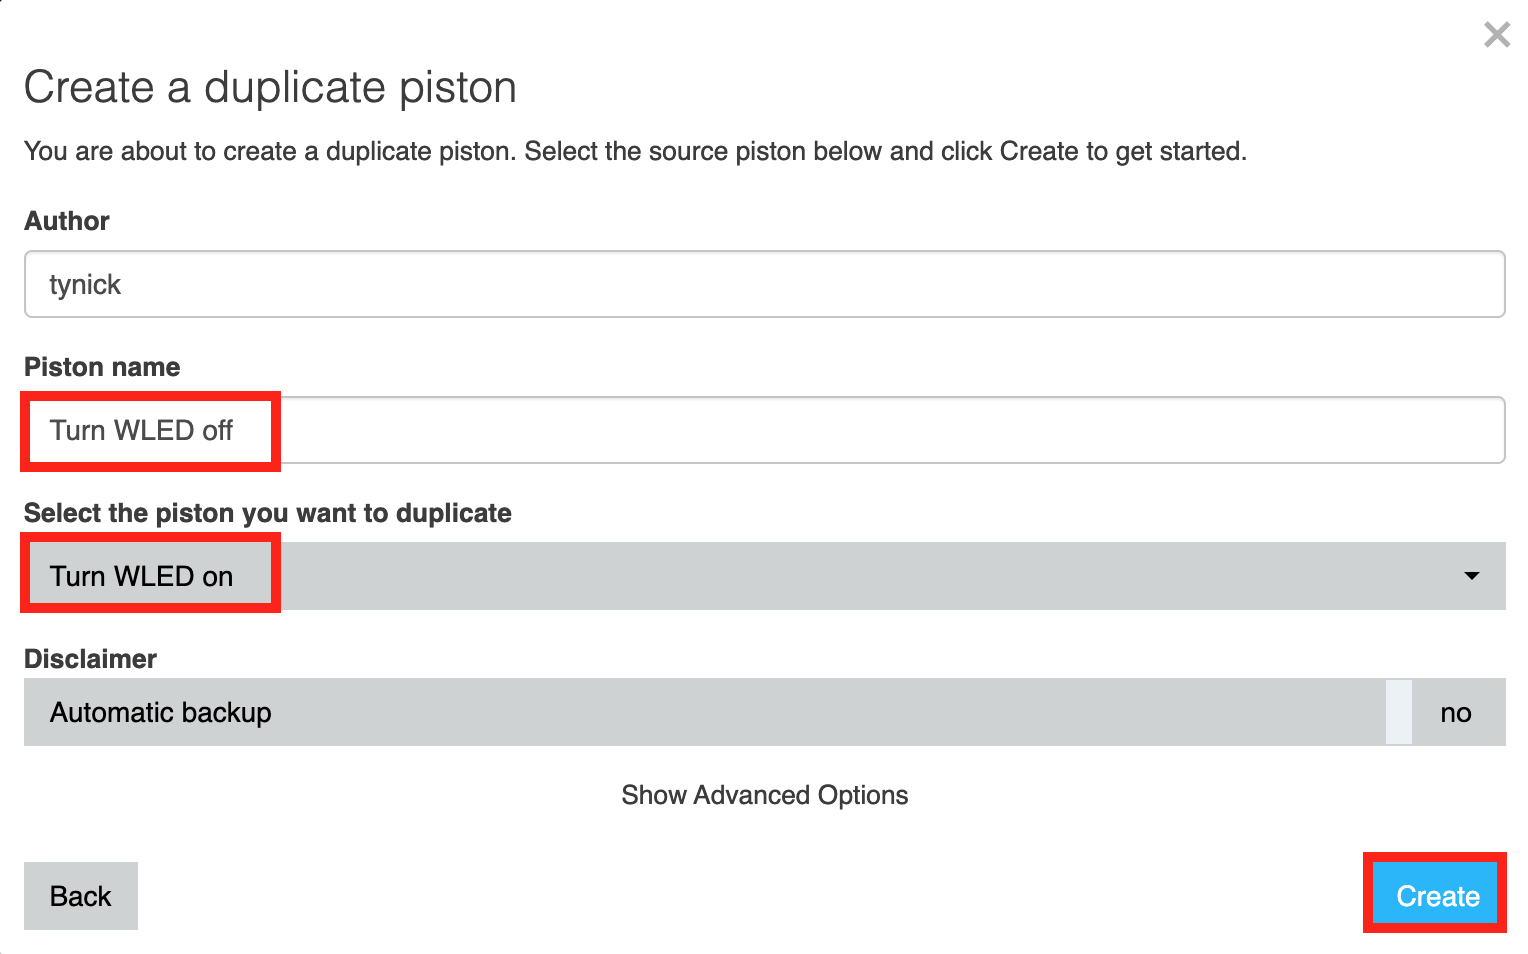
The important fields are outlined in red.
For Piston Name, give it a new name. I chose Turn WLED off because the original is named Turn WLED on.
From the Select the piston you want to duplicate dropdown, select the piston we just made to turn WLED on. In my case that was Turn WLED on.
Click Create.
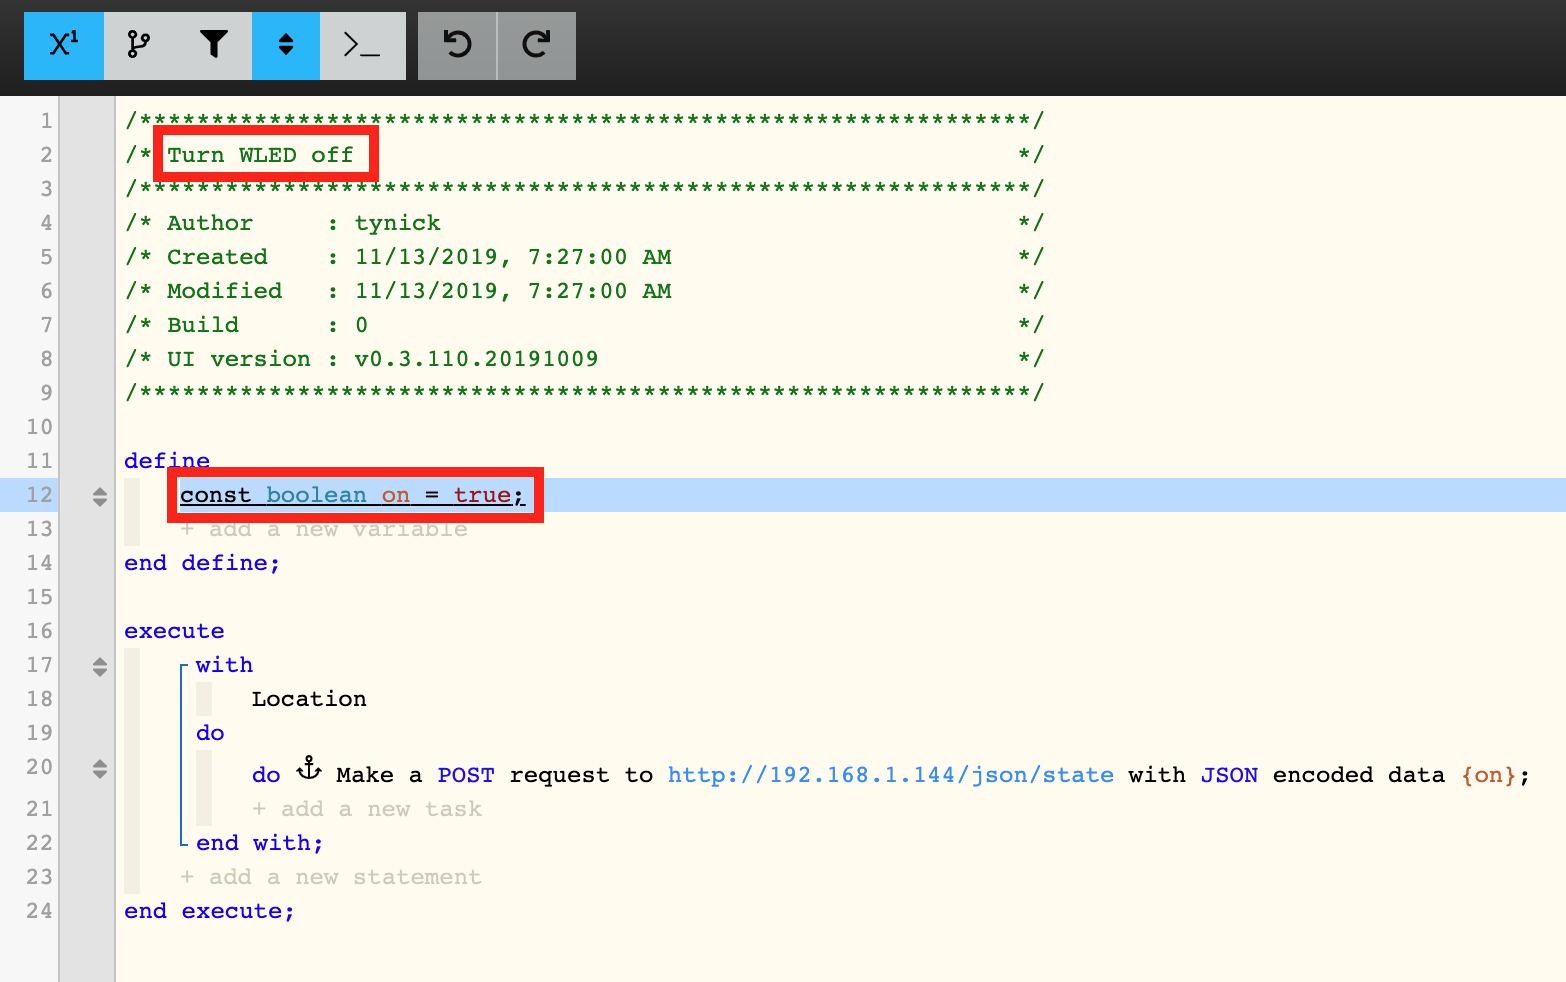
You’ll be brought directly to edit mode of your new duplicated piston.
We need to change the boolean variable from true to false.
To do that just click on the variable to edit it.
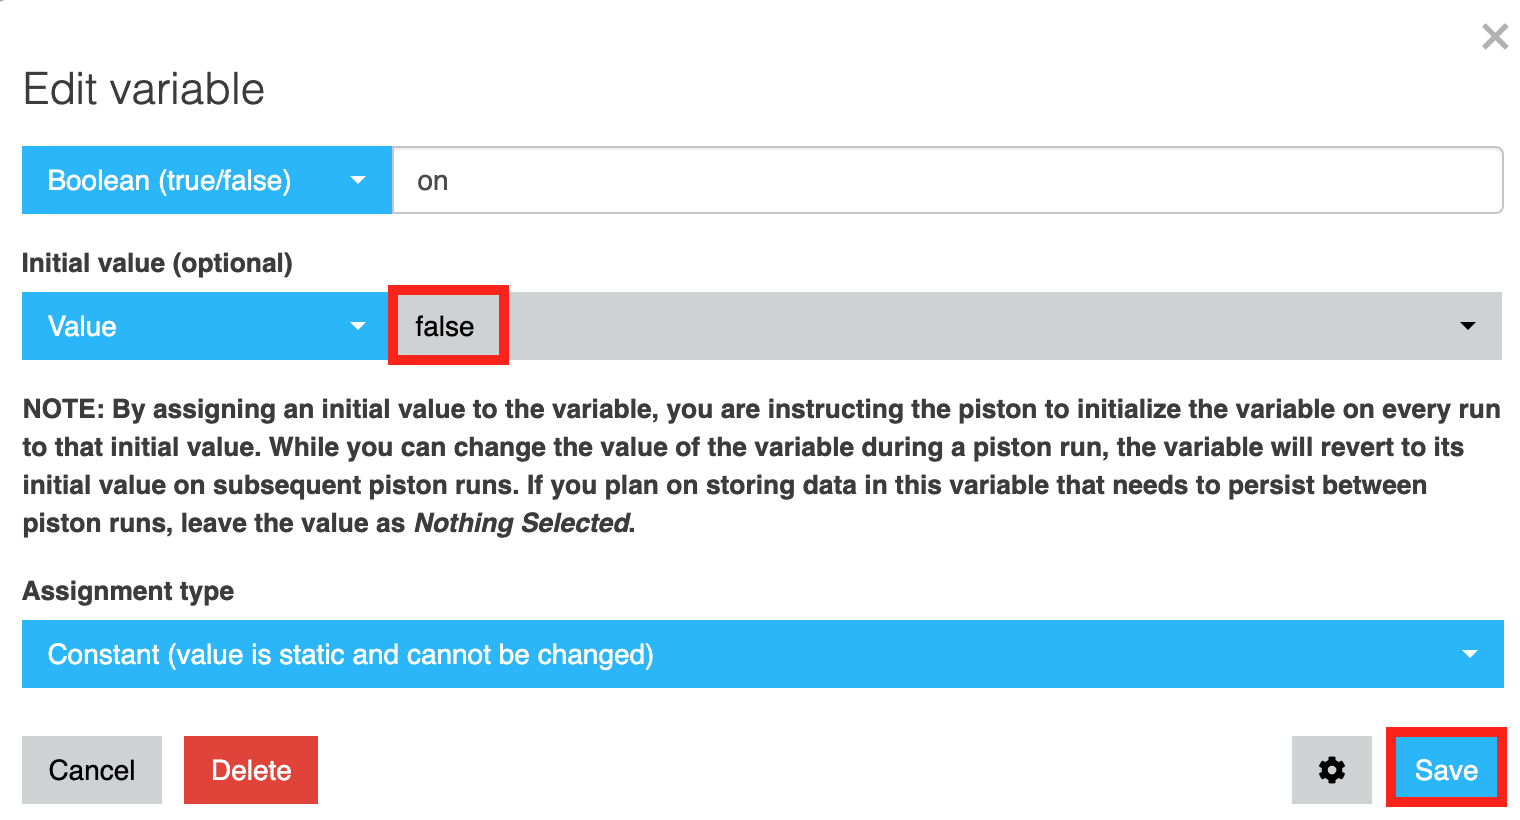
The Edit variable screen should pop up.
Change the Boolean (true/false) from true to false.
Click Save.
You should now have two new pistons. One to turn WLED on and one to turn WLED off.
Automating WLED With webCoRE/SmartThings
If you had webCoRE installed already you probably already know how to automate the process of turning them on and off. If you didn’t, I’ll give you a quick primer on that.
To be clear, the pistons we just created will not do anything by themselves without manual intervention (like when we clicked the Test button).
Let’s create another piston to execute the on/off pistons when something happens.
If you have LEDs mounted on the roofline of your house, you may want them to turn on automatically at sunset and turn off automatically at sunrise.
Let’s create a piston to do that for us.
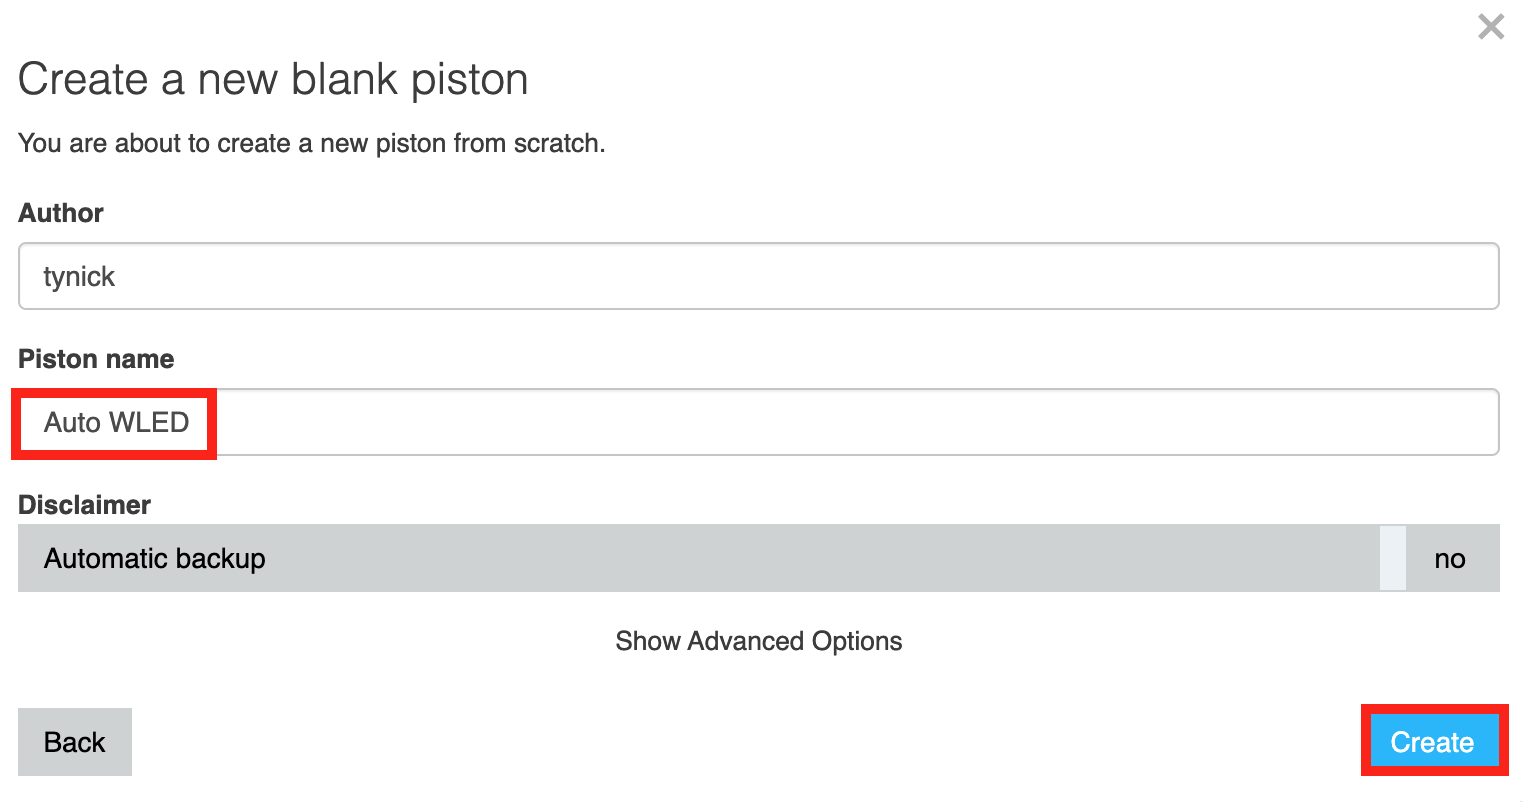
Start by creating a new blank piston. Name it something meaningful so you know what it does later on and then click Create.
We now have a new blank piston.
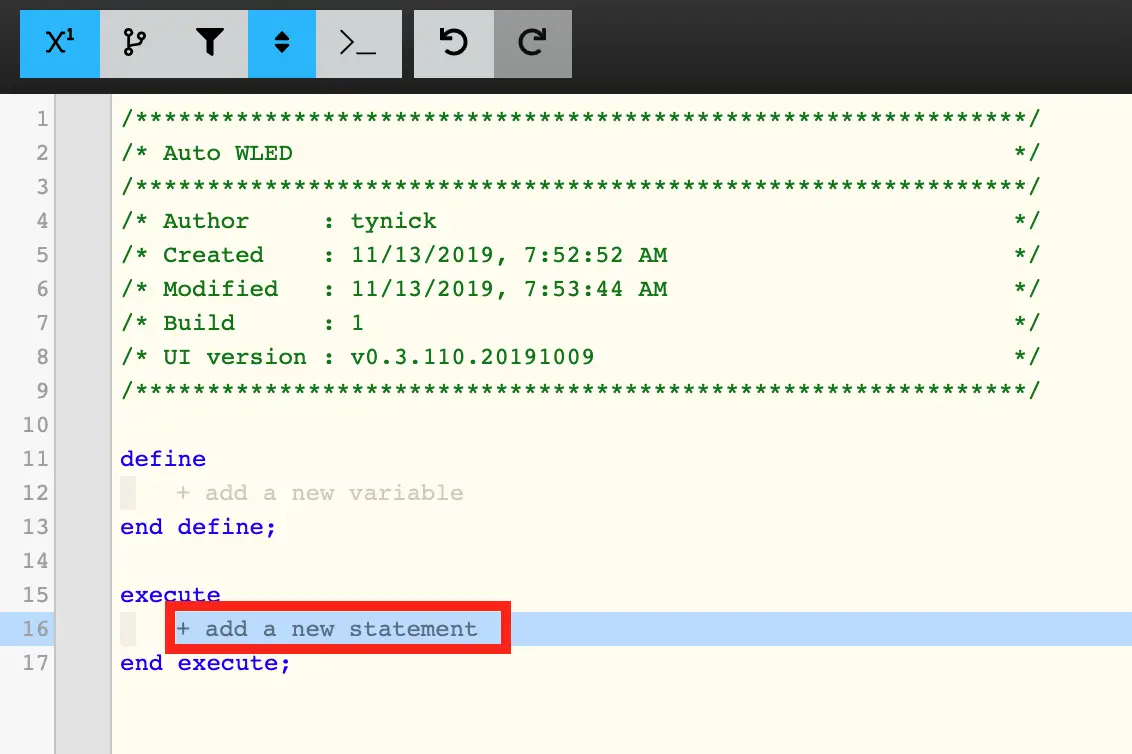
Just as we did earlier, select + add a new statement inside the execute code block.
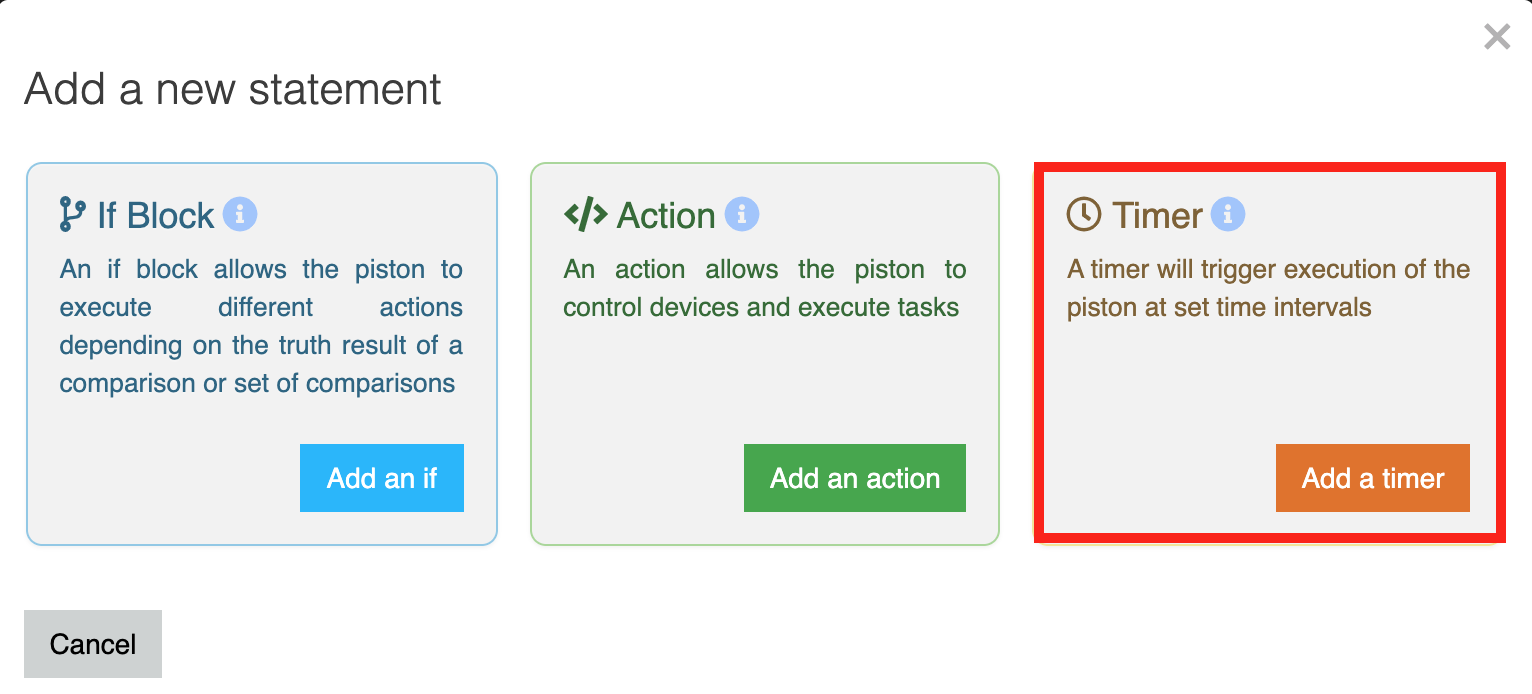
The new statement will be a Timer.
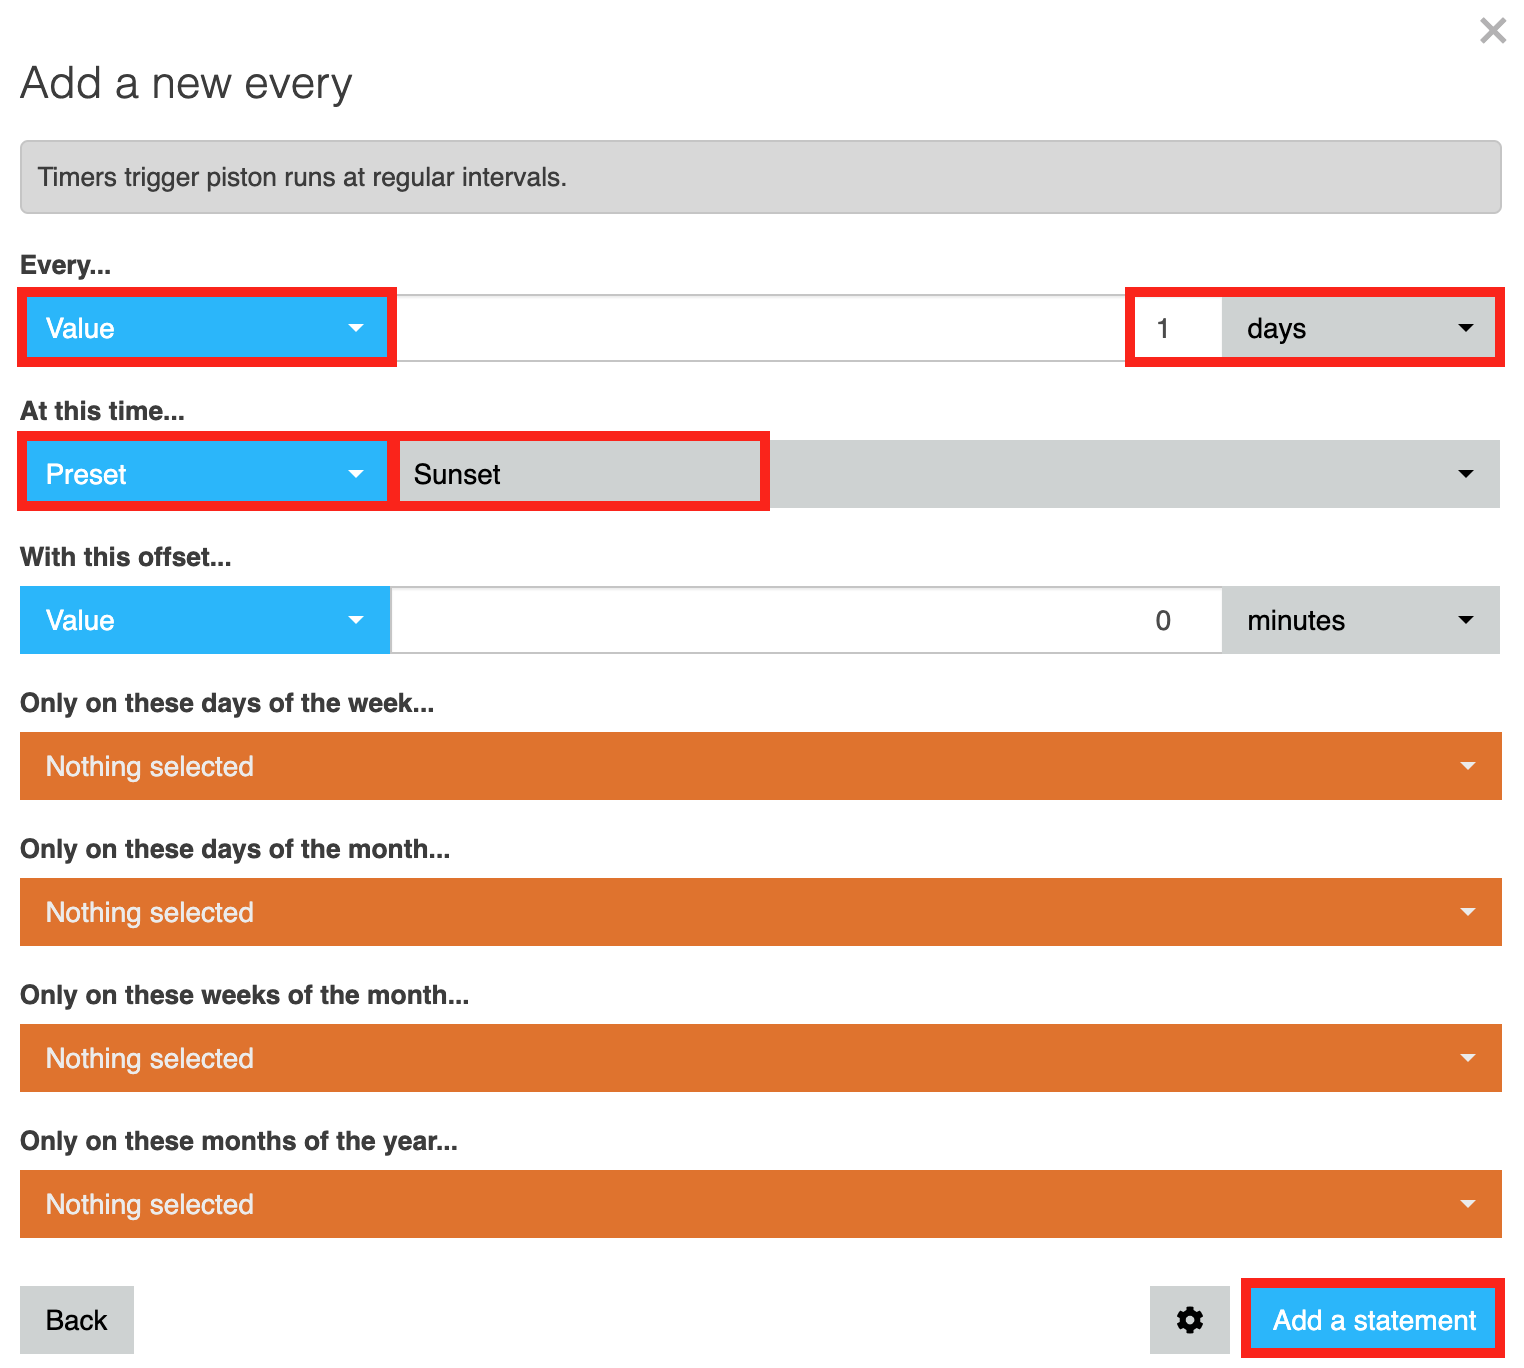
You should now see a new popup titled Add a new every.
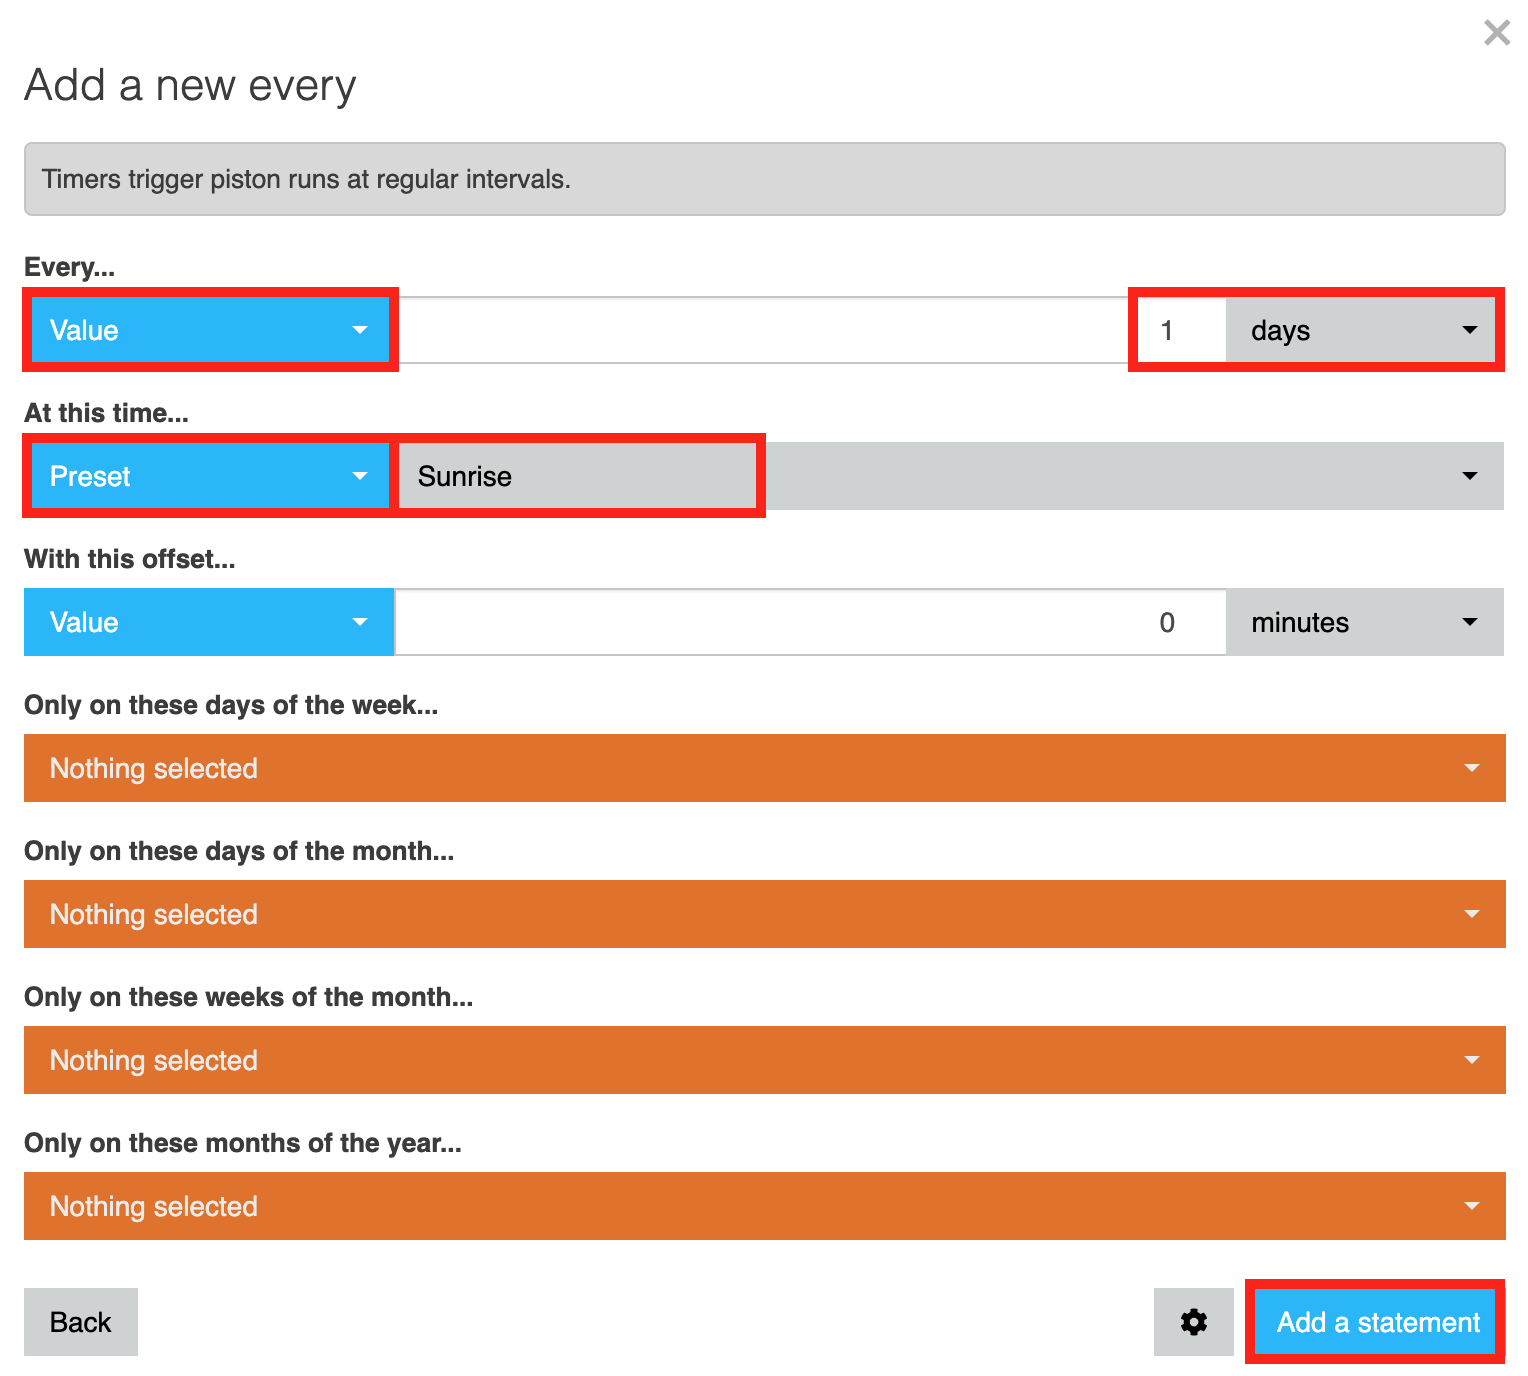
This is where we will tell our new Auto WLED piston to execute our Turn WLED Off piston.
The important fields are outlined in red.
This statement basically says do <something>, every single day at sunrise.
Feel free to customize the other fields if you want something different to happen.
webCoRE rules is very customizable. For example, if you were using this for Christmas lights, you could setup this piston to only trigger during the month of December.
Now we have a timer that executes at sunrise we need to create a new timer to execute at sunset.
Select + add a new statement below the first one.
Configure this just as you did the first but select Sunrise from the At this time... dropdown.
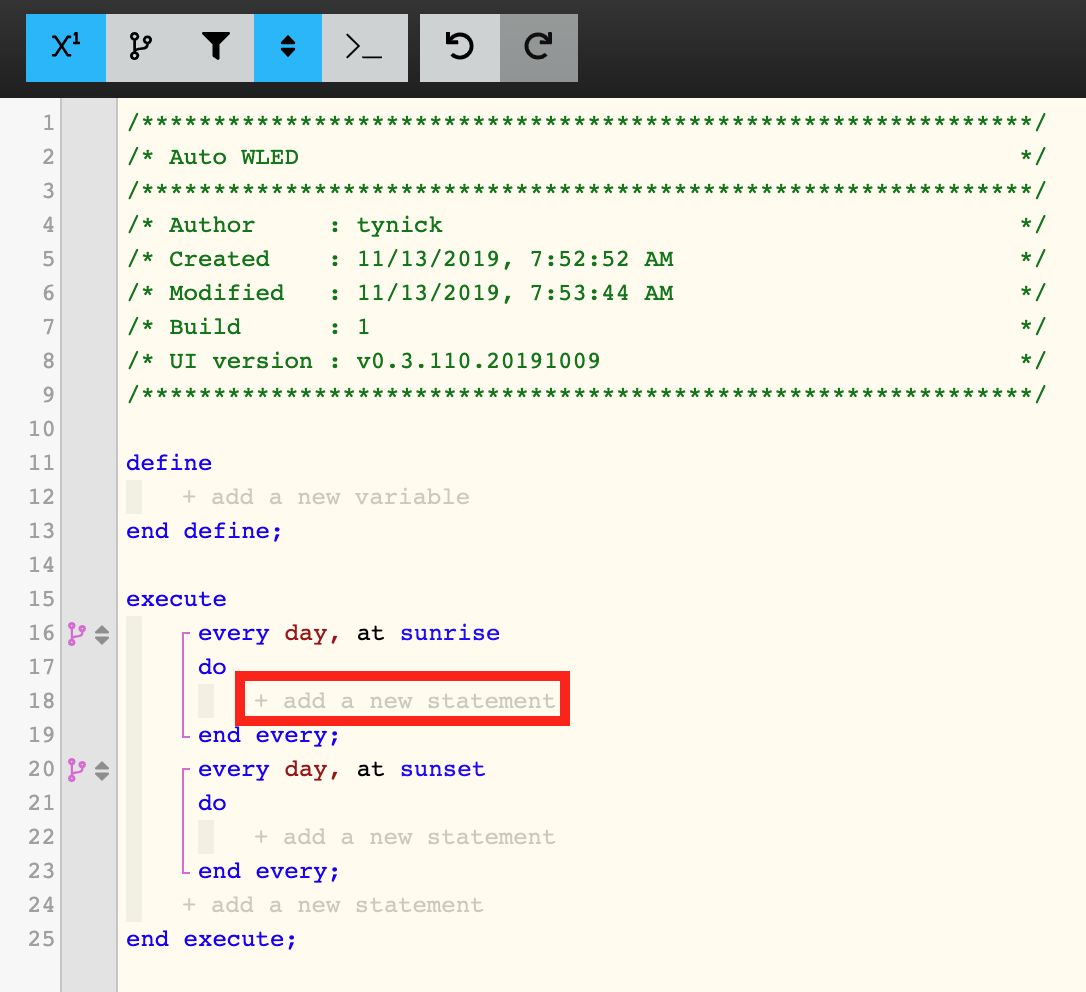
Your webCoRE piston should look like like the screenshot above.
Now that we have our timers setup, we need to tell webCoRE what to do during those times.
Select + add a new statement inside the sunrise timer.
Select Add an action from the Add a new statement popup.
Just as we did earlier in the tutorial, select Location from the dropdown and then click Add a Task.
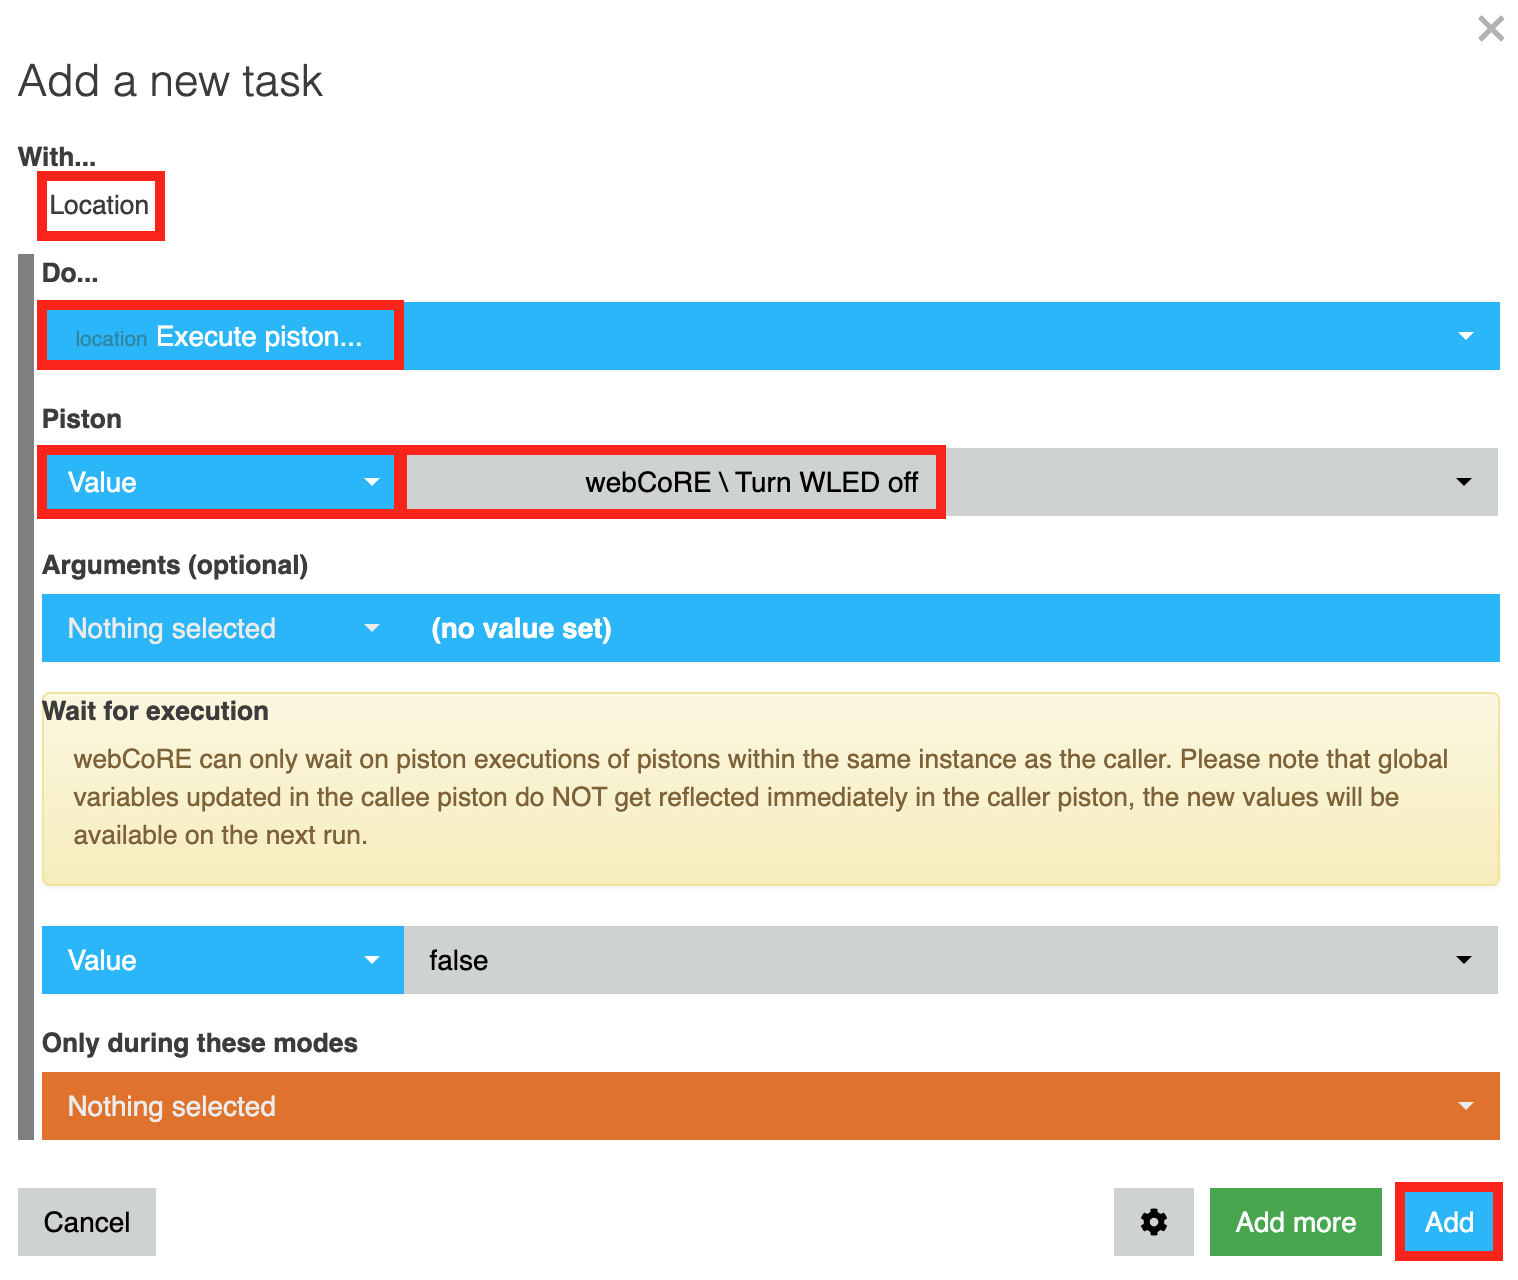
Configure this task as I’ve outlined in red and click Add in the bottom right corner.
You can now add another action statement to the sunset timer.
Make it the same as the action we just made but select Turn WLED on as the piston to execute.
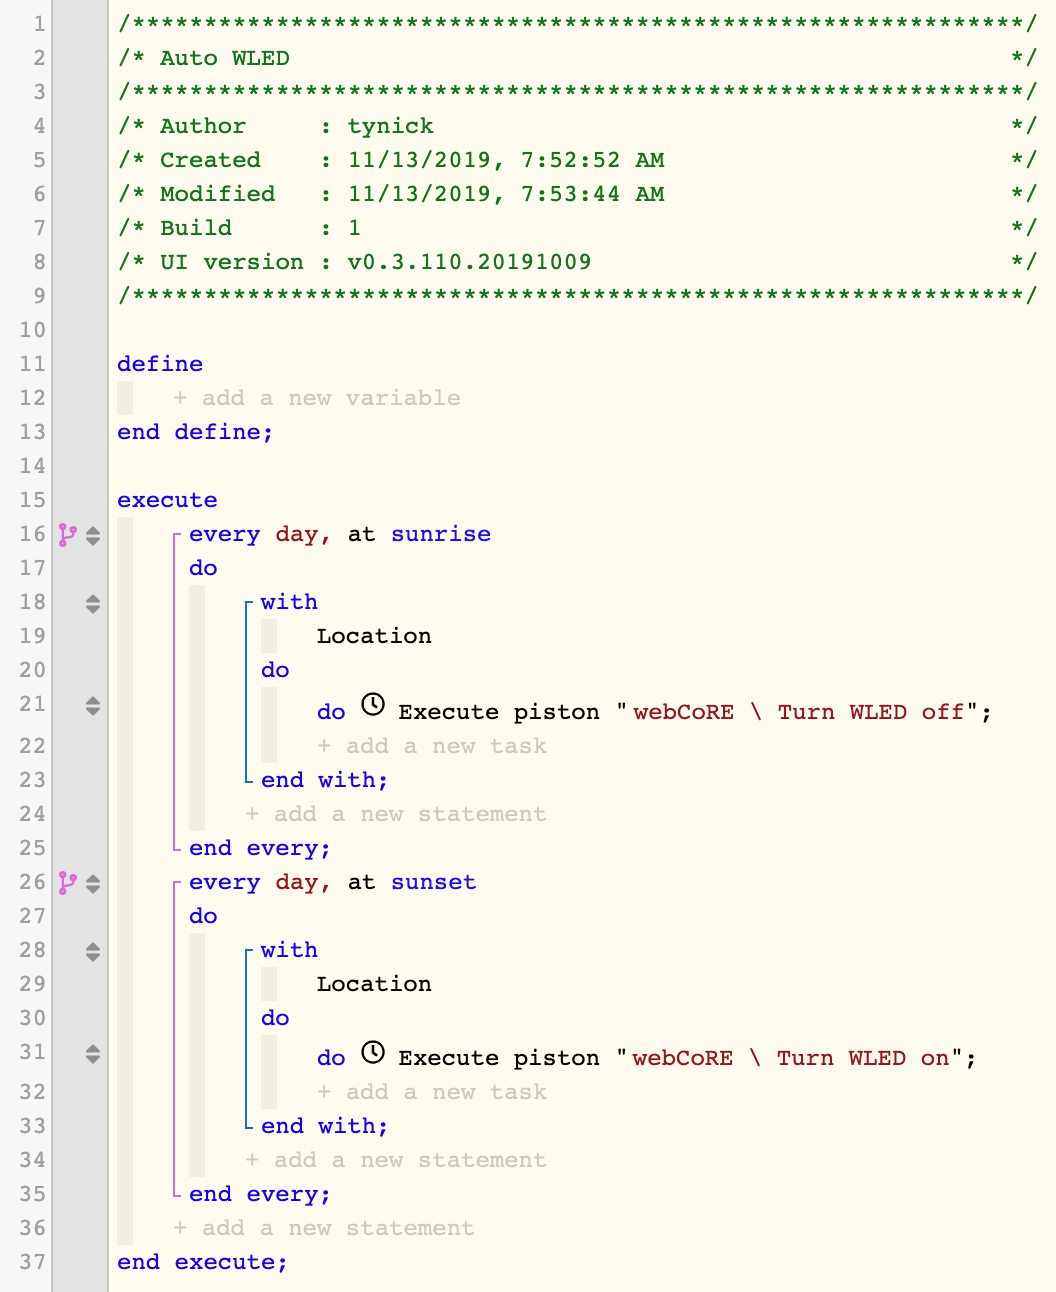
If you haven’t customized anything, your piston should look just like the one in the screenshot above.
Your WLED lights should now turn off at sunrise and turn back on at sunset. All automatically!
Have Fun
You should now have the knowledge to configure WLED and automate it with webCoRE and SmartThings.
Checkout my post on how to setup WLED on ESP8266 if you haven’t already.
It’s a really cost effective way to do custom lighting around the house and during holidays.
This post covers how I do some of my Christmas lights and decorations.
Make sure you take advantage of all the customizable rules you can make with webCoRE.
Let me know if you have any questions on Twitter.
Subscribe to my mailing list below to be notified when I make a new post or follow me on Twitter. You can also Buy Me A Coffee to help keep me going! Any of this stuff would be really appreciated.