How to Create a Site to Site VPN Between 2 Unifi Security Gateways
How to Create a Site to Site VPN Between 2 Unifi Security Gateways
My Setup
Just for some background, you’ll want to read about my current homelab setup.
Something I don’t mention in that post is that I have another NAS. It is kept at my Mom’s house for offsite backups.
When I first set this up she had a very basic home router. I was forced to open port 22 to the world in order to rsync my data from my house to her house.
Yes, I know I could have forwarded some obscure port to port 22 on the NAS but that doesn’t really help much. You still have an open port/host listening for SSH connections on the public internet. It’s not ideal.
My Mom was recently in the market for a new router so I decided that she would be getting a Ubiquiti Unifi Security Gateway.
My router at home is a Ubiquiti Unifi Security Gateway Pro.
This works out perfect because I can connect them to the same Unifi Controller and manage them from the same dashboard as completely different sites.
The Solution
As I just mentioned both sites(myself and my mom) are both connected to the same controller. That is a requirement for this to work.
Our main networks are as follows.
| Site | CIDR |
|---|---|
| Home | 192.168.1.0/24 |
| Mom | 192.168.3.0/24 |
It’s important to note that your two IP ranges can’t overlap for this to work.
We are now going to connect the 2 sites so that I can reach hosts on the 192.168.3.0/24 network from a host on my 192.168.1.0/24 network. This allows me to send my offsite backups to her house over an encrypted VPN connection without opening up a port on her network to the public internet.
It’s amazing how easy Ubiquiti made this!
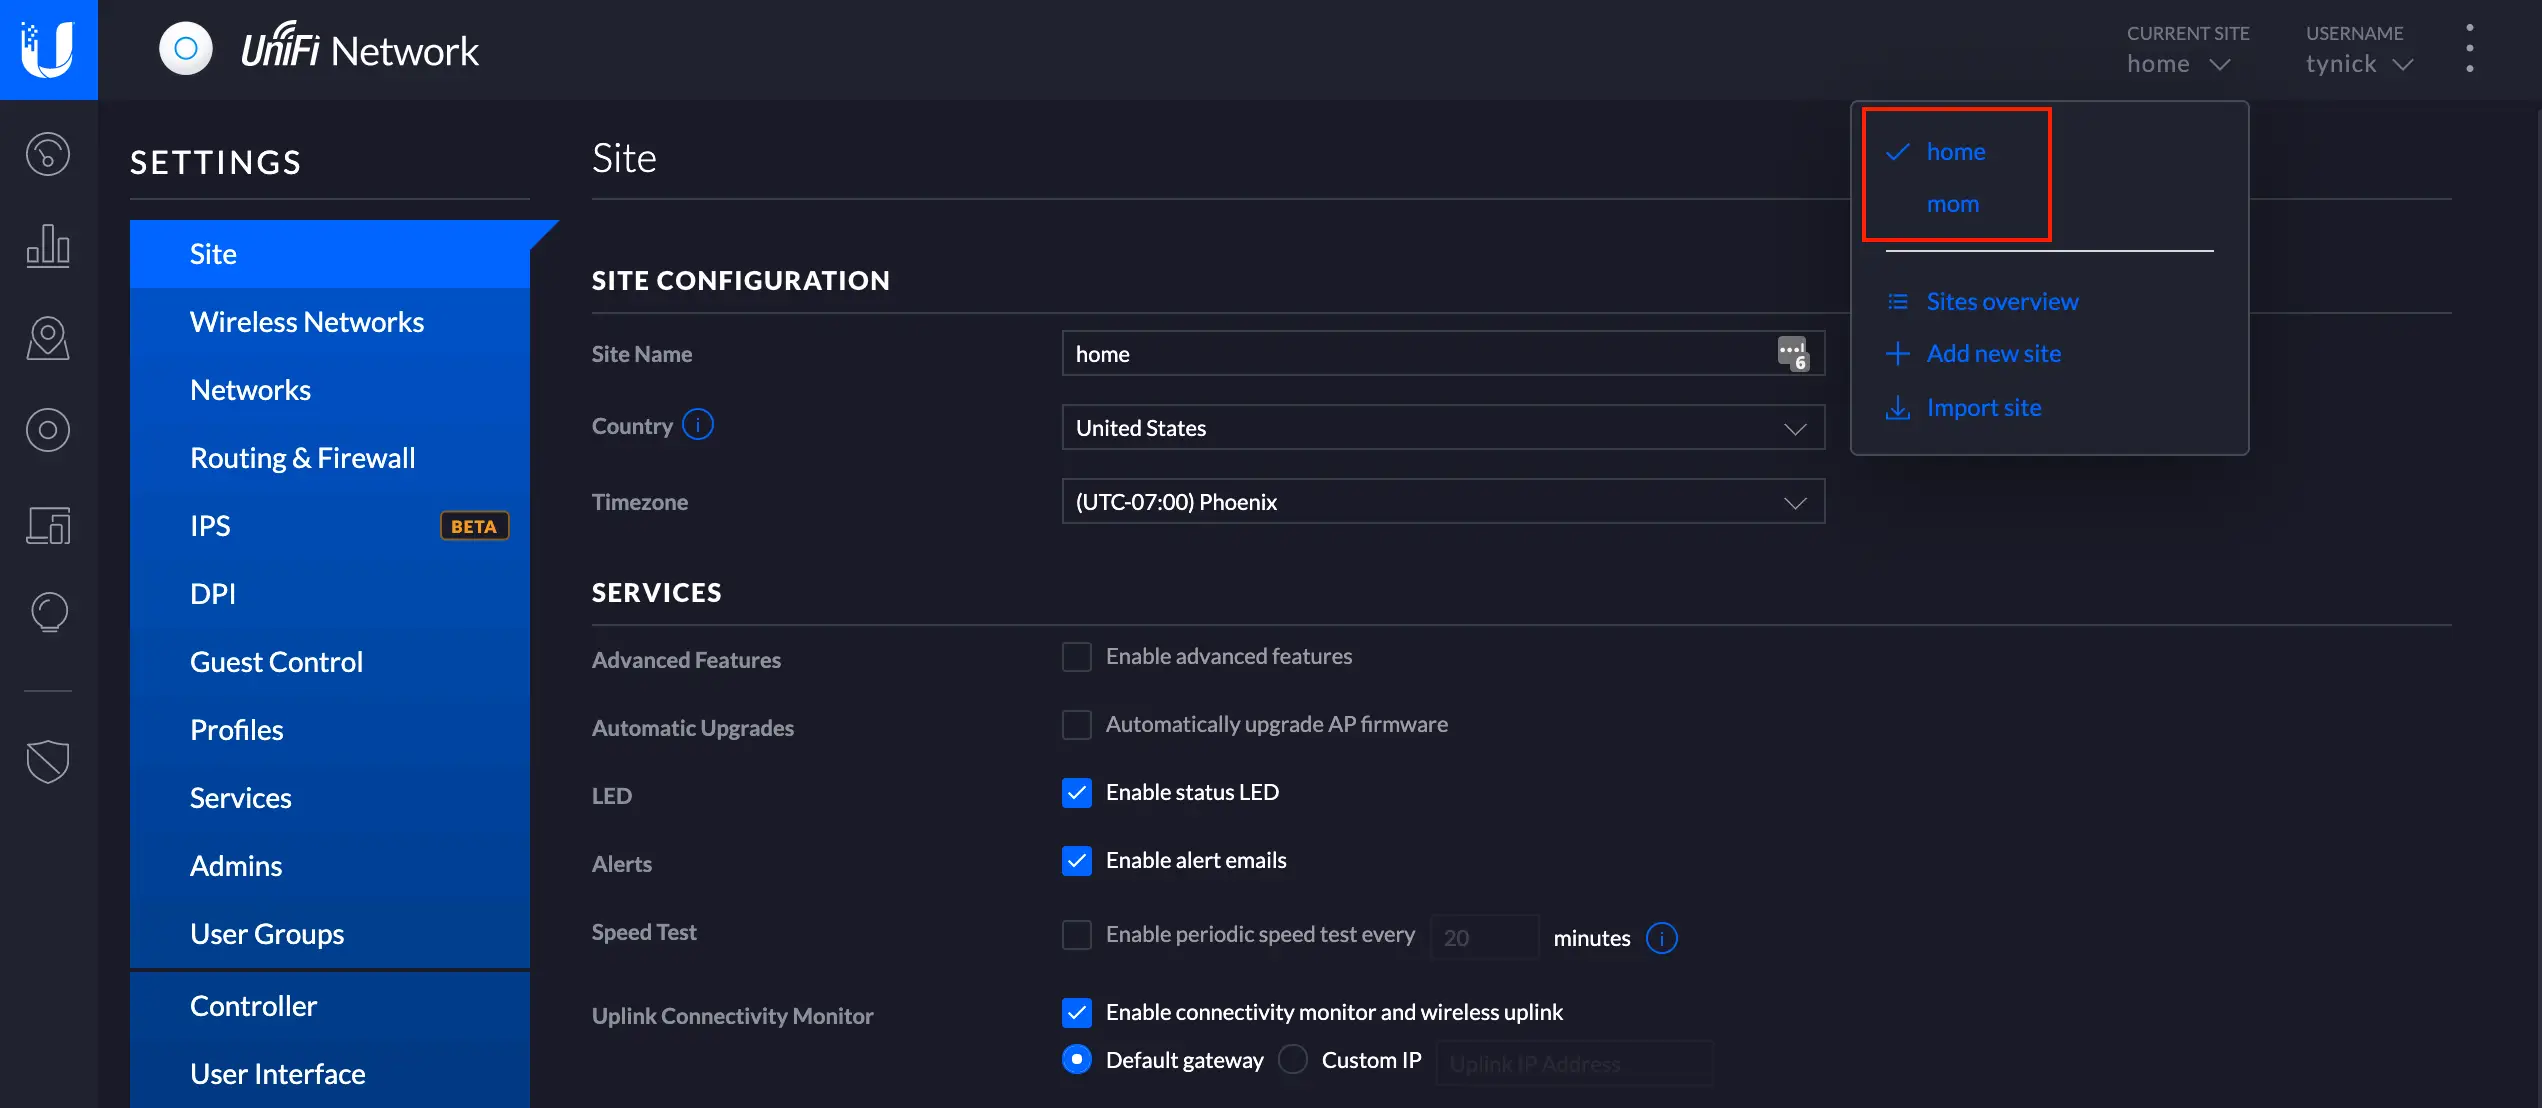
Here is my Unifi Controller showing both sites. Let’s connect them!
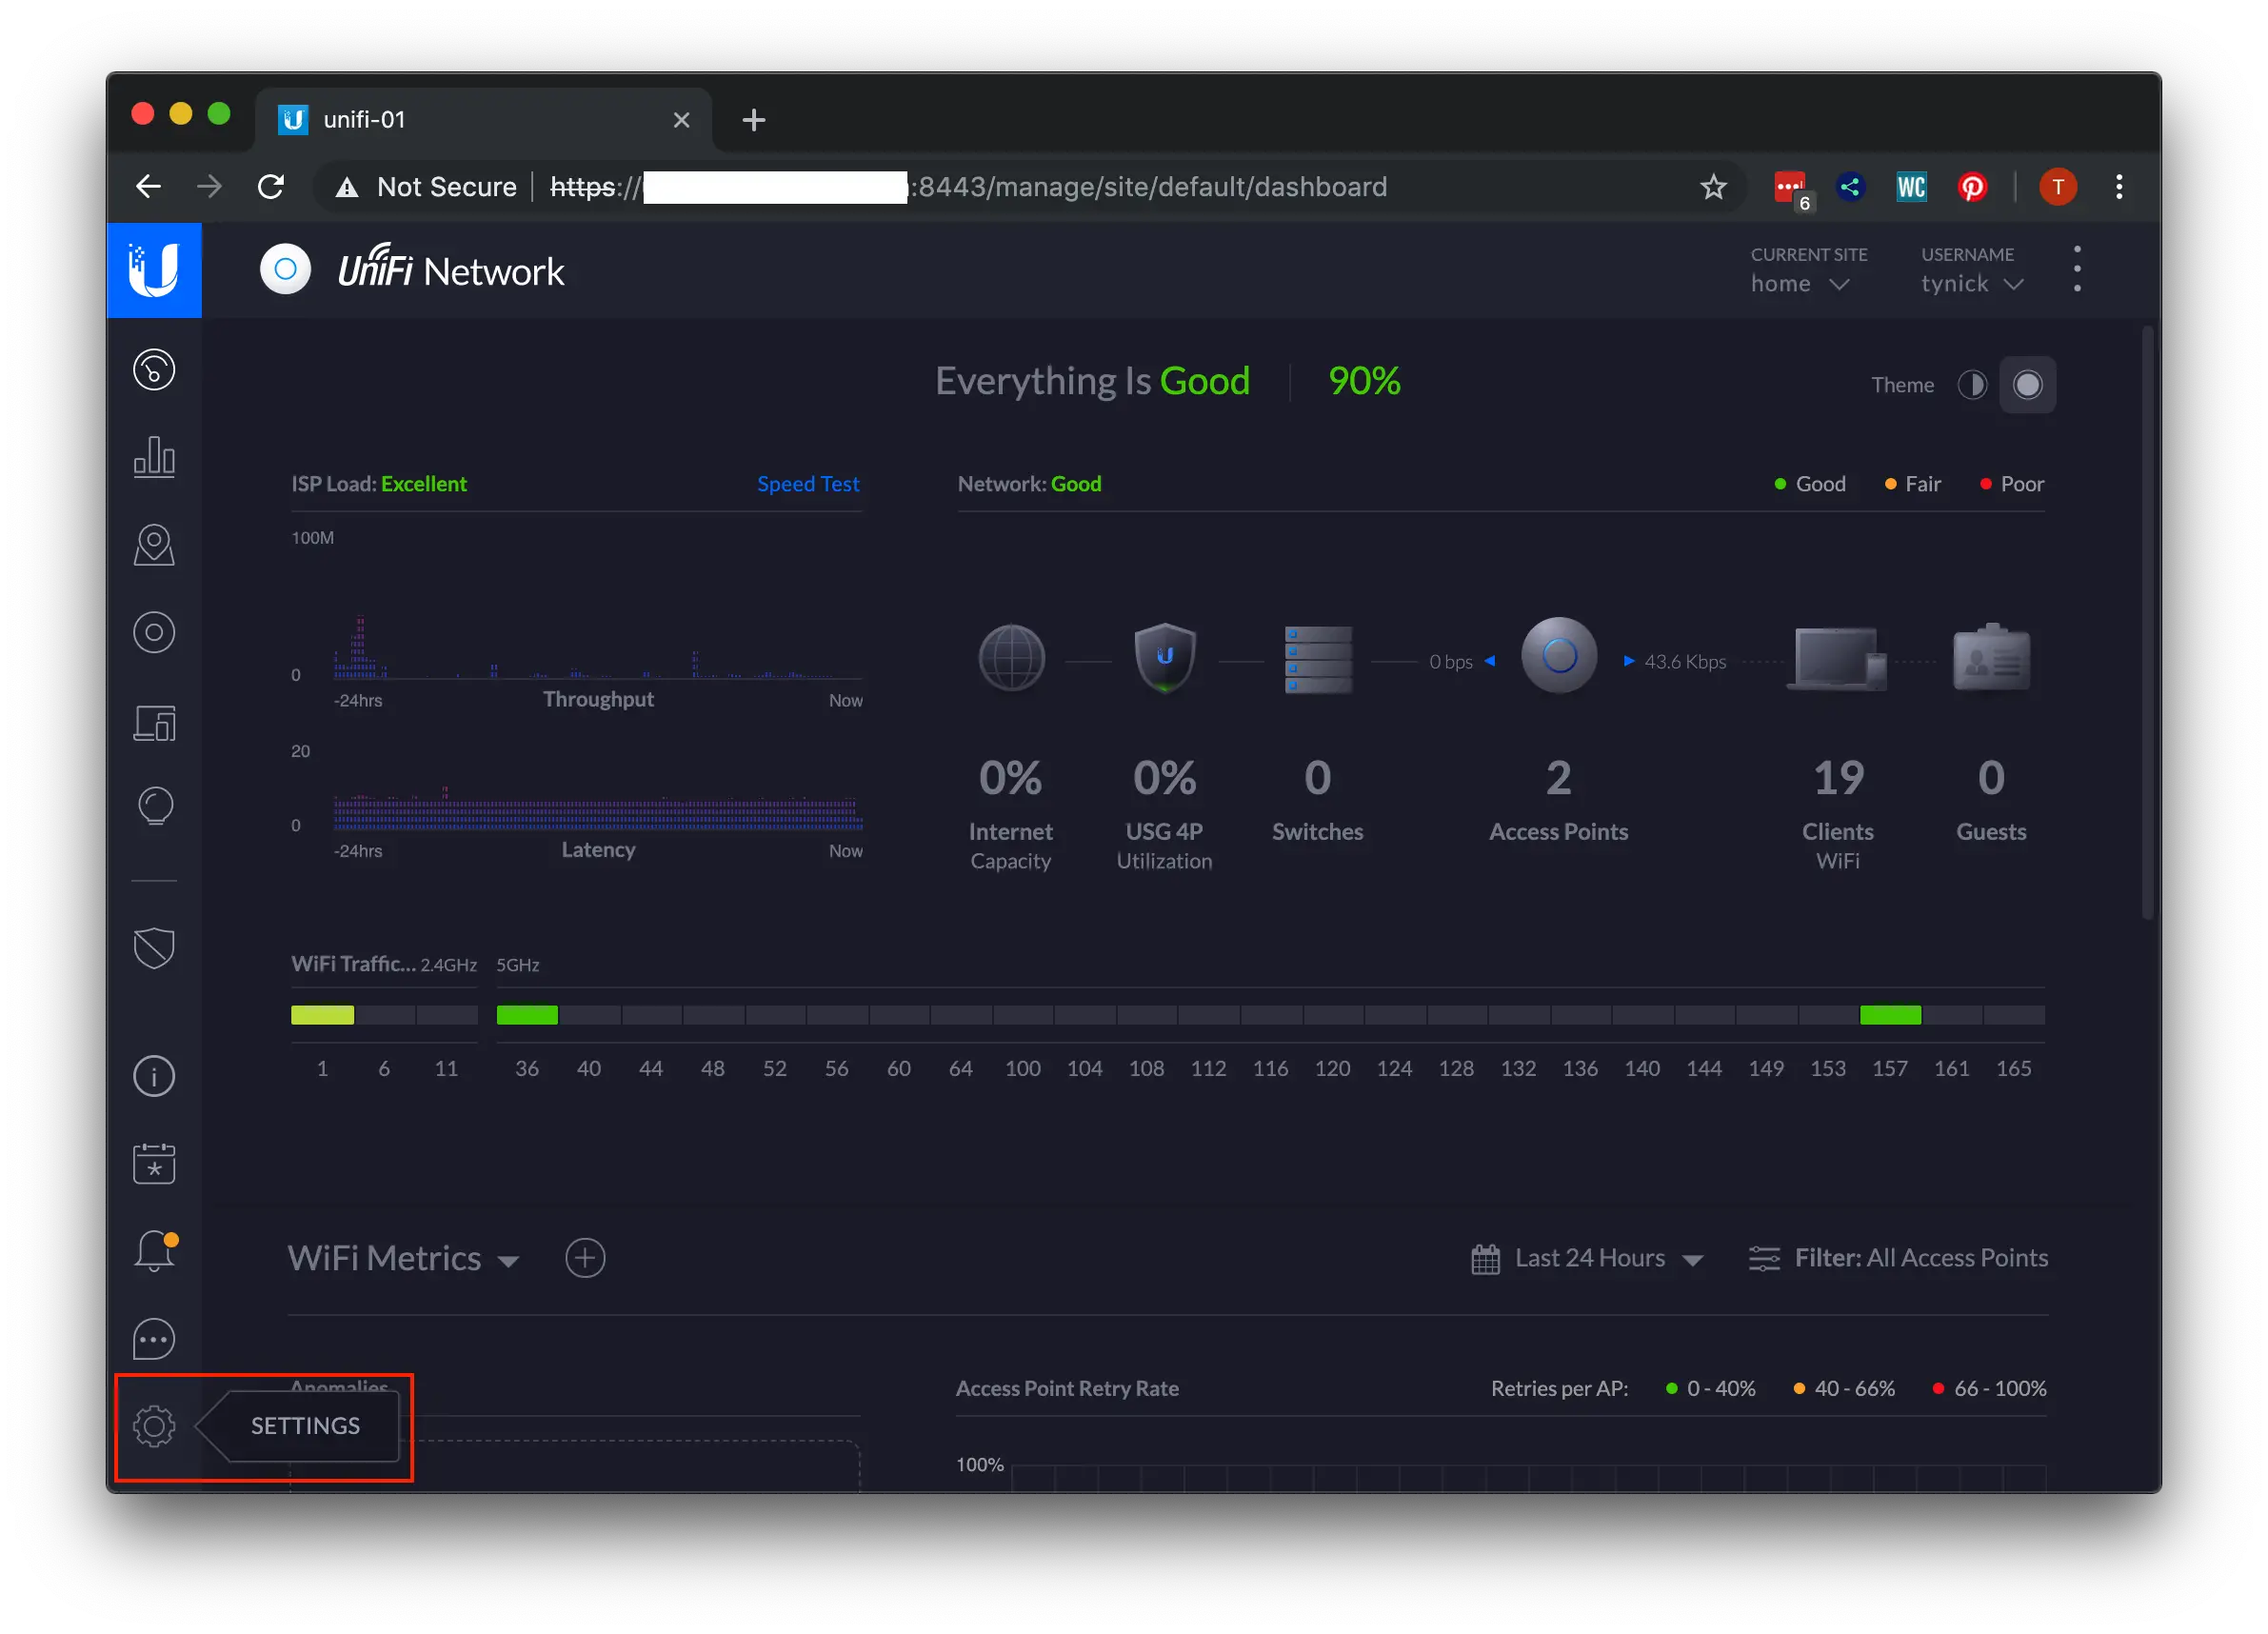
With your current site set to home(or wherever), click SETTINGS in the bottom left of the Unifi Controller.
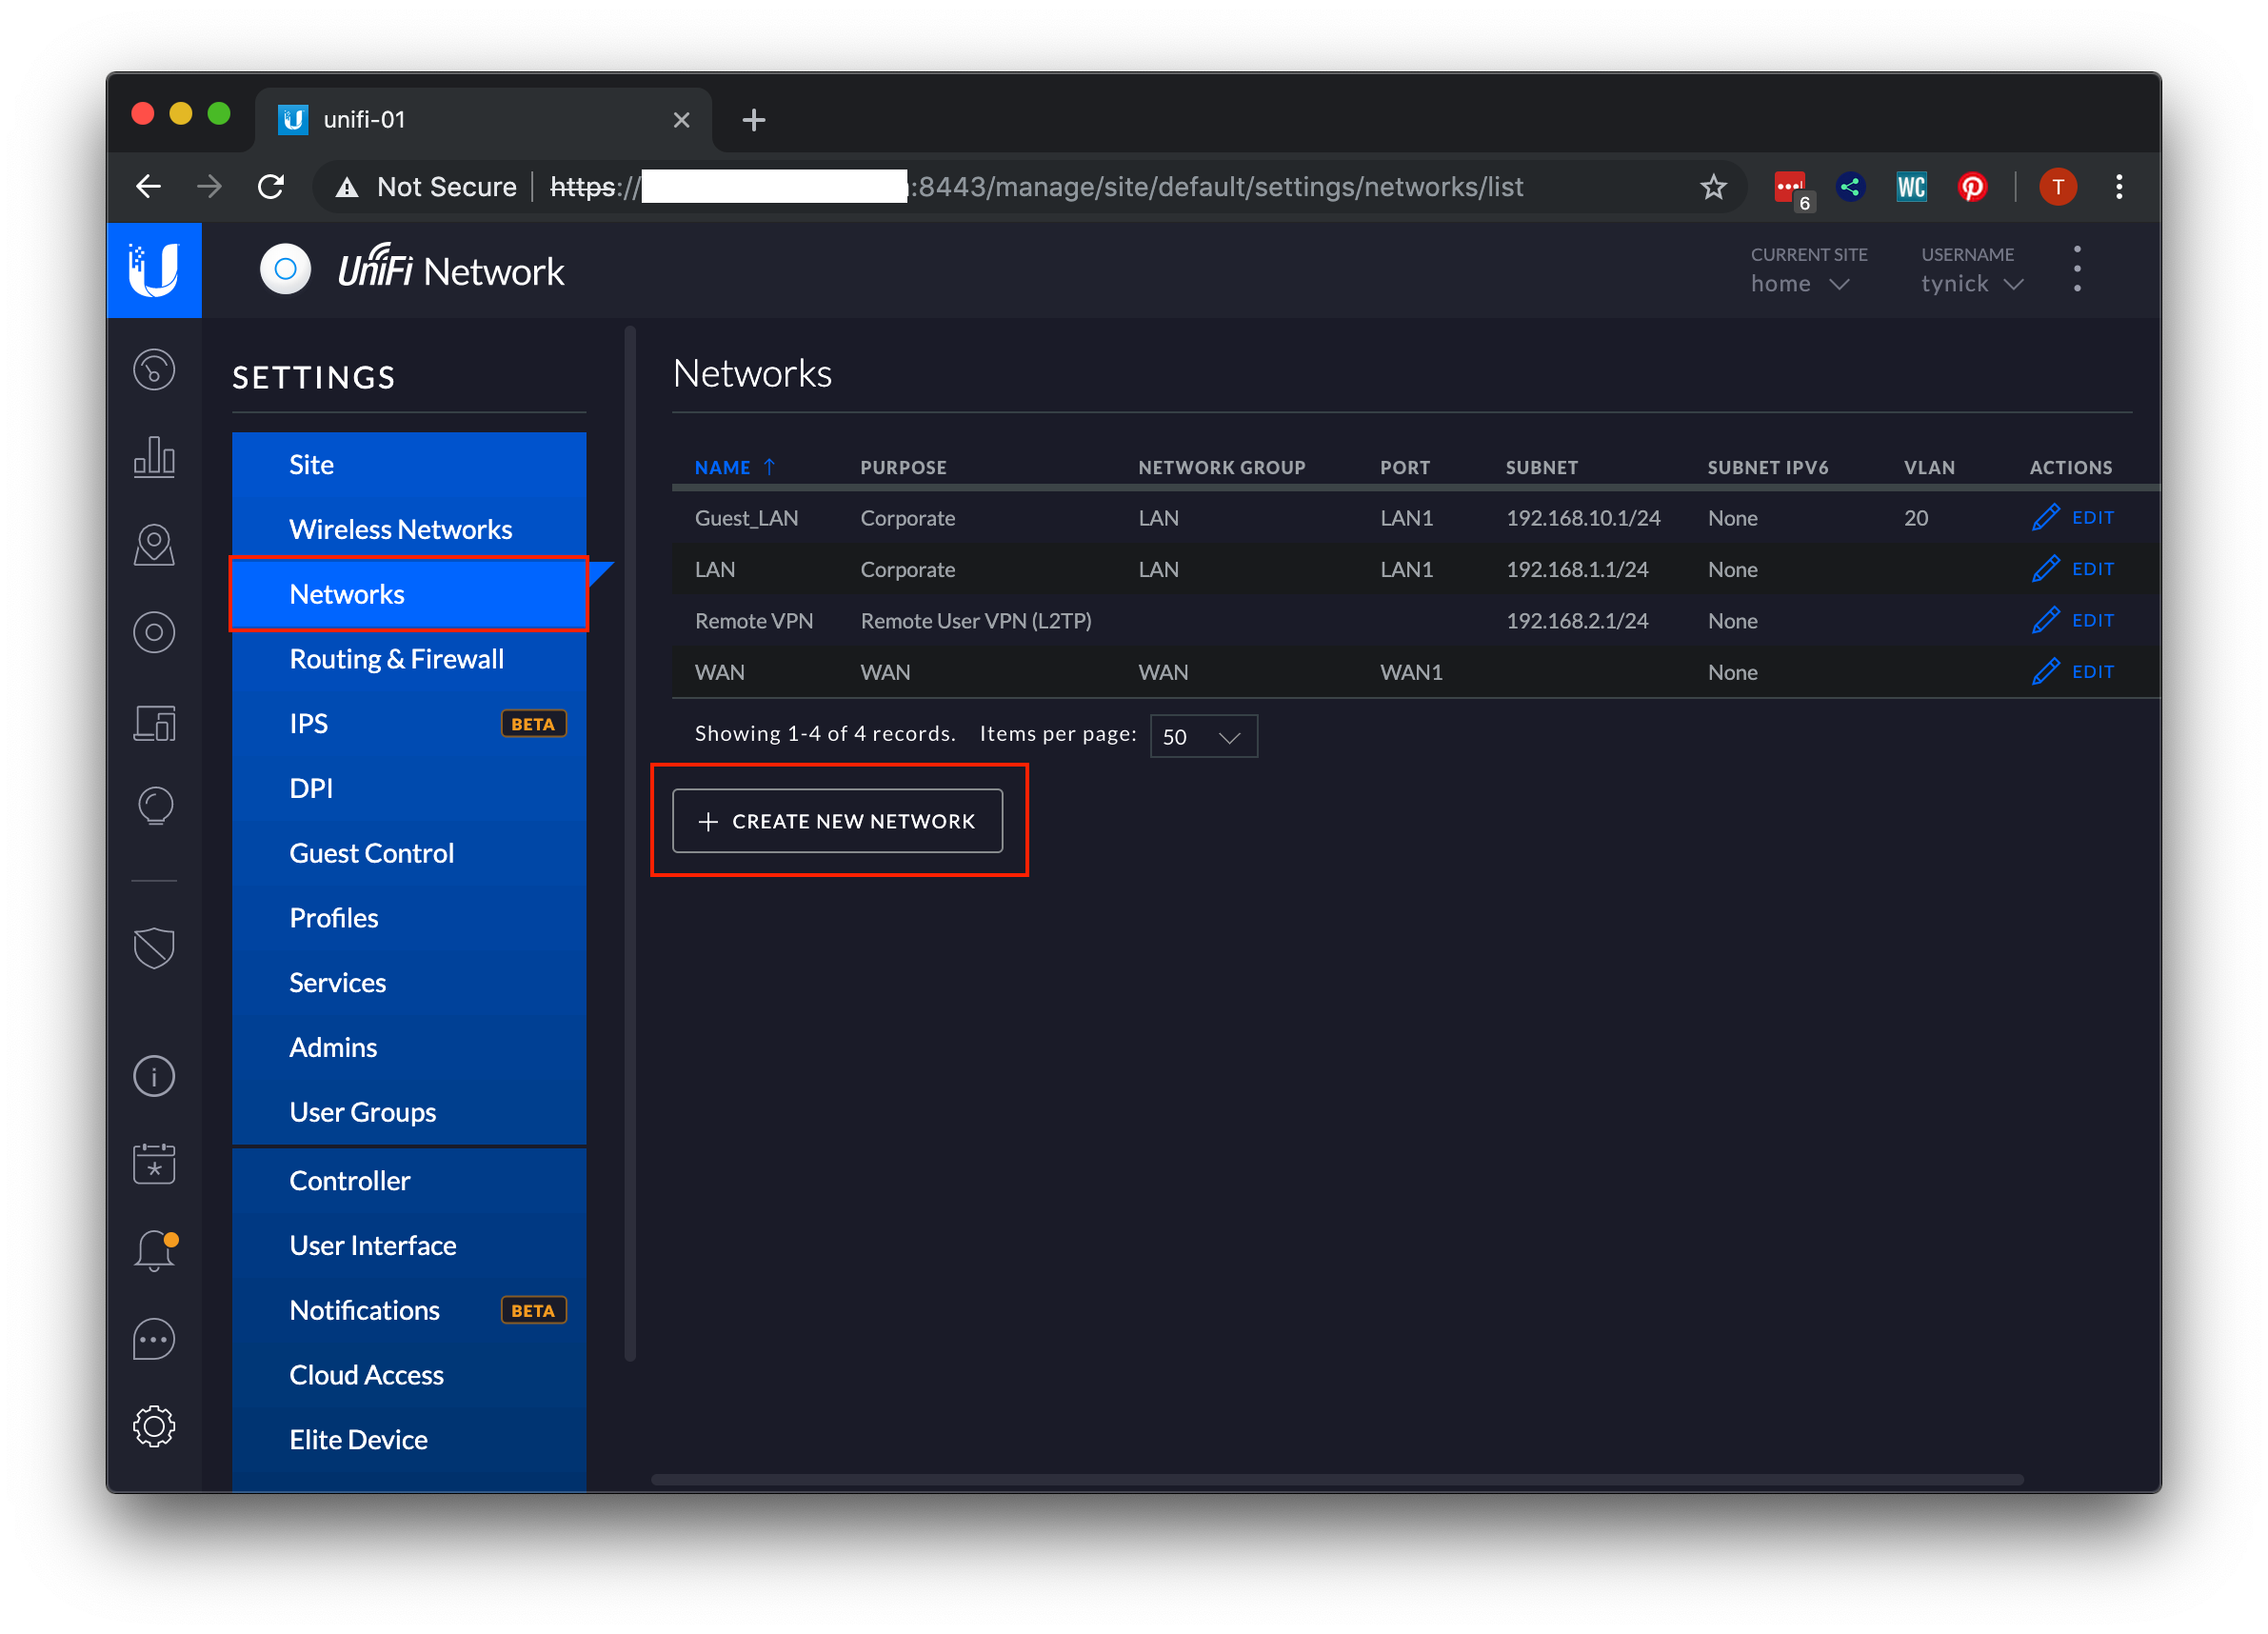
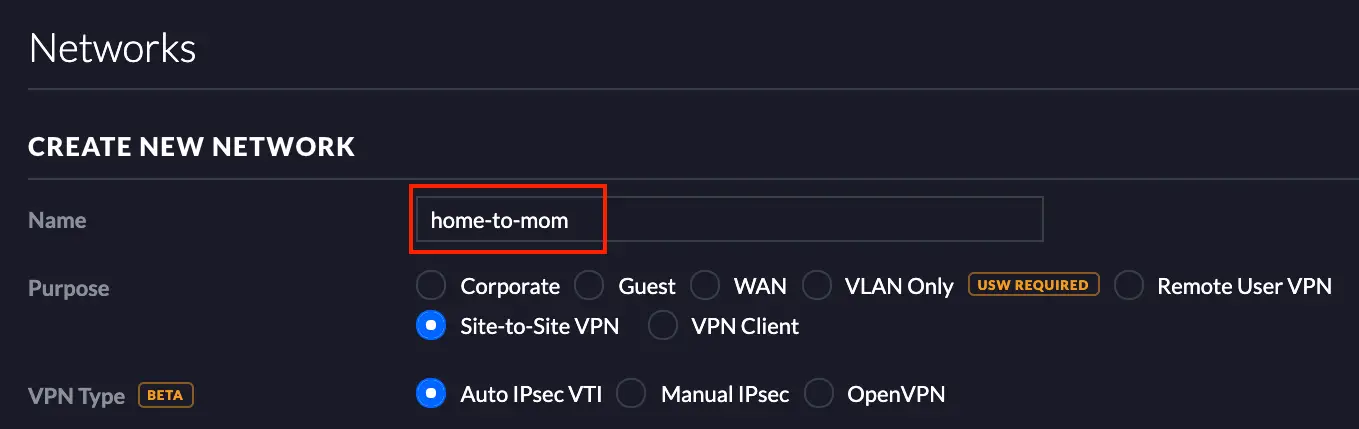
Once you are in the settings menu, click the Networks button from the side menu and then the + CREATE NEW NETWORK button.
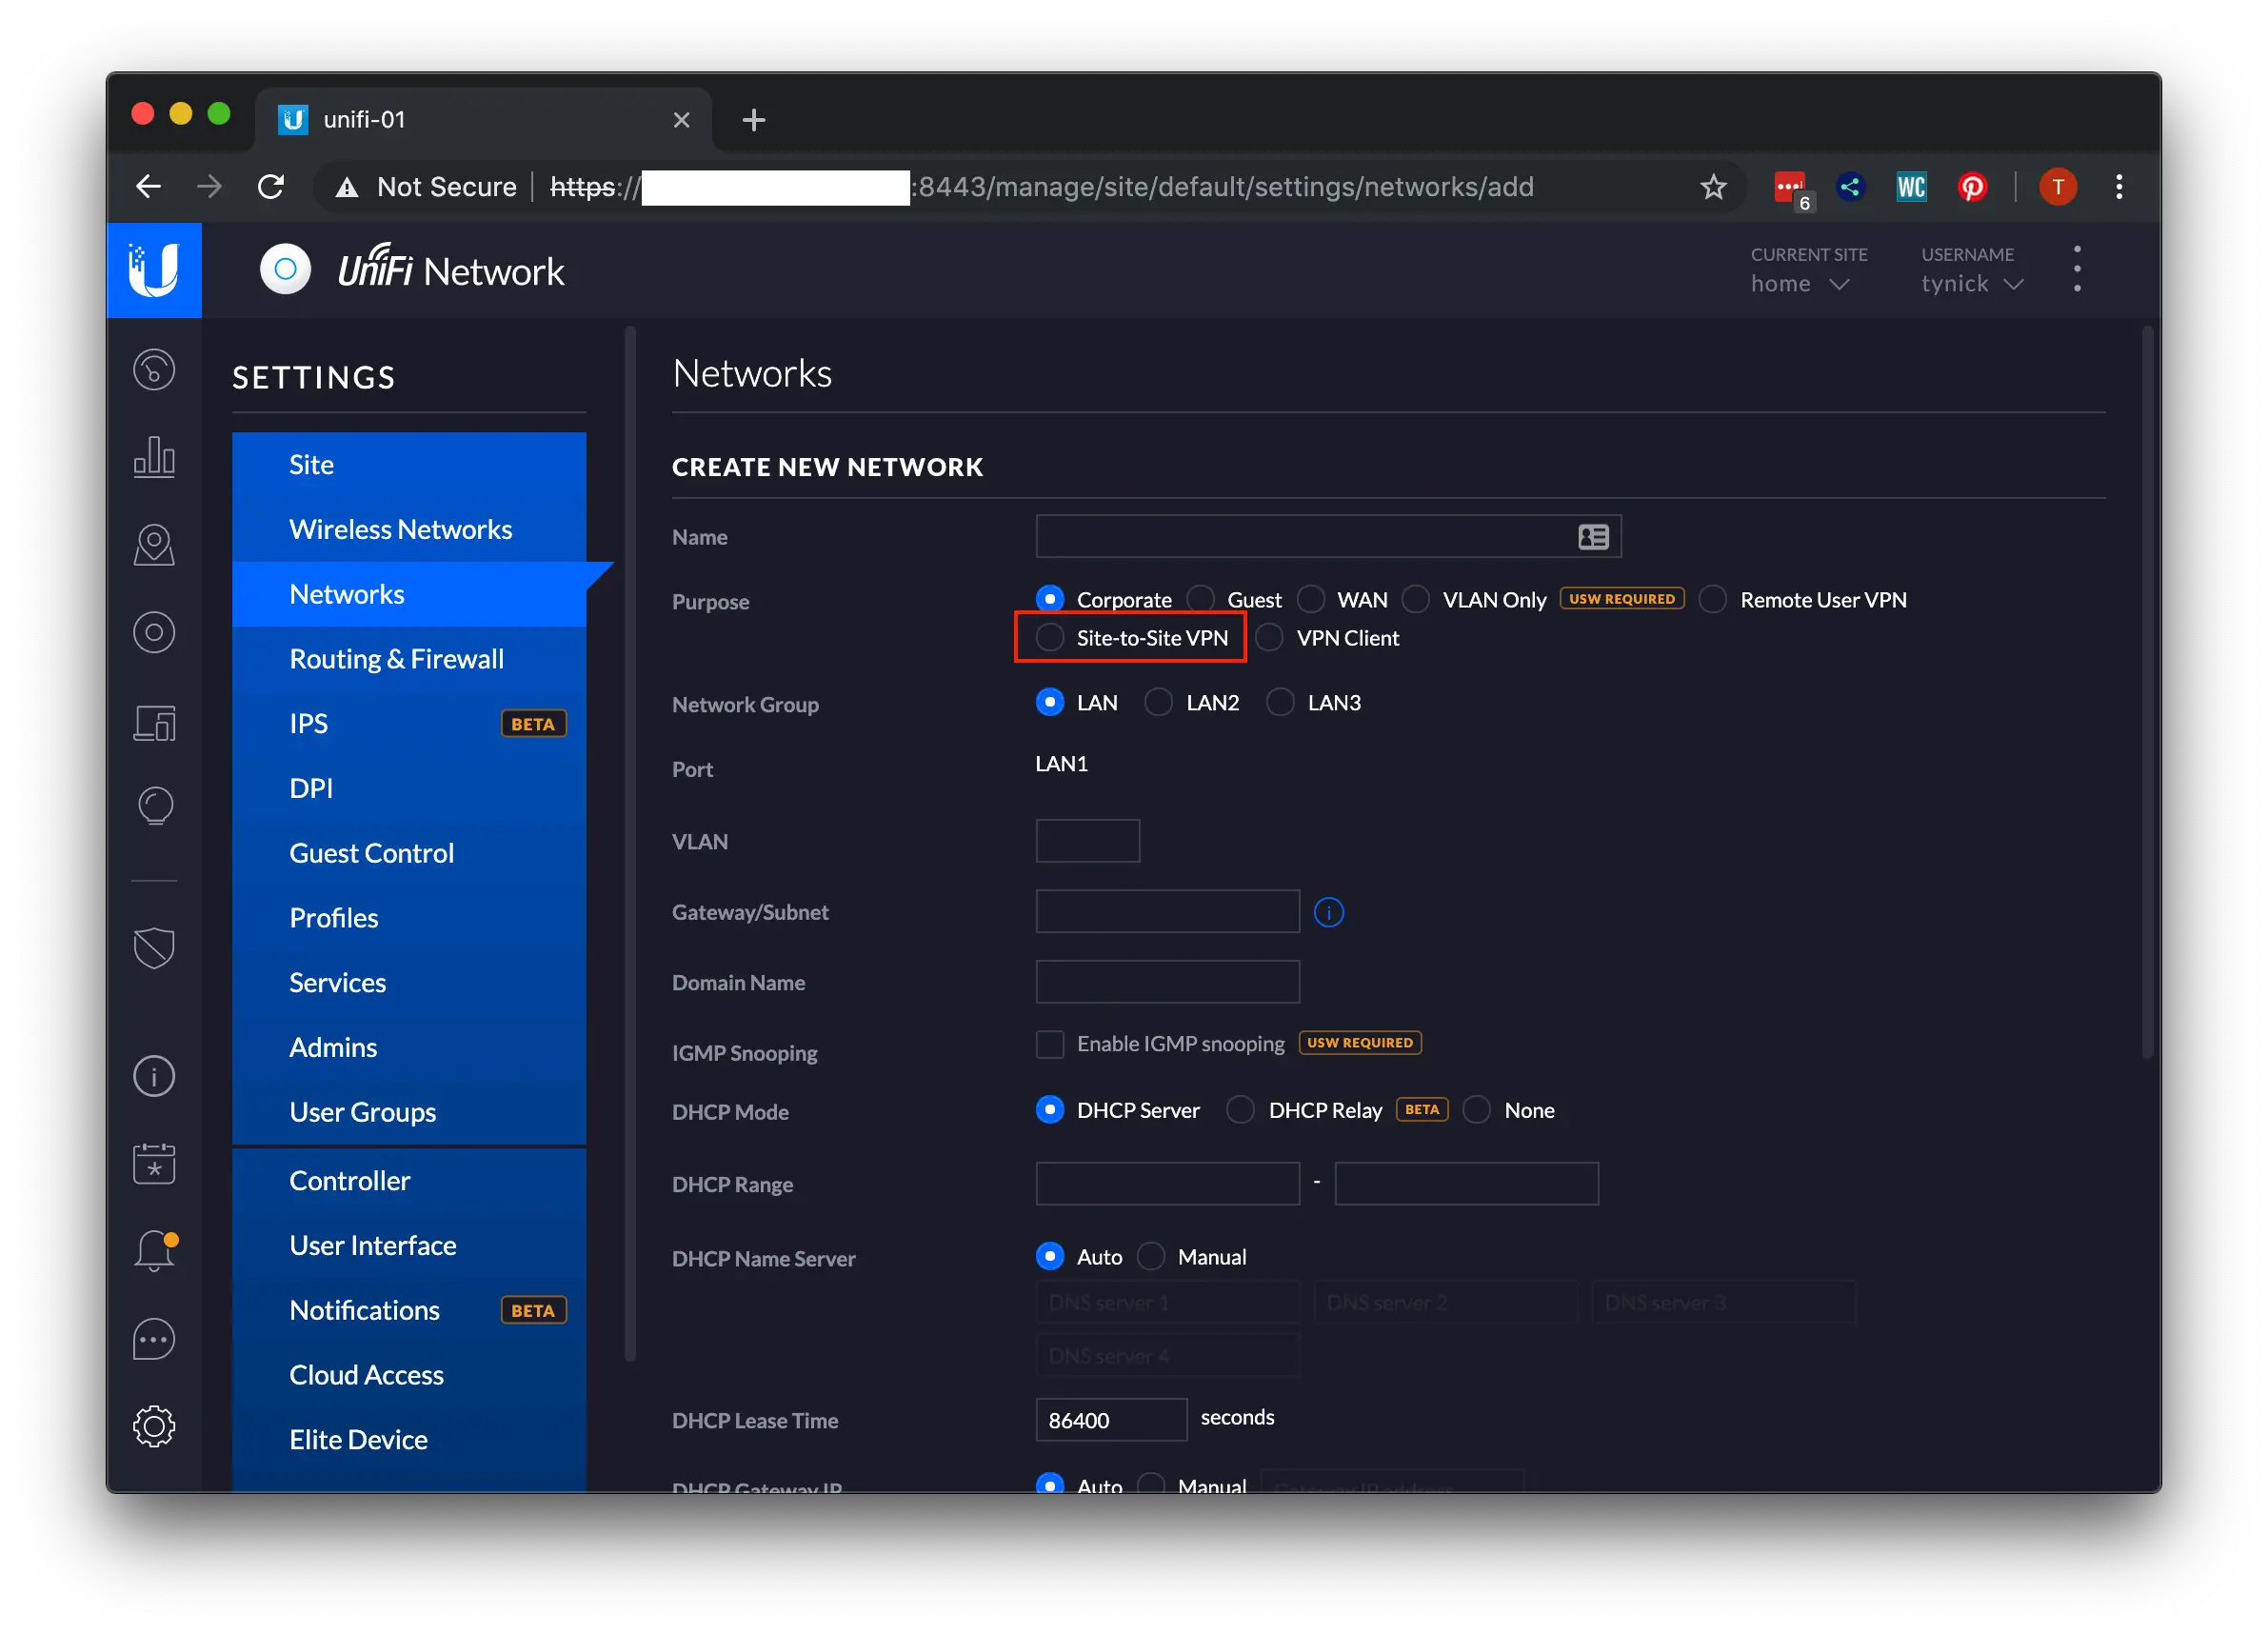
Now click the Site-to-Site VPN radio button near the top.
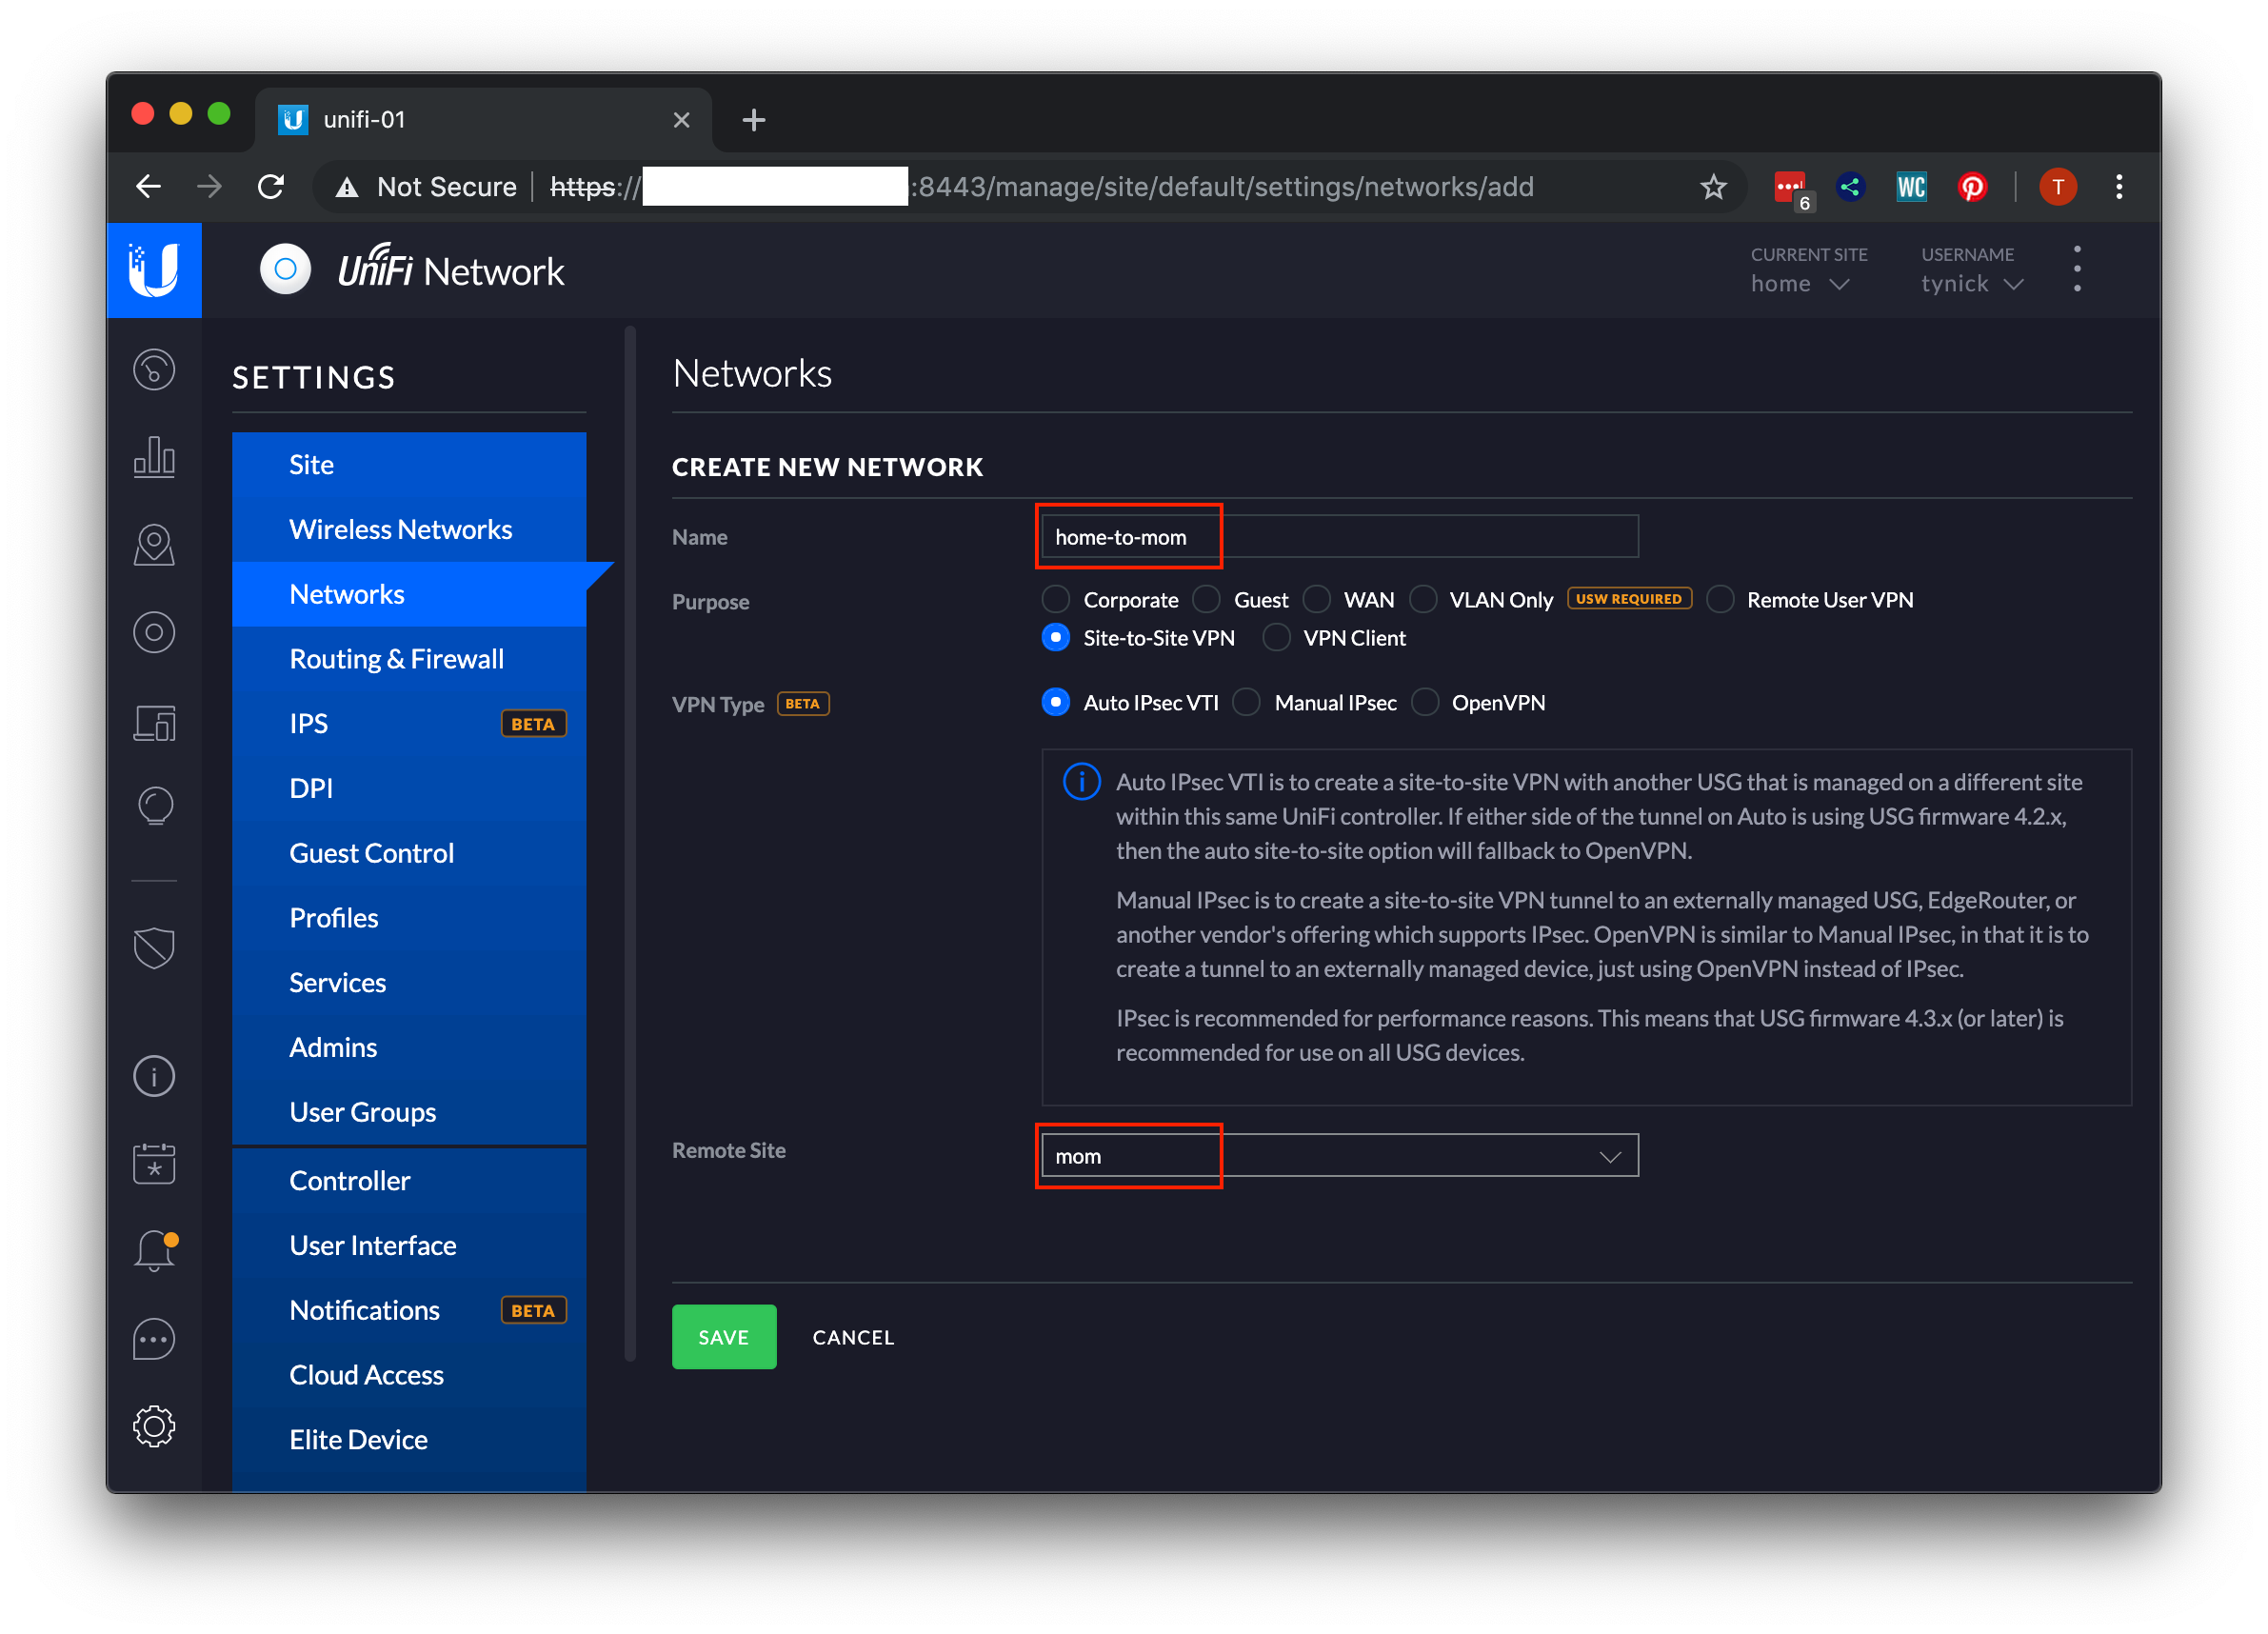
Give your VPN network a somewhat meaningful name. Then select the other site from the Remote Site dropdown at the bottom of this page. Click SAVE when finished.
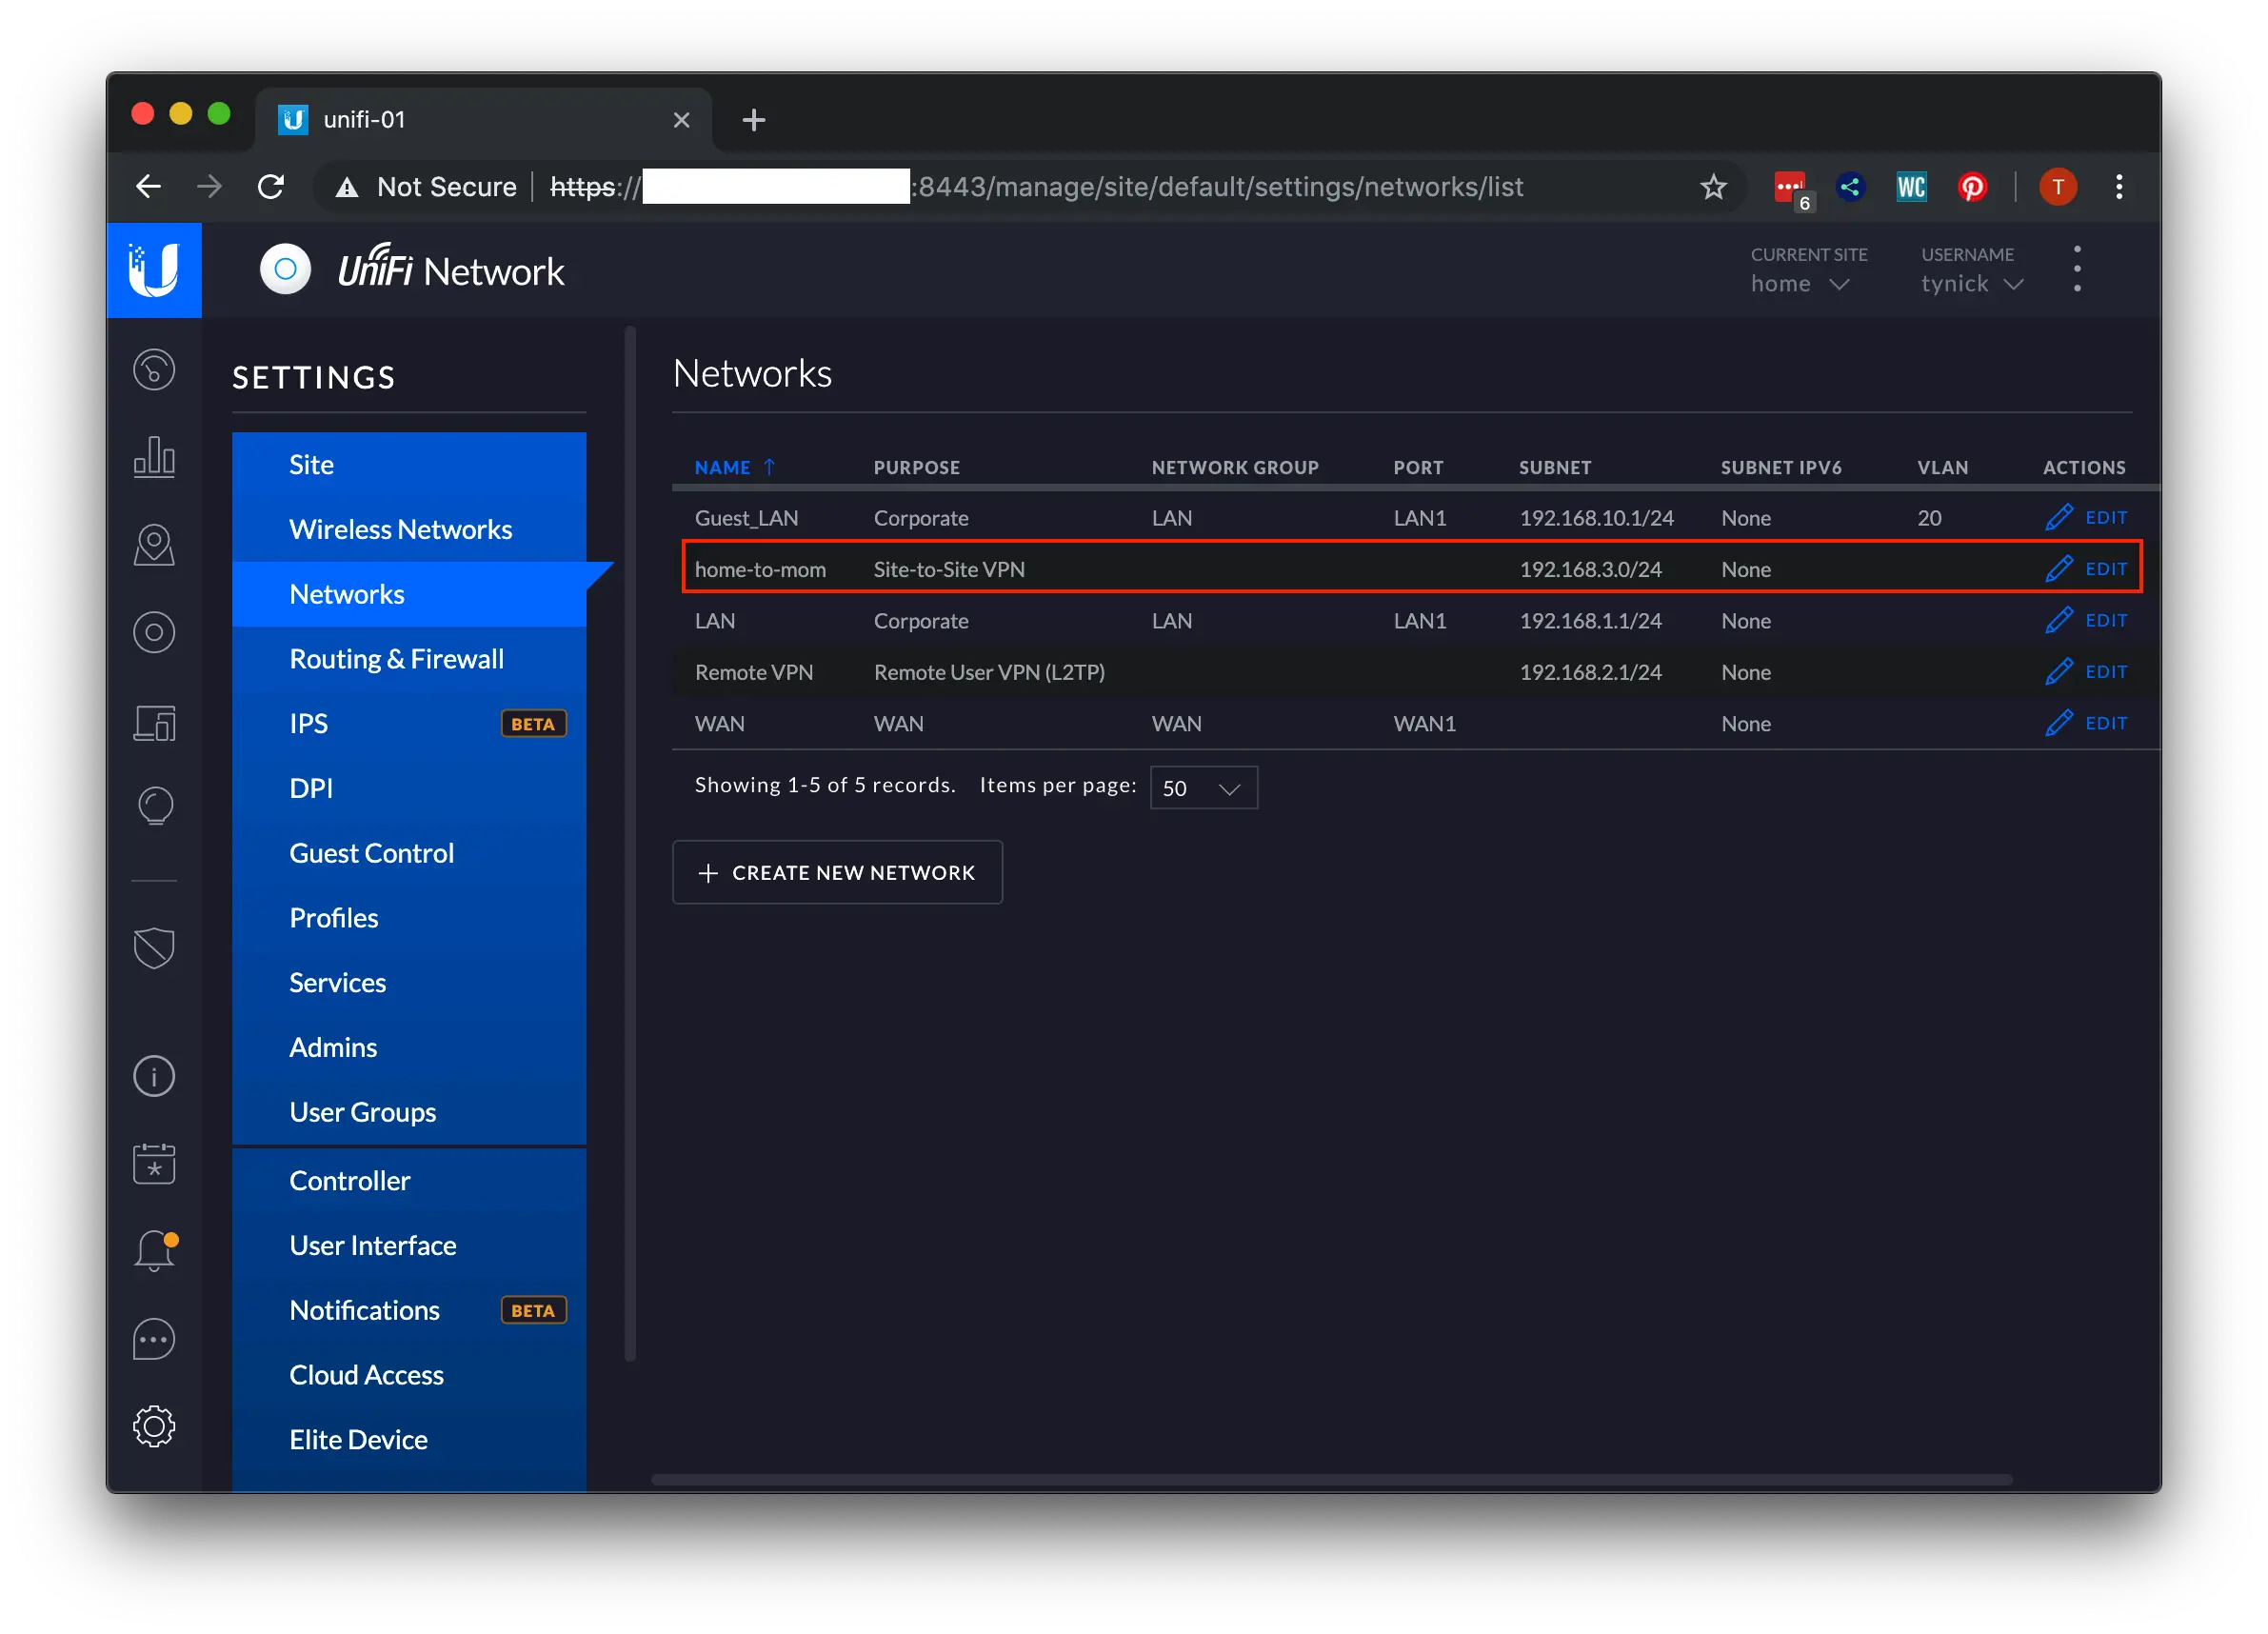
You should have been brought back to the main Networks page. Your newly created Site-to-Site VPN is now shown. Let’s test it now!
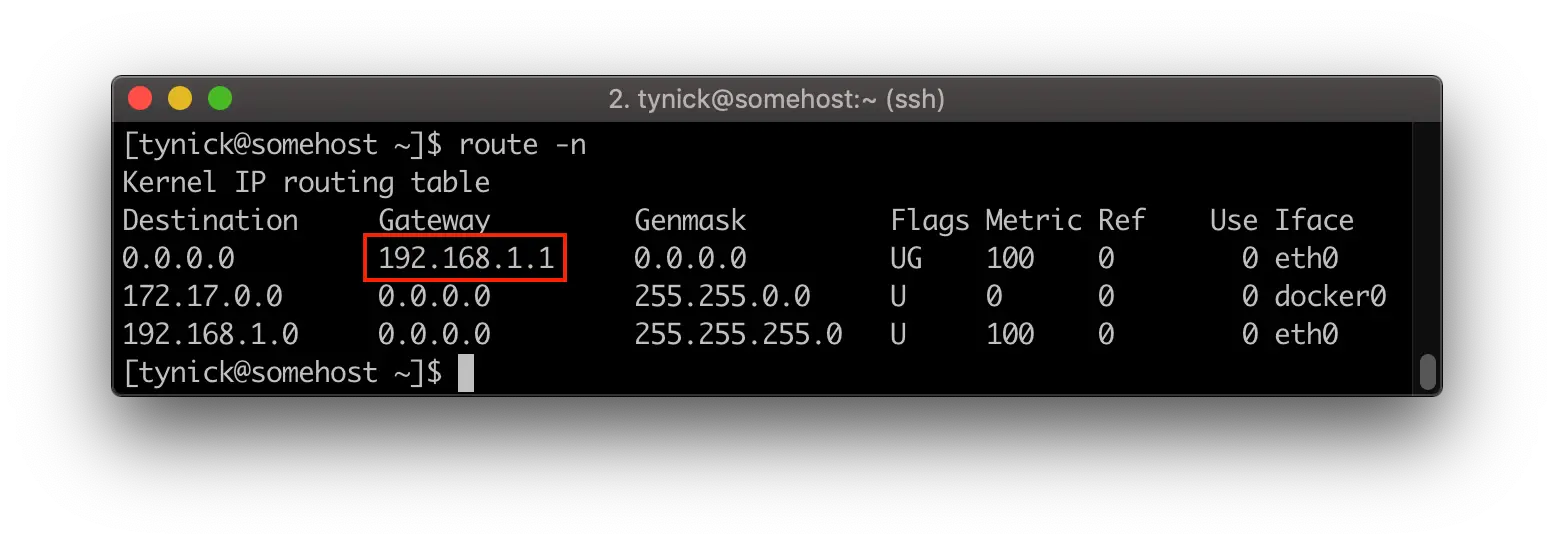
Here we have a host on my home network. You can tell it’s on my network by the gateway shown in the routing table. You can view your routing table by running route -n.
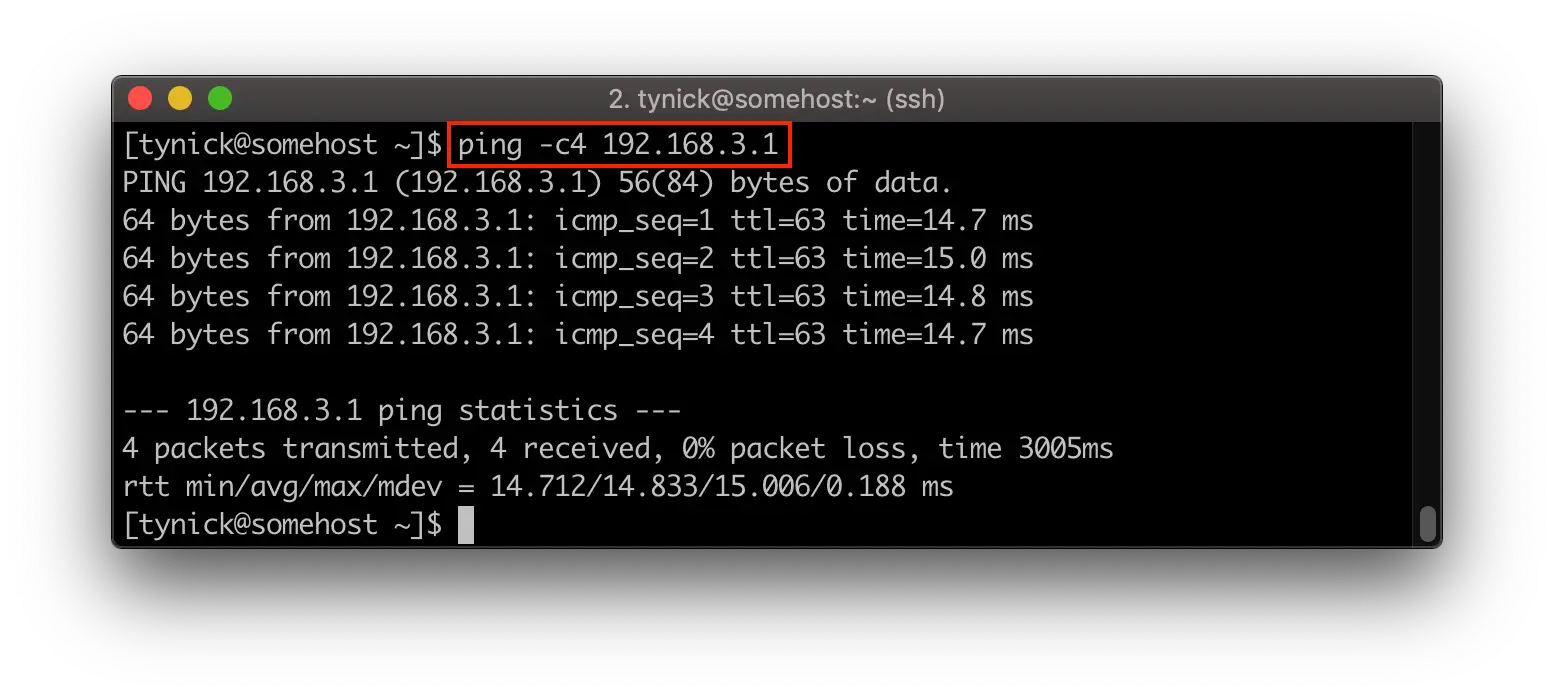
I can now ping the gateway at my Mom’s USG site.
Speed
After I originally posted this I had few people inquire about what sort of speeds I was getting when transferring files over this VPN connection. I decided to use this opportunity to write up a post on how to check speeds from host to host using iPerf. Check it out if you are interested in running speed tests on your home network. It’s very useful for troubleshooting WiFi dead-zones too!
I needed to deploy a hardwired host at my Mom’s home so that I could use iPerf to reliably test the speed between both sites.
The next time she came over I gave her a Raspberry Pi 3 B+ and a Raspberry Pi Power Over Ethernet (PoE) HAT to take home with her. She plugged it into her Ubiquiti US-8-150W PoE Switch when she got home and we were off to the races.
Below are the iPerf results.
Mac Mini(client)
[tynick@mac-mini ~]$ iperf3 -c 192.168.3.22
Connecting to host 192.168.3.22, port 5201
[  5] local 192.168.1.100 port 64135 connected to 192.168.3.22 port 5201
[ ID] Interval           Transfer     Bitrate
[  5]   0.00-1.00   sec  2.06 MBytes  17.3 Mbits/sec
[  5]   1.00-2.00   sec   154 KBytes  1.26 Mbits/sec
[  5]   2.00-3.00   sec  2.10 MBytes  17.6 Mbits/sec
[  5]   3.00-4.00   sec  1.15 MBytes  9.63 Mbits/sec
[  5]   4.00-5.00   sec  1.14 MBytes  9.56 Mbits/sec
[  5]   5.00-6.00   sec  1.22 MBytes  10.2 Mbits/sec
[  5]   6.00-7.00   sec  1.20 MBytes  10.1 Mbits/sec
[  5]   7.00-8.00   sec  1.16 MBytes  9.74 Mbits/sec
[  5]   8.00-9.00   sec  1.20 MBytes  10.0 Mbits/sec
[  5]   9.00-10.00  sec  1.15 MBytes  9.63 Mbits/sec
- - - - - - - - - - - - - - - - - - - - - - - - -
[ ID] Interval           Transfer     Bitrate
[  5]   0.00-10.00  sec  12.5 MBytes  10.5 Mbits/sec                  sender
[  5]   0.00-10.02  sec  12.4 MBytes  10.4 Mbits/sec                  receiver

iperf Done.
Raspberry Pi(server)
-----------------------------------------------------------
Server listening on 5201
-----------------------------------------------------------
Accepted connection from 192.168.1.100, port 64134
[  5] local 192.168.3.22 port 5201 connected to 192.168.1.100 port 64135
[ ID] Interval           Transfer     Bitrate
[  5]   0.00-1.00   sec  1.42 MBytes  11.9 Mbits/sec
[  5]   1.00-2.00   sec   700 KBytes  5.74 Mbits/sec
[  5]   2.00-3.00   sec  2.03 MBytes  17.0 Mbits/sec
[  5]   3.00-4.00   sec  1.19 MBytes  9.95 Mbits/sec
[  5]   4.00-5.00   sec  1.14 MBytes  9.53 Mbits/sec
[  5]   5.00-6.00   sec  1.24 MBytes  10.4 Mbits/sec
[  5]   6.00-7.00   sec  1.19 MBytes  10.0 Mbits/sec
[  5]   7.00-8.00   sec  1.18 MBytes  9.87 Mbits/sec
[  5]   8.00-9.00   sec  1.19 MBytes  9.94 Mbits/sec
[  5]   9.00-10.00  sec  1.13 MBytes  9.51 Mbits/sec
[  5]  10.00-10.02  sec  39.2 KBytes  14.0 Mbits/sec
- - - - - - - - - - - - - - - - - - - - - - - - -
[ ID] Interval           Transfer     Bitrate
[  5]   0.00-10.02  sec  12.4 MBytes  10.4 Mbits/sec                  receiver
As you can see, we are stuck around 10 Mbps. What gives?
I originally started to wonder if I had configured something incorrectly. After poking around the settings in the Unifi Controller and nothing jumping out at me, I realized what the actual issue was.
Our internet connections are both 100 Mbps download and 10 Mbps upload…
The upload speed is the bottleneck for us. We will never exceed 10 Mbps when transferring to or from either site.
This obviously isn’t ideal but it works for my situation. My backups are all incremental and typically only 10MB - 5GB each time. No big deal. It all happens in the middle of the night so it doesn’t really bother me. No need for us to upgrade our internet speeds just for this.
This unfortunately means that I can’t tell you the max speed of a VPN connection between 2 USGs. However, it is nice to know that the USG VPN is capable of using all of my internet connection!
It’s as easy as that! Feel free to send me a message on Twitter if you have any questions.
Be sure to subscribe at the bottom of the page to be notified when new posts become available.