My Humble Homelab (With Raspberry Pi Rack)
My Homelab With A Raspberry Pi Server Rack
UPDATE - Dell R710s have been replaced with 10 PoE Powered Raspberry Pi 4 Model B (4GB)
Here is my current homelab setup. I’m sure it’s not the most outrageous homelab you’ve ever seen, and that’s ok. It has grown a lot over the years, and has served me well. It has helped me learn so many things that I use daily at my job as a Linux System Administrator.
Full details below photo.
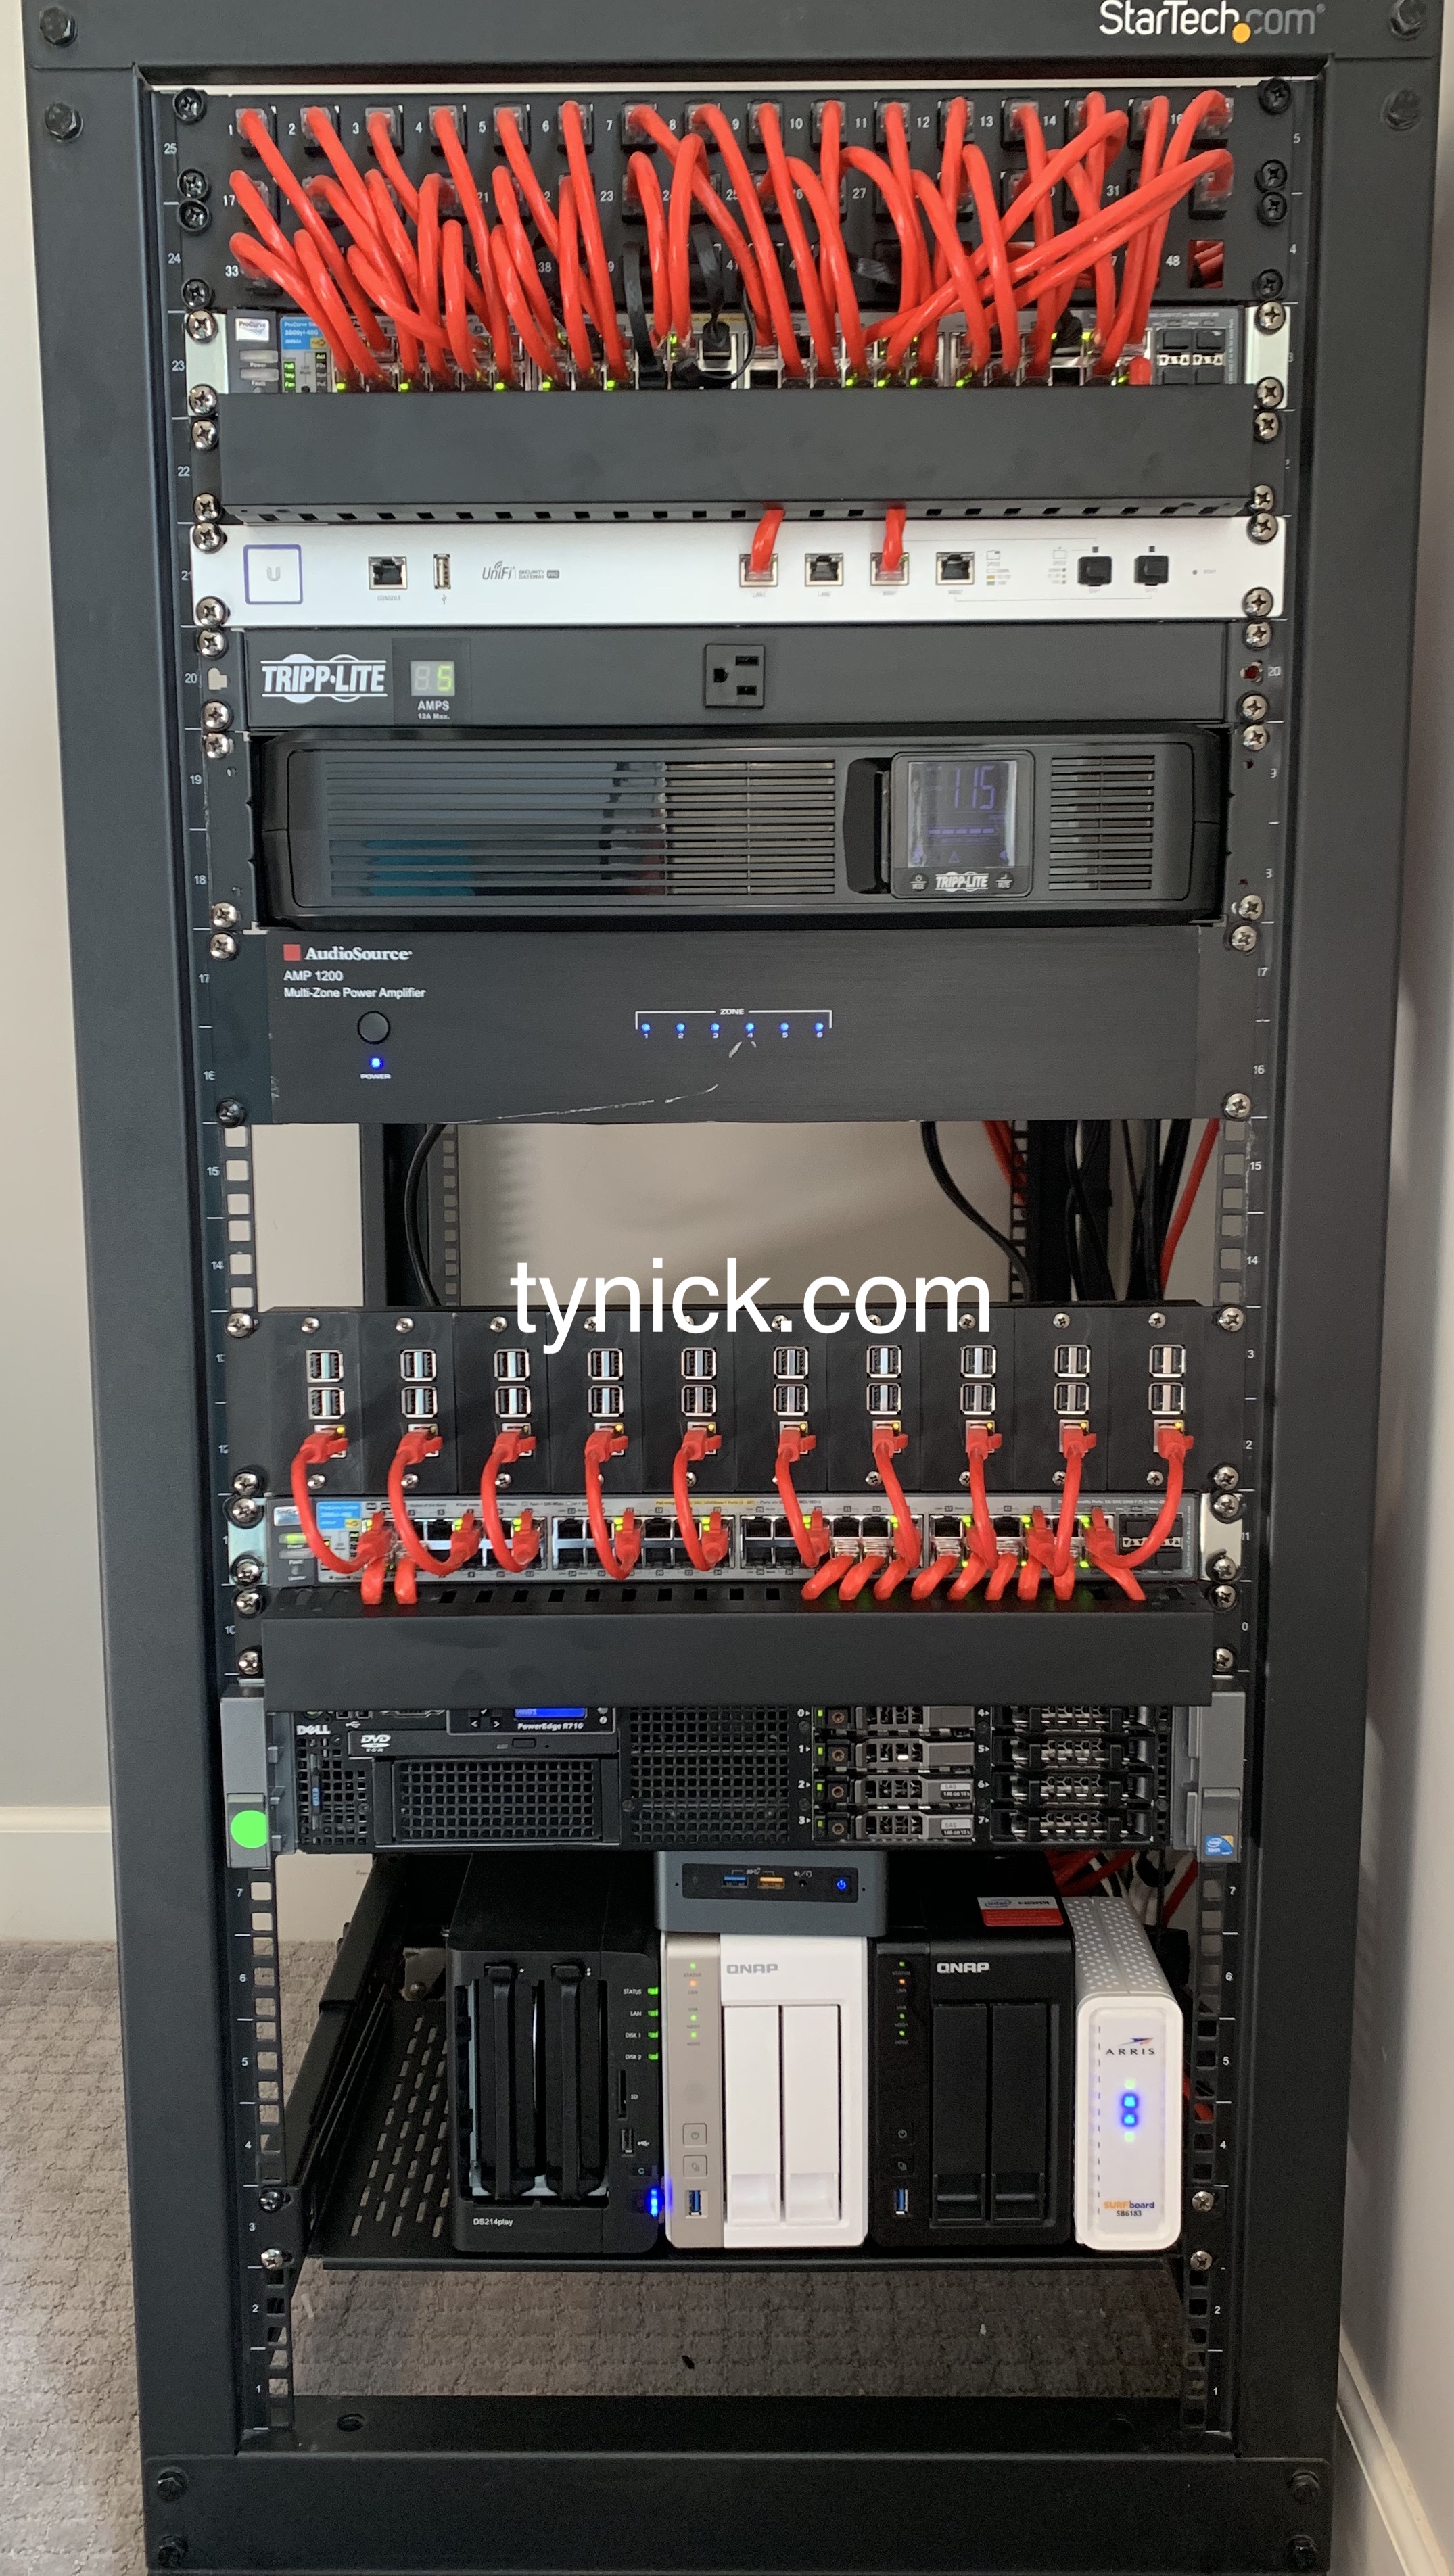
From top to bottom, here are the details!
48 Port Keystone Patch Panel
At the very top of the rack I have a Monoprice 48 Port Keystone Patch Panel.
If you use a keystone patch panel you will need to terminate your network cable(cat6a in my case) into keystone jacks. I personally use this punch down impact tool and I find that it works pretty well.
I currently have 44 of the patch panel ports used. I ran cat6a to every room in my house when I moved in. I also ran cat6a for my network cameras and for my PoE access points. More on those later.
I have a 1 story home with an attic/crawl space that spans the entire length of the house. In a house like this it isn’t hard to run cable. It just takes time and patience to fish the cables through the walls.
You’ll definitely want someone to help you with this. It’s very annoying when you are running cable if you frequently have to come down from the attic to pull wire.
In my infinite wisdom, I ran all of my cabling in the summer. I live in Phoenix, Arizona. It turns out that attics in Phoenix are exactly 1,000ºF in the middle of summer. Make sure you have plenty of ventilation and water if you are going to do something dumb like this. No need to die from heat stroke just for gigabit speeds!
HP ProCurve 48-Port Gigabit PoE Switch
Homelabs are expensive so I chose to get my switches used on eBay. I’m not a network guy so long as it moves packets at gigabit speeds and has PoE, it is fine with me. My Raspberry Pis, access points and network cameras are all powered by PoE.
You can see in the photo that each port has a patch cable that goes to the patch panel. This switch is exclusively for my network drops.
I’d love to replace my HP ProCurve Switches with Ubiquiti UniFi Switches but it’s not currently in the budget. If you are a trillionaire and want me to do a review or tutorial, feel free to gift me one.
Horizontal Rack Mount Cable Management Unit
This 1U Horizontal Cable Management Unit simply hides my wires going in and out of the front of the rack. Not much to it but I recommend them if you want to keep your homelab looking clean.
UniFi Security Gateway Pro
The UniFi Security Gateway Pro is a great gateway device. Perfect for the “prosumer” market. While it is built well, you can definitely feel the difference between a USG Pro and something like a Cisco ASA if you pick them up. The Cisco ASA is much heavier. I understand they aren’t really the same market but I wanted to point it out.
These are very easy to setup. The USG Pro is controlled by an external controller that runs on a server, your pc or the UniFi Cloud Key. I personally have my controller running on an Amazon EC2 instance running in a docker container. The docker image can be found at jacobalberty/unifi for anyone interested in running their controller this way. He has been great about keeping the image updated since I started using it.
Once you get the controller setup you just point your UniFi device at the controller to adopt it. Then you can configure it to your liking. This is how all UniFi devices work. It’s great to have all of your network devices managed by the same controller.
The USG Pro is also what I use as my VPN when I am out of the house.
Tripp-Lite Metered PDU
I haven’t had a single issue with my Tripp-Lite Metered PDU. It’s been great at distributing power.
It has a display on the front that tells me how much power is being used. It’s fun to see how that changes as you swap out equipment.
There are 13 outlets in the rear and 1 in the front. I use the one in front mainly when I am testing something that isn’t going into the rack permanently. It’s obviously not needed but it’s been a pretty convenient feature.
If I had more money I probably would go with the switched version so that I could monitor voltage, frequency & load via the built-in network connection.
Tripp-Lite 1500VA Smart UPS
I’ve owned this unit less than 2 years. The Tripp-Lite 1500VA Smart UPS hasn’t been perfect. Maybe it’s just bad luck but I have had 2 batteries go bad since I got it.
I don’t test it regularly so I have found out the hard way both times. “the hard way” is slang for “my power went out for a moment and all my shit turned off”. Not ideal.
Tripp-Lite was great about sending me a new battery the first time. I just had to send them a receipt and a picture of the display on the unit showing that the battery was “bad”.
Even with great customer service, it’s still really annoying.
As I write this post, it’s sitting in the rack running with a bad battery because I decided to write this post instead.
AudioSource AMP1200
The AudioSource AMP1200 is a 12 channel, 6 zone amplifier. I actually own two of them. I bought them both used on eBay. You can get them for a pretty reasonable price if you have patience.
You can see in the photo of the rack that there is an empty space under it. That is where the second AudioSource AMP1200 will go.
Unfortunately, I cannot find another set of rack mount ears for the second amp. I found the first set on eBay. I’m not sure if the device comes with them new or not but please let me know if you know where I can nab a set.
More on what these are used for below…
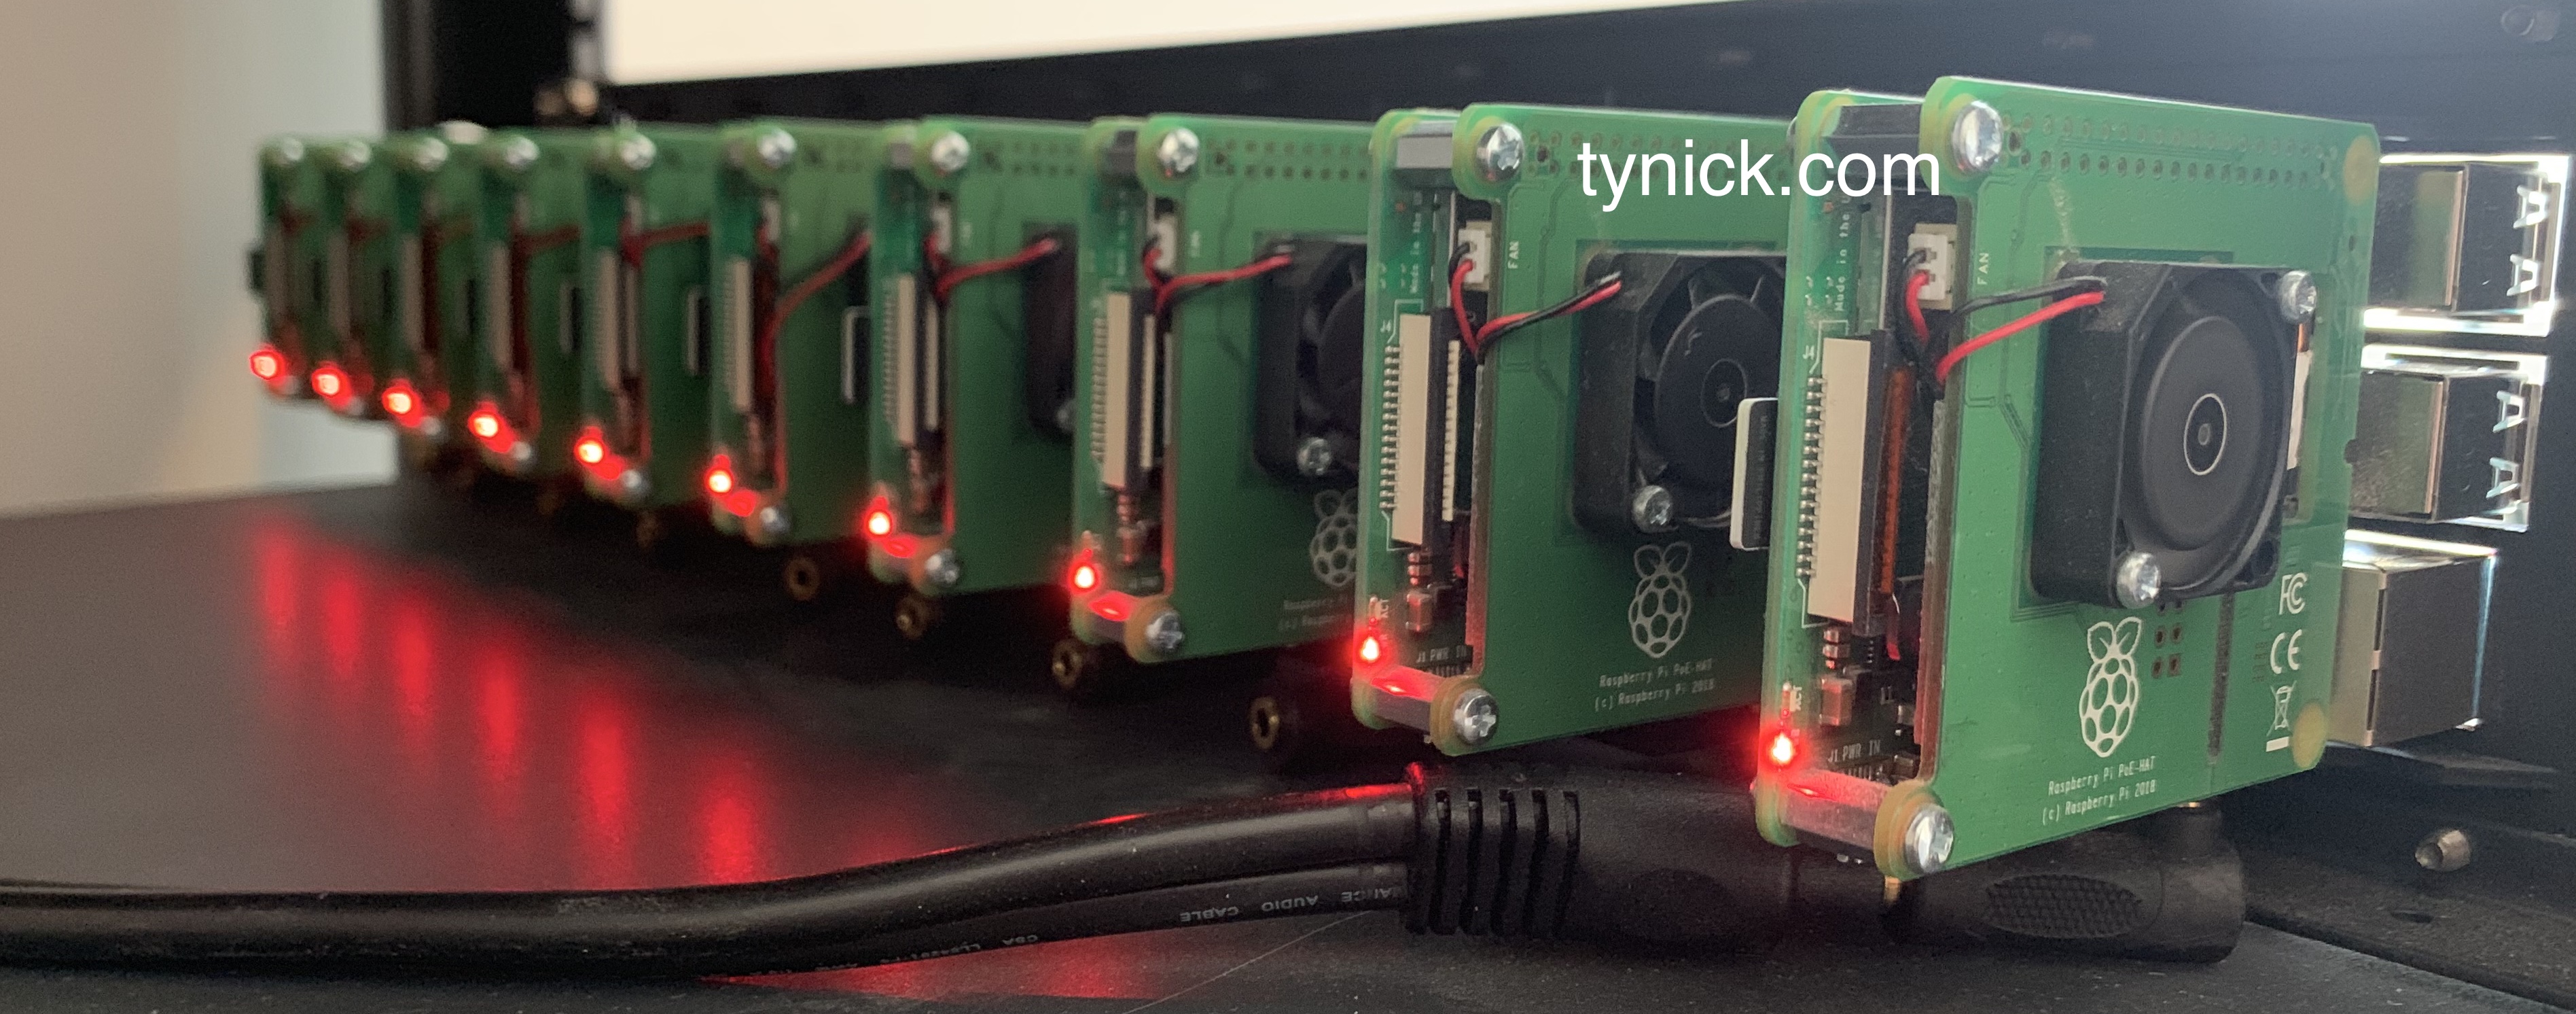
Raspberry Pi Server Rack
This is absolutely, without a doubt, my favorite part of my homelab.
A 10 node Raspberry Pi rack!
I 3D printed the rack trays from these files I got on Thingiverse. Thank you so much to SliderBOR for designing this. Definitely check it out!
The rack trays will sit inside this 2U Audio Rack Frame. Yes, I know that place is in London. I honestly cant find it anywhere in the U.S. If you do, please let me know where and I’ll update this post. Definitely don’t ask me for help on the site. I had no idea what I was doing.
I basically just clicked buttons and copy/pasted things into Google Translate until I got a confirmation email. I picked the cheapest shipping option and just prayed that I didn’t accidentally just spend $1000 on a 19" piece of metal. When I looked at it on my credit card statement I think it came out to around $50 after shipping. I was shocked when the item showed up 3 days later. Really quick shipping!
Back to the rack… Each Raspberry Pi is equipped with a PoE Hat. This makes it so much easier to manage cabling and keep the rack clean looking.
Previously I had two 12 Pi racks. It was a complete mess of USB hubs and micro USB cables. Eventually I realized that I didn’t need a 24 Pi cluster and downsized.
Even with only 10 Raspberry Pis, the Raspberry Pi PoE Hat really cleaned things up in the rack. Also, Micro USB is a piece of shit connector. So, I am glad I don’t have to use it anymore.
Originally the Raspberry Pi server rack was used for playing with docker clusters but then I had a better idea to use them for audio throughout my house.
Each Raspberry Pi will be running an AirPlay server and have its own dedicated zone on an AudioSource amplifier. This will allow me to play music wherever I am in the house or even in the yard, which is awesome!
So far, I’ve installed 1 set of speakers in the living room ceiling and 2 sets of rock speakers in the back yard. I am waiting until fall to install the rest of the speakers in the house. Again, summer is not the time to be in an attic in Phoenix.
I’ll follow up with another post once this is finished. The next zone will probably be the garage because I am out there quite a bit doing projects.
The really cool thing is that I am also using these as audio outputs for my home automation. I can set a wakeup alarm, yell at my dogs remotely, announce my arrival with walkout music. It’s so much fun!
HP ProCurve 48-Port Gigabit PoE Switch
Another eBay special HP ProCurve 48-Port Gigabit PoE Switch.
This one is used for supplying a network connection to the devices in the rack(listed below).
Horizontal Rack Mount Cable Management Unit
Just another 1U Horizontal Cable Management Unit. Keeps it neat and tidy!
Dell PowerEdge R710
The Dell PowerEdge R710 is my VM server.
I was running 2 of these but recently removed one to make room for the second AudioSource AMP1200. I run most of my “production” stuff in AWS so I am ok with that.
Here are the specs…
| Model | Dell PowerEdge R710 Gen 2 |
| Processor | 2 x Intel Xeon X5650 - 2.66GHz Six Core Processors |
| Storage | 4 x 1TB Samsung SSDs |
| RAM | 64GB(it’s expensive!) |
| Ethernet | Onboard Quad Gigabit 1000 Pro |
| Operating System | ProxMox |
Some of the VMs I run at home include a Plex Server, Jenkins, Pi-hole, random VMs for tinkering and a VM dedicated to running docker containers.
I don’t run anything too crazy. It handles pretty much anything I can throw at it. It makes my spare room really hot and really loud. Fun stuff!
Intel NUC
My Intel NUC has an i5-8259U with 16GB of RAM.
The NUC is used for my Blue Iris Server. Blue Iris is a really great piece of video security/capture NVR software.
Unfortunately, Blue Iris only runs on Windows. Feel free to recommend something but I’ve tried many Linux alternatives and cannot find anything better in terms of stability and ease of setup.
Aside from running on Windows, I’d say my only other issue with Blue Iris is that it eats CPU like crazy. It makes sense but it’s a real pain in the ass. It took me a while to get my setup tuned in so that it wasn’t constantly pegged at 100% CPU usage. I did pretty well though. I’m currently idling at 18% CPU which is amazing considering I have 10 network cameras continuously recording to Blue Iris.
NAS Devices(from left to right)
Synology DS214play
This is an older NAS and was actually my first. It currently has 2 WD Red 3TB Drives. I use this mainly for personal storage.
QNAP TS-251
I use this NAS primarily as network storage for my virtual machines. It has been upgraded to 8GB of RAM but and has 2 WD Red 2TB Drives.
QNAP TS-251+
My media library is held on this NAS. The Plex server uses this the most. It has 2 WD Red 8TB Drives.
Each device is running in a RAID 1 configuration. Important things are backed up to another NAS in a place that isn’t my house.
I definitely prefer the QNAPs over the Synology. Hardware is way behind on the Synology and in my opinion QNAP just has much better software. Having said that, the Synology has been a reliable basic network storage device.
ARRIS Surfboard Modem
It’s just an ARRIS Surfboard SB6183. Not much to say about this one. My internet at home is only 100Mbps down and 10Mbps up. So this modem gets the job done.
As you can see, I have probably spent a bunch of money on this stuff but it didn’t all happen at once. There are plenty of places to get used equipment. I got most of my new equipment from Amazon but almost all of my used equipment came from eBay for very reasonable prices.
You can also check local colleges. They frequently decommission servers and network equipment and then auction it off.
Craigslist is another good option. I only stayed away from this option because I am lazy and I’d rather not deal with people or driving around town.
You can also check things like r/homelabsales/ on Reddit.
I’ll make new posts as I do new things to my homelab so stay tuned! You can message me on Twitter if you have any questions.