How To Use iPerf To Test Network Speed From Host To Host

How To Test Network Speed With iPerf
You probably ended up on this page because you were searching for a way to test your network speed from one host to another. The best tool I have found for this job is iperf.
What is iPerf?
iperf is an open source network testing tool used to measure bandwidth from host to host. It is licensed under the BSD license.
It is available for most operating systems. Check the download page here to see if your OS is supported.
You can test TCP or UDP throughput using iperf.
Tests can run for a set amount of time or using a set amount of data.
iPerf uses a client/server model. The server can accept connections from multiple clients on different ports and can even run as a daemon.
I’ve used iPerf at for a couple of reasons. One reason was to verify that the connection between 2 hosts was as I expected over a VPN connection. This can be handy if you need to estimate the time it will take for a backup job to run from host to host.
My favorite use for iPerf is testing wifi. To do this I keep a hardwired host running in my homelab that runs an iPerf server in Daemon Mode. That means it is always running in the background and waiting for a client to connect to it.
If I am walking around using my laptop(or phone) wirelessly, I can generate traffic using the client and send it to the hardwired server to see what speeds I am getting.
This is helpful if you are trying to troubleshoot wifi dead zones.
Maybe you have a coworker or family member complaining that their wireless internet is too slow. You can bring your laptop to the dead zone and move your access point(s) around. Every time you move the access point, run another iPerf test with the laptop in the wifi dead zone. Continue this process until you see the connection improve.
If you are setting up a new wireless network for a client or at home, you can do the same to make sure you are happy with your coverage throughout the entire site. This can help you decide if you need to move an access point to another location or even get another access point for the site.
How to install iPerf on Mac, CentOS, and iOS
We will actually be using iperf3 for this tutorial. iPerf3 is currently the newest version of iPerf.
It’s important to note that iPerf3 is not backwards compatible with other versions of iPerf.
Mac
To install iperf3 on your Mac, you’ll want to have homebrew installed. You can do this by running the following command.
/usr/bin/ruby -e "$(curl -fsSL https://raw.githubusercontent.com/Homebrew/install/master/install)"
Now that we’ve installed Homebrew, we can run the next command to install iperf3
brew install iperf3
CentOS
Run the following command to install iperf3 using yum.
yum install iperf3
iOS
Download iPerf 3 Wifi Speed Test from the iOS App Store. I should note that is only useful as a client. You still need to have a host on the network running as a server to send data to.
How to Use iPerf
As mentioned before, iPerf needs to run a client and a server. That means you need 2 hosts. My server is always connected to my network with a wired connection. This allows me to only worry about the connection wireless from the client. It’s no fun troubleshooting the connection on 2 hosts at once.
I’ll run through some examples below.
For all of these demos, some-host will always be running the server. Clients will be run from mac-mini and my iPhone.
iPerf TCP Client and Server
Run iperf3 -s to start the iperf server.
[tynick@some-host ~]$ iperf3 -s
-----------------------------------------------------------
Server listening on 5201
-----------------------------------------------------------
You should see something similar to the snippet above. It is telling you that the server is listening and on what port. Per iPerf documentation, the default port for iPerf 3 is 5201. iPerf 2 default port is 5001. More on changing the port later.
Now we are going to move over to one of our clients.
Run the following command.
iperf3 -c 192.168.1.210
Replace that IP address with the IP of the iPerf server.
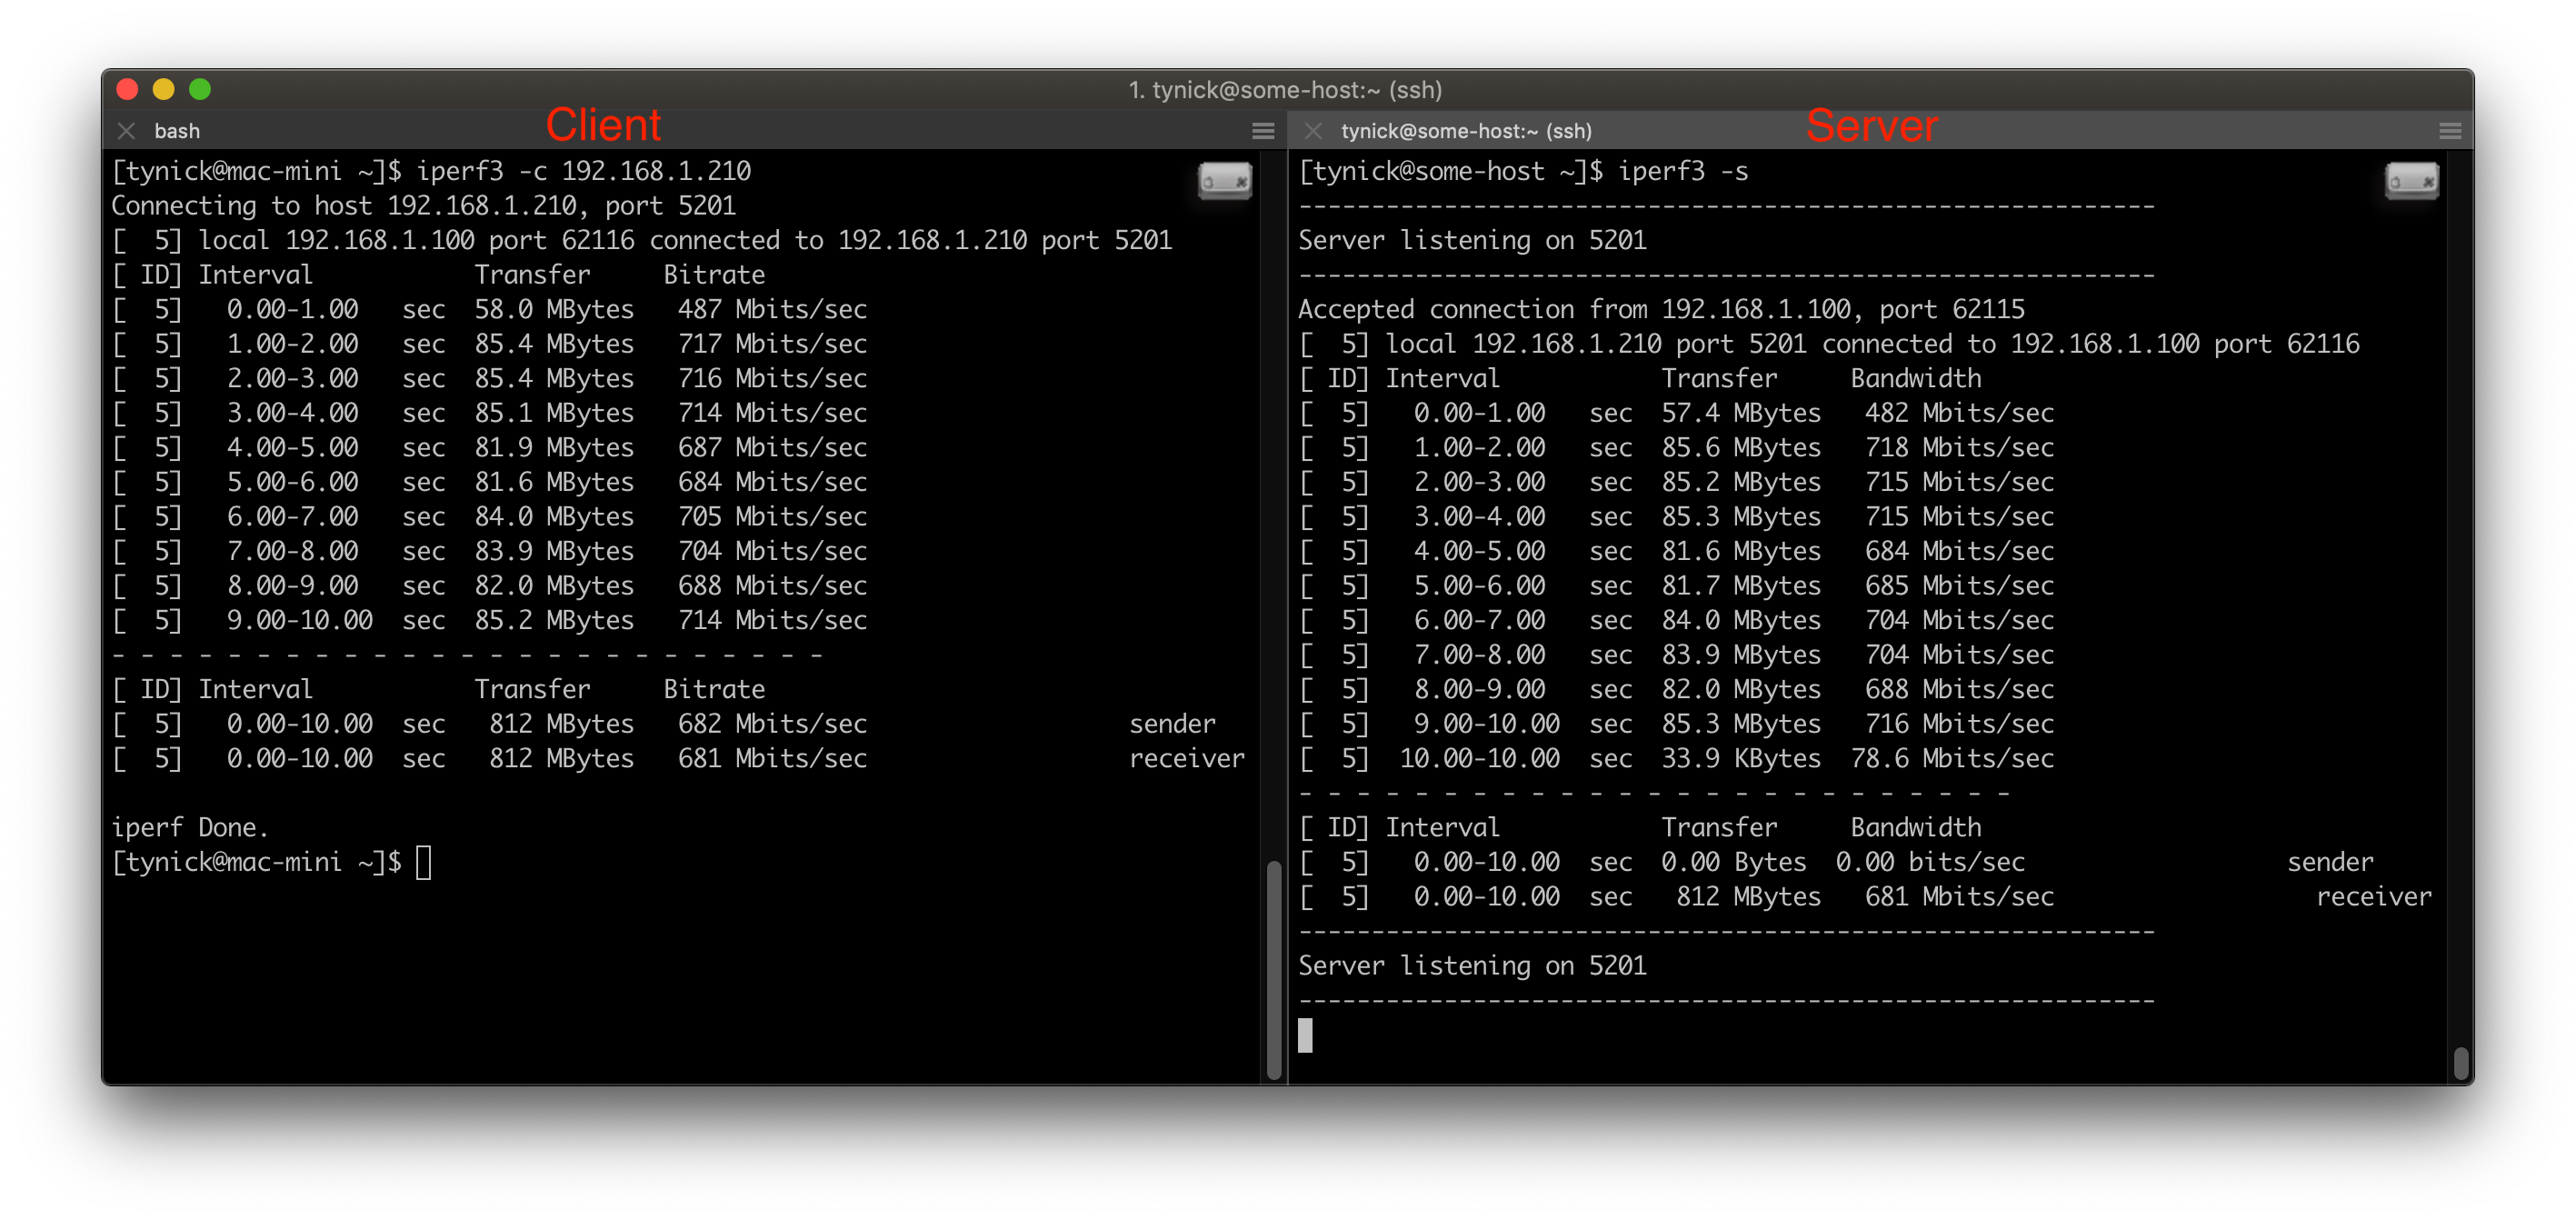
On the left you can see the iPerf 3 client is sending data to the iPerf 3 server on the right.
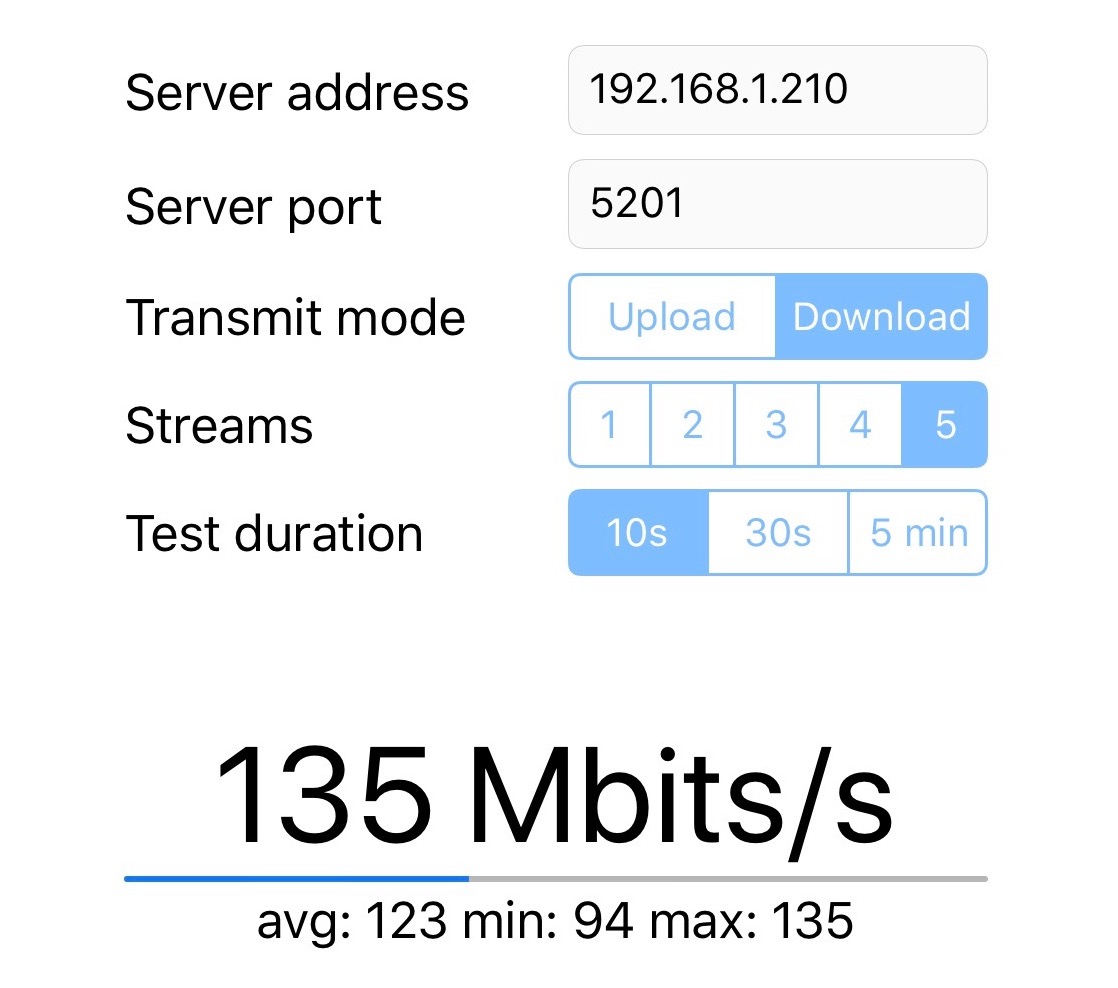
This screenshot is from the client running on my iPhone connecting to the iPerf 3 server. It shows that I am currently downloading from the server at 135 Mbits/s.
You can now walk around your house or office and find all the dead Wifi spots.
iPerf UDP Client and Server
When testing with UDP, no changes are required on the server side. Continue using iperf3 -s to run the server.
On the client side we just need to add the -u flag to start sending UDP packets instead of TCP packets. See below.
iperf3 -c 192.168.1.210 -u
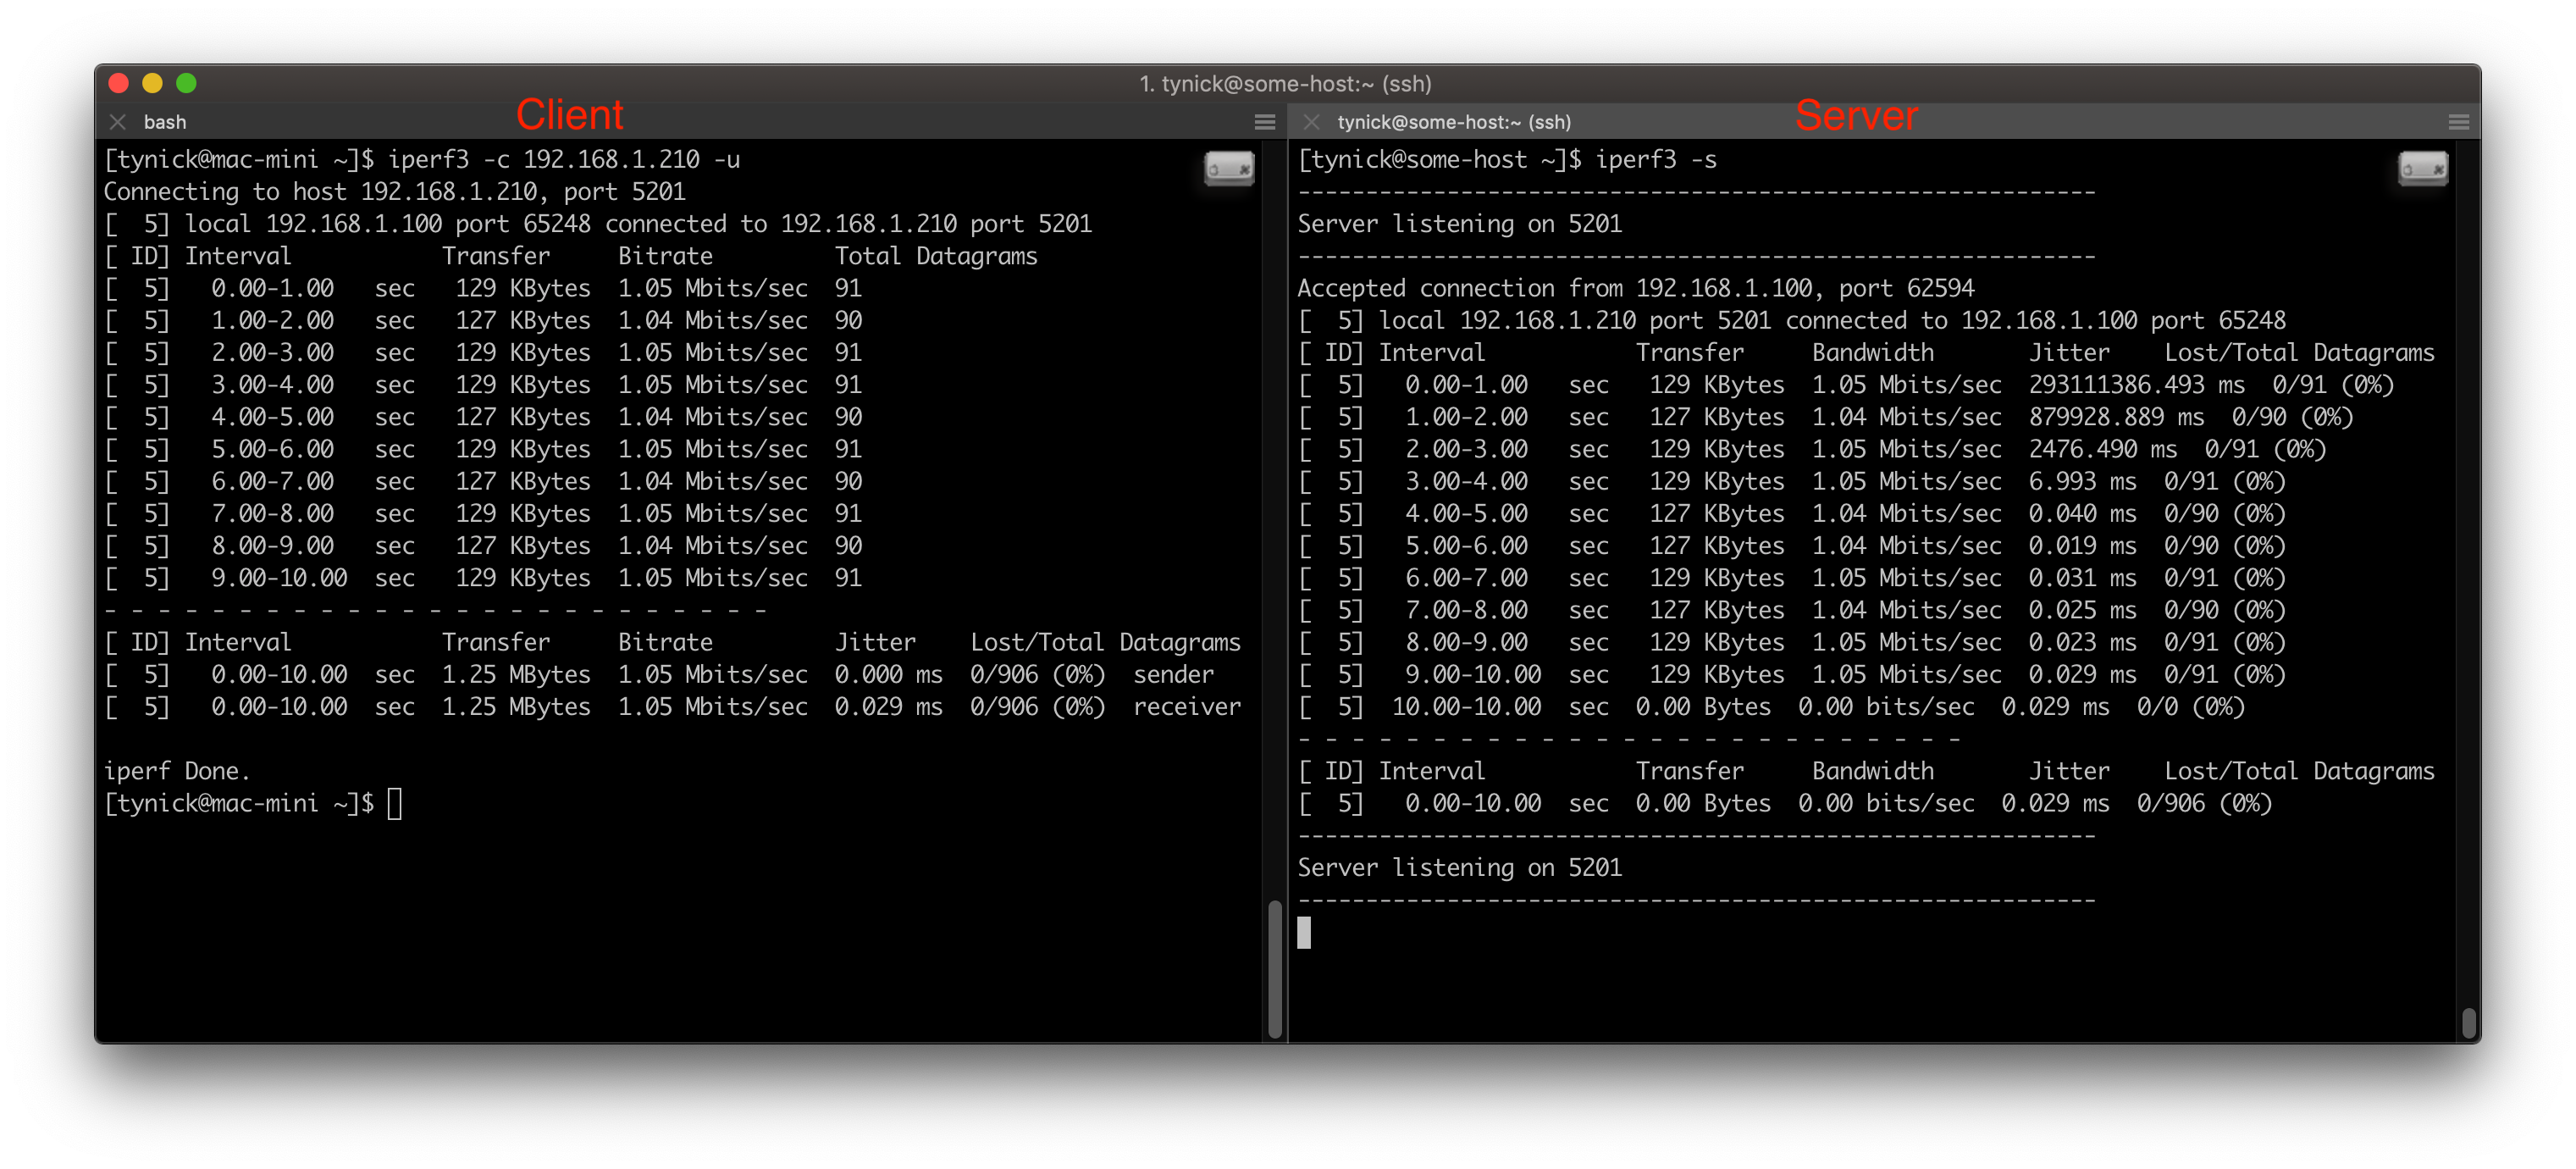
As you can see, UDP was faster than TCP from the same 2 hosts. This is pretty normal. I’m not a network engineer but I’ll try to explain anyway so someone on internet can tell me I am wrong.
The TCP protocol checks each time to make sure the target recieved the packets that the origin sent.
UDP on the other hand, just sends packets like a crazy person. It doesn’t care or check to see if the packets are being received. UDP just wants to send packets quickly. UDP is most commonly used for video streaming services. There is no error correction with UDP. If you lose a frame of a video during transfer, it wouldn’t make much sense to show the frame later on in the movie.
Changing iPerf Port
You may run into a situation where you want to run iPerf on a different port. This is pretty easily done by adding the -p flag. You will need to do this on both the client and the server.
Change iPerf Server Port
This will change the port that the iPerf Server is listening on.
iperf3 -s -p 5202
Change iPerf Client Port
This will change the port that the iPerf Client connects to.
iperf3 -c 192.168.1.210 -p 5202
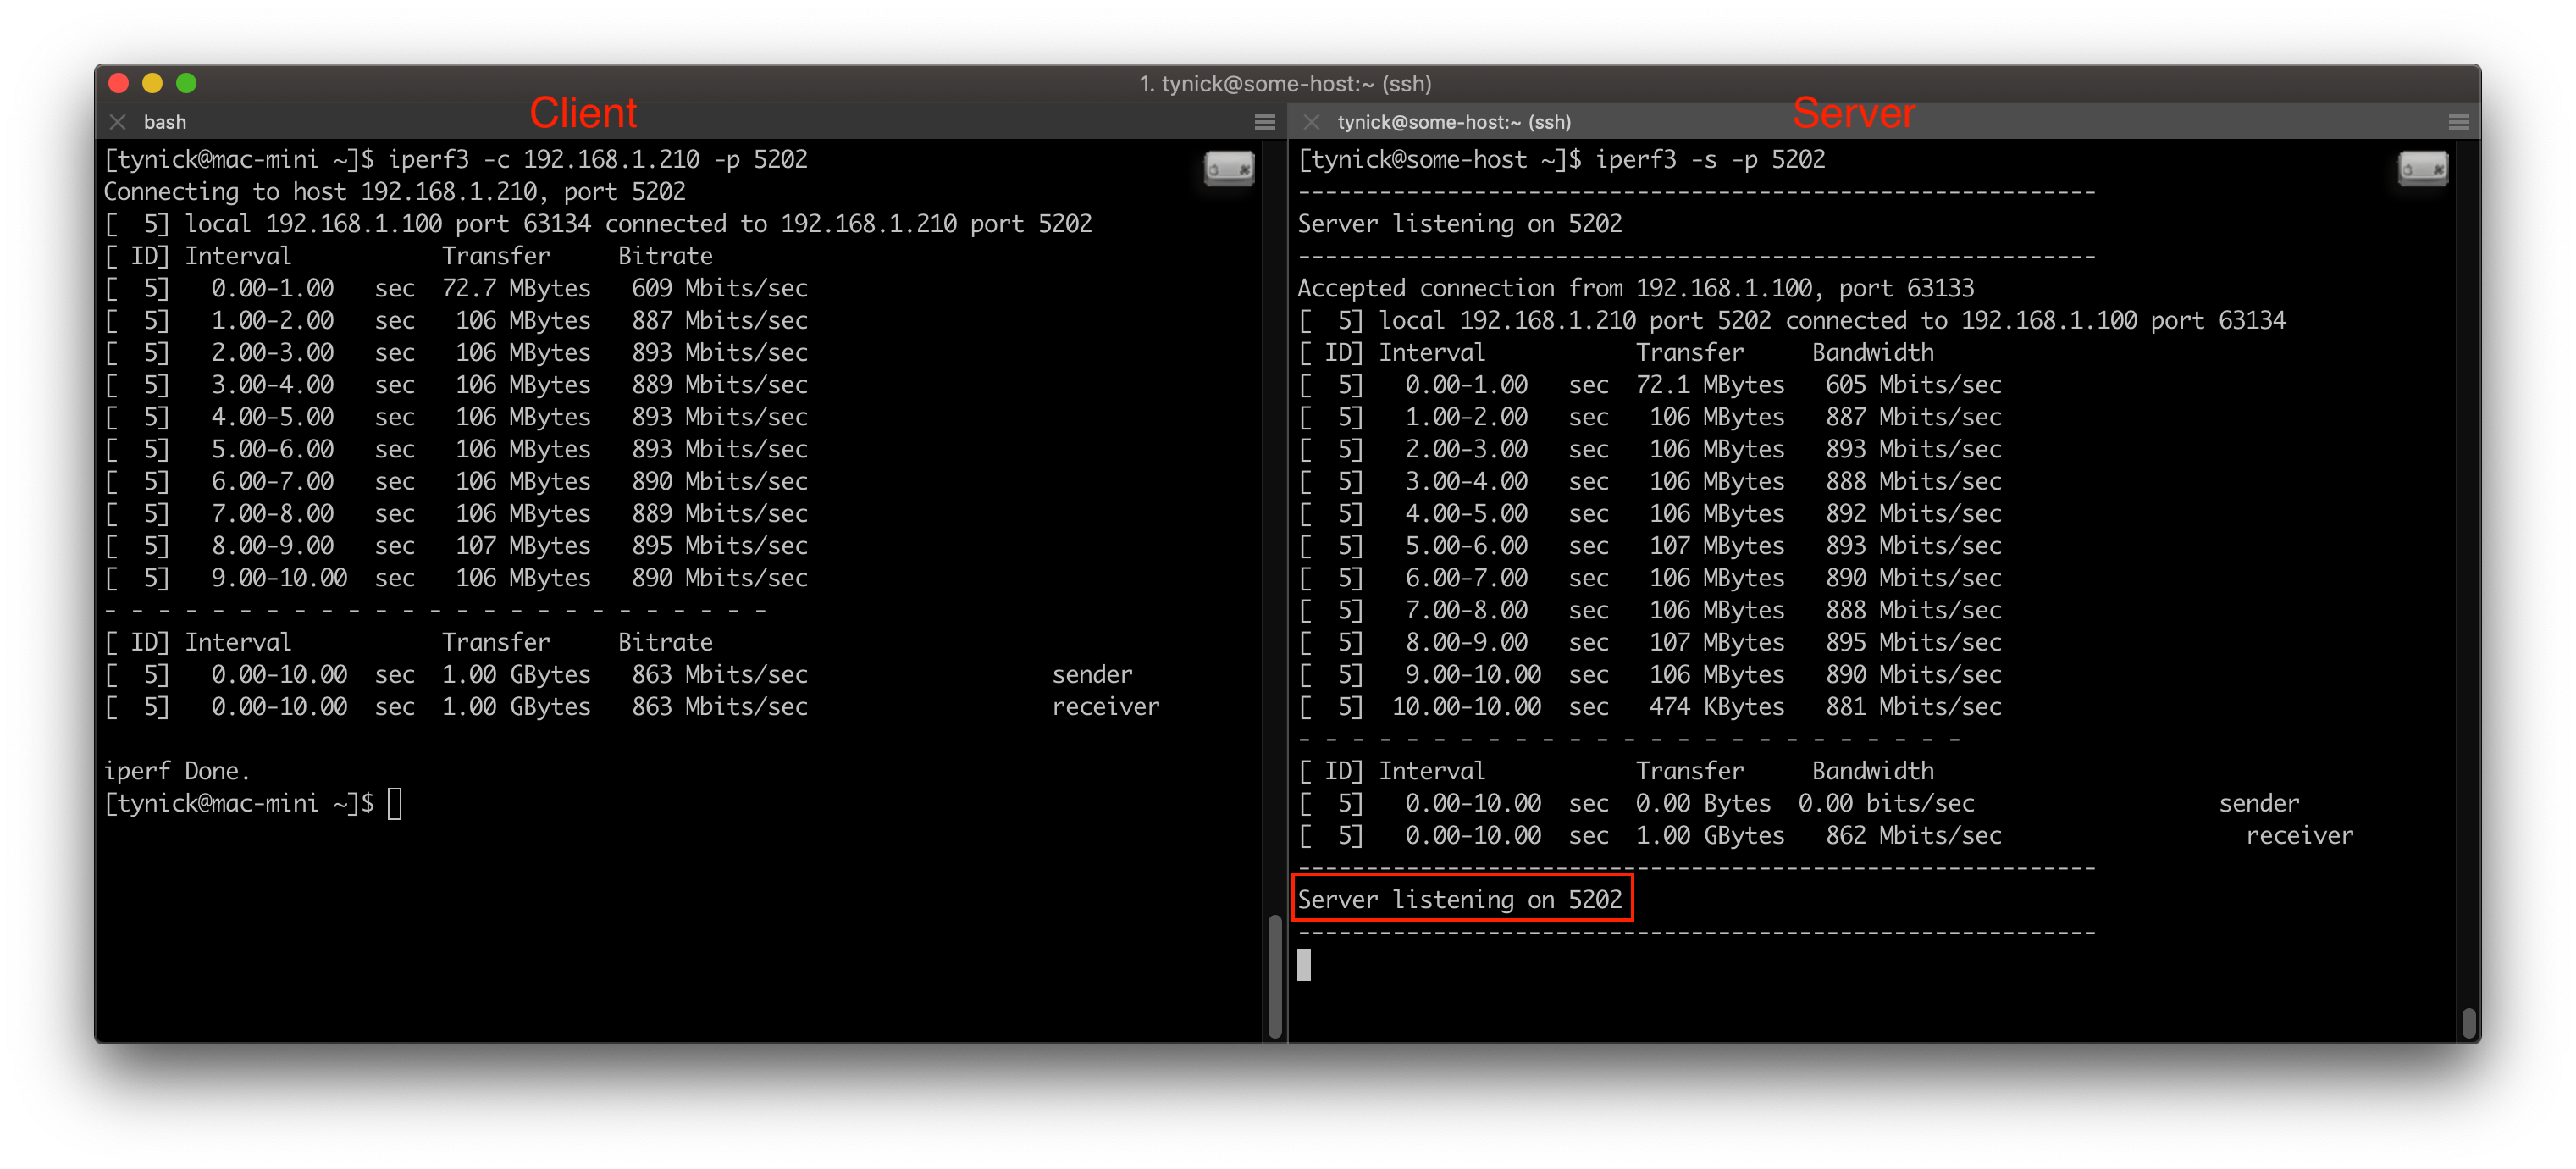
You can see that the client is connected to an iPerf server listening on port 5202.
Running iPerf Server in Daemon Mode
Daemon mode is used when you want to keep your iPerf Server up and running without having to SSH in each time to start it up.
It will run in the background just waiting for connections from iPerf Clients.
To do this, run the server command with the -D flag from the server host.
iperf3 -s -D
You wont see anything after that. It should look something like this…
[tynick@some-host ~]$ iperf3 -s -D
[tynick@some-host ~]$

There are no changes to the client side when running in this configuration. Just connect as you normally would from the iPerf Client.
Check if iPerf is Running in Daemon Mode
At some point you will want to see if iPerf is running in the background.
The obvious solution is to use the ps command.
[tynick@some-host ~]$ ps aux | grep iperf | grep -v grep
[tynick@some-host ~]$ iperf3 -s -D
[tynick@some-host ~]$ ps aux | grep iperf | grep -v grep
tynick    5129  0.0  0.0   9612   332 ?        Ss   17:35   0:00 iperf3 -s -D
[tynick@some-host ~]$
However, iPerf 3.1 offers a new feature that creates a PID file when it starts.
[tynick@some-host ~]$ ls
[tynick@some-host ~]$ iperf3 -s -D --pidfile /home/tynick/iperf.pid
[tynick@some-host ~]$ ls
iperf.pid
We can cat that file to get the iPerf PID.
[tynick@some-host ~]$ cat iperf.pid
5141
Just to show you that it is the iPerf PID…
[tynick@some-host ~]$ ps aux | grep iperf | grep -v grep
tynick    5141  0.0  0.0   9612   332 ?        Ss   17:48   0:00 iperf3 -s -D --pidfile /home/tynick/iperf.pid
[tynick@some-host ~]$
It also removes the PID file when the process dies.
[tynick@some-host ~]$ ls -la /home/tynick/iperf.pid
-rw-------. 1 tynick tynick 5 Jul  8 18:14 /home/tynick/iperf.pid
[tynick@some-host ~]$ pkill iperf
[tynick@some-host ~]$ ls -la /home/tynick/iperf.pid
ls: cannot access /home/tynick/iperf.pid: No such file or directory
[tynick@some-host ~]$
Pretty useful feature if you are looking to automate iPerf or need a way for a monitoring check to see if iPerf is still running.
Stopping iPerf Server in Daemon Mode
Eventually you will probably want to stop the iPerf Server running in Daemon Mode. This is as simple as running pkill iperf.
[tynick@some-host ~]$ iperf3 -s -D
[tynick@some-host ~]$ ps aux | grep iperf
tynick    5056  0.0  0.0   9612   332 ?        Ss   17:10   0:00 iperf3 -s -D
tynick    5058  0.0  0.0 112708   944 pts/0    S+   17:10   0:00 grep --color=auto iperf
[tynick@some-host ~]$ pkill iperf
[tynick@some-host ~]$ ps aux | grep iperf
tynick    5061  0.0  0.0 112708   940 pts/0    S+   17:10   0:00 grep --color=auto iperf
[tynick@some-host ~]$
You could also use the PID file you just learned how to make. Here is a quick one-liner to kill iPerf if you are using a PID file.
kill $(cat /home/tynick/iperf.pid)
[tynick@some-host ~]$ iperf3 -s -D --pidfile /home/tynick/iperf.pid
[tynick@some-host ~]$ ps aux | grep iperf | grep -v grep
tynick    5253  0.0  0.0   9612   332 ?        Ss   21:20   0:00 iperf3 -s -D --pidfile /home/tynick/iperf.pid
[tynick@some-host ~]$ kill $(cat /home/tynick/iperf.pid)
[tynick@some-host ~]$ ps aux | grep iperf | grep -v grep
[tynick@some-host ~]$
As you can see, iPerf is an extremely useful networking tool.
If you’d like to do some more learning, here are the iPerf command line options in their entirety from the iPerf documentation page
iPerf General Options
| Command Line Option | Description |
|---|---|
| -p, –port n | The server port for the server to listen on and the client to connect to. This should be the same in both client and server. Default is 5201. |
| -f, –format [kmKM] | A letter specifying the format to print bandwidth numbers in. ‘k’ = Kbits/sec ‘K’ = KBytes/sec ’m’ = Mbits/sec ’M’ = MBytes/sec |
| -i, –interval n | Sets the interval time in seconds between periodic bandwidth, jitter, and loss reports. If non-zero, a report is made every interval seconds of the bandwidth since the last report. If zero, no periodic reports are printed. Default is zero. |
| -F, –file name | client-side: read from the file and write to the network, instead of using random data server-side: read from the network and write to the file, instead of throwing the data away. |
| -A, –affinity n/n,m-F | Set the CPU affinity, if possible (Linux and FreeBSD only). On both the client and server you can set the local affinity by using the n form of this argument (where n is a CPU number). In addition, on the client side you can override the server’s affinity for just that one test, using the n,m form of argument. Note that when using this feature, a process will only be bound to a single CPU (as opposed to a set containing potentialy multiple CPUs). |
| -B, –bind host | Bind to host, one of this machine’s addresses. For the client this sets the outbound interface. For a server this sets the incoming interface. This is only useful on multihomed hosts, which have multiple network interfaces. |
| -V, –verbose | Give more detailed output |
| -J, –json | Output in JSON format |
| –logfile file | Send output to a log file. (new in iPerf 3.1) |
| –d, –debug | Emit debugging output. Primarily (perhaps exclusively) of use to developers. |
| -v, –version | Show version information and quit. |
| -h, –help | Show a help synopsis and quit. |
iPerf Server Options
| Command Line Option | Description |
|---|---|
| -s, –server | Run iPerf in server mode. (This will only allow one iperf connection at a time) |
| -D, –daemon | Run the server in background as a daemon. |
| -I, –pidfilefile | Write a file with the process ID, most useful when running as a daemon. (new in iPerf 3.1) |
iPerf Client Options
| Command Line Option | Description |
|---|---|
| -c, –client host | Run iPerf in client mode, connecting to an iPerf server running on host. |
| –sctp | Use SCTP rather than TCP (Linux, FreeBSD and Solaris). (new in iPerf 3.1) |
| -u, –udp | Use UDP rather than TCP. See also the -b option. |
| -b, –bandwidth n[KM] | Set target bandwidth to n bits/sec (default 1 Mbit/sec for UDP, unlimited for TCP). If there are multiple streams (-P flag), the bandwidth limit is applied separately to each stream. You can also add a ’/’ and a number to the bandwidth specifier. This is called “burst mode”. It will send the given number of packets without pausing, even if that temporarily exceeds the specified bandwidth limit. |
| -t, –time n | The time in seconds to transmit for. iPerf normally works by repeatedly sending an array of len bytes for time seconds. Default is 10 seconds. See also the -l, -k and -n options. |
| -n, –num n[KM] | The number of buffers to transmit. Normally, iPerf sends for 10 seconds. The -n option overrides this and sends an array of len bytes num times, no matter how long that takes. See also the -l, -k and -t options. |
| -k, –blockcount n[KM] | The number of blocks (packets) to transmit. (instead of -t or -n) See also the -t, -l and -n options. |
| -l, –length n[KM] | The length of buffers to read or write. iPerf works by writing an array of len bytes a number of times. Default is 128 KB for TCP, 8 KB for UDP. See also the -n, -k and -t options. |
| -P, –parallel n | The number of simultaneous connections to make to the server. Default is 1. |
| -R, –reverse | Run in reverse mode (server sends, client receives). |
| -w, –window n[KM] | Sets the socket buffer sizes to the specified value. For TCP, this sets the TCP window size. (this gets sent to the server and used on that side too) |
| -M, –set-mss n | Attempt to set the TCP maximum segment size (MSS). The MSS is usually the MTU - 40 bytes for the TCP/IP header. For ethernet, the MSS is 1460 bytes (1500 byte MTU). |
| -N, –no-delay | Set the TCP no delay option, disabling Nagle’s algorithm. Normally this is only disabled for interactive applications like telnet. |
| -4, –version4 | only use IPv4. |
| -6, –version4 | only use IPv6. |
| -S, –tos n | The type-of-service for outgoing packets. (Many routers ignore the TOS field.) You may specify the value in hex with a ‘0x’ prefix, in octal with a ‘0’ prefix, or in decimal. For example, ‘0x10’ hex = ‘020’ octal = ‘16’ decimal. The TOS numbers specified in RFC 1349 are: IPTOS_LOWDELAY minimize delay 0x10 IPTOS_THROUGHPUT maximize throughput 0x08 IPTOS_RELIABILITY maximize reliability 0x04 IPTOS_LOWCOST minimize cost 0x02 |
| -L, –flowlabel n | Set the IPv6 flow label (currently only supported on Linux). |
| -Z, –zerocopy | Use a “zero copy” method of sending data, such as sendfile(2), instead of the usual write(2). This uses much less CPU. |
| -O, –omit n | Omit the first n seconds of the test, to skip past the TCP slowstart period. |
| -T, –title str | Prefix every output line with this string. |
| -C, –linux-congestion algo | Set the congestion control algorithm (Linux only for iPerf 3.0, Linux and FreeBSD for iPerf 3.1). |
It’s best to yell at me on Twitter if you have any questions.
You can subscribe to my mailing list below or follow me on Twitter if you want me to notify you when I make a new post.
You can also Buy Me A Coffee to help keep me going!
Any of this stuff would be really appreciated.