PynamicDNS - Dynamic DNS With Raspberry Pi, Python and AWS

As an Amazon Associate I earn from qualifying purchases. Purchasing through my Amazon links helps me keep the site up and running.
PynamicDNS - Self Hosted Dynamic DNS
Having a homelab without a static IP can be a pain.
I frequently need to access servers and/or storage on my internal network. I do this by connecting to a VPN that I host inside my network.
Unfortunately, I have a residential internet plan which does not include an option for a static IP.
Cox tends to change my IP address more than I’d like. This makes things like my VPN unavailable until I am able to find out what my IP has changed to.
I have ways of finding my IP remotely but it’s still annoying to change it if you are without a computer.
Everyone has different reasons for needing to get to their home servers or computers.
- Web Server Hosting
- Game Server Hosting
- VPN Hosting
- Remote Desktop
- Access Files
The list goes on but having a dynamic IP address is a pretty common issue for nerds like me.
This can easily be solved with a Dynamic DNS service. There are many out there but the most popular companies I’ve seen used are Dyn, DuckDNS, and No-IP.
Their prices range from free, a couple of dollars per month and all the way up to $55 per year.
How Dynamic DNS Works
These DDNS companies all work pretty much the same way.
They take their domain name someddnscompany.com and assign you a subdomain like yoursubdomain.someddnscompany.com.
Next, you install some sort of agent on a host that you have running at home. This can be your PC, router or even a Raspberry Pi.
The DDNS agent then checks your public IP on a scheduled interval. If it finds that your IP has changed, it will update the value of the yoursubdomain.someddnscompany.com DNS record.
It’s very simple.
What’s The Problem DDNS Services?
As mentioned before, some of them cost money. $55 per year is a big expense if you are just playing games at home and want your friends to be able to access your Minecraft server.
Others are free but there are downsides.
If you are hosting a family photo album at your house, you might use familyphotos.someddnscompany.com to share links with your family on Facebook. You send a link to a few relatives and then Facebook might flag the post as spam.
This happens because a lot of people on the internet do malicious things. someddnscompany.com cannot control what other people are doing with the host on scammers.someddnscompany.com.
Eventually, large companies (Google, Facebook, Twitter…) will put someddnscompany.com on a blacklist because of whatever malicious things scammers.someddnscompany.com was doing. Now your familyphotos.someddnscompany.com is also seen as malicious and flagged as spam.
Guilty by association.
Luckily you can use PynamicDNS to run your own dynamic DNS service at home with a Raspberry Pi!
What is PynamicDNS
I wrote PynamicDNS in Python to deal with the issue of not having a static IP address.
I use AWS Route53 to purchase my domain names. So naturally, I use AWS Route53 to control DNS for those domains.
If I have the domain myfamilyphotos.mydomain.com resolving to my home IP address. PynamicDNS will update the IP address in AWS Route53 if it ever changes.
You don’t need to do a thing as long as the Pi is running and connected to the internet.
Things You Need
I’ll run you through everything needed to get started and then move on to configuration.
| Part | Comment |
|---|---|
| Raspberry Pi | I’ve seen them on sale quite a bit lately so check the price if you don’t already have one laying around. Any version will work but I’m using a Raspberry Pi 4. |
| AWS Account | You will get a lot of free services for the first year. You should do this even if you aren’t going to use PynamicDNS. AWS is awesome! |
Raspberry Pi
Everything in this tutorial should work on pretty much any Linux host with a few adjustments. However, Raspberry Pi is the PERFECT device for dealing with dynamic DNS. Raspberry Pis are always on and consumes very little power compared to a regular computer or server.
Pis are also very capable and could be run alongside Pi-hole and/or PiVPN.
If you were searching for a dynamic DNS solution, you are probably the type that already has one sitting in a junk drawer. If not, head over to Amazon.com!
The tutorial and script have only been tested on a Raspberry Pi.
AWS (Amazon Web Services) Account
If you don’t have an AWS account already, the good news is that it is free.
The bad news is that you will need to purchase a domain name through AWS Route53. A standard .com is going to cost you $12 per year.
AWS Route53 will be handling all of your DNS requests and there is a very small charge for this.
AWS charges $0.50 per hosted zone (domain name) per month. They also charge $0.40 per million queries, for the first 1 Billion queries, per month. This is prorated.
To put this into perspective, last month tynick.com had 103,124 queries. Meaning, 103,124 things/people/websites/servers/computers/browsers tried to resolve something from tynick.com last month.

The cost for this was $0.50 for the tynick.com hosted zone and $0.04 for 103,124 queries (screenshot above). I can’t imagine a reason you’d have that many queries if you were using Route53 for just PynamicDNS.
Here is what you can expect your AWS bill to be each month running PynamicDNS. Even though you pay the $12 for a domain name upfront, I’ve broken it down into a monthly cost.
| AWS Service | Cost Per Month |
|---|---|
| Route53 Domain Name | $1.00 |
| Route53 Queries | $0.01 |
| Route53 Hosted Zone | $0.50 |
| TOTAL | $1.51 |
This is much cheaper than the paid dynamic DNS providers and you also get your own completely custom domain name. Feel free to verify these costs on the Route53 pricing page.
Now that you understand what you need and the costs involved, let’s start configuring!
Configuring AWS
I will start here assuming that you’ve already purchased a domain name through Route53.
Route53
Head over to the Hosted Zones portion of Route53. AWS should have created a hosted zone for you when you purchased your domain name.
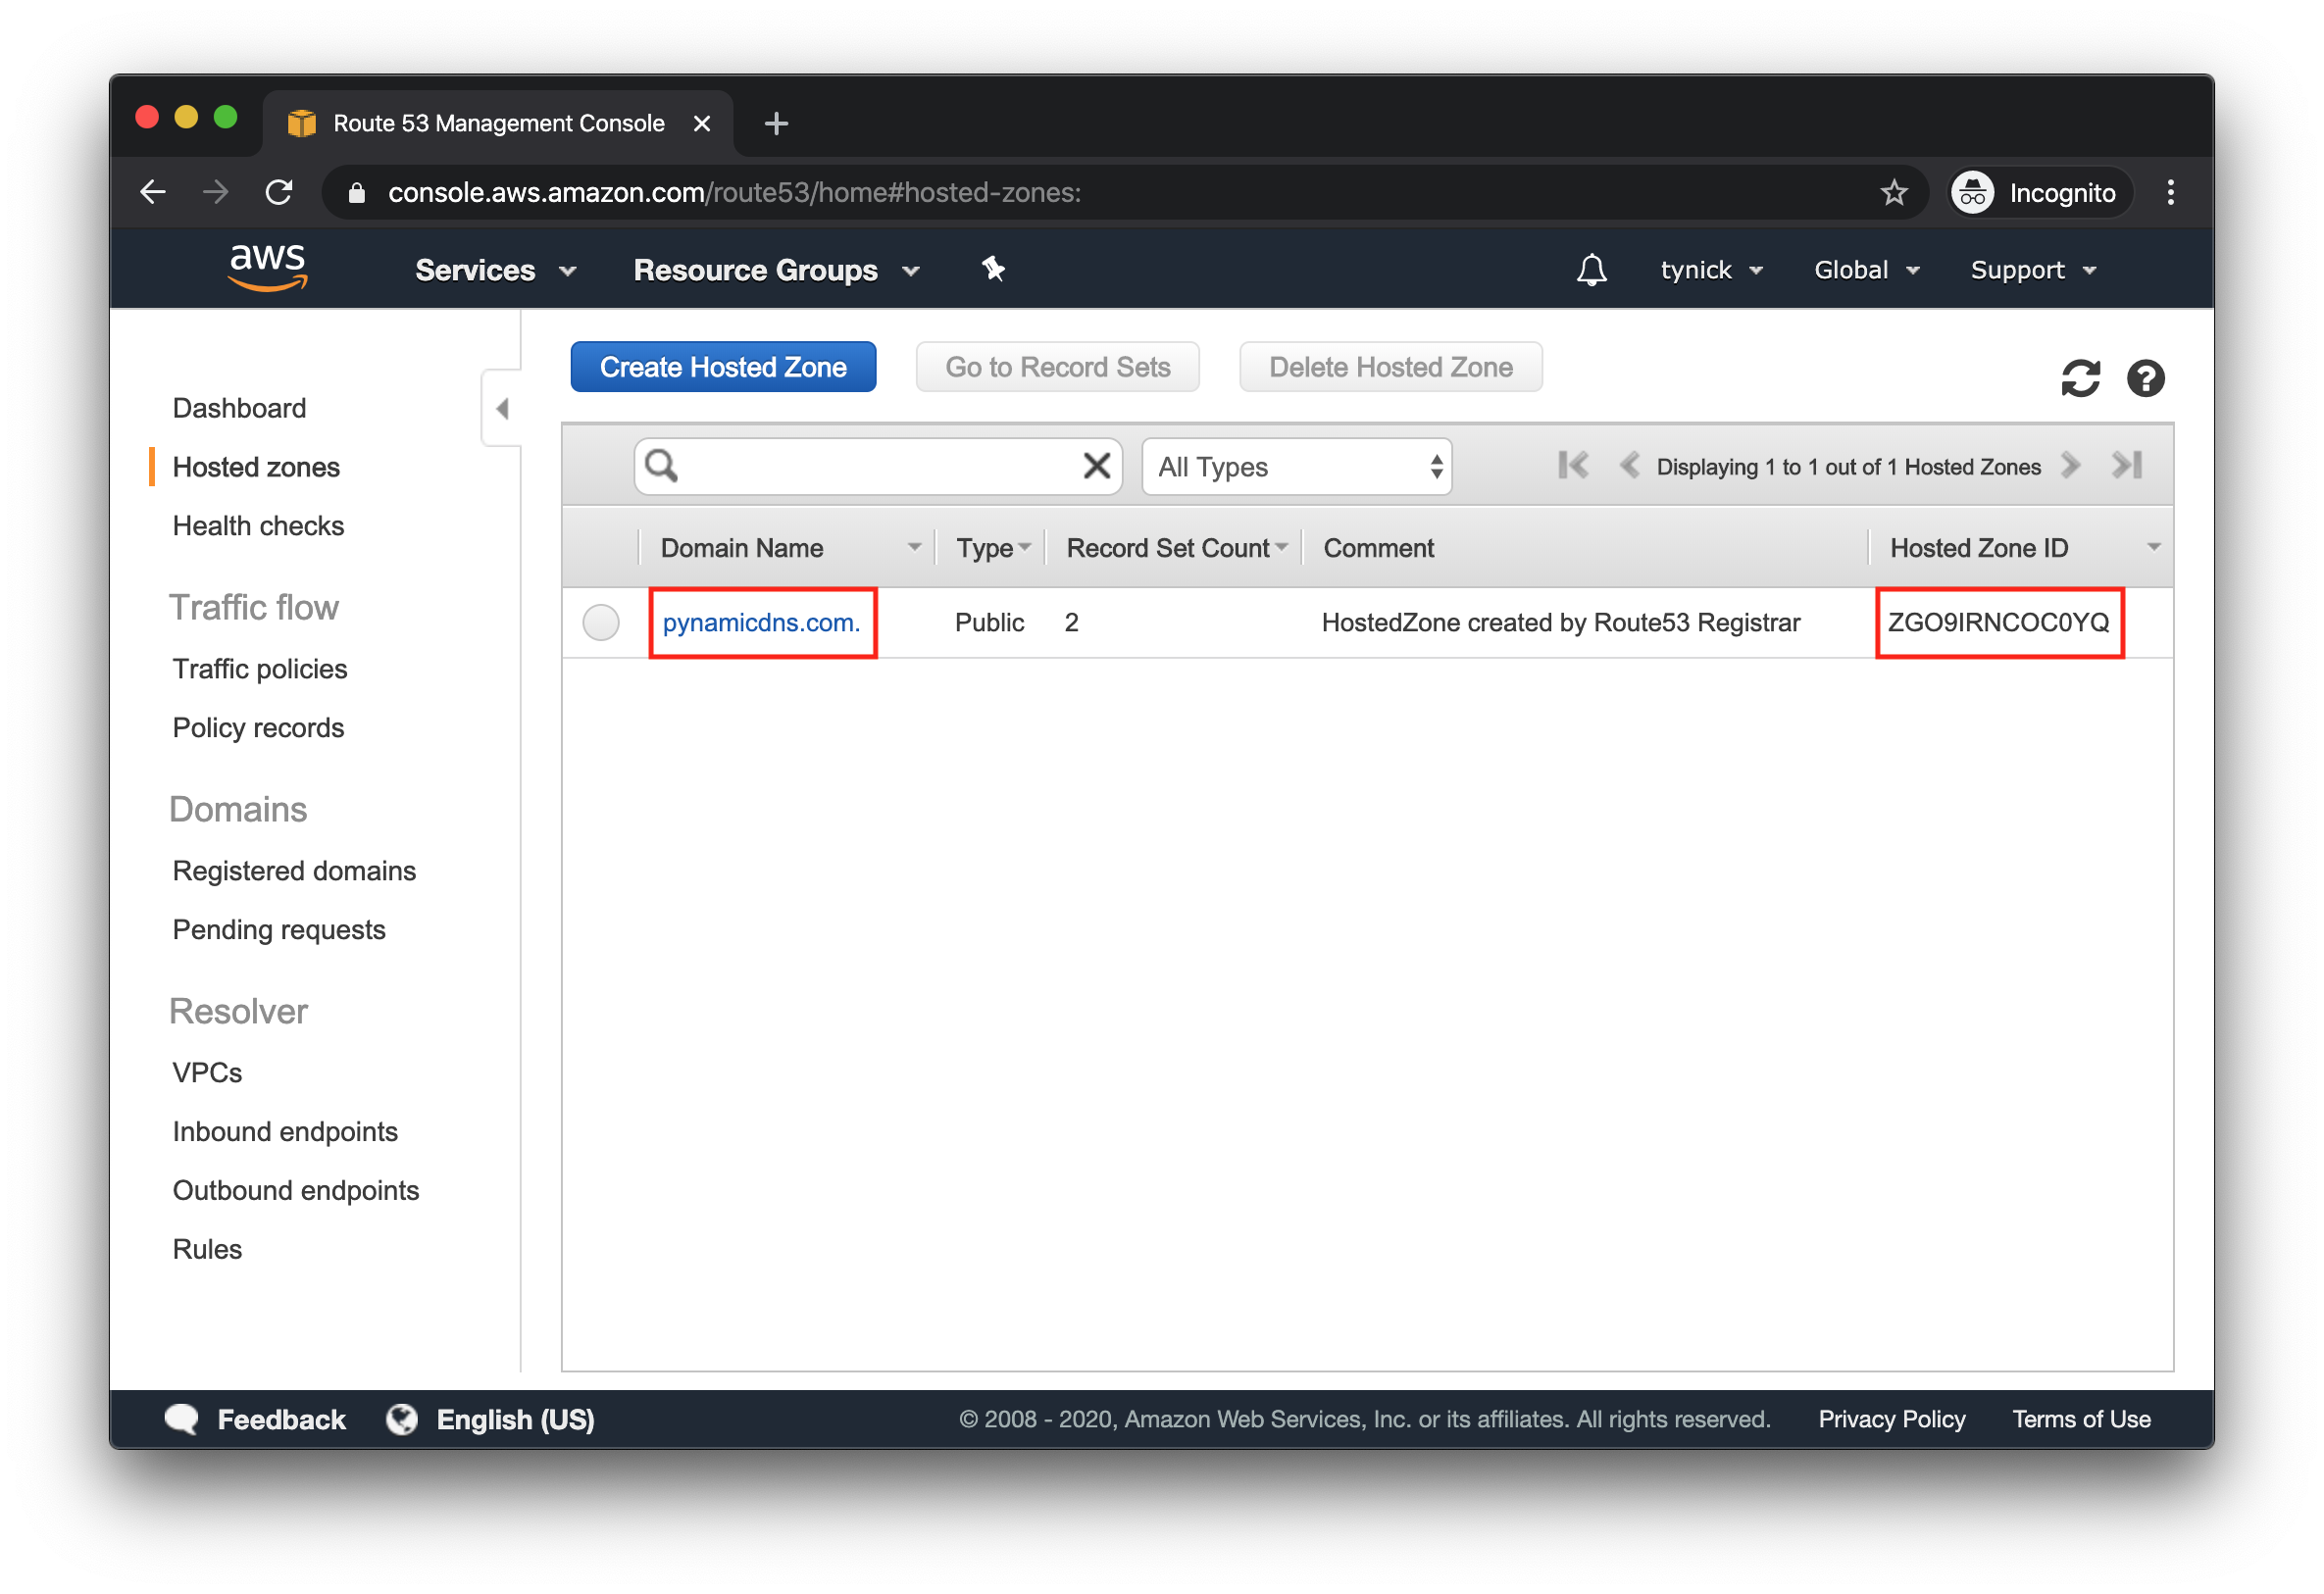
Copy the Hosted Zone ID somewhere. You will need it later.
Click on the Domain Name to view all record sets for that Hosted Zone.
Your screen should look very similar to what you see in the screenshot above.
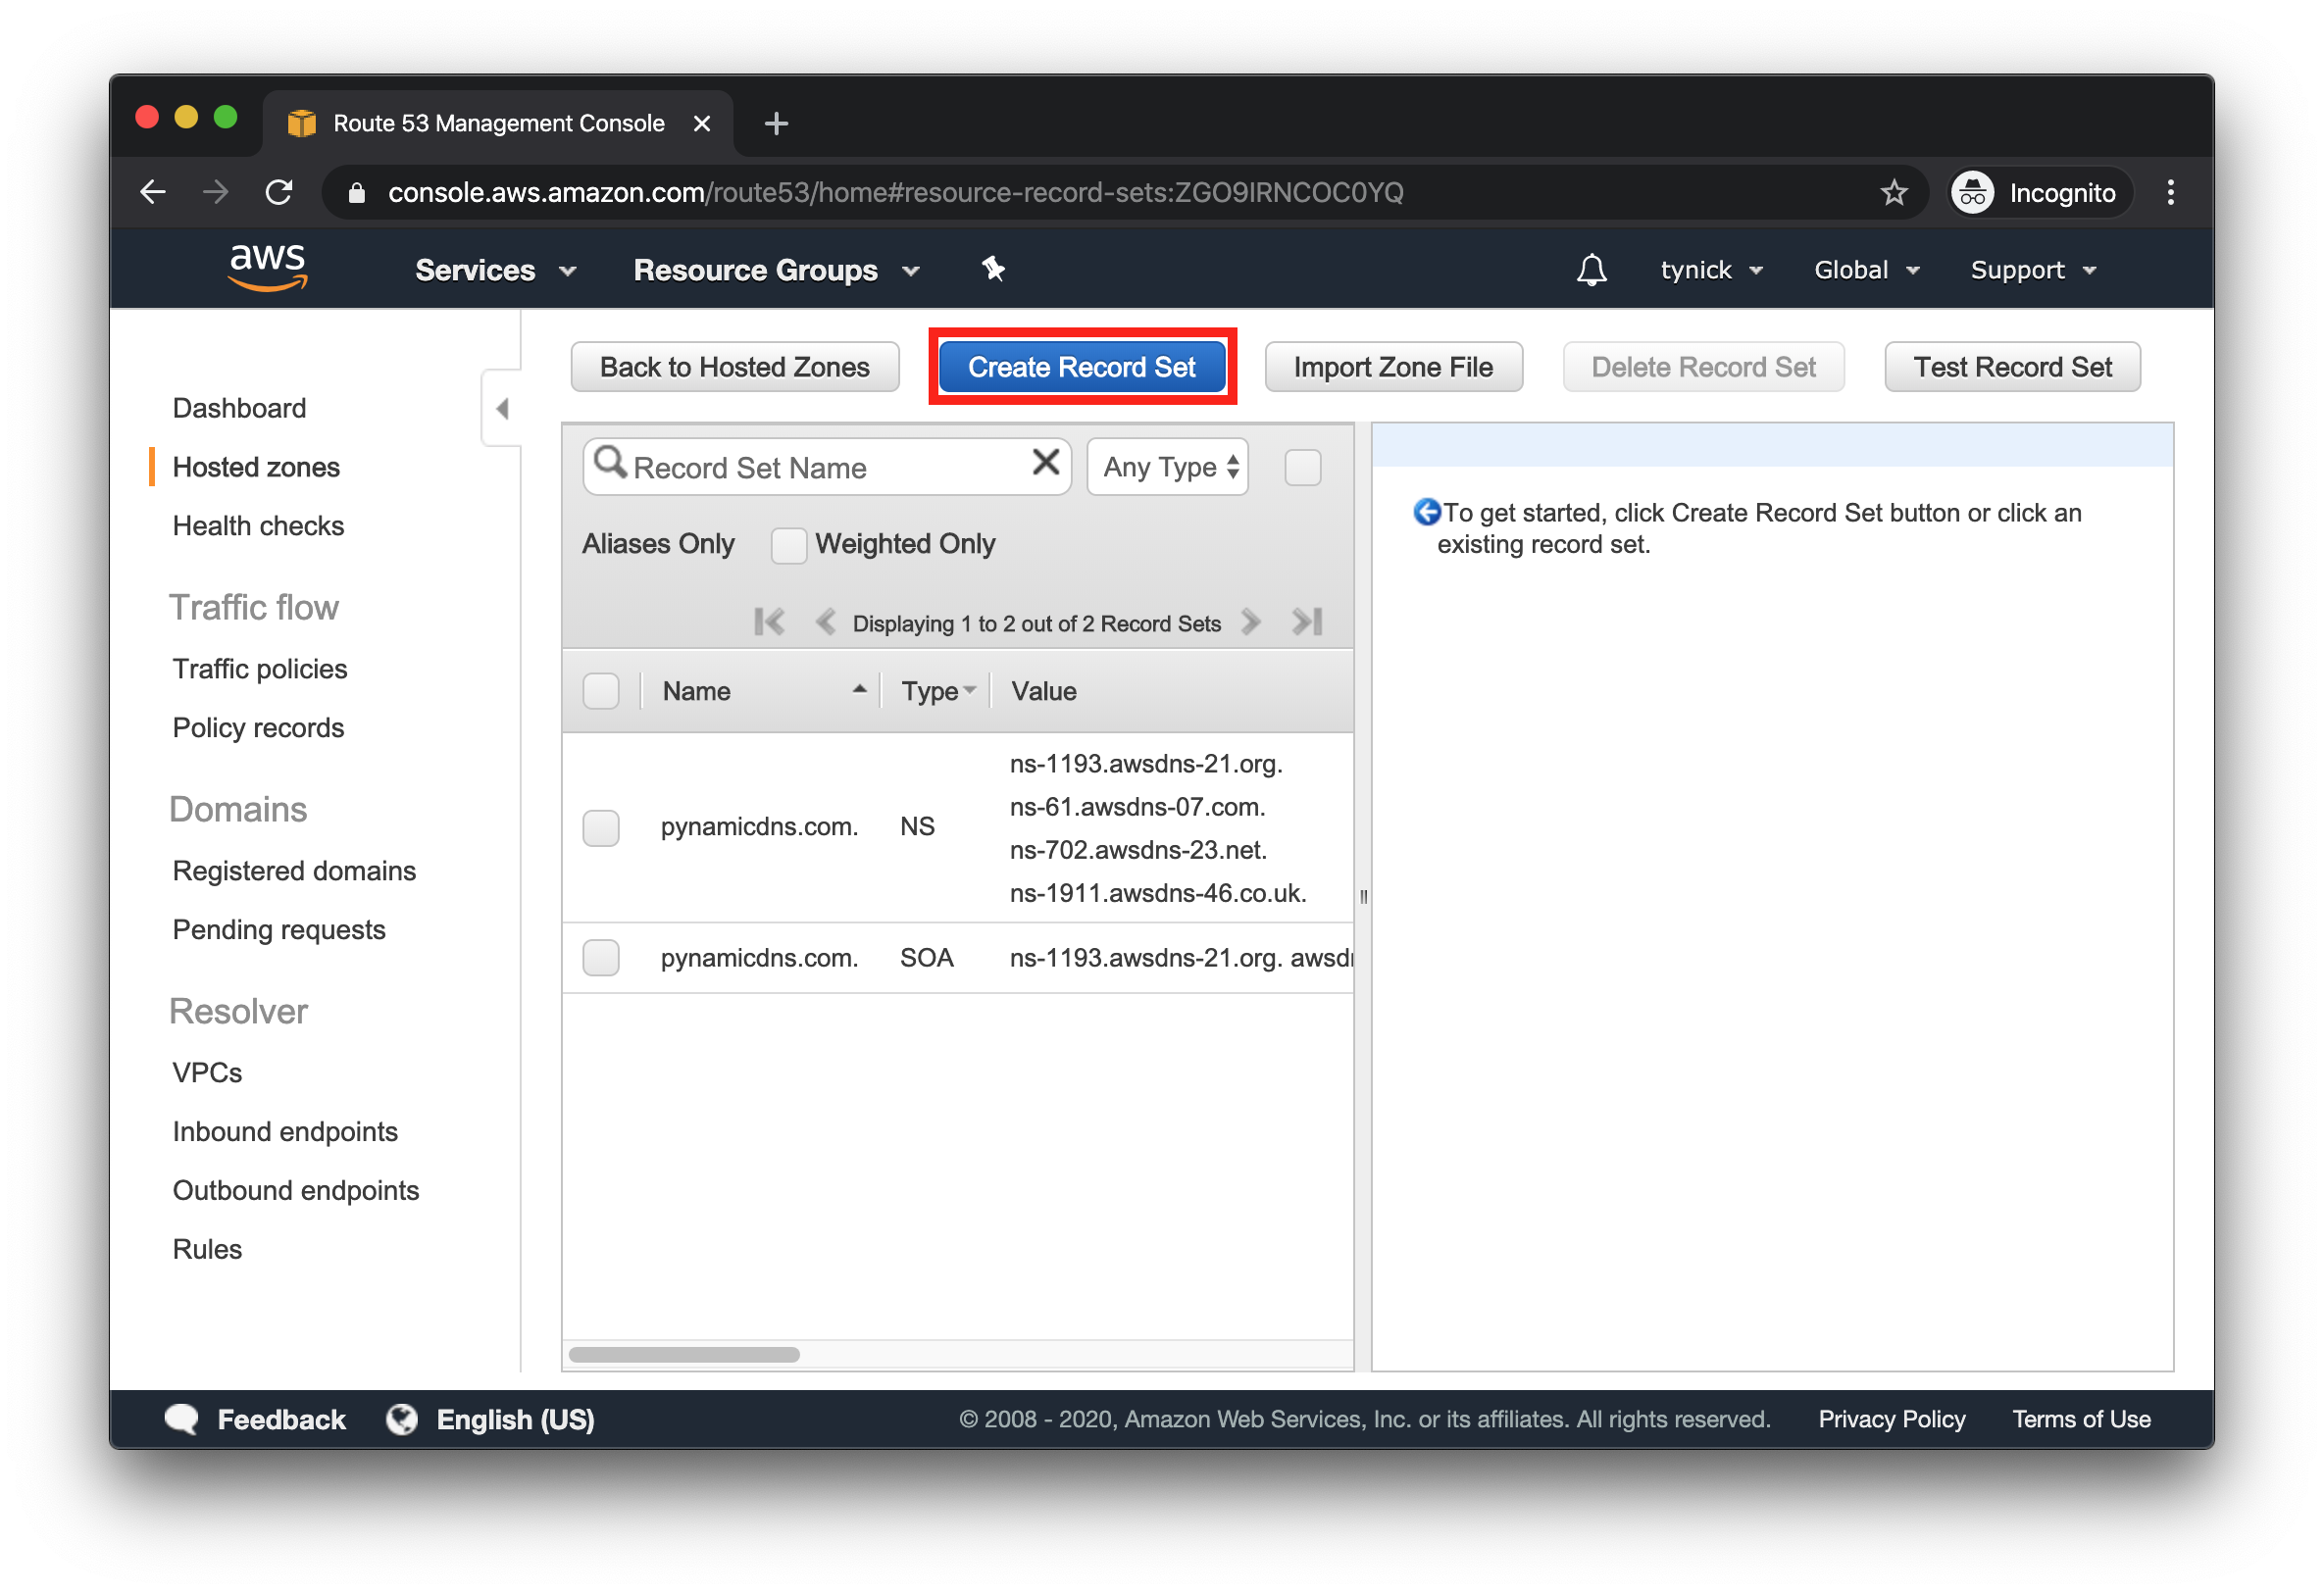
Click the Create Record Set button.
The right panel should have populated with a way to create a record set.
The fields outlined in red are the only fields you need to use.
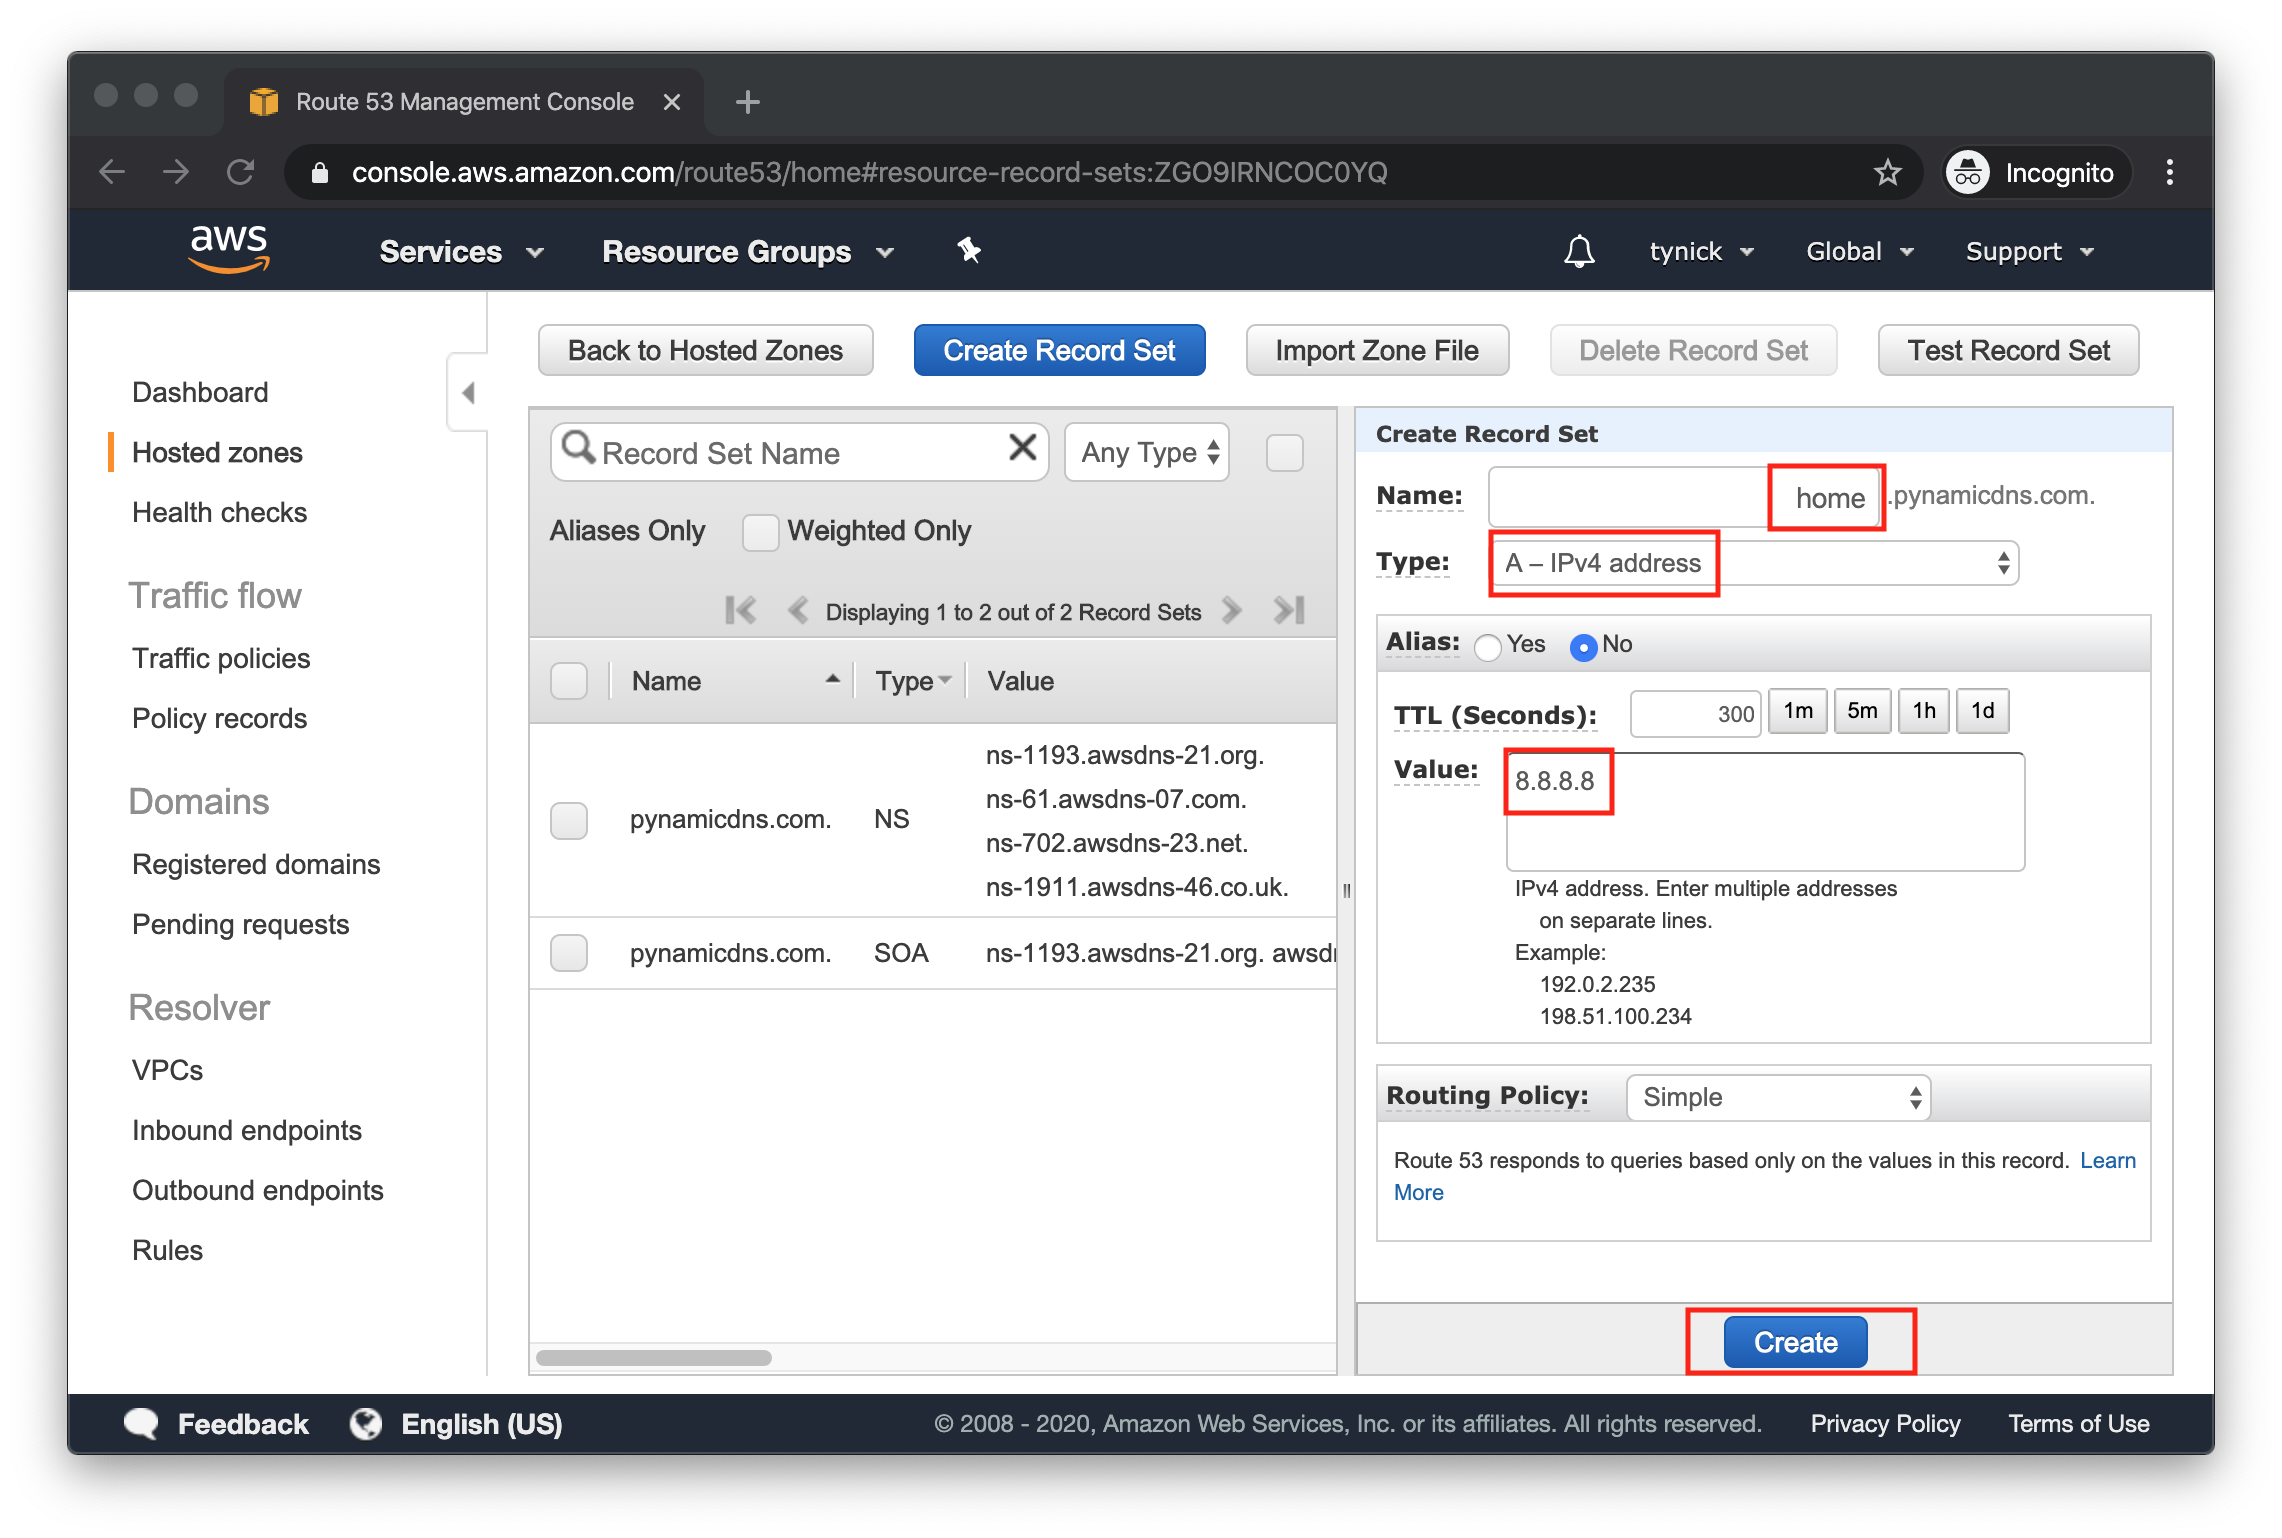
Name: This one is optional. If you want <your-domain>.com to be controlled by PynamicDNS, leave this blank. If you are already using <your-domain>.com for something else, we can create a subdomain instead. Feel free to name the subdomain after whatever it is you will do with it. vpn.<your-domain>.com, home.<your-domain>.com, plex.<your-domain>.com are all acceptable subdomain names.
Type: Choose A - IPv4 address. A records are the most basic type of DNS record. They simply point a domain or subdomain at an IP address. It’s perfect for what we are trying to accomplish.
Value: This field is where your IP address goes. For testing purposes, put 8.8.8.8 in this field. Once PynamicDNS starts working, we will come back here to check if it has changed.
Click Create.
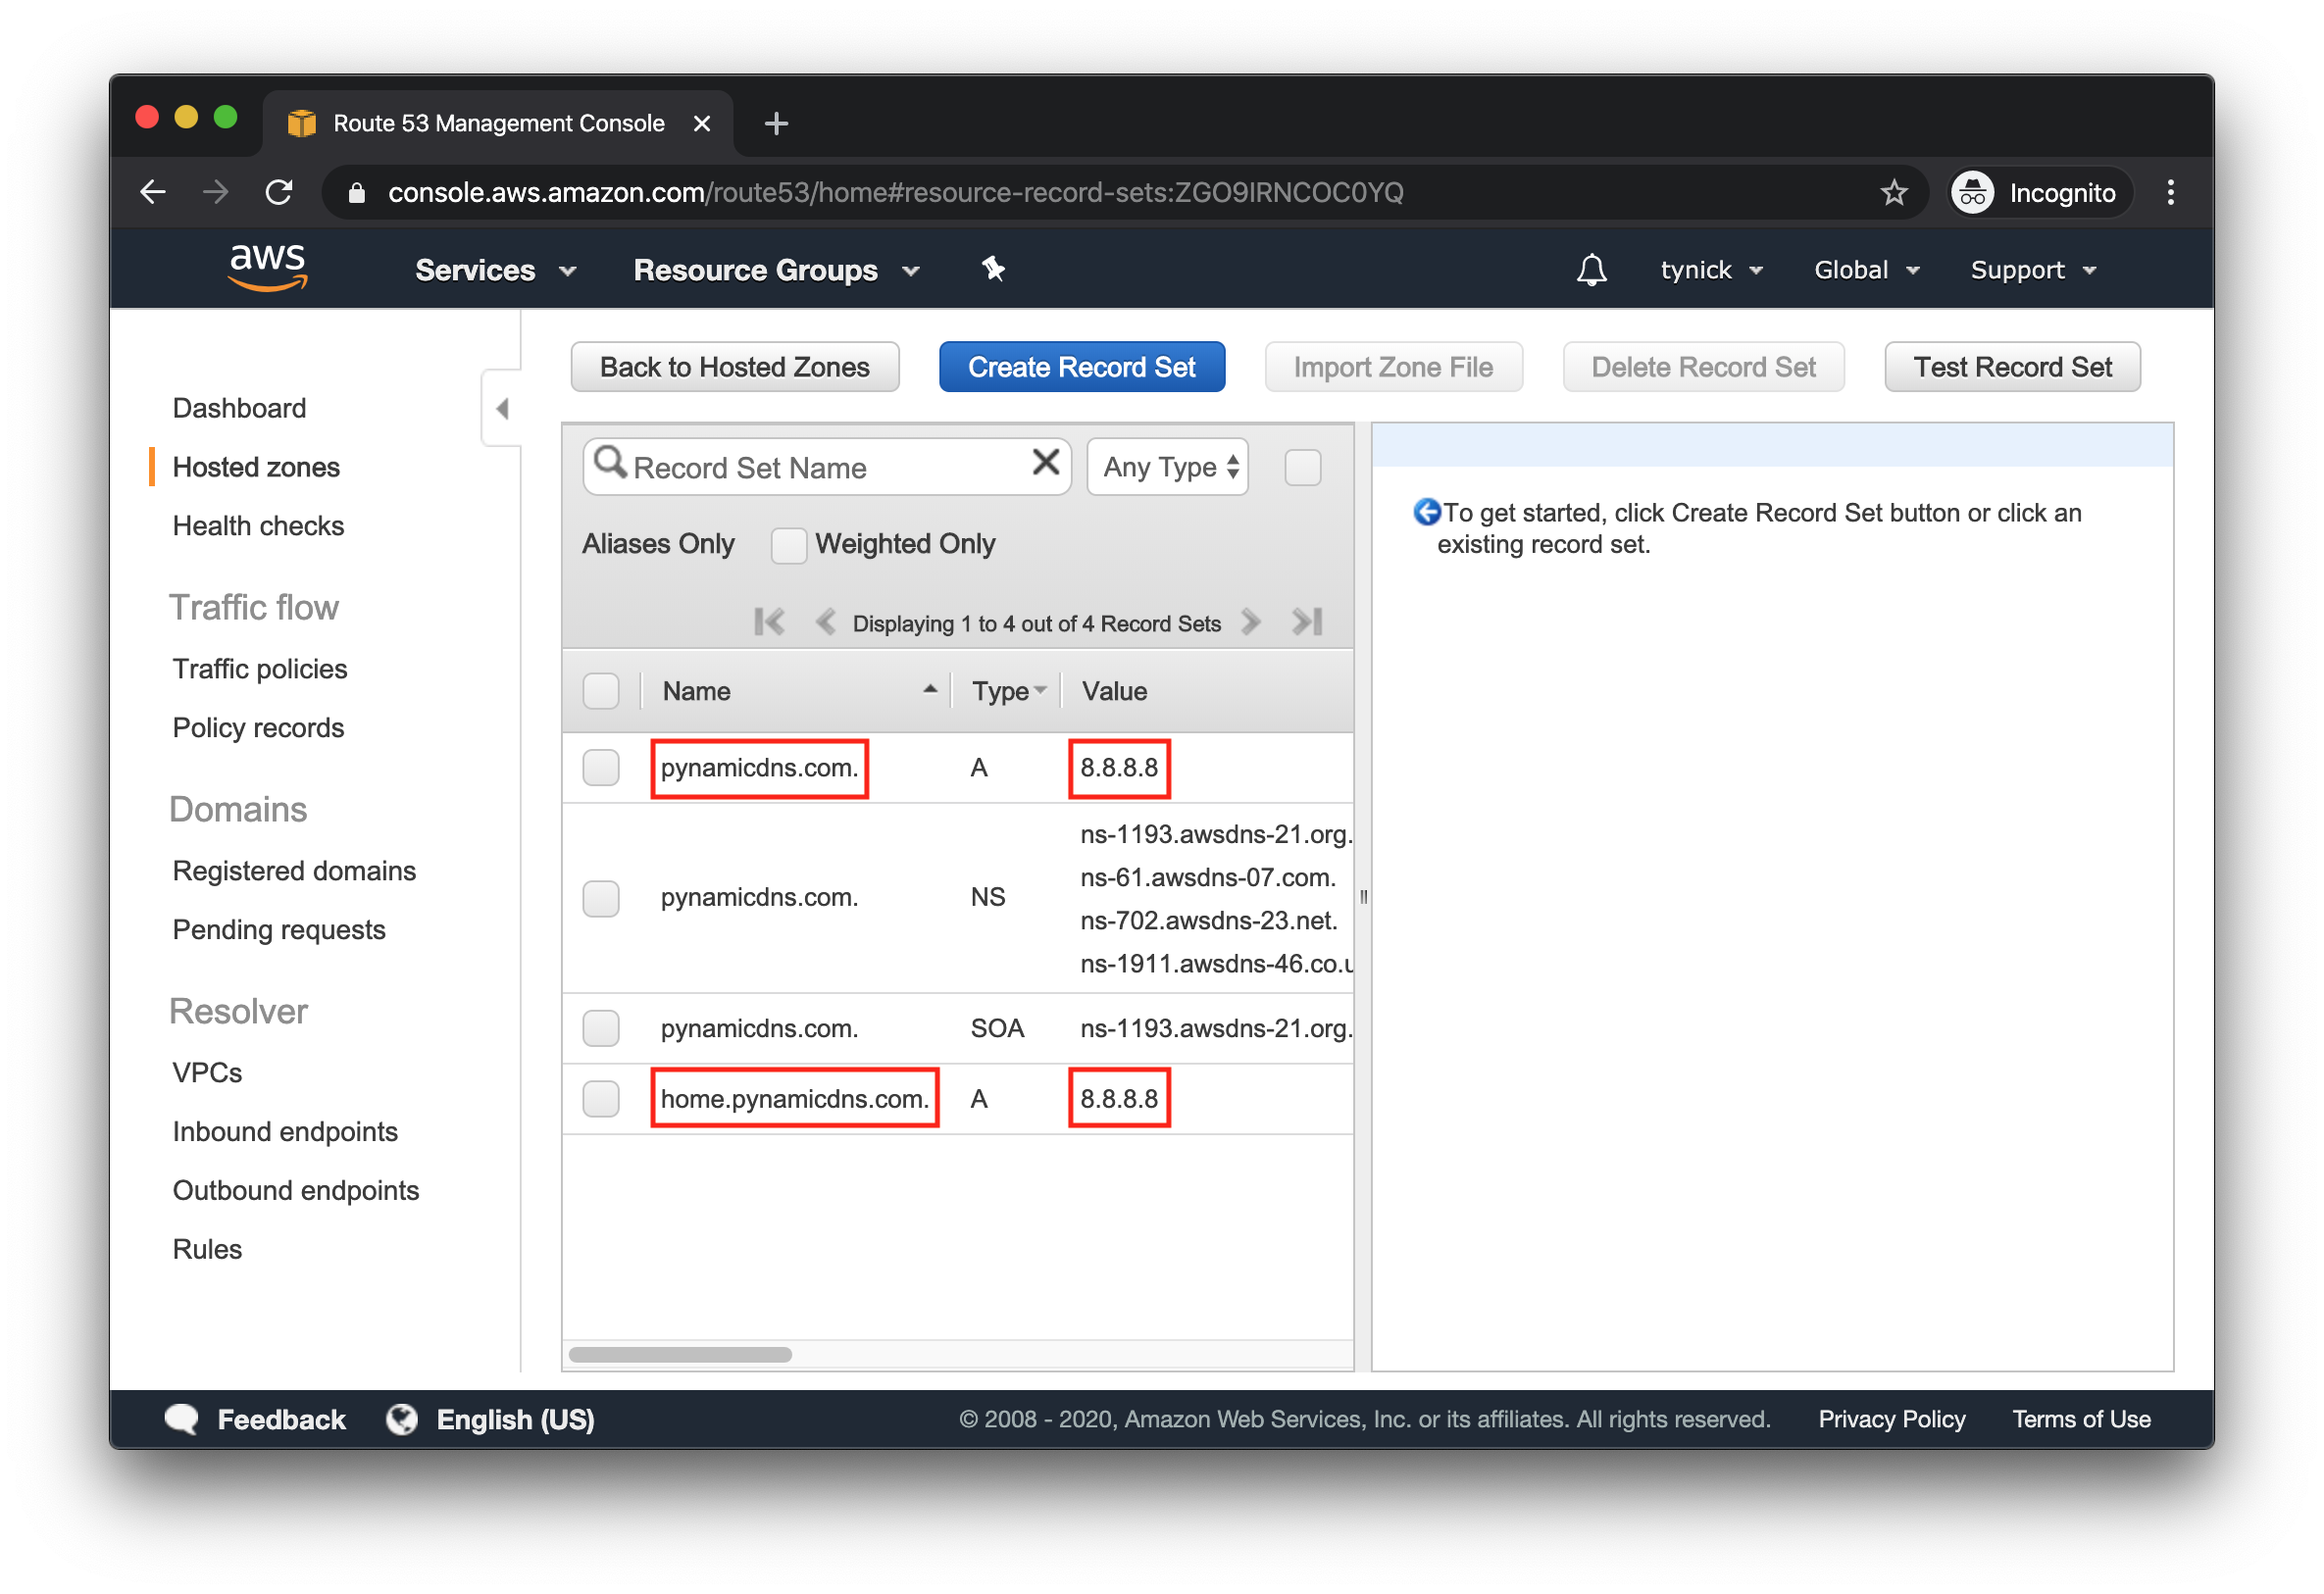
Depending on whether you created your A record for your domain name or a subdomain, you should see an entry similar to the screenshot.
Once this is complete, move on to the next section.
IAM
Now that we have our domain or subdomain A record, we need to create a new AWS user.
The purpose of this user is to give PynamicDNS programmatic access to change your DNS entries.
Go to the Users section of the AWS IAM Console.
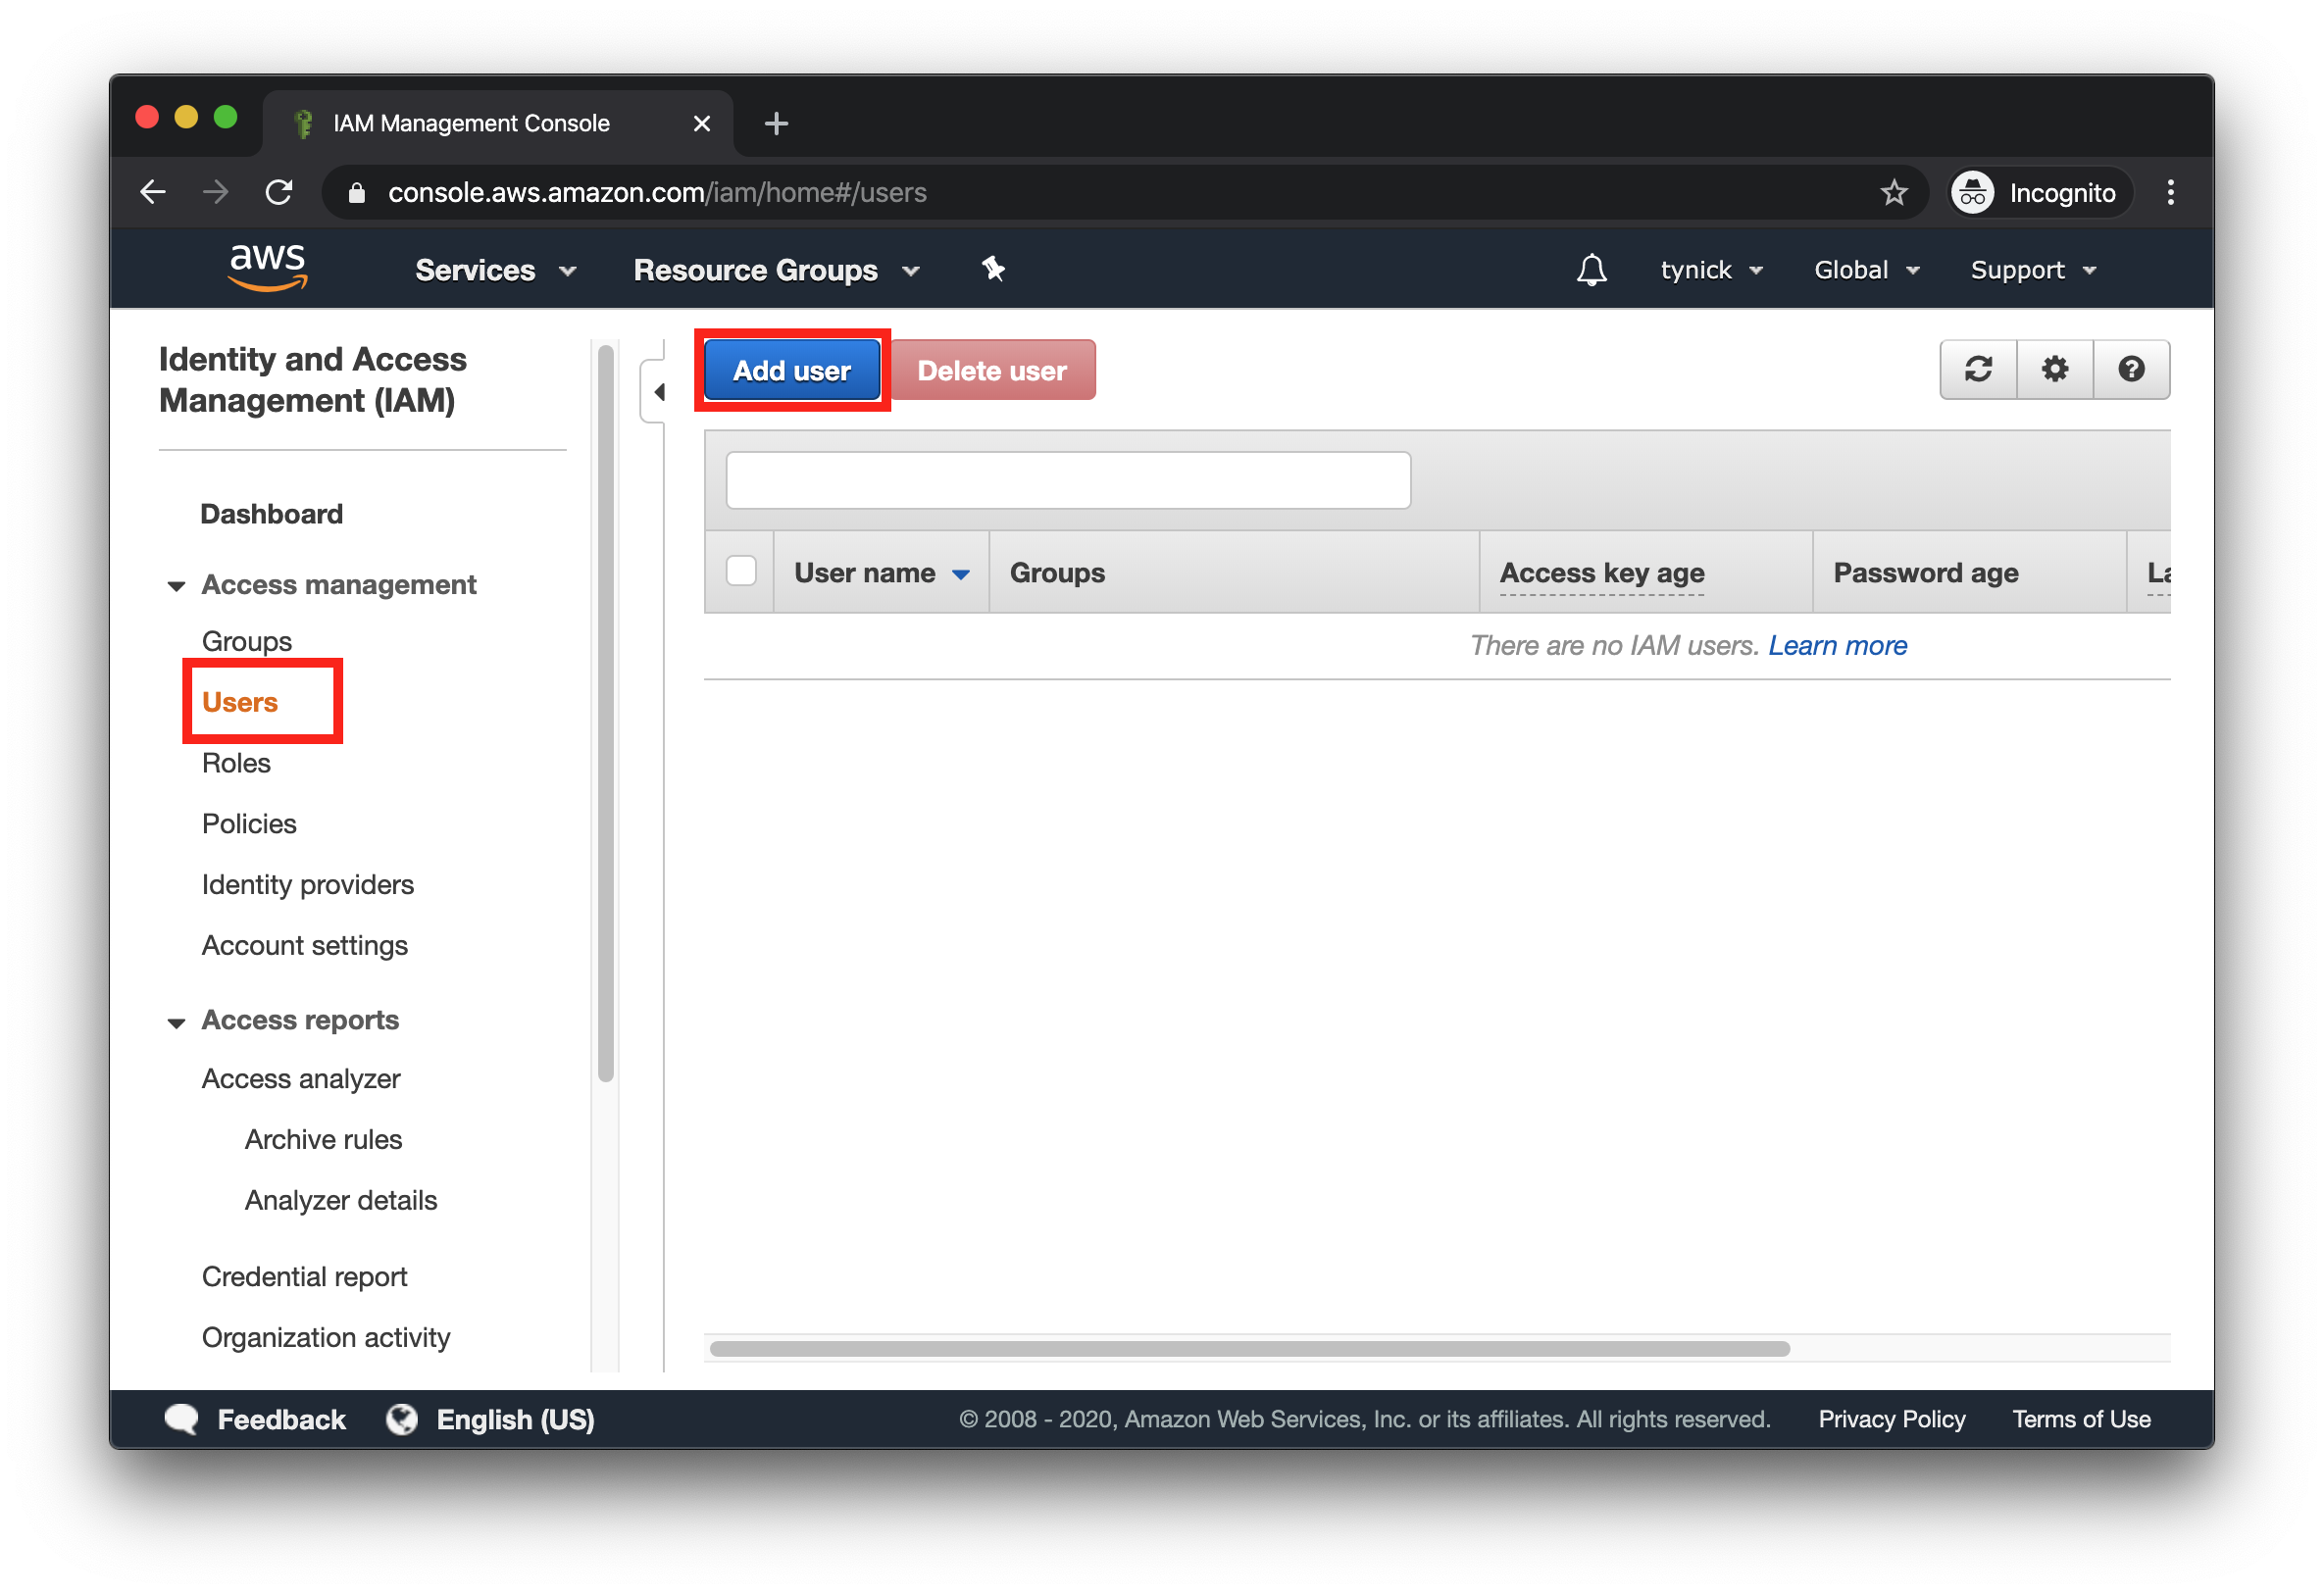
Once you are on the Users screen, click Add User.
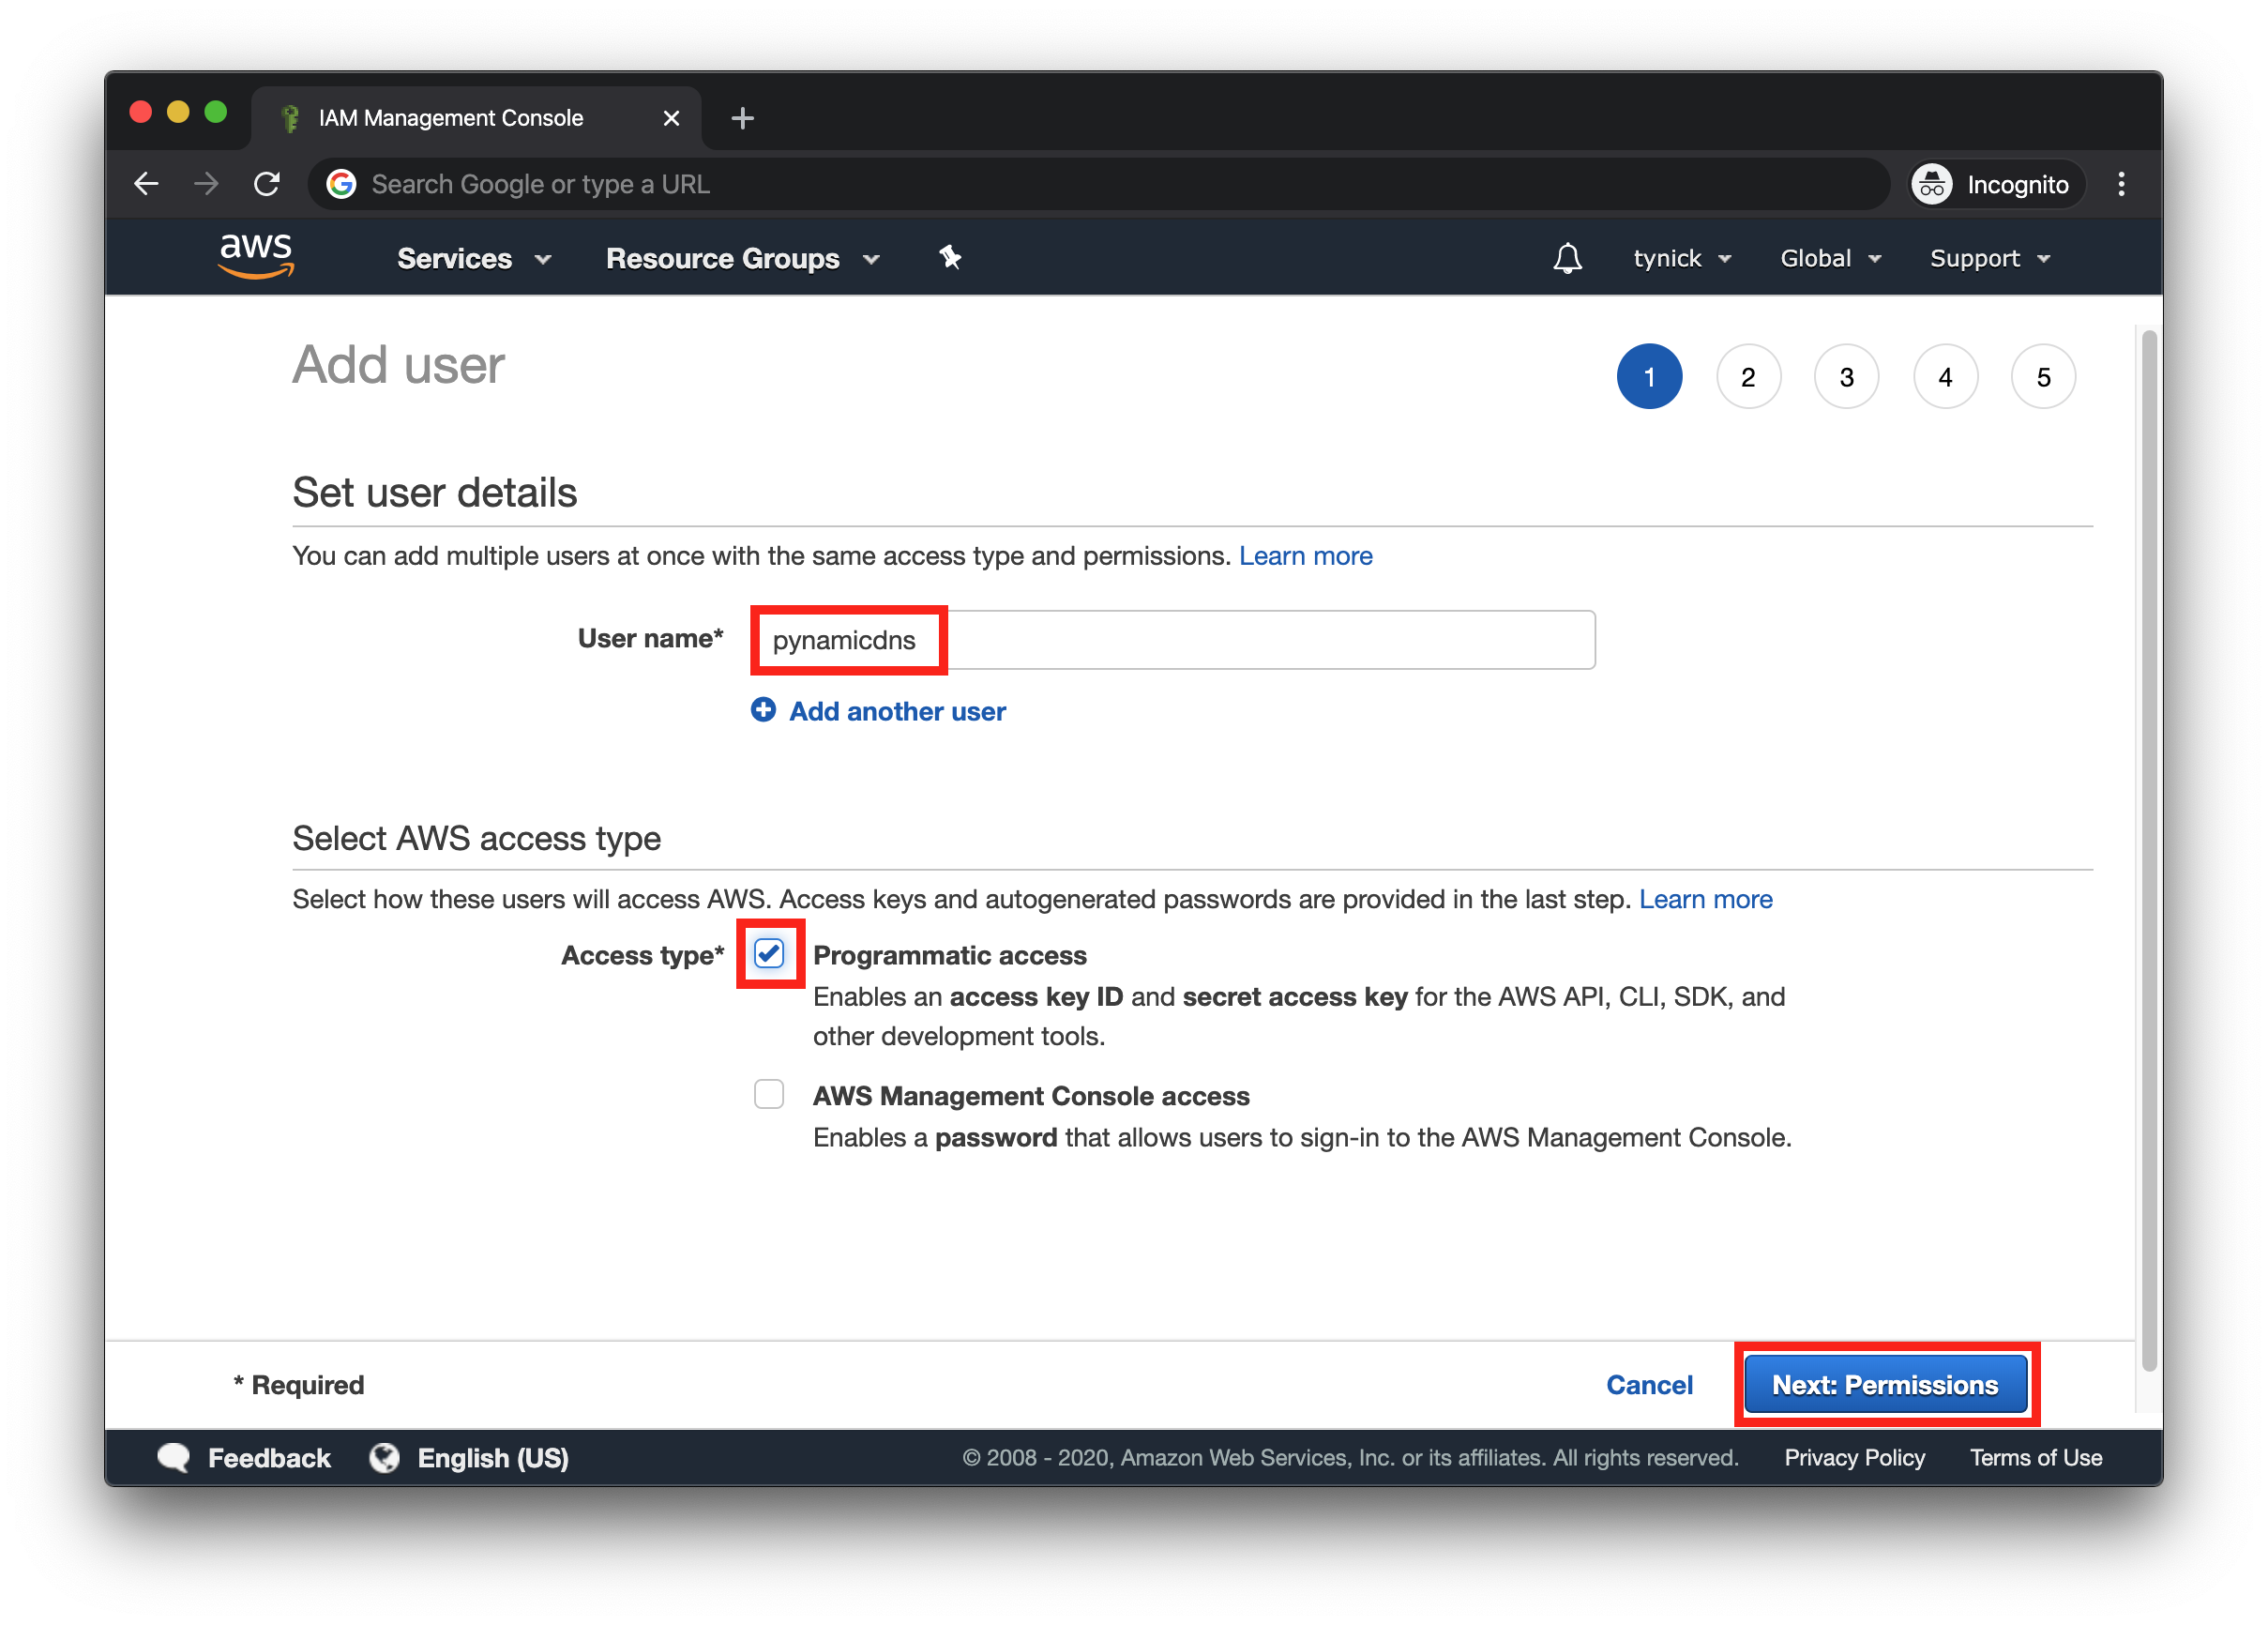
User name should be pynamicdns.
Check the Programmatic access box.
Click Next: Permissions when this is complete.
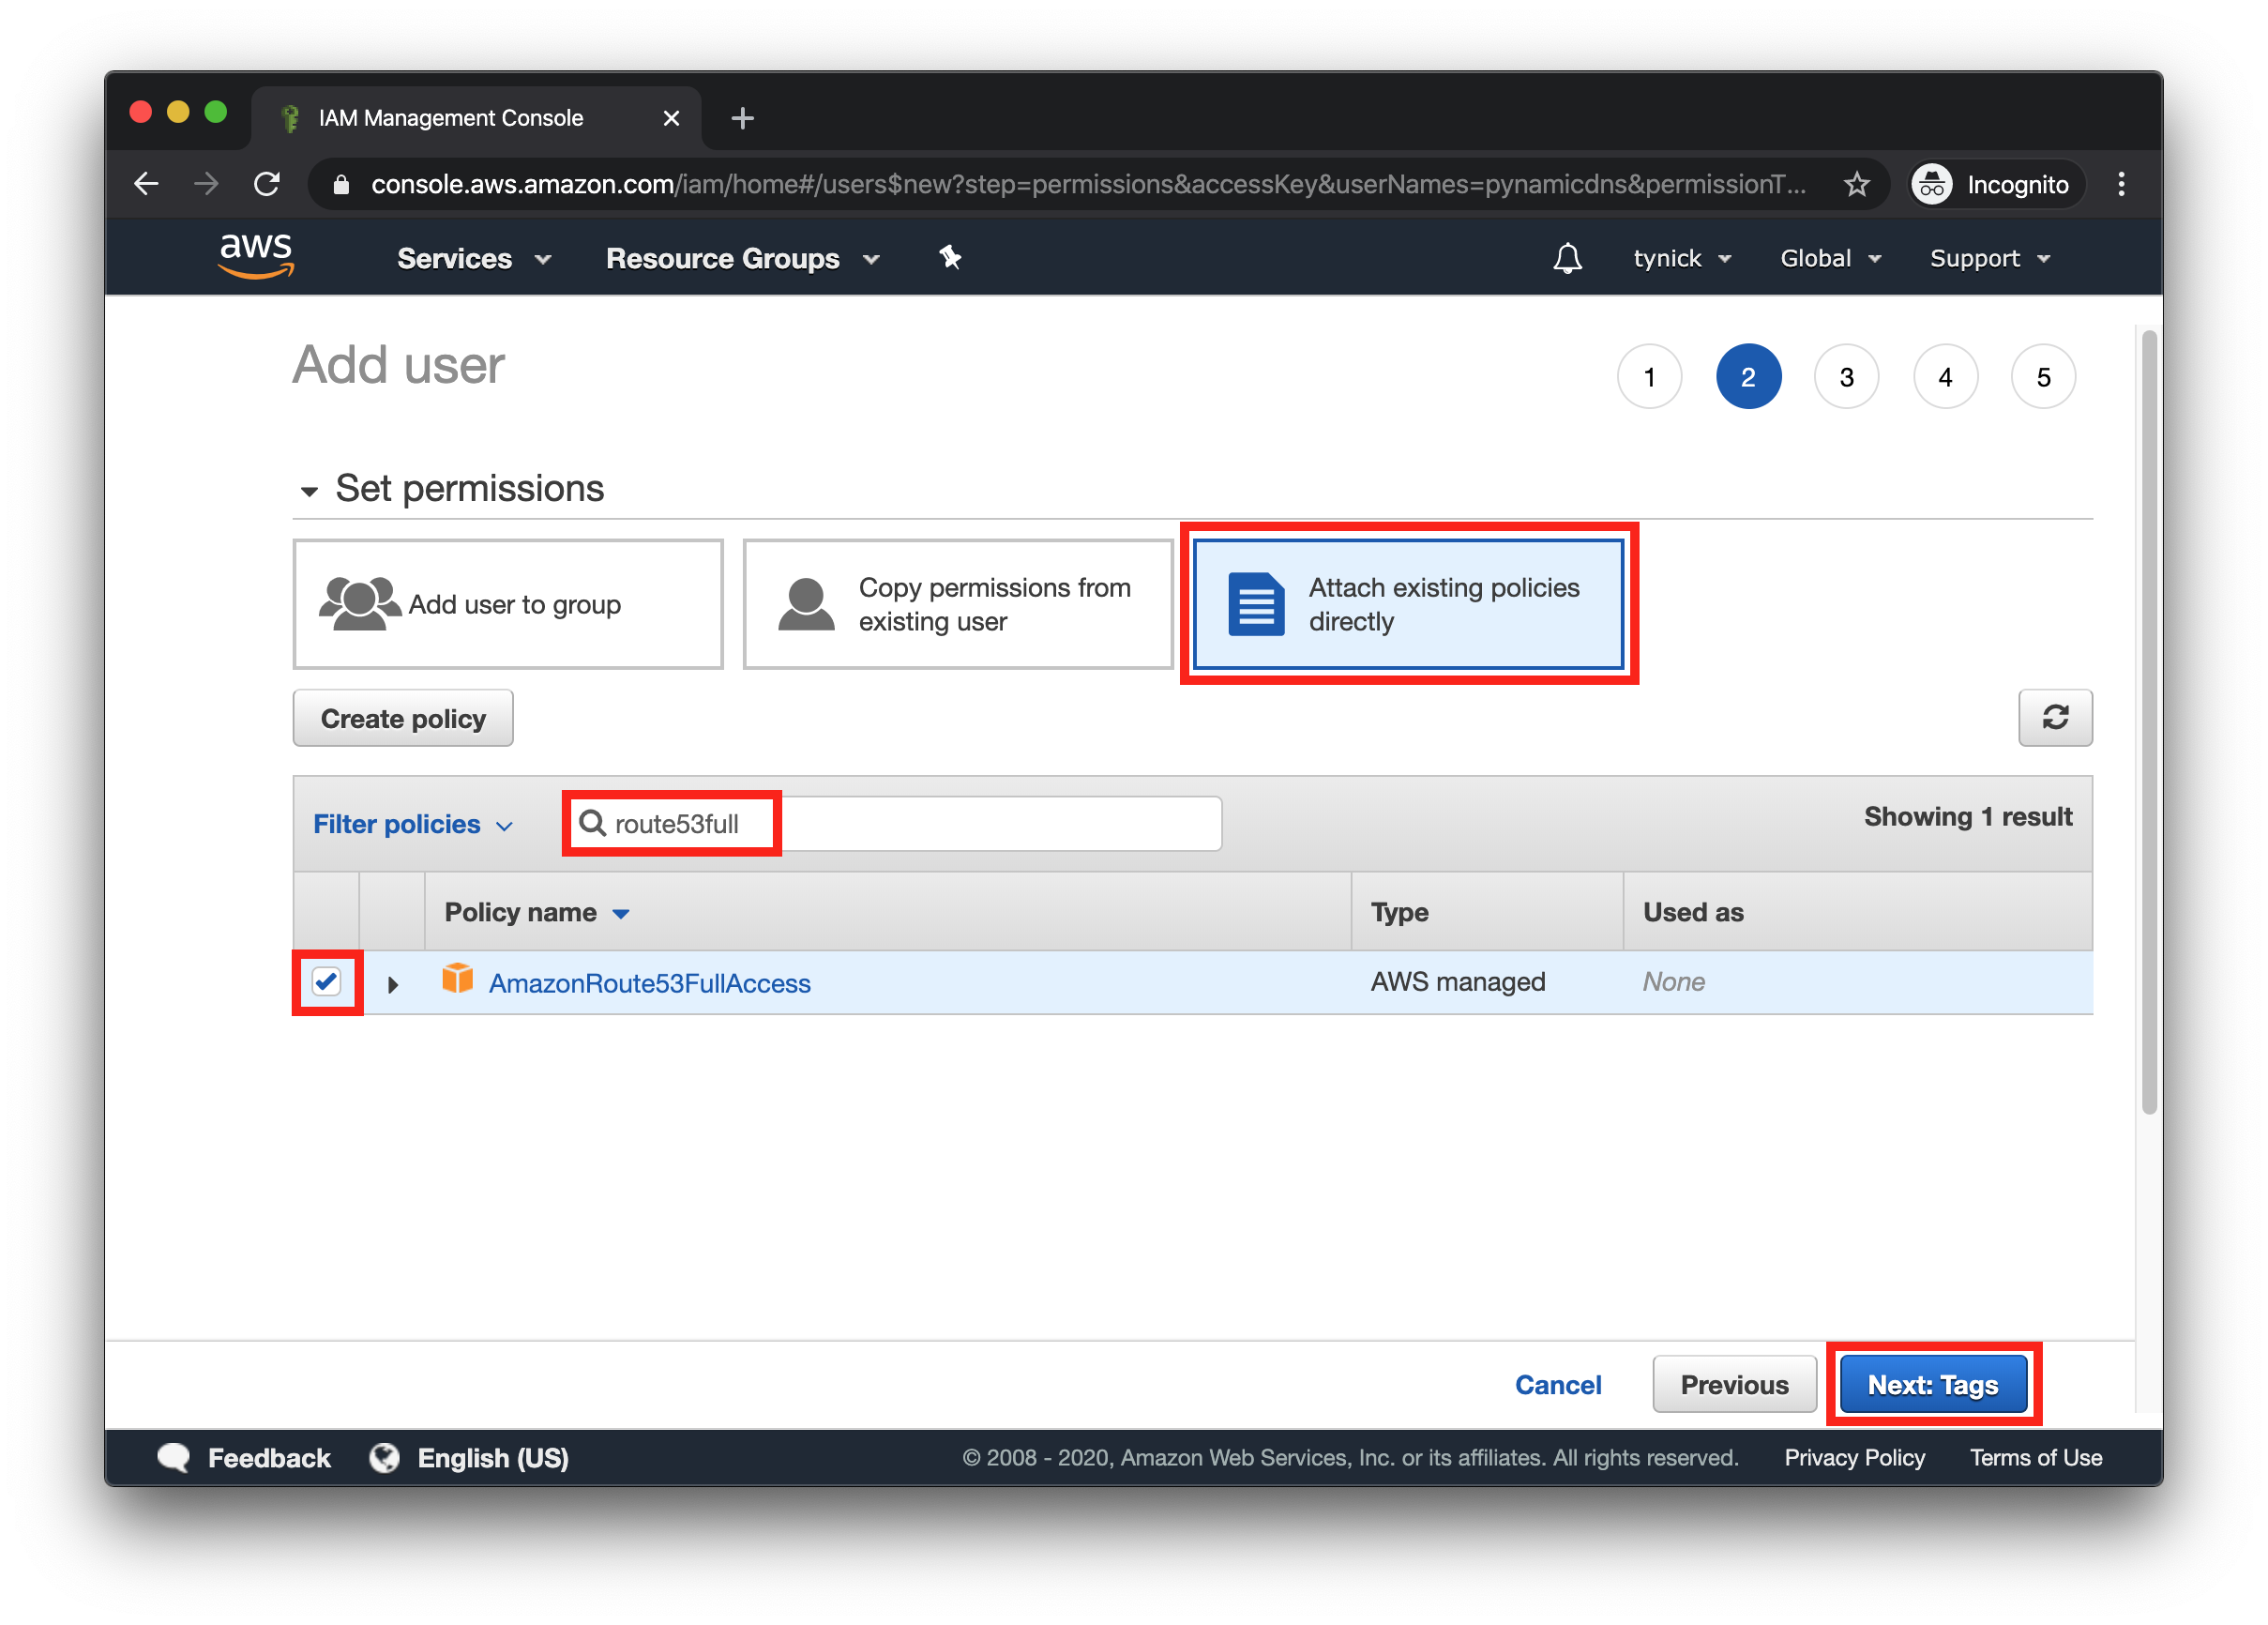
This is where we tell AWS what we want our new user to be able to do.
Select Attach existing policies directly near the top.
You will be greeted with a LONG list of policies that you can attach to this user. You can use the search to filter out all the other policies.
Check the box for AmazonRoute53FullAccess.
Once complete, click Next: Tags.
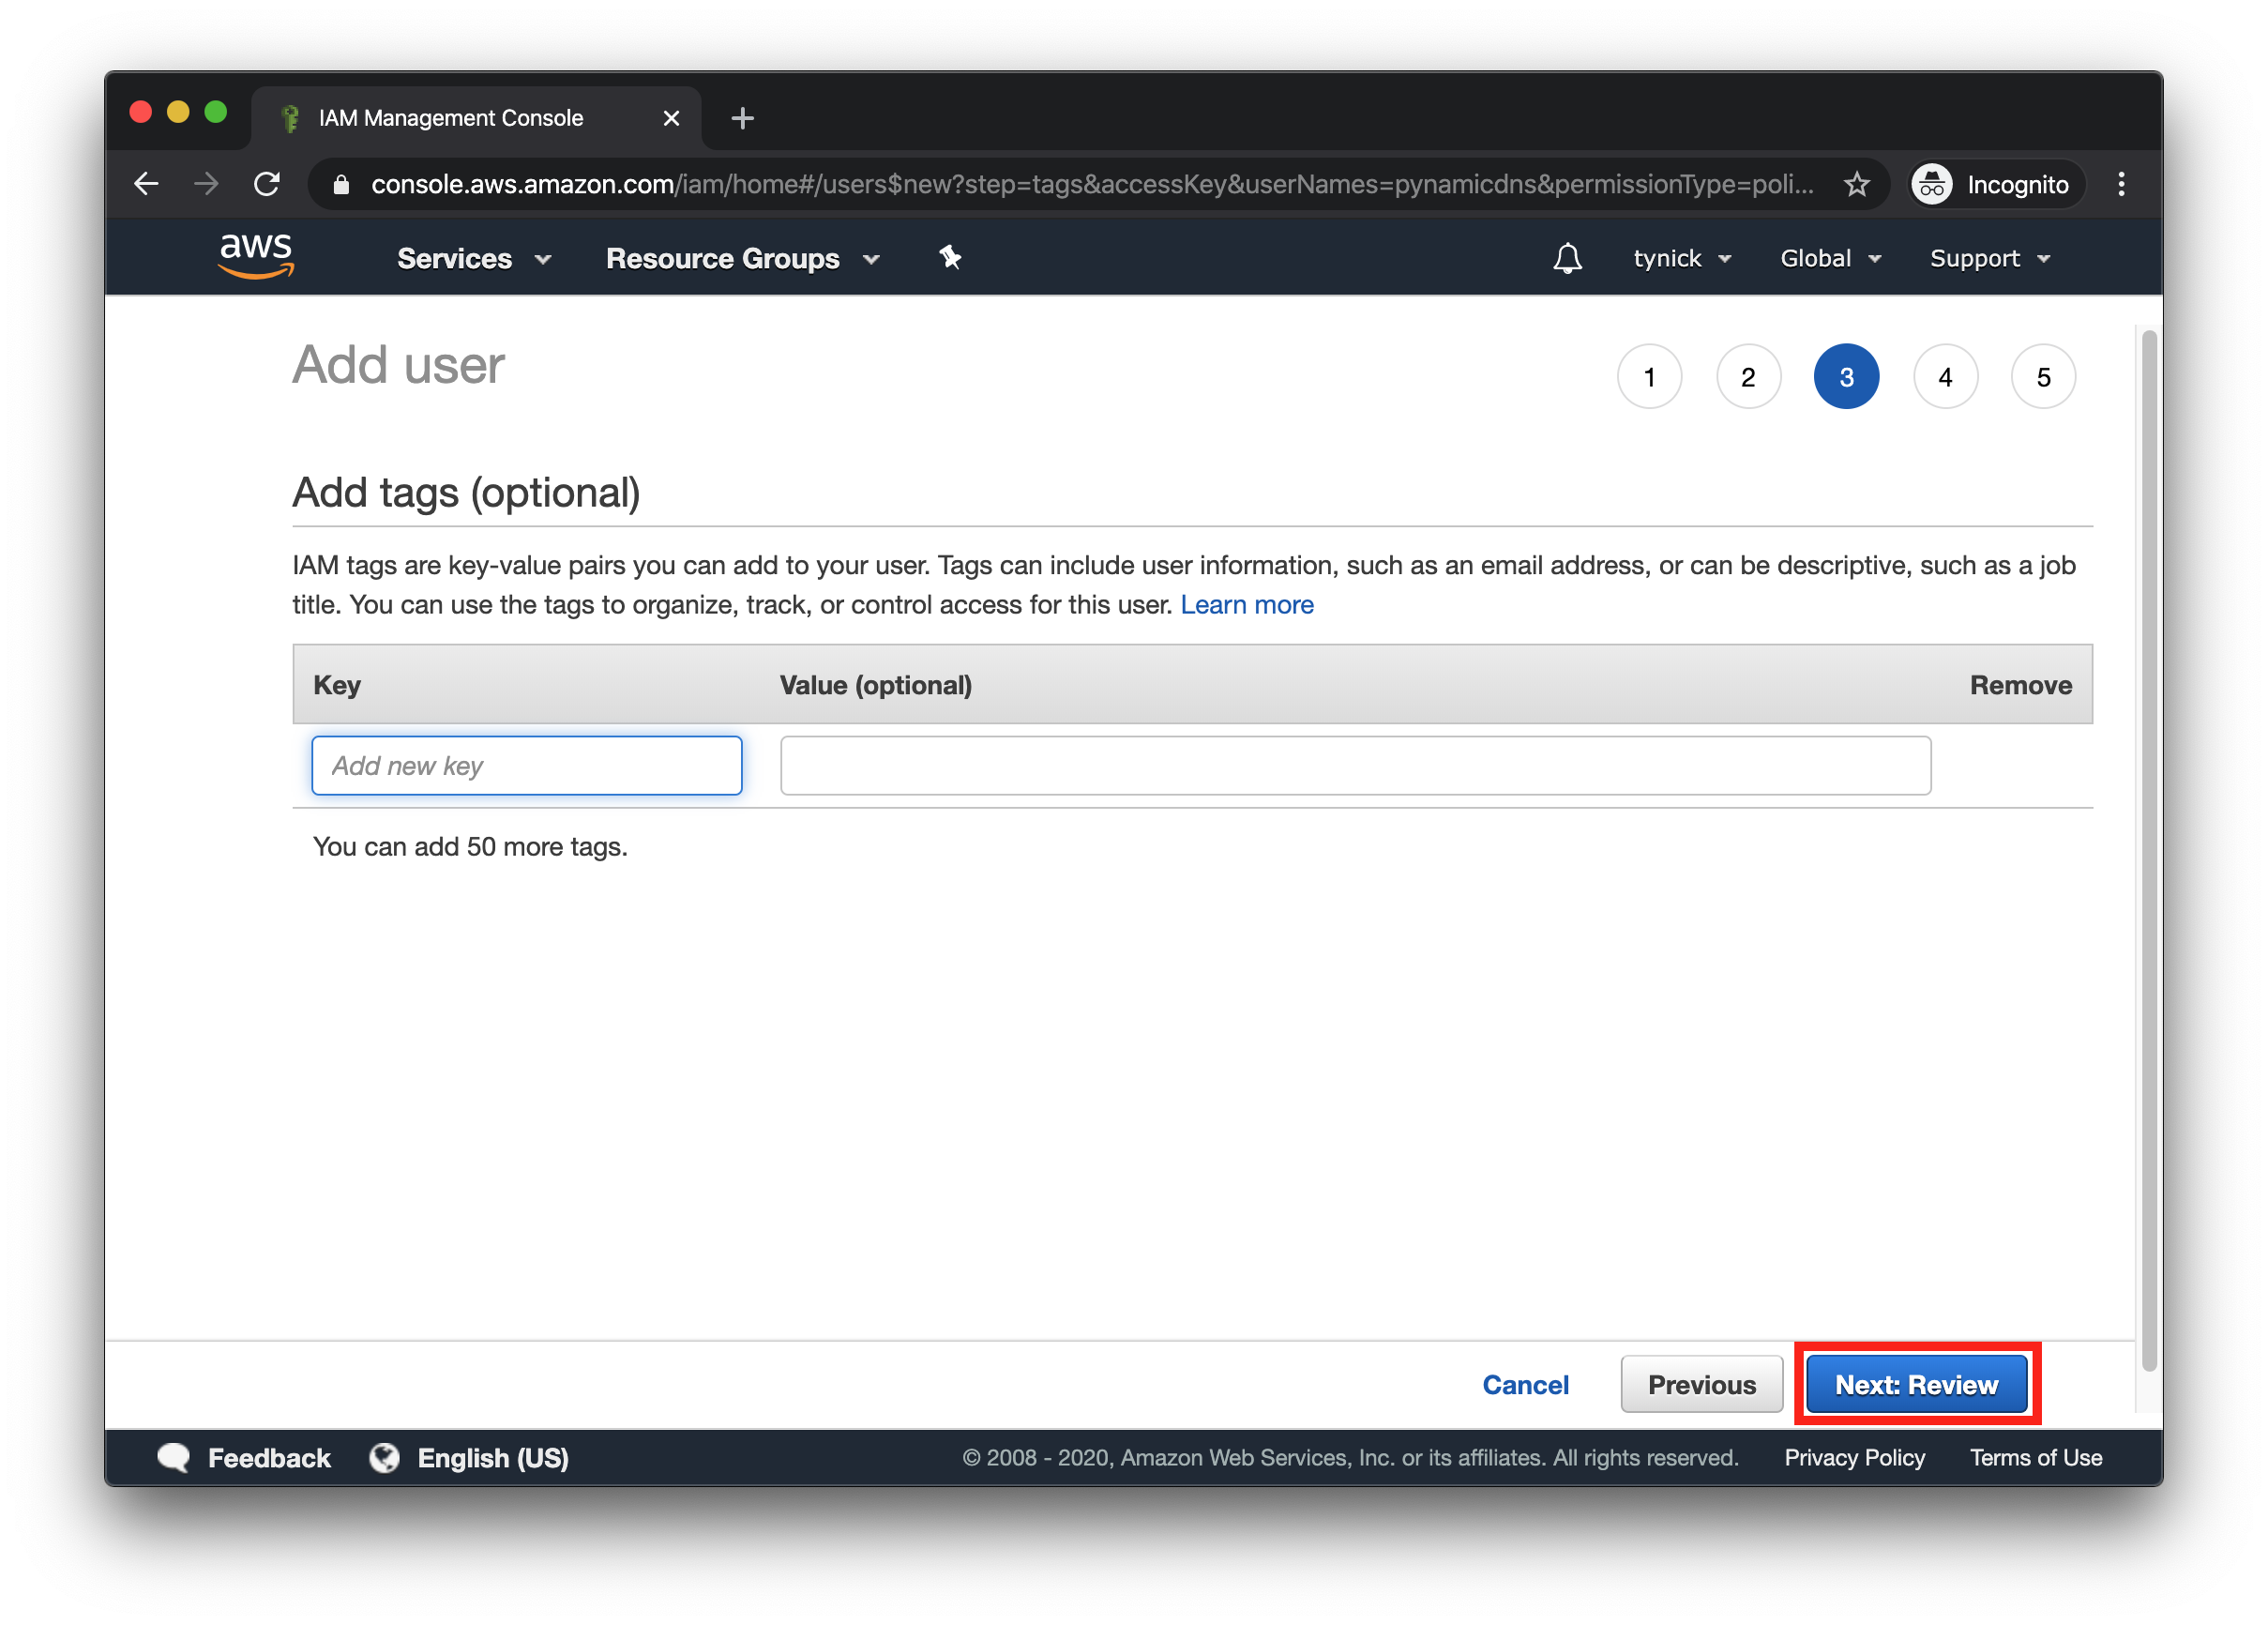
We don’t need to create any tags for our user.
Click Next: Review.
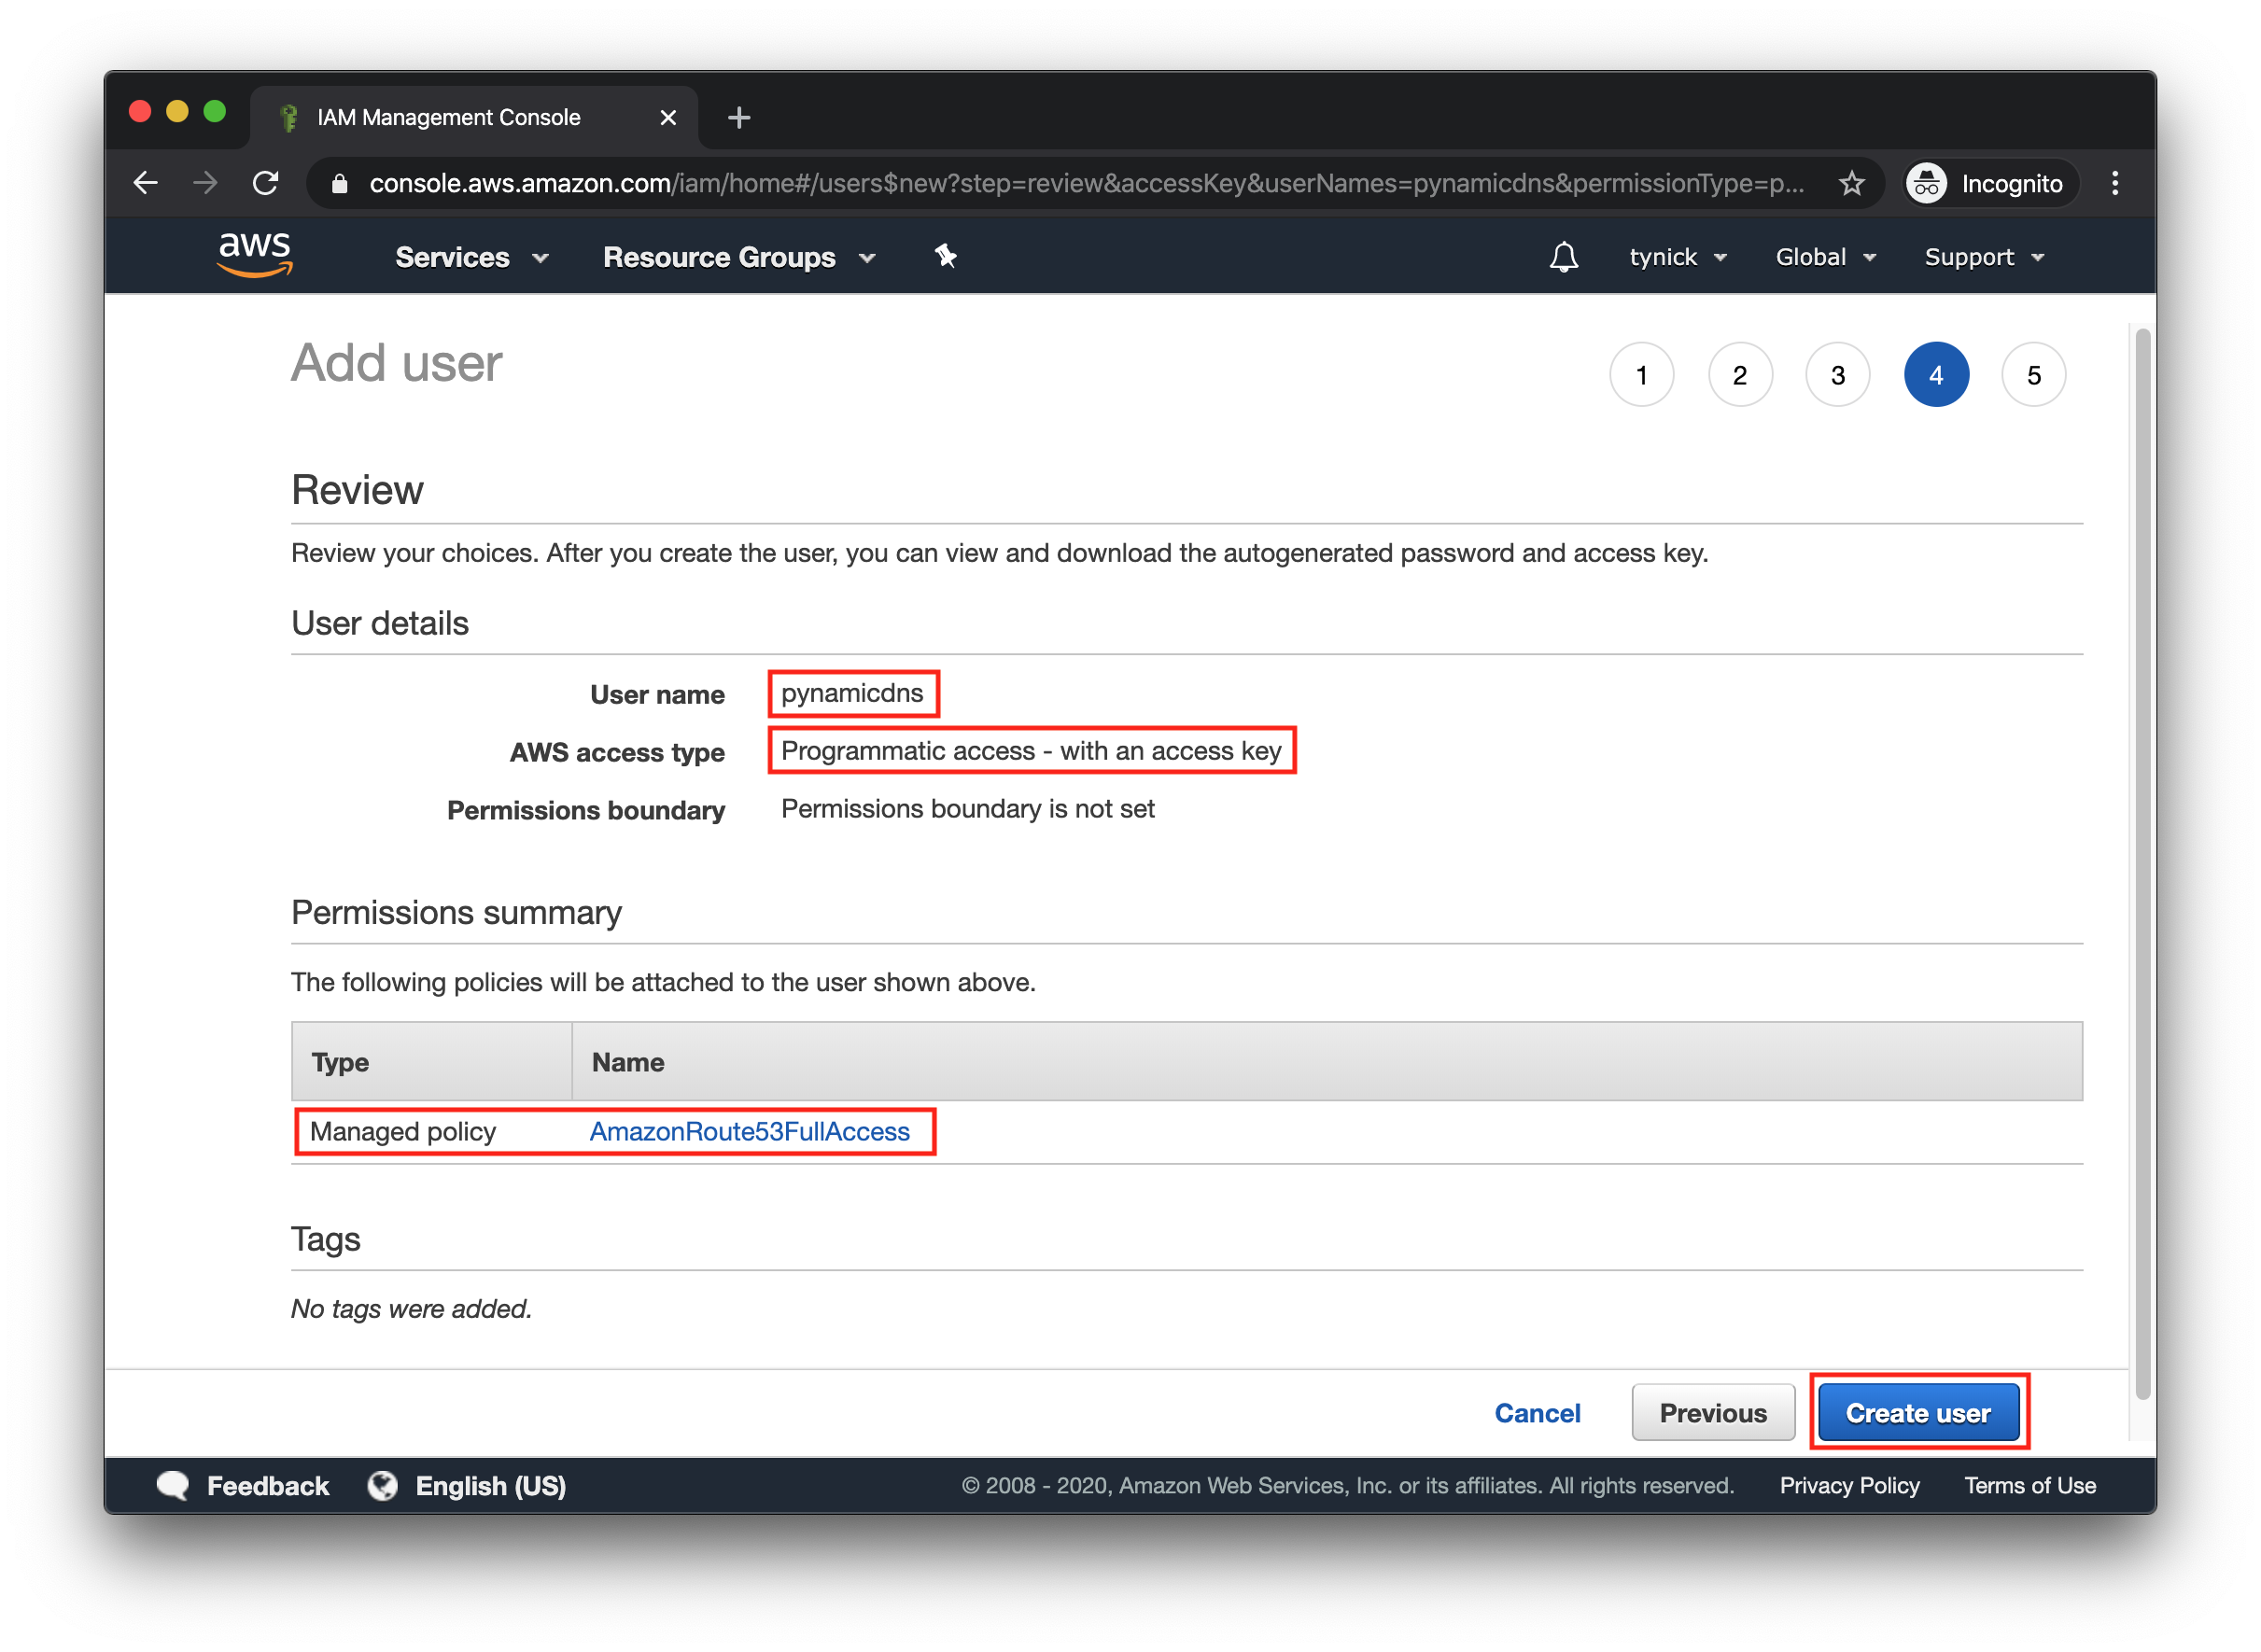
Verify the outlined fields in the screenshot above.
Then click Create user.
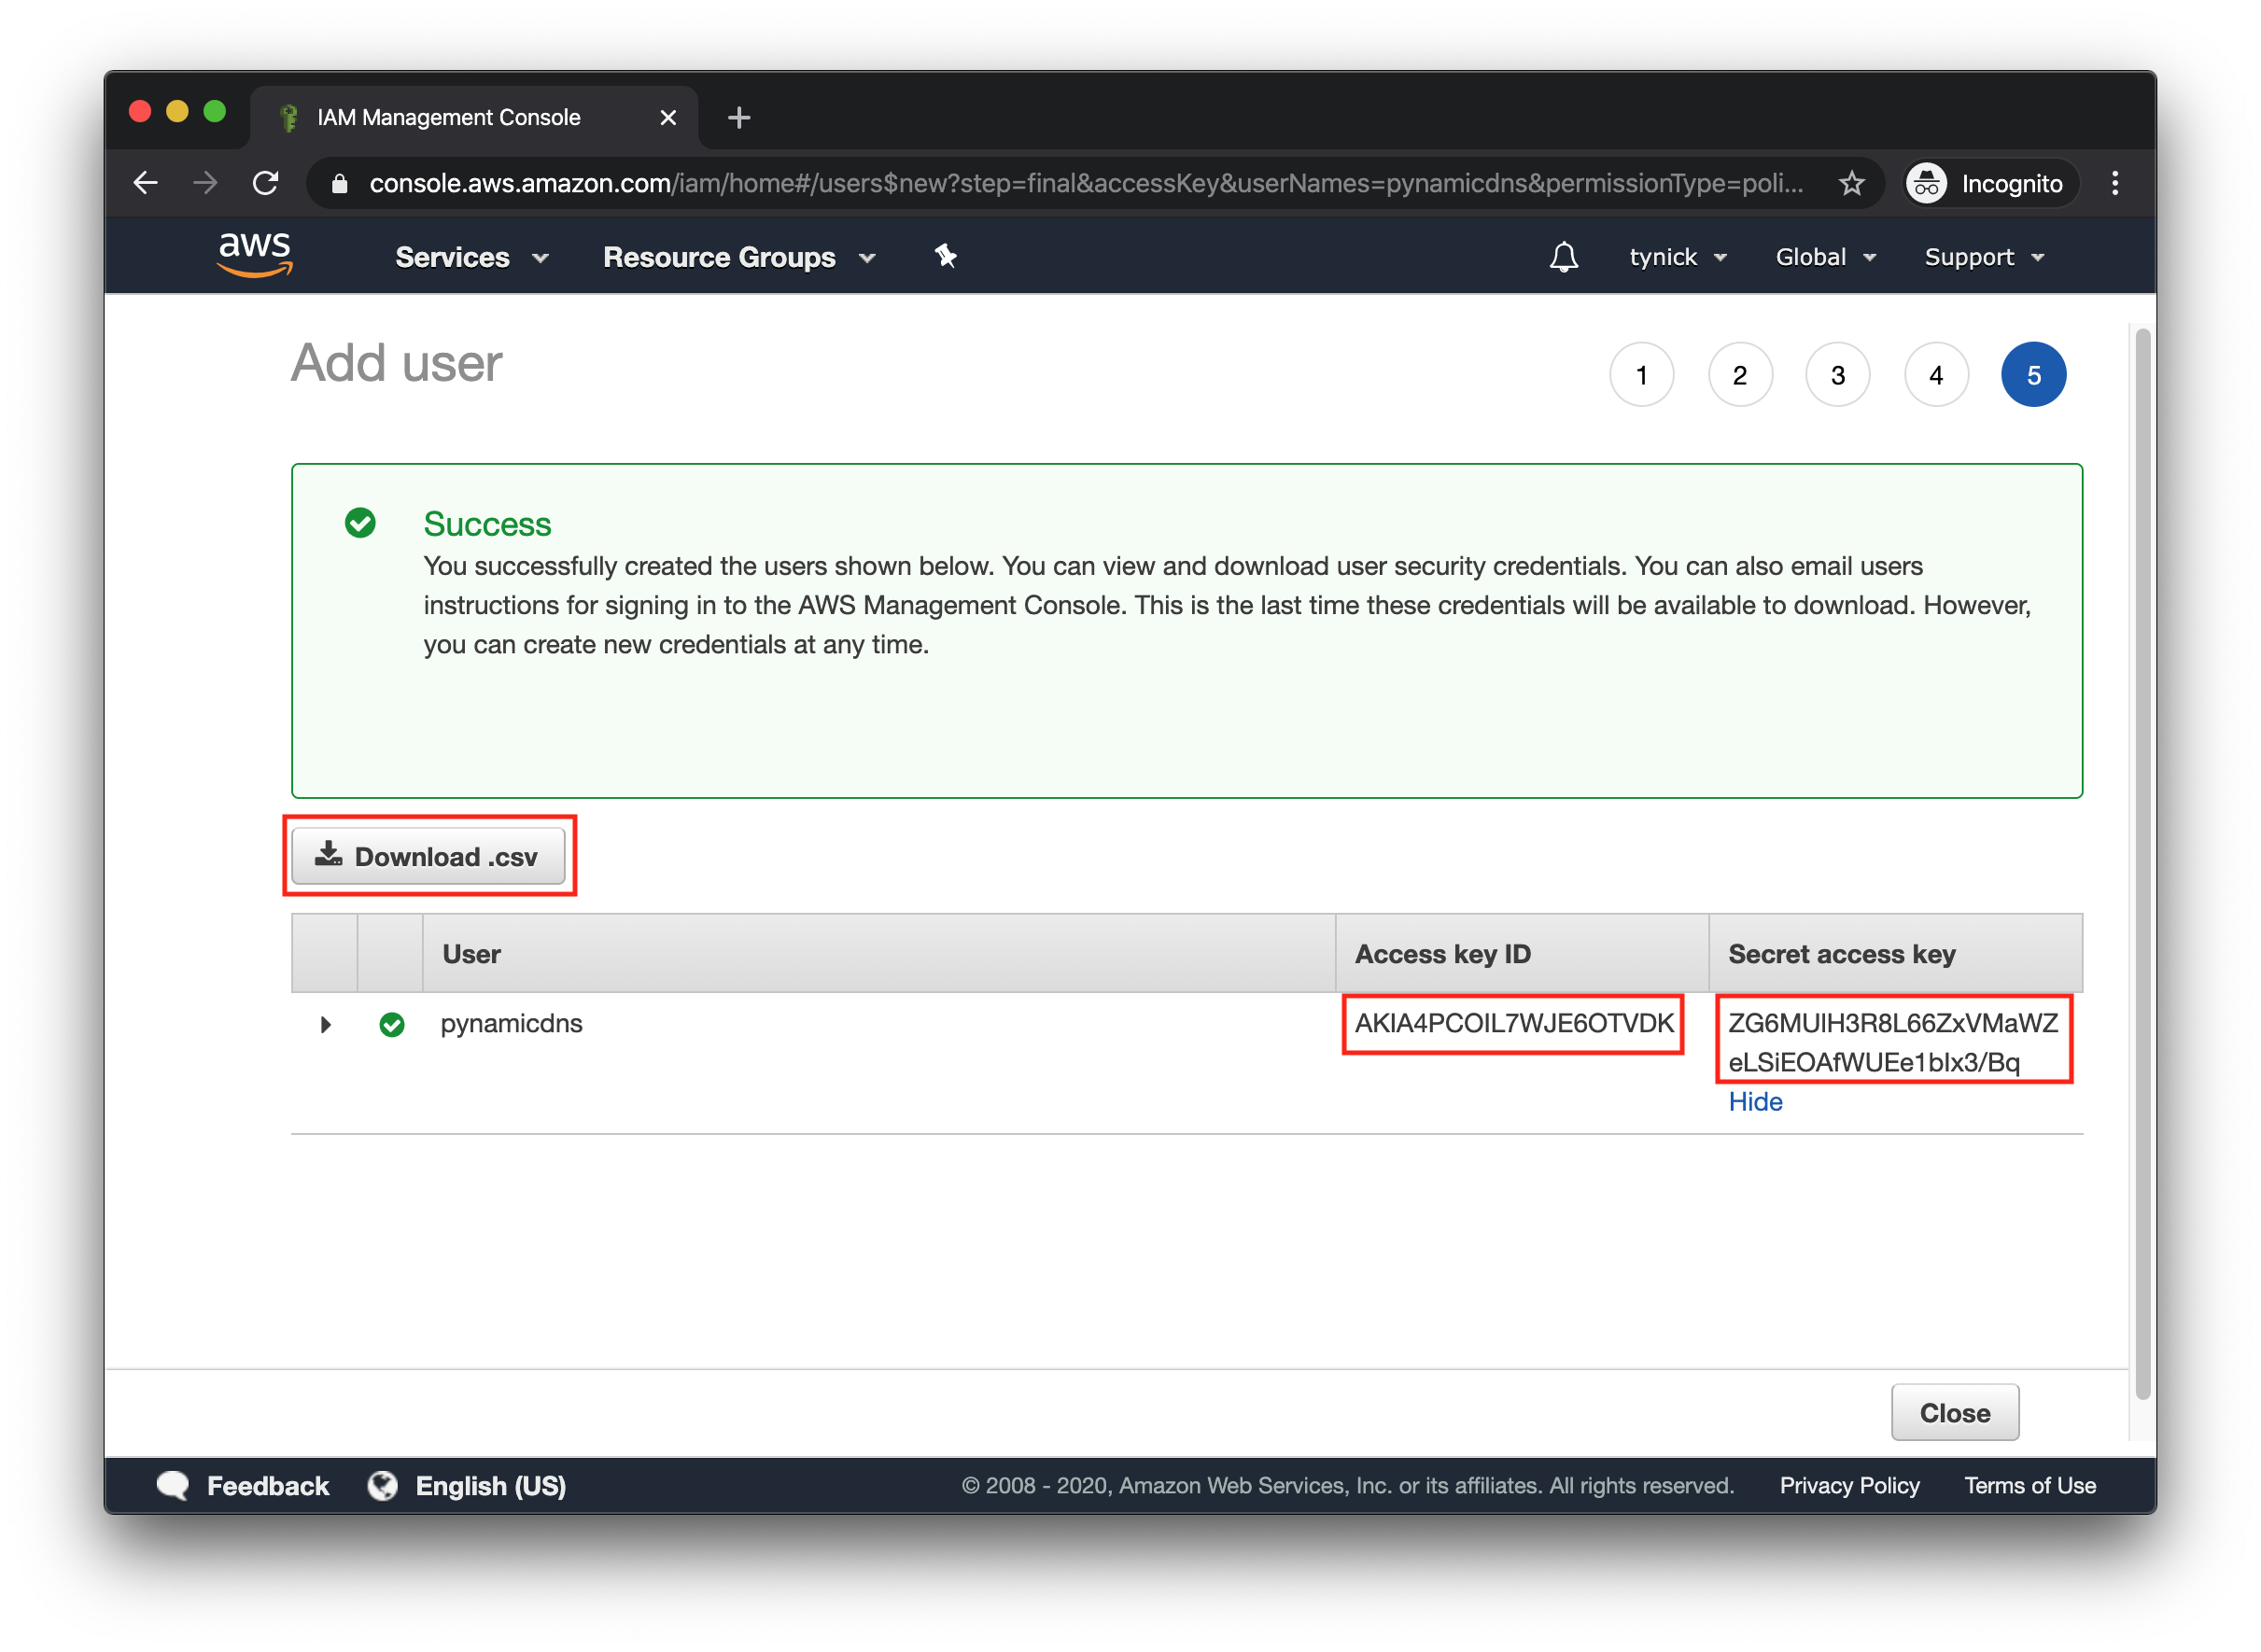
You should be met with a screen telling you that the user was created successfully!
Click the Download .csv button.
Once you leave this screen the Secret access key will no longer be available to view.
If you accidentally close that window or go to another page, the credentials are in the .csv file you downloaded.
Keep the Access key ID and Secret access key safe! Treat them exactly like you would with a username and password. Don’t be like me and take a screenshot to post on the internet!
We are going to move on to the Raspberry Pi portion of this install.
You will need your Hosted Zone ID, Access key ID, and Secret access key.
Configuring Raspberry Pi
This part assumes that you already have a Raspberry Pi setup and running with the latest version of Raspbian.
First, we want to install some packages. We need all of these packages to get PynamicDNS working.
pip3 is a package manager for Python.
git is a version control system. We will use it to download PynamicDNS from the repo on github.com
boto3 is a Python library for working with the AWS API. This allows us to control Route53 programmatically.
Run the following commands to install pip3, git, and boto3 as the root user.
sudo su -
apt-get update -y
apt install python3-pip git -y
pip3 install boto3
Configure boto3
boto3 will need to use the user we created in AWS IAM earlier.
We are going to configure the AWS credentials now.
Run the following commands to create the directory and files that boto3 will look for.
mkdir ~/.aws
touch ~/.aws/credentials
touch ~/.aws/config
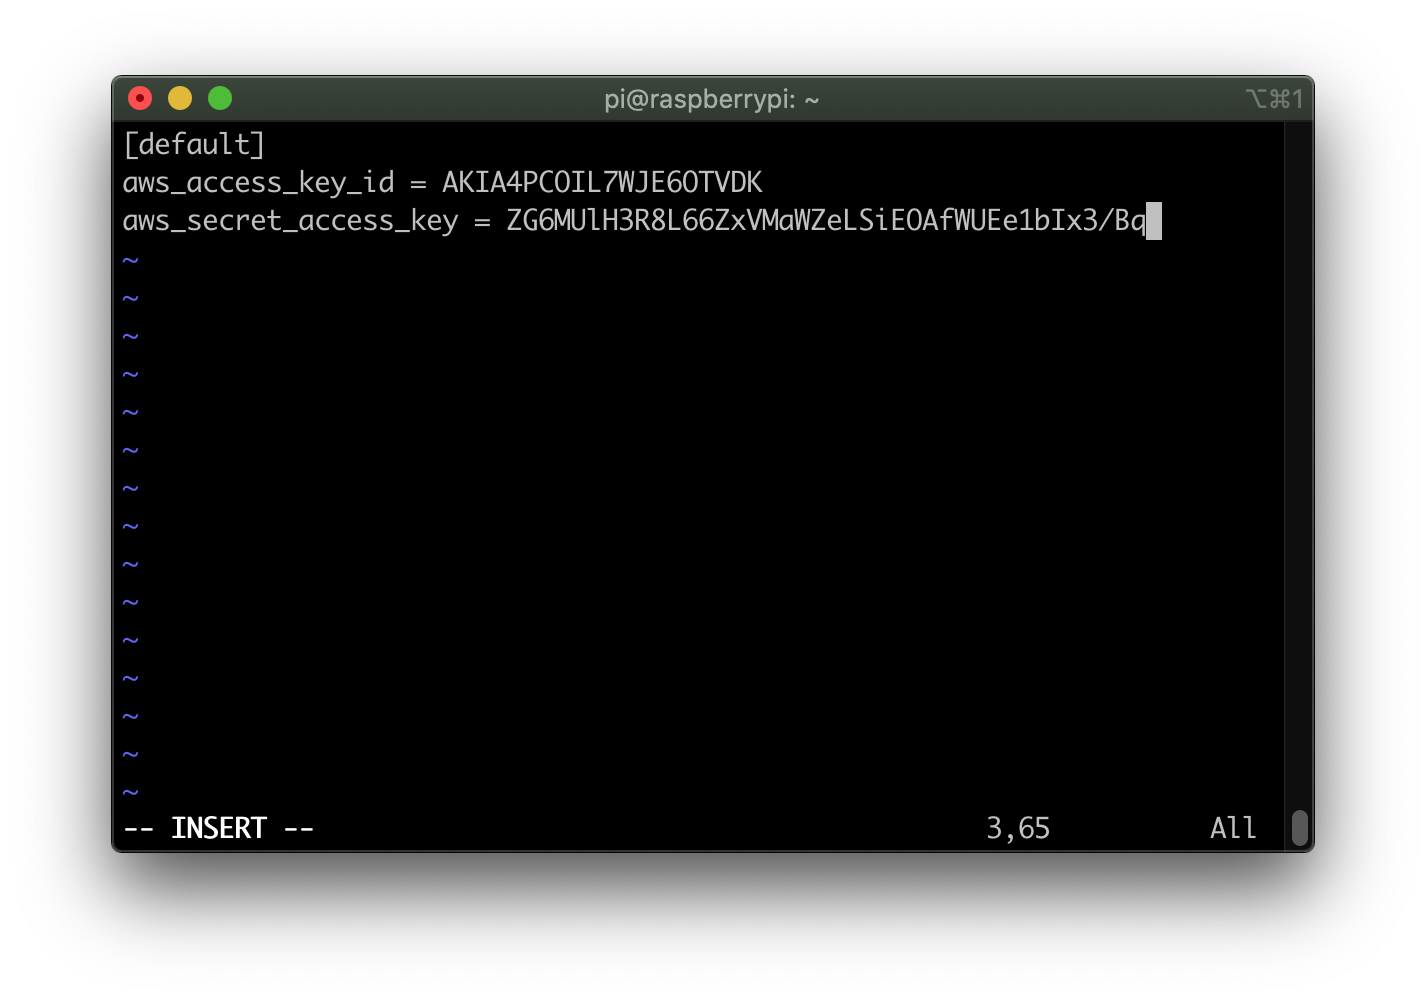
Add the following to the ~/.aws/credentials file.
[default]
aws_access_key_id = <Access key ID>
aws_secret_access_key = <Secret access key>
Be sure to replace <Access key ID> and <Secret access key> with the credentials from the new pynamicdns user you created.
It should look similar to the following screenshot when complete.
This next step tells AWS which region we want to run our boto3 commands. It’s not really applicable for this install because IAM and Route53 are global AWS services. However, it is needed to properly configure boto3.
Add the following to the ~/.aws/config file.
[default]
region=us-west-2
AWS credentials are now configured and boto3 should work!
Download PynamicDNS
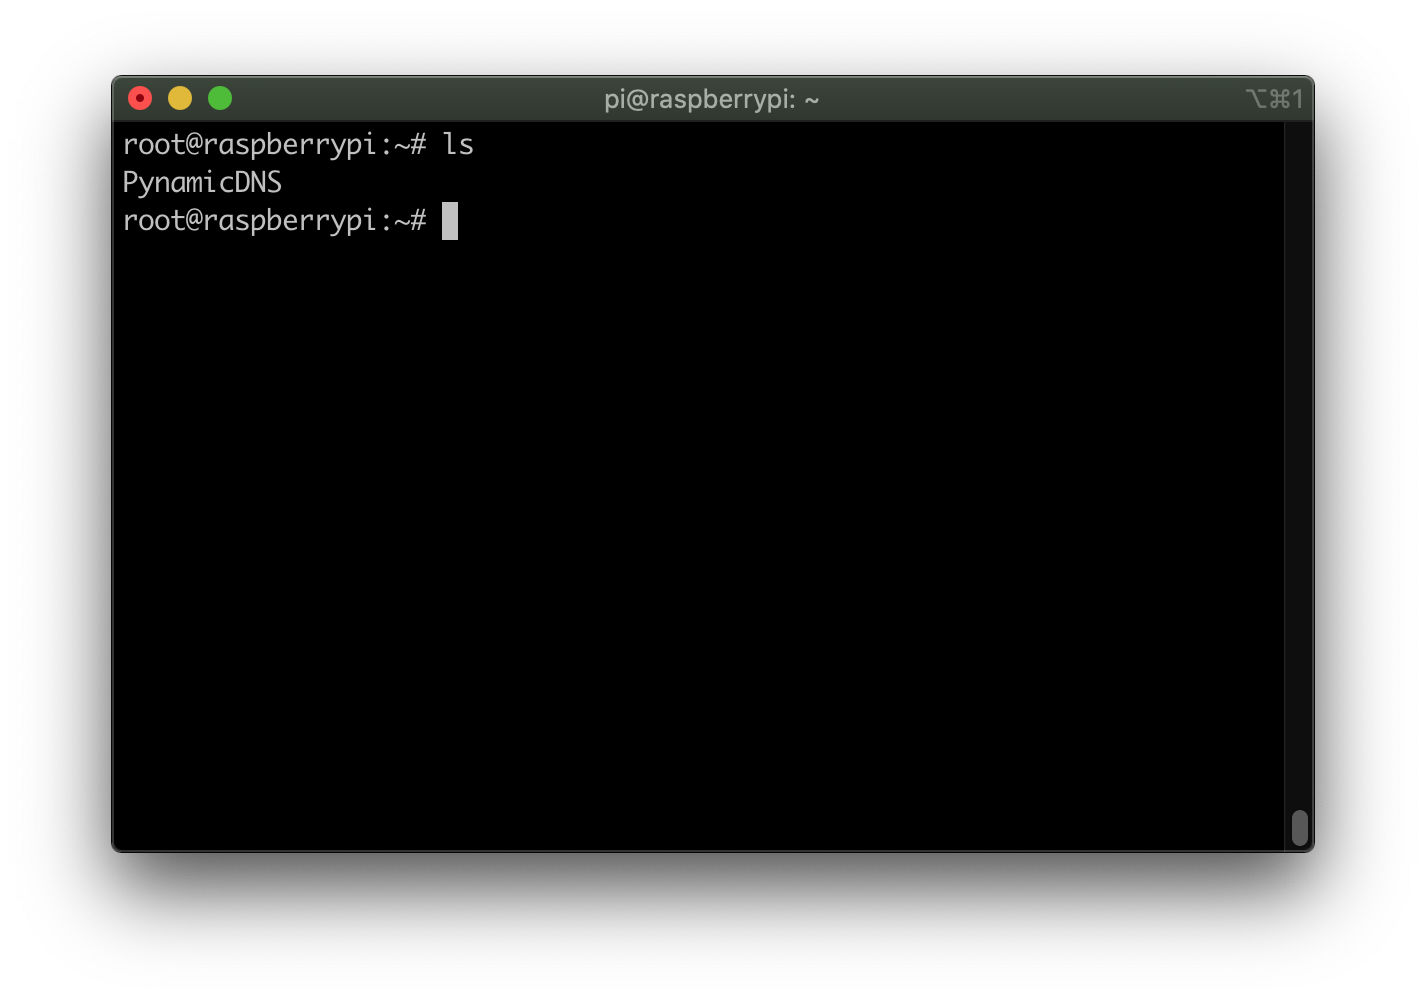
Run the following commands to download PynamicDNS into the root user’s home directory.
cd
git clone https://github.com/tynick/PynamicDNS.git
If you run ls you should see the PynamicDNS directory.
Now we can do a test run!
If everything works out, we can create a cronjob so that it runs every 5 minutes.
Run the following command. Replace <Hosted Zone ID> and <DNS Record> with your own.
python3 ~/PynamicDNS/PynamicDNS.py <DNS Record> <Hosted Zone ID>
You should get a similar response as I did in the screenshot below.
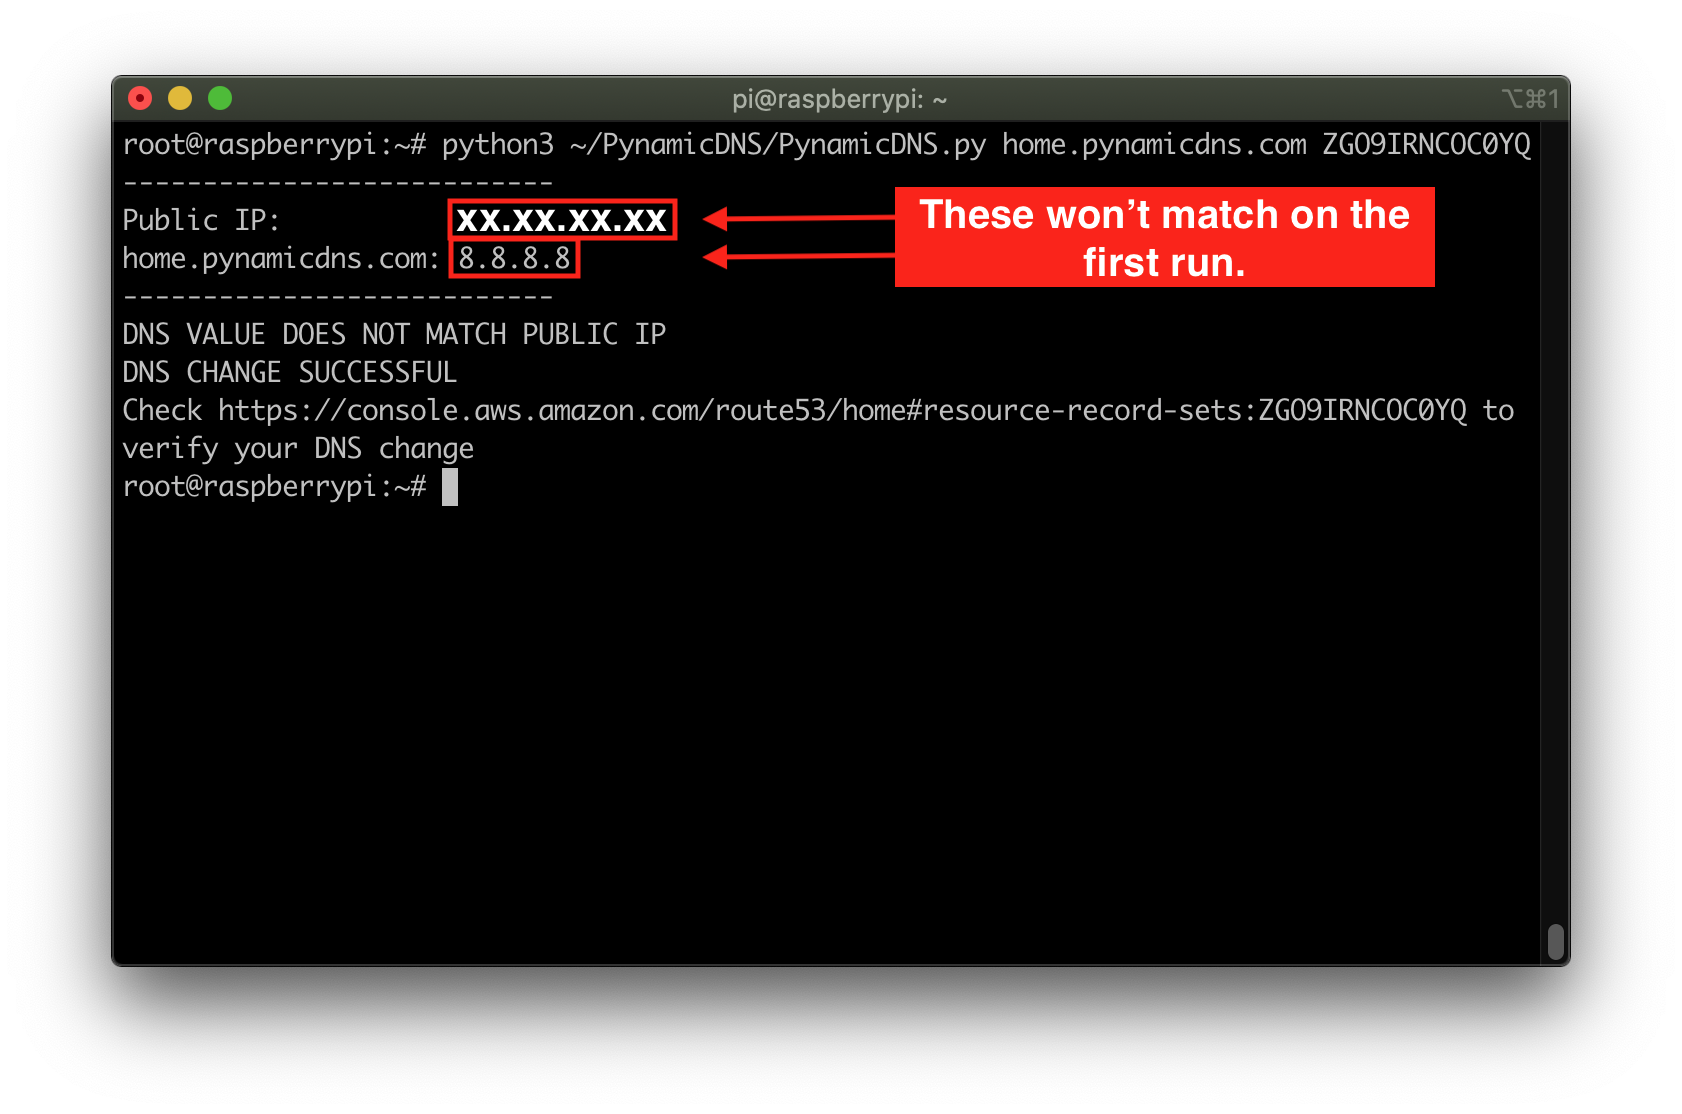
The script should have found your public IP and then checked to DNS record you provided to see what the value was in AWS.
You can copy/paste that URL into your browser to verify that the change has happened. It should take you right to your Hosted Zone.
After you verify that the Route53 record has changed as you expected, run your command again.
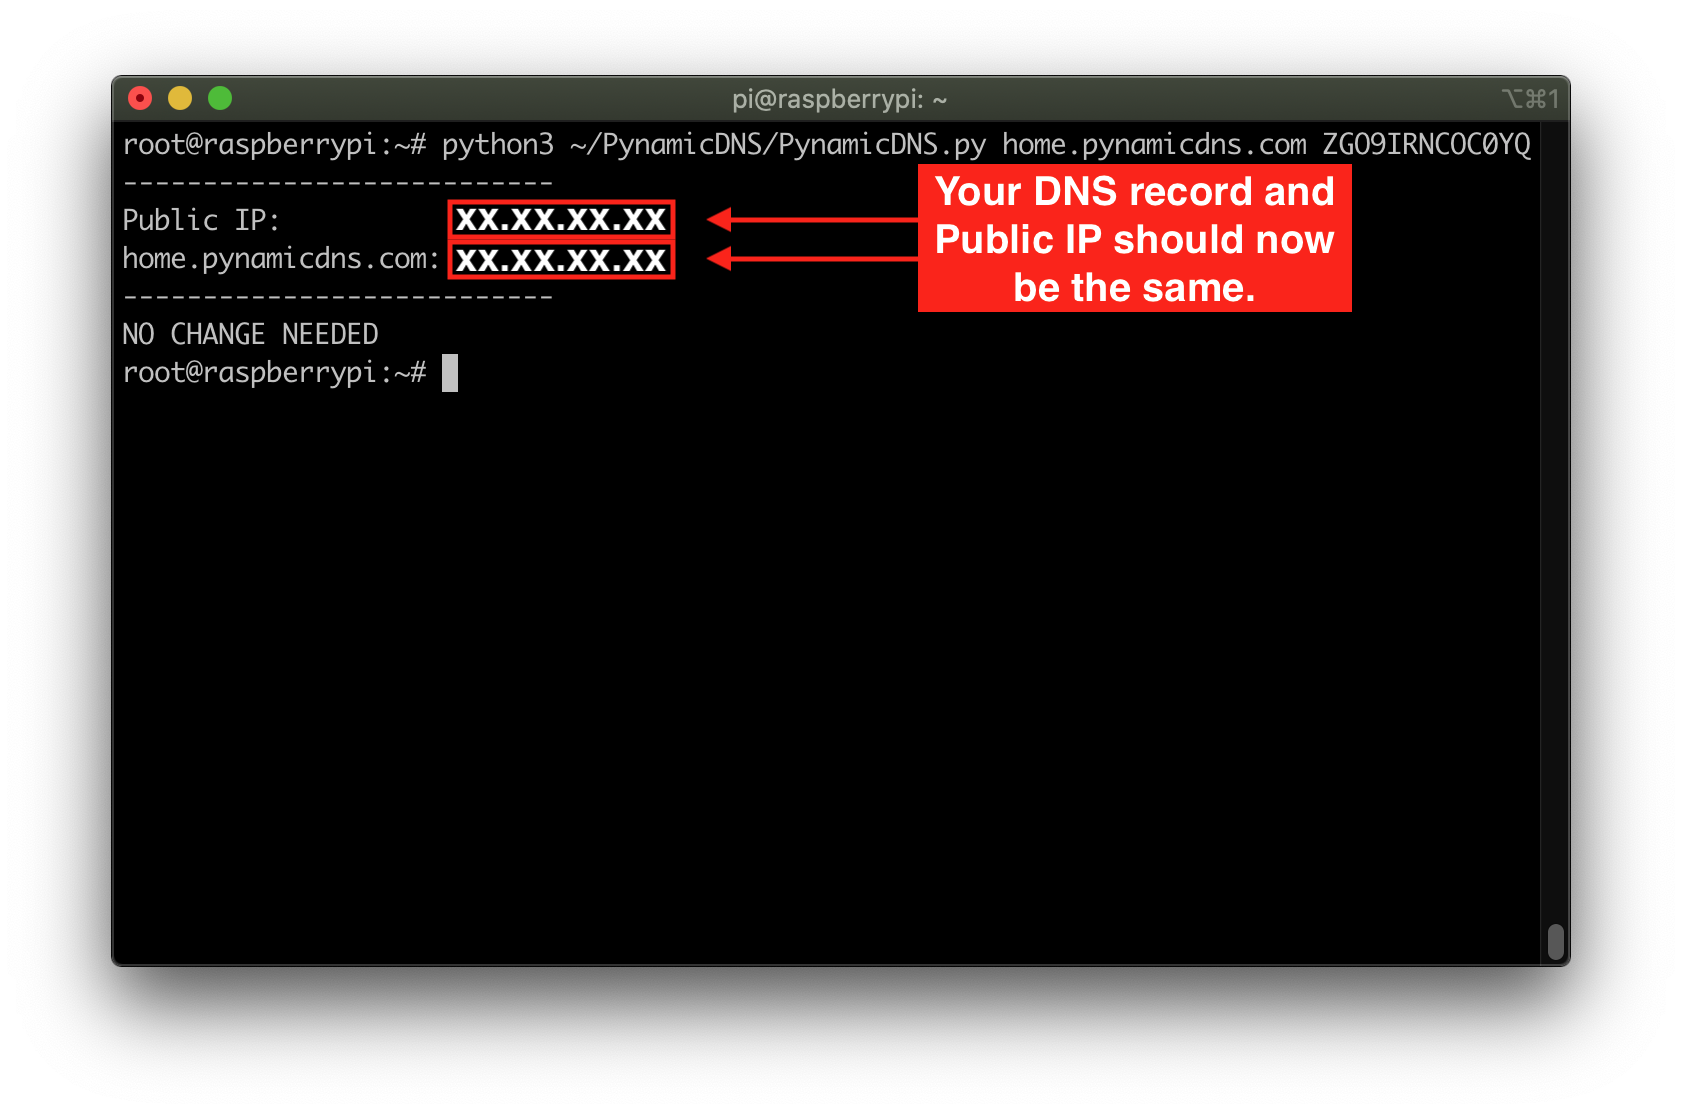
PynamicDNS will now see the change that it made and exit until the next time we run it.
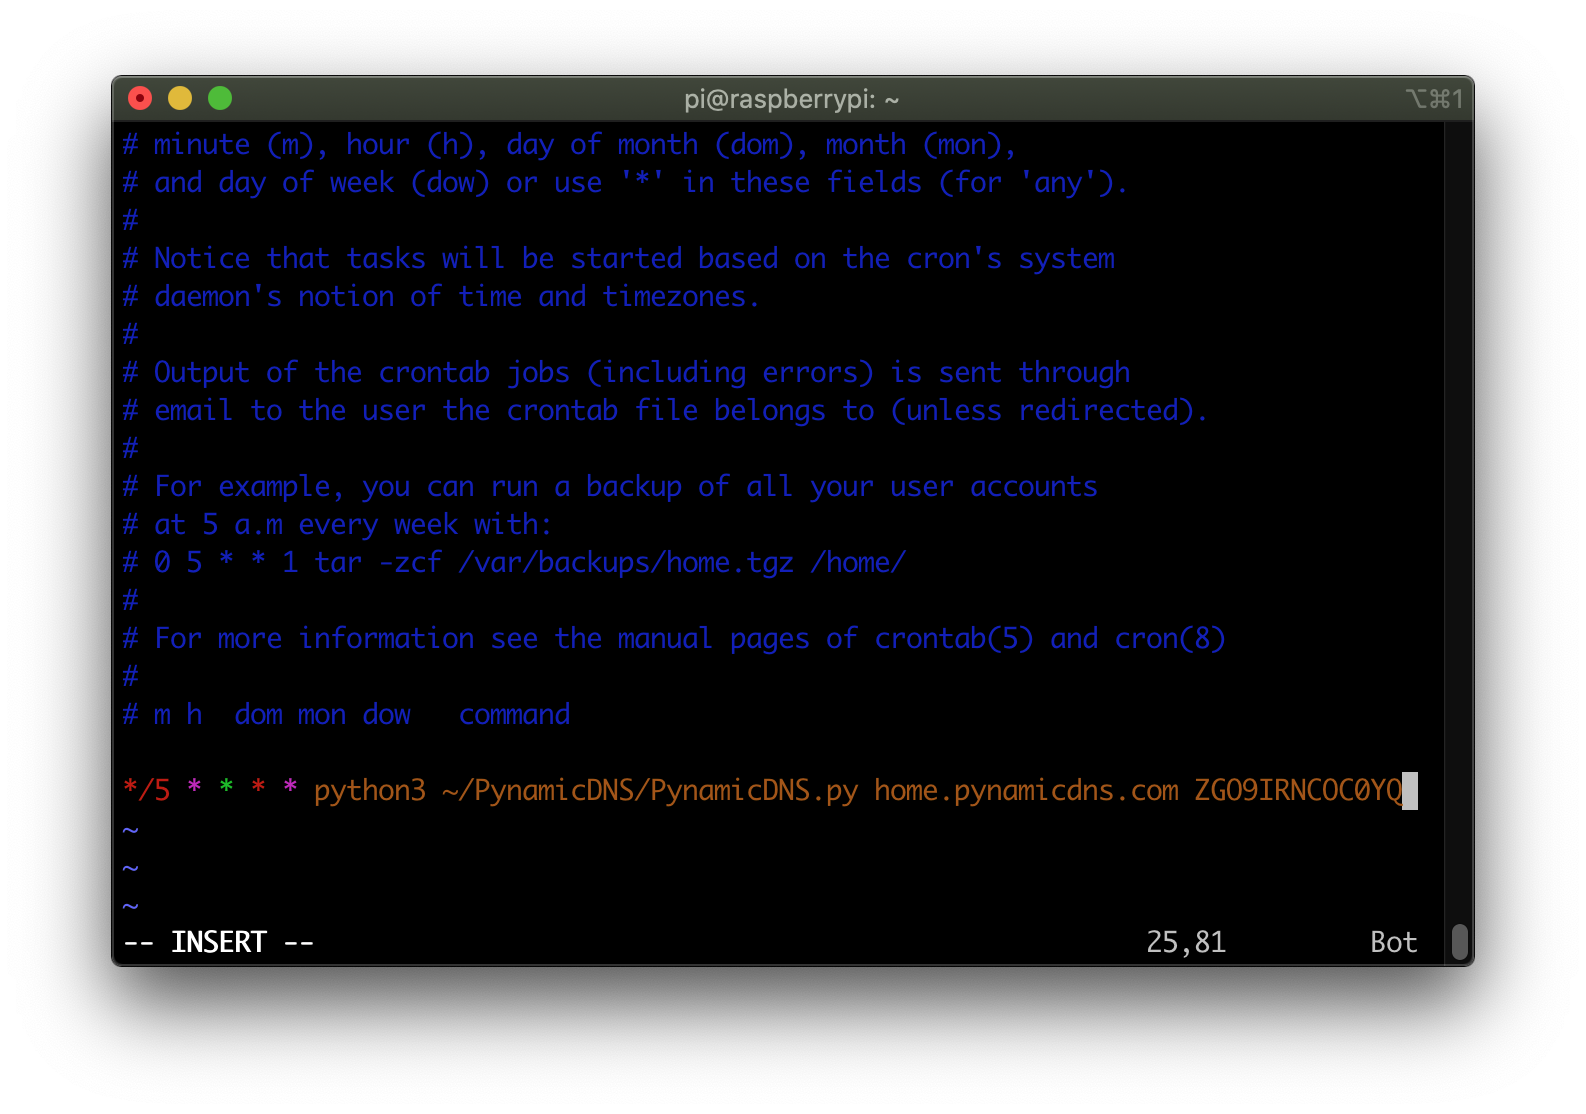
Now that we’ve verified PynamicDNS works, we will set it up to run every 5 minutes.
Run With Cron
We will be using cron to schedule PynamicDNS to run every 5 minutes.
Run the following command to open the crontab editor…
crontab -e
Add the following to the end of the file. Replace
*/5 * * * * python3 ~/PynamicDNS/PynamicDNS.py <DNS Record> <Hosted Zone ID>
Your crontab command should look similar to this screenshot.
Save the file and close the editor.
You are done!
As long as your Raspberry Pi is running, it will make sure the value of your DNS entry matches your public IP.
Pro-tip
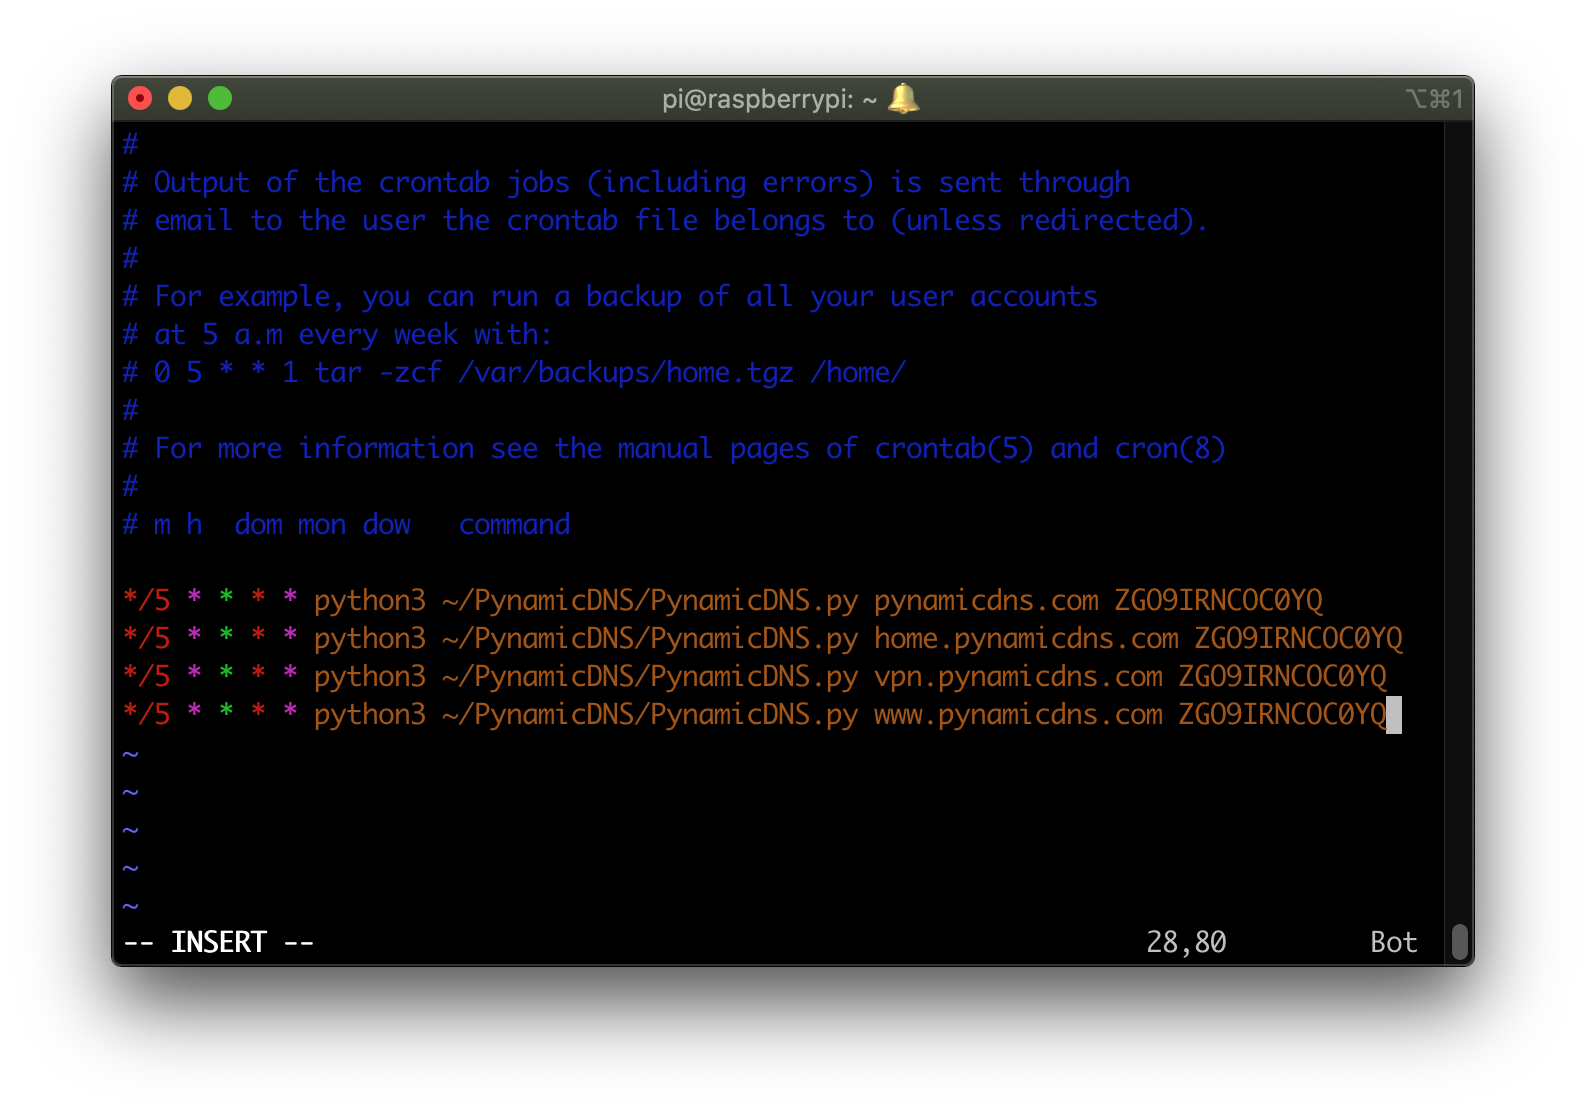
You can even use PynamicDNS to set multiple DNS entries (even in different Hosted Zones) to the same public IP.
Conclusion
PynamicDNS is a very cheap alternative to paying someone else for a hosted dynamic DNS service. Especially if you already have a Pi lying around.
It is pretty lightweight and can easily be configured to run on the same Raspberry Pi as Pi-hole.
I’ll continue to develop it as I see needed. If you find any bugs, please create a new issue on https://github.com/tynick/PynamicDNS/issues.
Feel free to add feature requests as well. I don’t guarantee that I’ll do it, but I will consider pretty much anything.
I’d also accept a PynamicDNS logo as a gift if you are good at that sort of thing…
Twitter would be best if you just have a quick question or want to let me know what you thought.
Subscribe to my mailing list below or follow me on Twitter to be notified when I post.