Controlling WLED With Raspberry Pi Using the WLED API
WLED Automation Using HTTP Request API
I started using WLED last year and quickly switched all of my other LEDs over. I have 10+ WLED installs in my house as I write this. I got a bit carried away.
Since then, I’ve been making a bunch of WLED tutorials.
I have had many people contact me via Twitter or email me about these posts.
These are the 2 most common requests/questions I get…
How can I control WLED with a Raspberry Pi?
How do I use the WLED API?
So I decided to make a post covering both requests.
I use SmartThings and webCoRE to automate my WLED installs but I totally understand why people are asking for this.
Not everyone has a smarthome running SmartThings or HomeAssistant. A lot of people are already using a Raspberry Pi at home for one thing or another. This tutorial aims to help those people automate their WLED setups.
I wrote this tutorial using a Raspberry Pi running the latest version of Raspbian but it should work on pretty much any host running Linux.
You should also have a working installation of WLED already. If not, check out how to get started with WLED and then come back here.
Here are all the parts I used to make this work.
Parts Used For This Project
| Part/Link | Comment | |
|---|---|---|
| Raspberry Pi 4 4GB | I used a Raspberry Pi 4 4GB to make this tutorial but you can absolutely use another version of the Pi if you have one laying around. Any linux computer will work. This kit comes with the board, power supply and heat sinks. It’s a pretty good deal for the price if you don’t have the parts already. | |
| Samsung MicroSDHC EVO Select | I have been running these cards in all of my Raspberry Pis for a while without issue. | |
| ESP8266 Dev Board | Honestly, you might as well get the 4 pack. No one does just 1 WLED project and they are really inexpensive. | |
| WS2812B LED Strip | 150 individually addressable RGB LEDs. | |
| Jumper Wires | Used to connect the ESP8266 to the LED strips. | |
| Micro USB Data Cable | Used for powering the ESP8266. You probably have 38 of these in your junk drawer. You just need to make sure it is capable of carrying power as well as data. I do a lot of projects so the 3 pack has been the best value for me. | |
| USB Wall Charger | Output 5V and up to 2.4 Amps to the ESP8266. |
What Is The WLED HTTP Request API?
Let’s start with the basics.
To talk to the ESP8266 we will be using HTTP (HyperText Transfer Protocol). HTTP is the client/server protocol that runs a lot of the internet.
When you type a URL into your browser it makes an HTTP GET request to the server where that website lives. The server looks at the request for https://tynick.com/ and says, “Oh hi, you want the homepage for tynick.com? Sure thing, here you go!”, and then it sends back the webpage at the URL you requested.
API stands for Application Programming Interface. Meaning it provides an interface that allows us to send or receive information to an application.
WLED has an HTTP request API built in. If you’ve never worked with an API or the command line before, the documentation can be daunting.
APIs are awesome because they allow you to manipulate applications remotely (usually using HTTP) or locally. This means we can use our Raspberry Pi to send commands to WLED and
I’ll do my best to explain.
How To Make An HTTP Request
There are many different types of HTTP requests.
GET
POST
PUT
HEAD
DELETE
PATCH
OPTIONS
As of this post, the WLED HTTP request API only uses GET requests. That’s what we will be working with today.
We will be using a Linux utility named curl to make our HTTP requests to the WLED API.
Let’s break down the following command so you understand what you are doing.
curl "http://192.168.1.144/win&T=1&A=128&FX=0&SX=0&R=255&G=0&B=0"
| Command | Meaning |
|---|---|
| curl | The tool that sends the request to WLED. There are many different options you can use with curl. Luckily we only need to send a basic HTTP GET request. By default without any options, curl will send an HTTP GET request. |
| http:// | Protocol that we are using. As explained earlier, HTTP works by a client sending a request to a server which then returns a response. |
| 192.168.1.144 | IP address of the WLED install that we are working with. |
| /win | API endpoint. This is where the API lives. The server sees this and says “looks like they want to talk to the API!” |
| &T=1&A=128&FX=0&R=255&G=0&B=0 | Query string. It looks like a big mess of garbage at first so I’ll explain more below. |
A Query String works by setting parameters to a value.
Check out the table below and hopefully this will make more sense.
You’ll notice that I didn’t include the &. This is because it is basically just used as a separator to tell the API that we are sending a new parameter=value.
| Parameter and Value | Meaning |
|---|---|
| T=1 | T is the Off/On/Toggle parameter and we are setting a value of 1, which means On. 0 will turn the LEDs off. 1 will turn the LEDs on. 2 will toggle the LEDs on if they are already off and off if they are already on. |
| A=128 | A is the master brightness parameter and we are setting the value to 128. The range of values for this parameter runs from 0-255. |
| FX=0 | FX is the LED Effect parameter and we are setting the value to 0. This will set our LEDs to a solid color or no effect. The range of values for this parameter runs from 0-79. |
| R=255 | R is the red parameter and we are setting the value to 255. This will turn the red value all the way up. The range of values for this parameter runs from 0-255. |
| G=0 | G is the green parameter and we are setting the value to 0. We don’t want any green at all. The range of values for this parameter runs from 0-255. |
| B=0 | B is the blue parameter and we are setting the value to 0. We don’t want any blue at all. The range of values for this parameter runs from 0-255. |
In english, this query string basically says the following…
Turn the LEDs on.
Set the brightness of the LEDs close to the middle.
Don't use any effects.
Turn the red value of the LEDs all the way up.
Turn the green value of the LEDs all the way down.
Turn the blue value of the LEDs all the way down.
Hopefully that helps make sense of this if you weren’t familiar with HTTP requests.
The WLED documentation has so many more options than I am going to cover but this post will help you understand what you are actually looking at.
Once you understand the basics of how this format, the rest is just WLED specific options.
I’ll give you a few more example commands to get you started.
After that we will go into setting this up on a Raspberry Pi so it automatically sends your commands to WLED at specific times.
WLED API Examples
I’m just going to list a bunch of examples so you can get a feel for it. Feel free to modify these to your liking or just copy/paste them as is into your terminal.
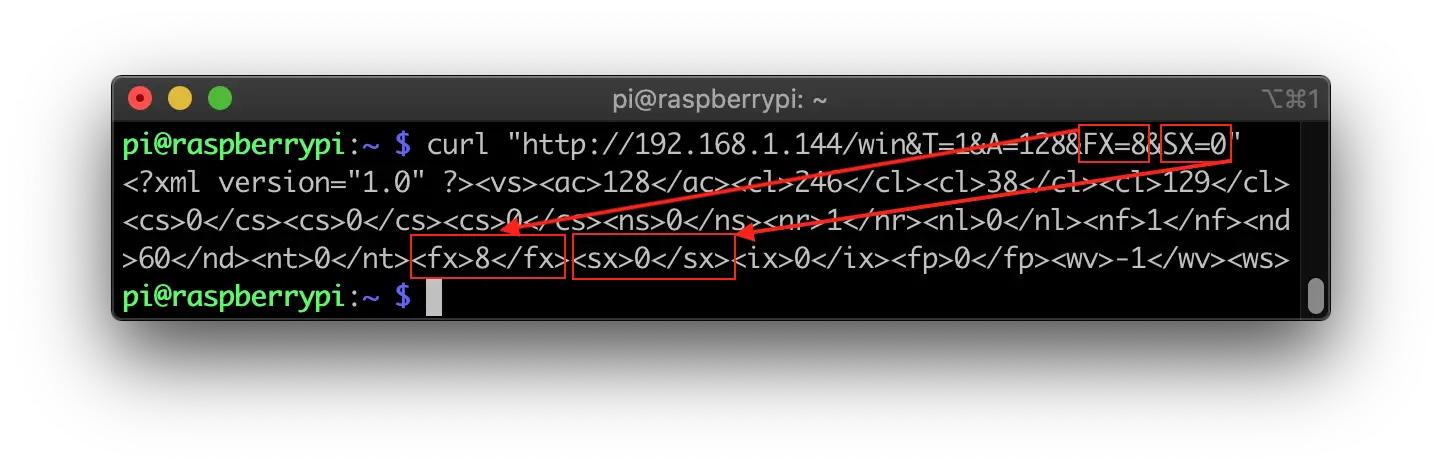
When you send an API request, you will get a response back from the WLED web server. It’s hard to read but the response actually contains the current state of WLED. You can match up values you set to verify it worked without even looking at your LEDs. The response will look like the following.
A couple of troubleshooting notes before we get started…
Change 192.168.1.144 to your own WLED IP address
Be sure to include the quotes around the URLs
When setting your colors, you can use a color picker to get the RGB values of the color you want.
Turn LEDs Off
curl "http://192.168.1.144/win&T=0"
Turn LEDs On
curl "http://192.168.1.144/win&T=1"
Toggle LEDs On/Off
curl "http://192.168.1.144/win&T=2"
Turn on and constantly fade all LEDs from a single random color to another single random color very slowly
curl "http://192.168.1.144/win&T=1&A=128&FX=5&SX=0&IX=255"
Turn on and constantly fade all LEDs from a single random color to another single random color very quickly
curl "http://192.168.1.144/win&T=1&A=128&FX=5&SX=255&IX=255"
Turn on and change all LEDs from a single random color to another single random color after a few seconds
curl "http://192.168.1.144/win&T=1&A=128&FX=5&SX=0&IX=0"
Turn on and change all LEDs from a single random color to another single random color very rapidly
curl "http://192.168.1.144/win&T=1&A=128&FX=5&SX=255&IX=0"
Turn on and fade LEDs through all colors of the rainbow
curl "http://192.168.1.144/win&T=1&A=128&FX=8&SX=0"
Turn on and scan a red LED from end to end of your LED strip very slowly
curl "http://192.168.1.144/win&T=1&A=128&FX=10&SX=0&R=255&G=0&B0"
Turn on and scan a red LED from end to end of your LED strip very rapidly
curl "http://192.168.1.144/win&T=1&A=128&FX=10&SX=255&R=255&G=0&B0"
Turn on and scan a blue LED from end to end of your LED strip very slowly
curl "http://192.168.1.144/win&T=1&A=128&FX=10&SX=0&R=0&G=0&B255"
Turn on and scan a blue LED from end to end of your LED strip very rapidly
curl "http://192.168.1.144/win&T=1&A=128&FX=10&SX=255&R=0&G=0&B255"
Turn on and scan a green LED from end to end of your LED strip very slowly
curl "http://192.168.1.144/win&T=1&A=128&FX=10&SX=0&R=0&G=255&B0"
Turn on and scan a green LED from end to end of your LED strip very rapidly
curl "http://192.168.1.144/win&T=1&A=128&FX=10&SX=255&R=0&G=255&B0"
Turn on and alternate red and green lights for Christmas without any changes
curl "http://192.168.1.144/win&T=1&A=128&FX=44&SX=0"
Turn on and alternate red and green lights for Christmas and swap them slowly
curl "http://192.168.1.144/win&T=1&A=128&FX=44&SX=1"
Turn on and alternate red and green lights for Christmas and swap them rapidly
curl "http://192.168.1.144/win&T=1&A=128&FX=44&SX=255"
These examples should be enough to get you started. I could go on for years with all the things you can do. I didn’t even scratch the surface.
Notice for most of these I’m only changing a 1 or 2 values at a time and you can get a completely different look.
After you figure out what curl commands you’d like to use, move on to the next section to automate the process using a Raspberry Pi and Linux.
WLED With Raspberry Pi Or Linux
To automate WLED on our Raspberry Pi, we are going to use something called cron. Cron is a Linux utility used for scheduling tasks or scripts to run.
Running the following command will open up an editor in your terminal.
crontab -e

If you are running this command for the first time you will be asked what editor you’d like to use. Choose whatever option you are most comfortable with and press enter.
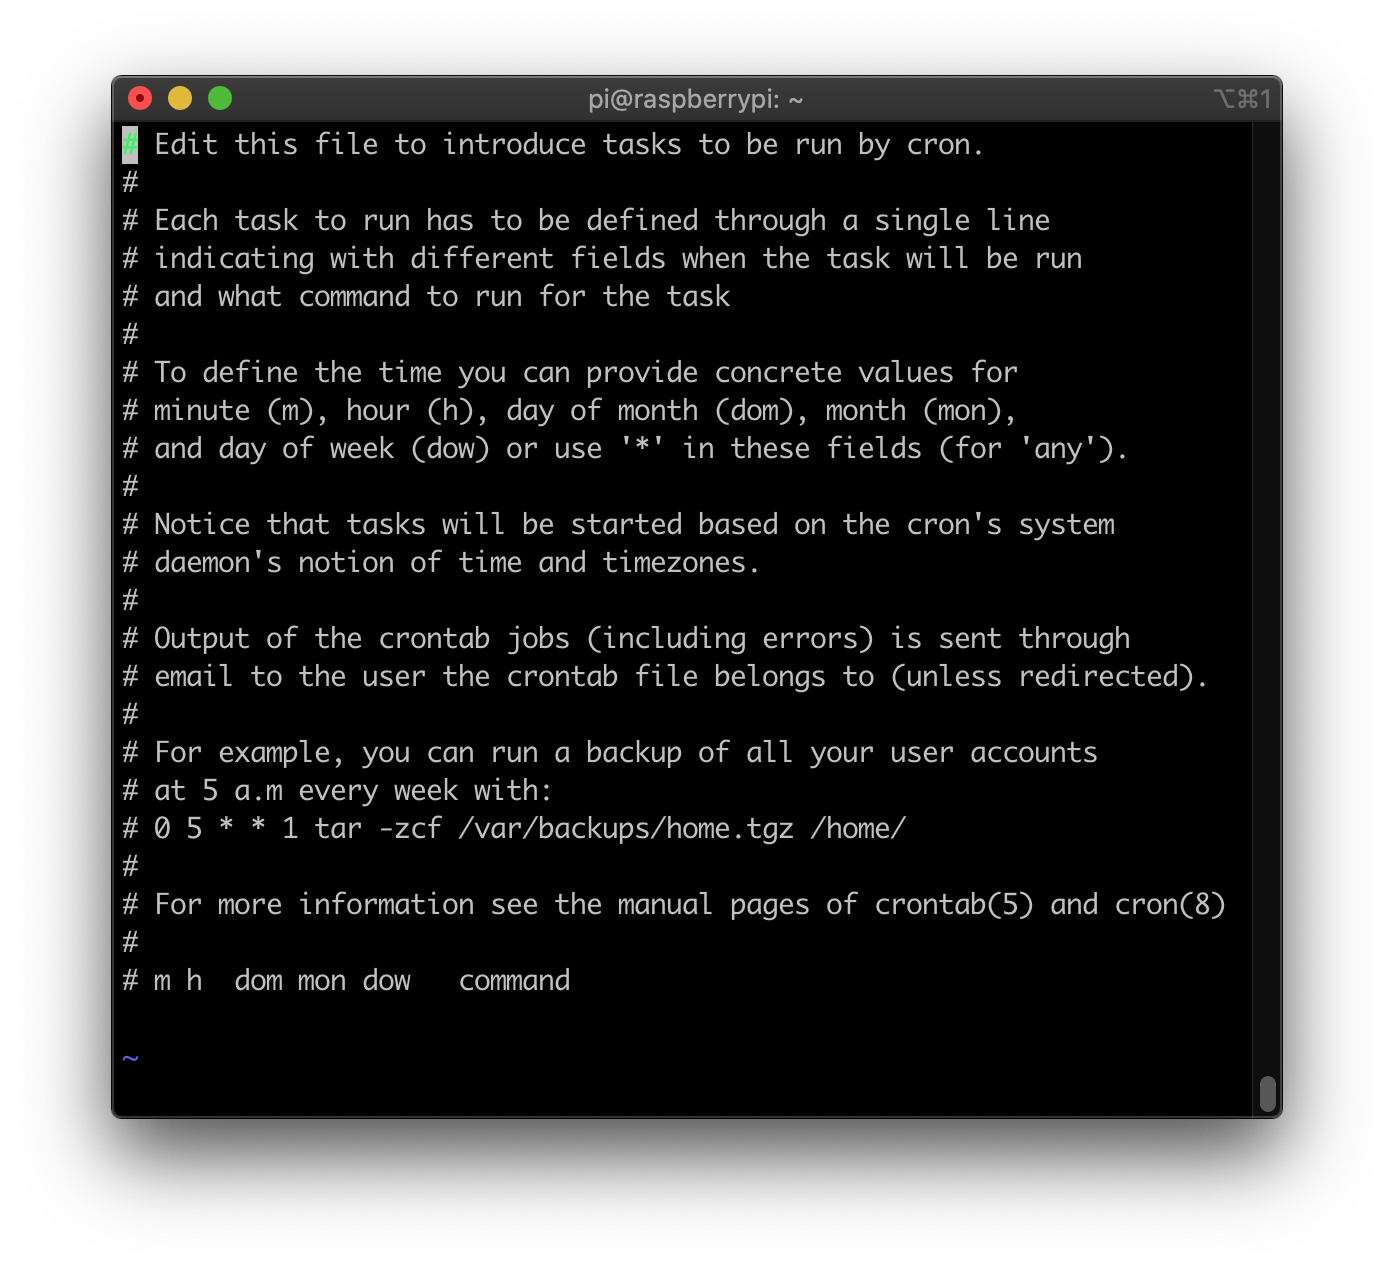
The file that opened is where you will keep all of your scheduled tasks.
Cron can also be a bit confusing at first glance. Don’t worry, I’ll explain!
Let’s start by looking at the format of a cron job.
* * * * * curl "http://192.168.1.144/win&T=0"
Here we have * * * * * prepended to a command that turns off WLED. What does it mean?
The first 5 characters separated by spaces in a cron job each do something different. The * character basically means every.
| Character | Meaning | Explanation |
|---|---|---|
| 1 | Minute | Can be set to 0-59 or * (Every minute) |
| 2 | Hour | Can be set to 0-23 or * (Every hour) |
| 3 | Day of month | Can be set to 1-31 or * (Every day of month) |
| 4 | Month | Can be set to 1-12 or * (Every month) |
| 5 | Day of week | Can be set to 0-7 (Sunday can be 0 or 7 depending on how you start your week) or * (Every day of week) |
Translated to English, that cron job from above says the following…
Every minute
Every hour
Every day of the month
Every month
Every day of the week
Turn off WLED
In short…
Turn off WLED once a minute!
I’ll give you a few more useful examples that you can manipulate to your own needs.
WLED Crontab Examples
On the 1st of December, turn on Christmas LEDs
0 0 1 12 * curl "http://192.168.1.144/win&T=1&A=128&FX=44&SX=1"
At 5am the morning after Christmas Day, turn off LEDs
0 5 26 12 * curl "http://192.168.1.144/win&T=1&T=0"
At midnight on New Years Eve, turn on LEDs with a rainbow strobe light
0 0 1 1 * curl "http://192.168.1.144/win&T=1&A=128&FX=24&SX=255"
On Wednesdays at 5am to remind you that it is trash day, turn on pulsing red LEDs
0 5 * * 3 curl "http://192.168.1.144/win&T=1&A=128&FX=2&SX=128&R=255&G=0&B=0"
At 5am on Valentine’s Day, turn on solid pink LEDs
0 17 14 2 * curl "http://192.168.1.144/win&T=1&A=128&FX=0&R=246&G=38&B=129"
Every night at 7pm, turn on and fade LEDs through all colors of the rainbow
0 19 * * * curl "http://192.168.1.144/win&T=1&A=128&FX=8&SX=0"
Every day at 4:30am, turn off LEDs
30 4 * * * curl "http://192.168.1.144/win&T=1&A=128&FX=8&SX=0"
Hopefully you are starting to get the idea.
Cron is very customizable and robust. Just play with it until you become familiar.
You can/should also use a crontab checker to verify you are setting things up as you planned.
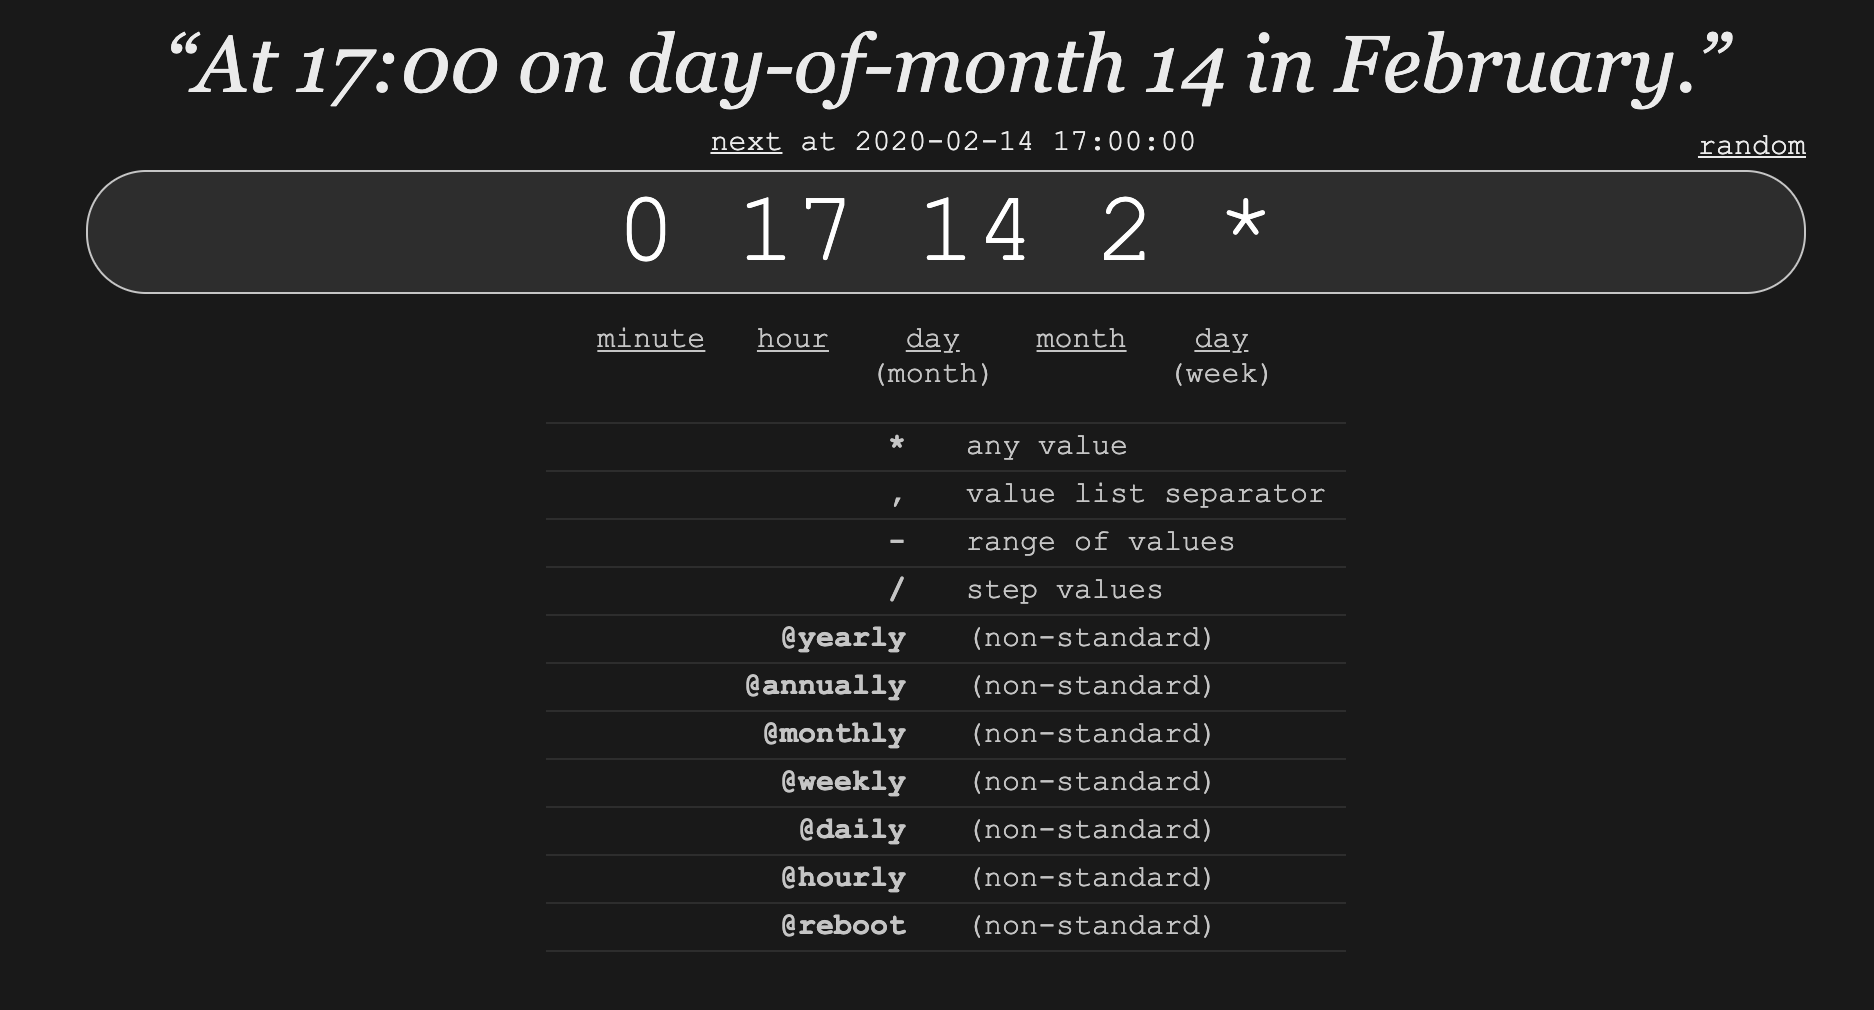
This is what the crontab checker shows when you paste the 0 17 14 2 * line in from our Valentine’s Day cron job.
You can see the meaning of your cron job and the exact time it will be ran next by cron. It’s a very useful troubleshooting tool.
You just need to put your jobs on separate lines at the end of the file in crontab -e. Look at my example below if this doesn’t make sense.
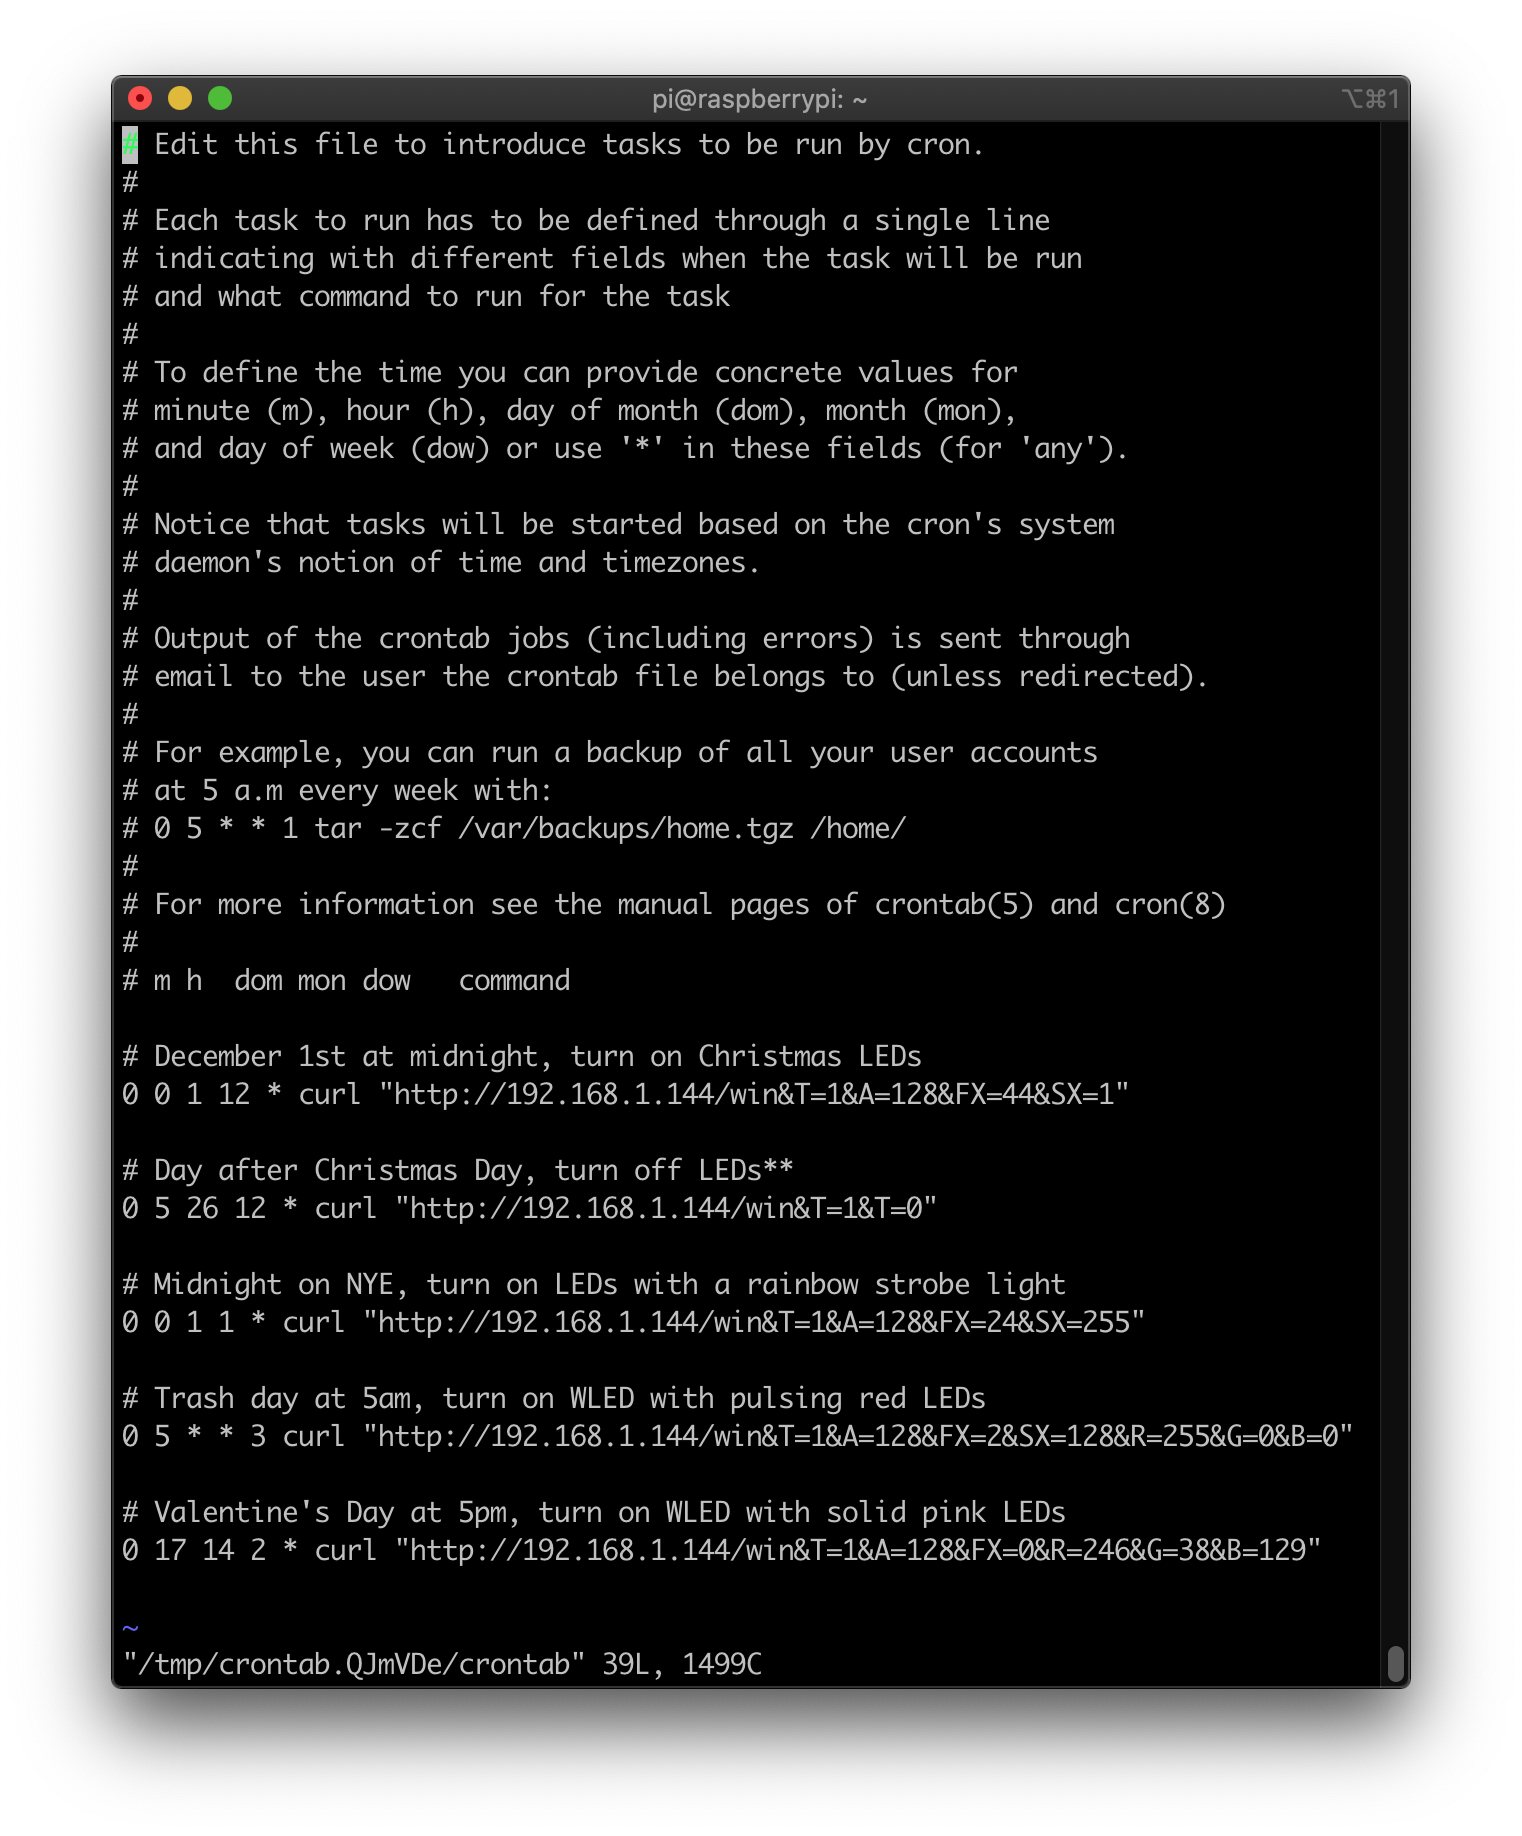
Feel free to copy and paste mine if you can’t be bothered with typing them out yourself.
# December 1st at midnight, turn on Christmas LEDs
0 0 1 12 * curl "http://192.168.1.144/win&T=1&A=128&FX=44&SX=1"

# Day after Christmas Day, turn off LEDs**
0 5 26 12 * curl "http://192.168.1.144/win&T=1&T=0"

# Midnight on NYE, turn on LEDs with a rainbow strobe light
0 0 1 1 * curl "http://192.168.1.144/win&T=1&A=128&FX=24&SX=255"

# Trash day at 5am, turn on WLED with pulsing red LEDs
0 5 * * 3 curl "http://192.168.1.144/win&T=1&A=128&FX=2&SX=128&R=255&G=0&B=0"

# Valentine's Day at 5pm, turn on WLED with solid pink LEDs
0 17 14 2 * curl "http://192.168.1.144/win&T=1&A=128&FX=0&R=246&G=38&B=129"
Notice the lines that start with #. These are just comments. You can use them to help you remember why you put that cron job in and what it does.
You can also use crontab -l to simply list your cron jobs without opening the editor.
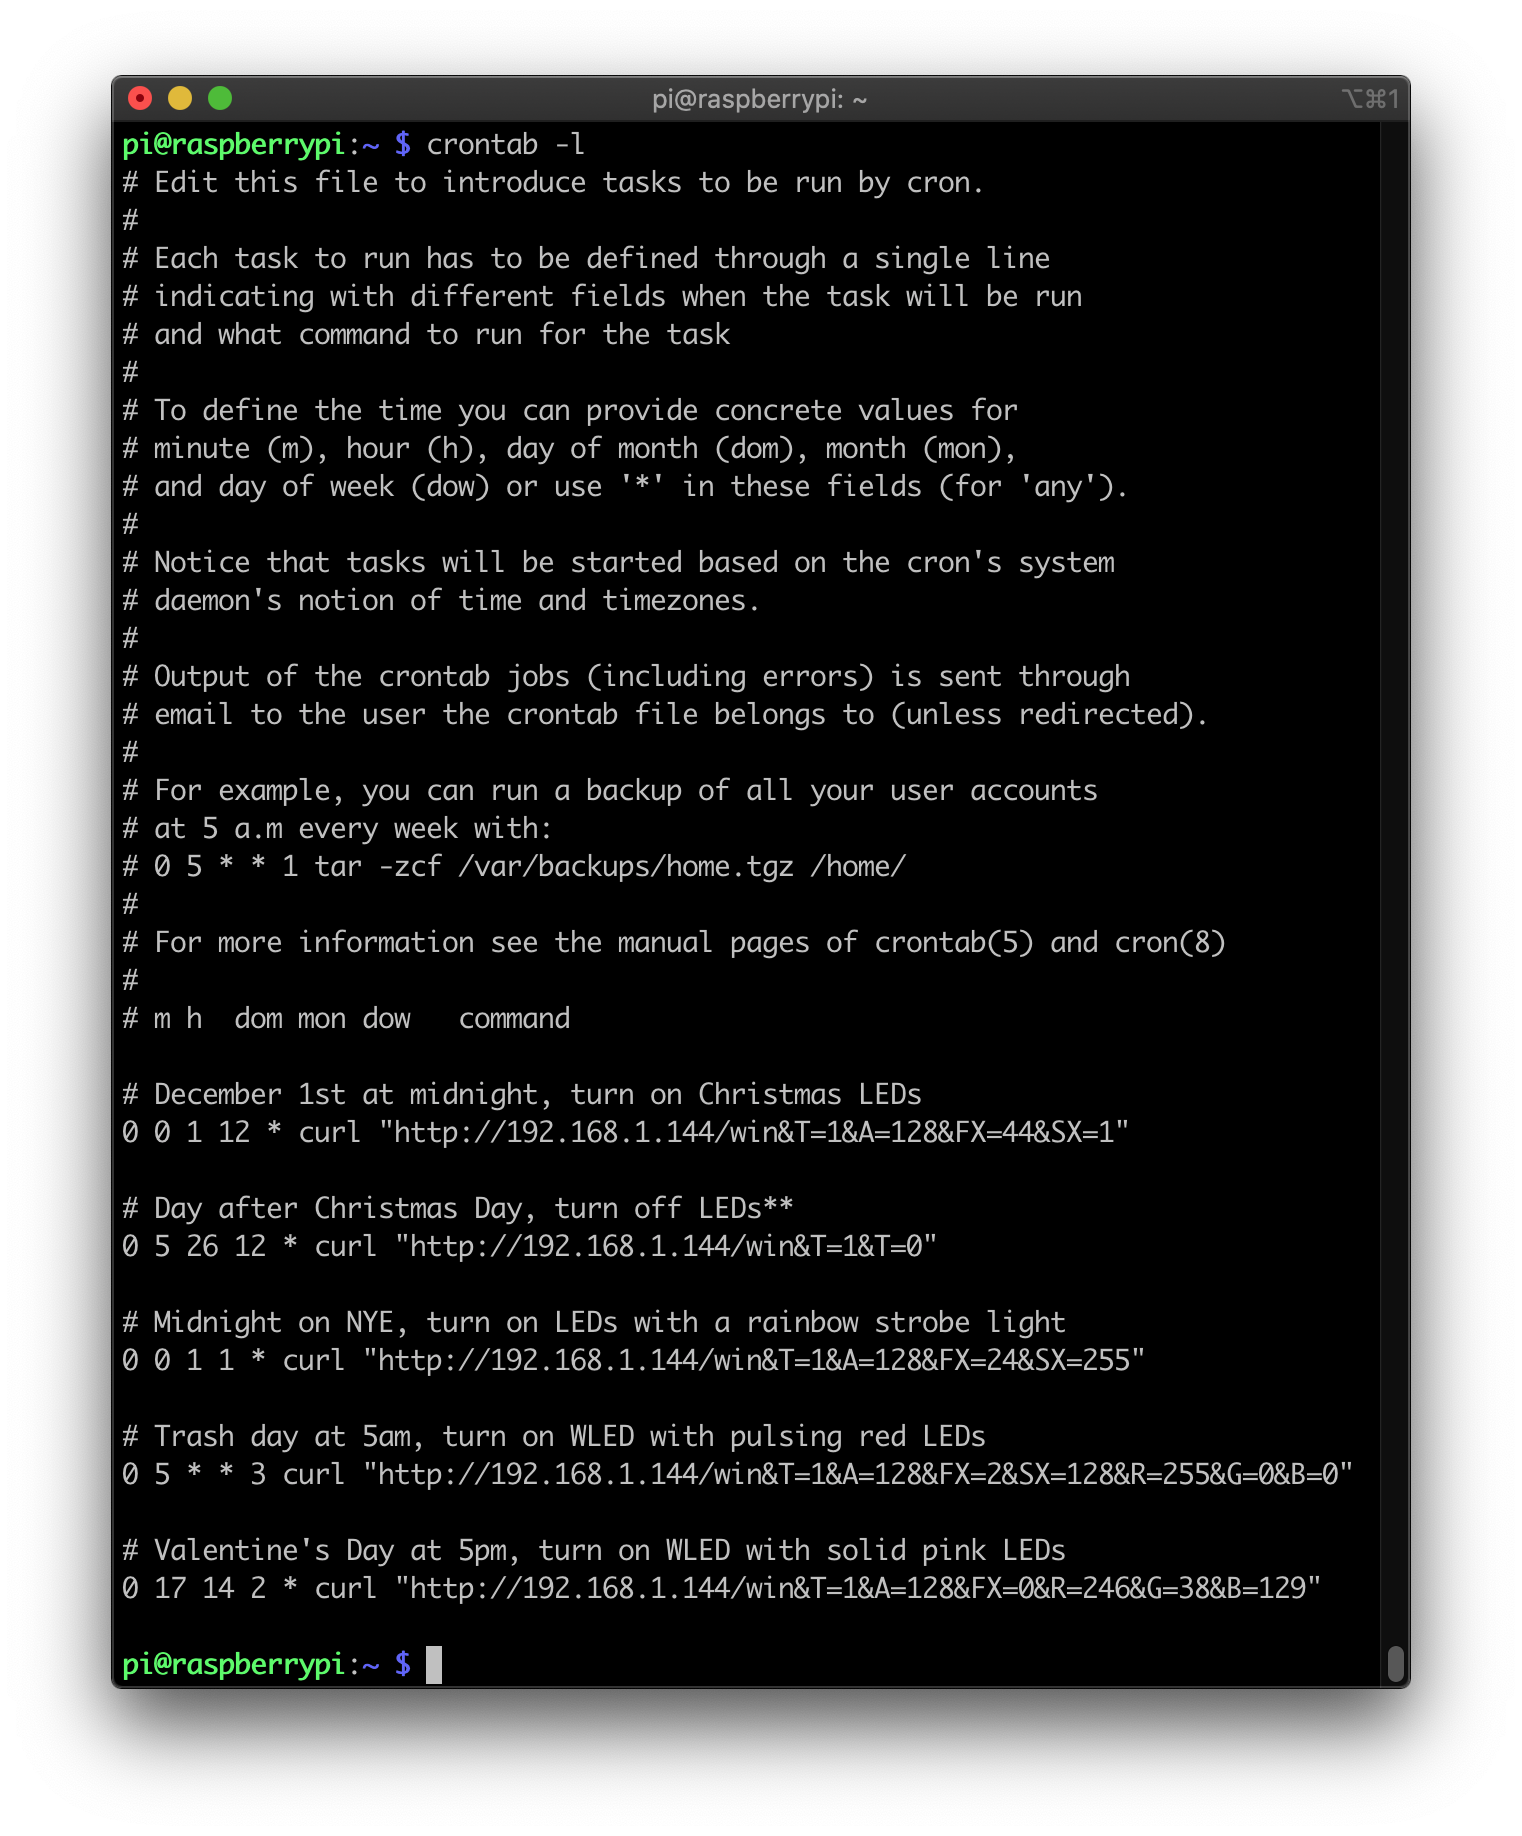
This is handy for quickly checking your jobs.
Conclusion
You should now have the knowledge to setup a Raspberry Pi to control and automate all of your WLED installations.
Once you get your crontab setup with jobs you can set the Pi up in a closet and just let it run. It will take care of all the heavy lifting for you.
Don’t be afraid of anything I’ve shown you today. You aren’t going to break anything that isn’t fixable. It’s the best way to learn this stuff.
If you run into any trouble with WLED, just check the documentation. Aircoookie (the WLED developer) has done a seriously awesome job of documenting his entire project.
I’m not exaggerating…
He has a list of all the LED effects with freaking animated GIFs of each effect. It’s insane and amazing at the same time!
Subscribe to my mailing list below and follow me on Twitter to be notified when I post a new article.