Plex Media Server On Raspberry Pi 4
How To Setup Plex Media Server On Raspberry Pi 4
The reason I made this tutorial is because I am currently transitioning all my VMs on 2 Dell R710s in my “humble homelab” to a fleet of 10 Raspberry Pi 4 Model B (4GB).
I know people are wondering if the new Pi is capable enough to transcode while running Plex.
Here it goes!
Parts Used For Project
| Part | Comment | Link |
|---|---|---|
| Raspberry Pi | This tutorial/article covers the Raspberry Pi 4 specifically. I use the 4GB model but Plex Media Server Requirements say that that 2GB is sufficient. I personally haven’t seen my Raspberry Pi 4 break 1.5GB running only Plex. This CanaKit comes with a power supply. It’s not a bad deal if shipping is free for you. | Raspberry Pi 4 2GB CanaKit With Power Supply |
| Micro SD Card | I personally use Samsung MicroSDHC EVO Select cards in all of my Raspberry Pis. They are great for the price. | Samsung 64GB MicroSD EVO Select MicroSD Card with Adapter |
| Power Supply | The Raspberry Pi 4 I am using for my Plex Server is powered by a Raspberry Pi PoE HAT but that isn’t a requirement. The power supply I’ve linked puts out 3A, which is the max that the Raspberry Pi 4 can accept. It also has an on/off switch built in. All Raspberry Pis before the Raspberry Pi 4 have used Micro USB. The Pi 4 uses USB Type C. So make sure you have the right power supply. If you are purchasing the CanaKit from above, it comes with a power supply and you do not need this. | USB Type C 5V 3A Power Supply With On/Off Switch |
| NAS Device | I am using a QNAP TS-251+ 2-Bay to store my media. You can use whichever brand NAS you’d like for this tutorial as long as it functions as a Samba server and you’ve set up a share. | QNAP TS-251+ |
Getting Started
As with all of my Raspberry Pi tutorials, I am assuming that you’ve already installed the most recent version of Raspbian onto your SD card and are able to SSH into your Pi.
I will also assume you are running these commands as the pi user rather than root.
I made this tutorial using the latest version of Rasbian Buster Lite which was released on 2019-07-10.
Mount Shared Drive From NAS To Your Raspberry Pi
The first thing we need to do is create a directory to mount the NAS share to. Run the following command to make a new directory.
mkdir /mnt/Media/
Now that our directory has been made, we need to mount the NAS share.
My share is hosted on a QNAP NAS. To be honest, Plex Media Server would probably perform better running on my NAS than the Raspberry Pi 4. This is because the QNAP has an Intel X86 based processor. A NAS isn’t as much fun as a Raspberry Pi though. So let’s do it this way!
My network shares are served by Samba.
We will need to authenticate with the Samba server before it allows us to connect.
First we need to create a file to store our NAS user credentials. Run the following command to open a file named .smbcredentials in the /home/pi/ directory.
vim /home/pi/.smbcredentials
Add the following lines to the file. Replace <username> with the user that has access to your NAS share. Replace <password> with the password for the user.
username=<username>
password=<password>
With our credentials in place, we now need to tell the operating system to mount the Samba share and to mount it again every time we restart the Raspberry Pi.
Let’s open the /etc/fstab file and add a line.
Open the file by running the following command.
sudo vim /etc/fstab
Append the file with the following line of text. Be sure to replace <IP of my NAS> with whatever your NAS IP is. Also replace <Name of shared directory on NAS> with whatever the directory name is that you are sharing from the NAS.
//<IP of my NAS>/<Name of shared directory on NAS> /mnt/Media/ cifs credentials=/home/pi/.smbcredentials 0 0
Here is an example of how my /etc/fstab file looks now.
pi@plex-pi-01:~ $ sudo cat /etc/fstab
proc            /proc           proc    defaults          0       0
PARTUUID=8e7de79a-01  /boot           vfat    defaults          0       2
PARTUUID=8e7de79a-02  /               ext4    defaults,noatime  0       1
# a swapfile is not a swap partition, no line here
#   use  dphys-swapfile swap[on|off]  for that

//192.168.1.11/Media /mnt/Media/ cifs credentials=/home/pi/.smbcredentials 0 0
Now that we’ve added that line, the operating system will attempt to mount your Samba share whenever it boots.
We can tell it to mount everything in /etc/fstab manually by running the following command.
sudo mount -a
Here is an example of the filesystems connected to my Raspberry Pi before and after I mounted the Samba Share.
pi@plex-pi-01:~ $ df -h
Filesystem      Size  Used Avail Use% Mounted on
/dev/root        59G  1.2G   55G   3% /
devtmpfs        1.8G     0  1.8G   0% /dev
tmpfs           2.0G     0  2.0G   0% /dev/shm
tmpfs           2.0G   17M  1.9G   1% /run
tmpfs           5.0M  4.0K  5.0M   1% /run/lock
tmpfs           2.0G     0  2.0G   0% /sys/fs/cgroup
/dev/mmcblk0p1  253M   40M  213M  16% /boot
tmpfs           391M     0  391M   0% /run/user/1000

pi@plex-pi-01:~ $ sudo mount -a

pi@plex-pi-01:~ $ df -h
Filesystem                 Size  Used Avail Use% Mounted on
/dev/root                   59G  1.2G   55G   3% /
devtmpfs                   1.8G     0  1.8G   0% /dev
tmpfs                      2.0G     0  2.0G   0% /dev/shm
tmpfs                      2.0G   17M  1.9G   1% /run
tmpfs                      5.0M  4.0K  5.0M   1% /run/lock
tmpfs                      2.0G     0  2.0G   0% /sys/fs/cgroup
/dev/mmcblk0p1             253M   40M  213M  16% /boot
tmpfs                      391M     0  391M   0% /run/user/1000
//192.168.1.11/Media  5.4T  2.4T  3.0T  44% /mnt/Media
pi@plex-pi-01:~ $
You should now be able to browse /mnt/Media on your Raspberry Pi and see your media library.
Awesome! Let’s move on and get Plex installed.
Installing Plex Media Server On Raspberry Pi 4
Update Raspbian
This first command will update the list of packages available to your Raspberry Pi.
The second command will install the apt-transport-https package. This package will allow us to connect to the Plex apt repo using an HTTPS endpoint.
sudo apt update -y
sudo apt install apt-transport-https -y
Great. Now we can add the Plex Media Server repo to the list of repos that apt uses.
The first curl command downloads the PGP signing key from Plex. Next we add a file to the /etc/apt/sources.list.d/ directory. The package manager (apt) will read the Plex repo location from this file.
curl https://downloads.plex.tv/plex-keys/PlexSign.key | sudo apt-key add -
echo 'deb https://downloads.plex.tv/repo/deb public main' | sudo tee /etc/apt/sources.list.d/plexmediaserver.list
With our new apt source added, we will now update our available package lists again and then install Plex Media Server.
sudo apt update
sudo apt install plexmediaserver
At some point during the update/install, apt will ask if you want to install the new repo source we’ve added. Type y and press <enter>. It should look like the following.
Configuration file '/etc/apt/sources.list.d/plexmediaserver.list'
 ==> File on system created by you or by a script.
 ==> File also in package provided by package maintainer.
   What would you like to do about it ?  Your options are:
    Y or I  : install the package maintainer's version
    N or O  : keep your currently-installed version
      D     : show the differences between the versions
      Z     : start a shell to examine the situation
 The default action is to keep your current version.
*** plexmediaserver.list (Y/I/N/O/D/Z) [default=N] ? y
Installing new version of config file /etc/apt/sources.list.d/plexmediaserver.list ...
You are done installing Plex Media Server on your Raspberry Pi 4!
If all went well, you should be able to head over to <IP of Raspberry PI>:32400/web/index.html in a browser and begin configuring Plex Media Server.
How To Update Plex Media Server
While logged into the Plex web app, you may see something like Update available for Plex Media Server or An update is available. Please install manually.
Assuming you followed the instructions in this tutorial, this process is very easy.
Before you start, I should note that this will take your Plex Server down for a moment while it is upgrading the package. It should be very brief but still probably not a great idea while the family is sitting down for movie night.
First we need to check the Plex package repo for the most up to date packages. We added the Plex repo to our apt sources earlier. Simply run the following command to update the list of packages.
apt-get update
You should see output similar to the snippet below. Notice the line that starts with Get:1. This means that apt reached out to the Plex repo.
Get:1 https://downloads.plex.tv/repo/deb public InRelease [6,685 B]
Get:2 http://raspbian.raspberrypi.org/raspbian buster InRelease [15.0 kB]
Get:3 http://archive.raspberrypi.org/debian buster InRelease [25.1 kB]
Get:4 https://downloads.plex.tv/repo/deb public/main armhf Packages [1,724 B]
Get:5 http://raspbian.raspberrypi.org/raspbian buster/main armhf Packages [13.0 MB]
Get:6 http://archive.raspberrypi.org/debian buster/main armhf Packages [327 kB]
Get:7 http://raspbian.raspberrypi.org/raspbian buster/contrib armhf Packages [58.7 kB]
Get:8 http://raspbian.raspberrypi.org/raspbian buster/non-free armhf Packages [103 kB]
Fetched 13.5 MB in 8s (1,658 kB/s)
Reading package lists... Done
root@plex-pi-01:~#
We still haven’t upgraded the package yet. Let’s do that by running this command. This will only update the Plex Media Server package and it’s dependencies. The rest of your system should be safe (assuming it doesn’t have an issue with one of the dependencies being updated).
apt-get upgrade plexmediaserver -y
If there was a package in the repo that was newer than the one you were running, you will see a lot of output indicating that while it downloads and installs.
If there wasn’t a newer package, you will see output similar to what is below.
root@plex-pi-01:~# apt-get upgrade plexmediaserver -y
Reading package lists... Done
Building dependency tree
Reading state information... Done
plexmediaserver is already the newest version (1.19.3.2764-ef515a800).
Calculating upgrade... Done
The following packages have been kept back:
  binutils binutils-arm-linux-gnueabihf binutils-common libbinutils libnode64 nodejs rpi-eeprom
0 upgraded, 0 newly installed, 0 to remove and 7 not upgraded.
root@plex-pi-01:~#
Can Plex On Raspberry Pi 4 Transcode?
I’m 99% sure this is why you came here. The short answer…YES.
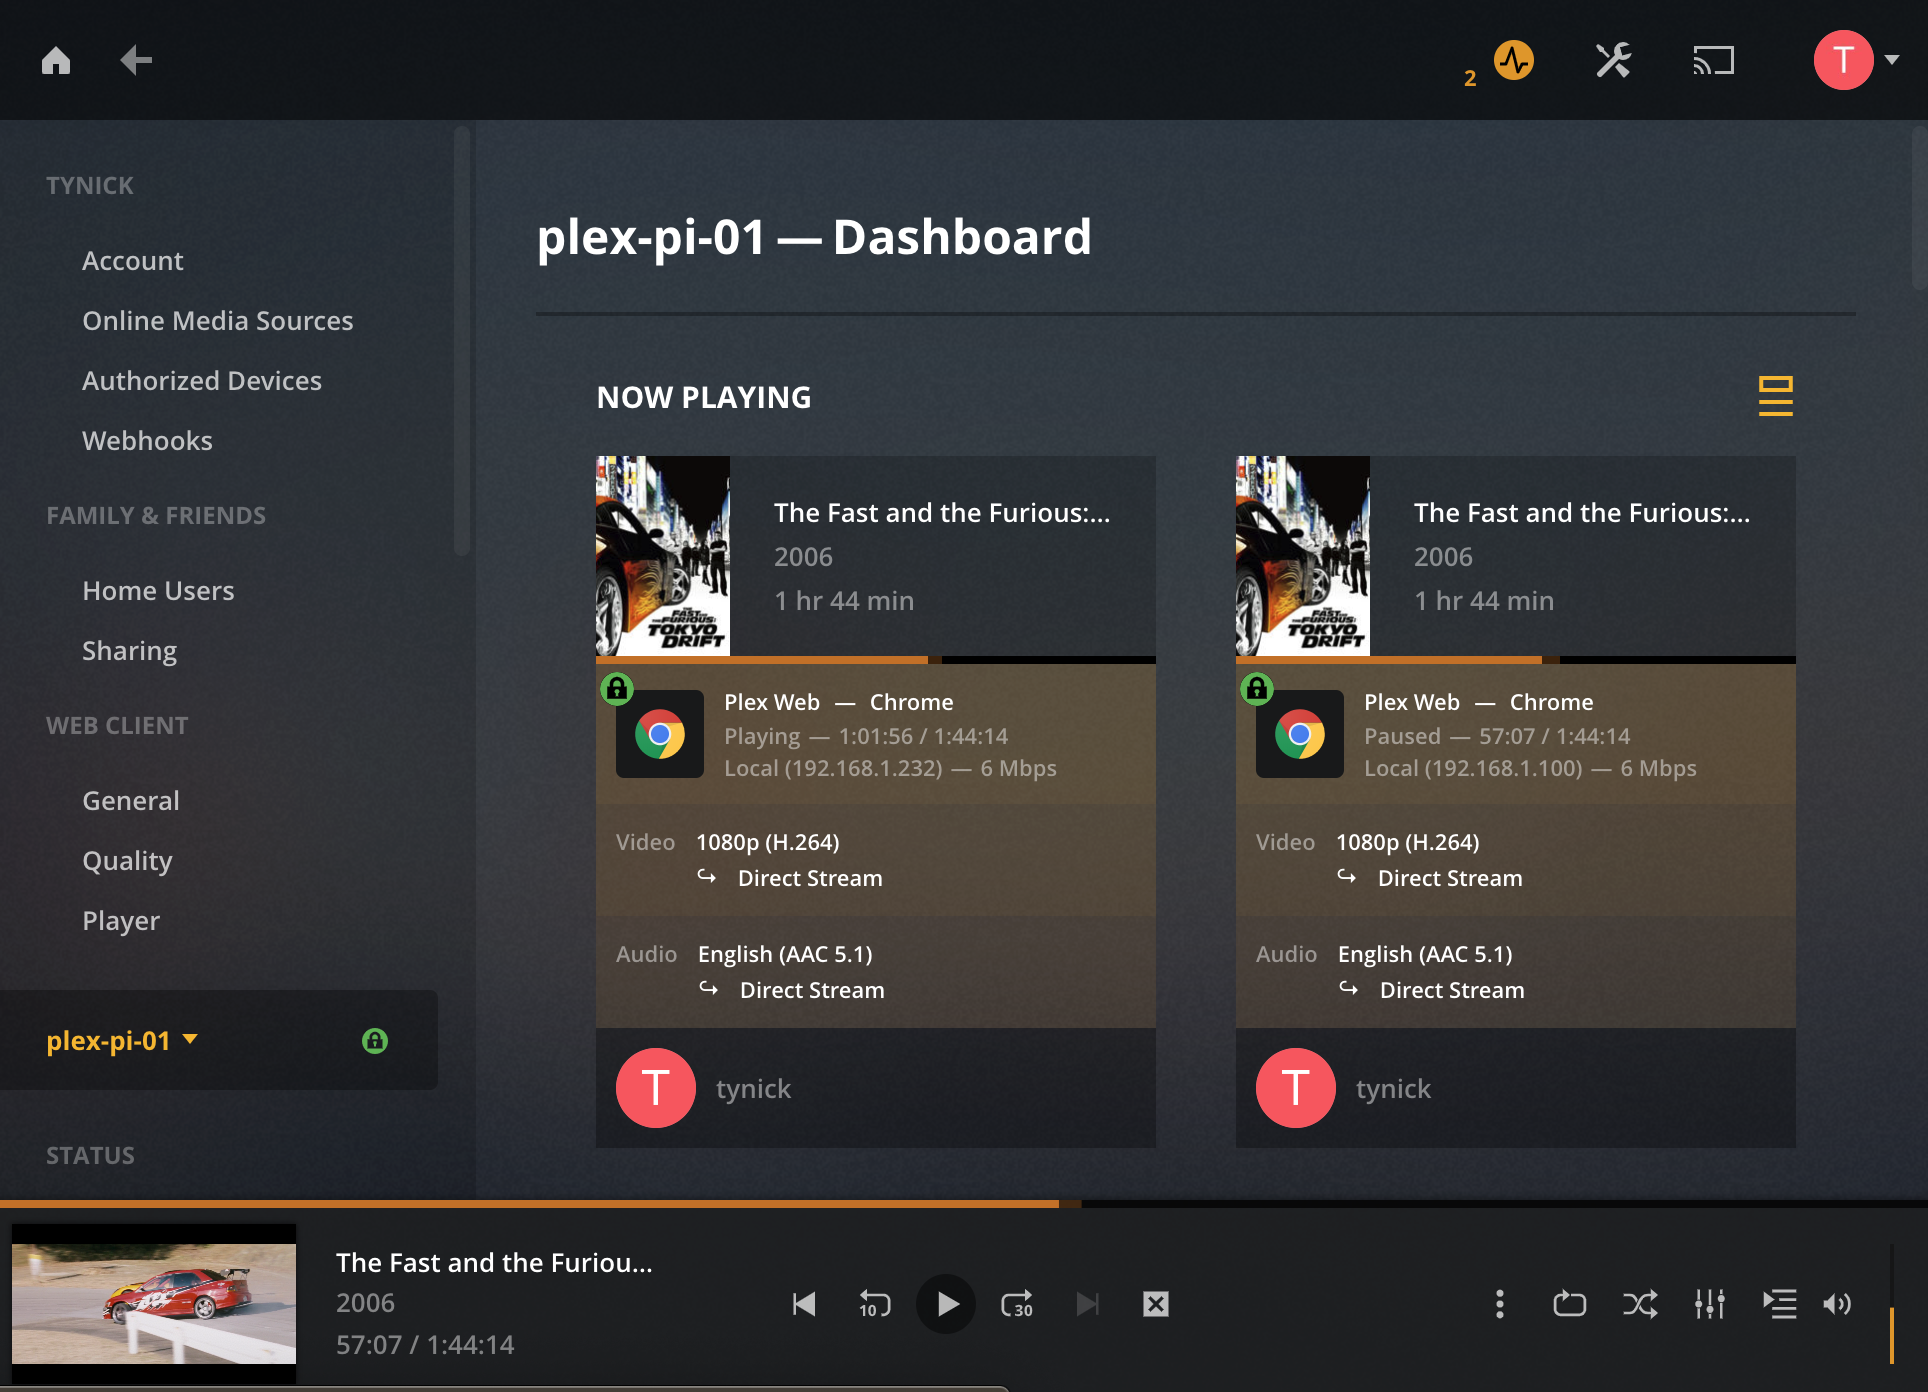
I personally have very little need for transcoding. I do my best to encode my video for the devices I have in my house. Every TV in my house has an Apple TV hooked up to it. I am almost always using Direct Stream.
I rarely, if ever use my Plex server off of my network. I’m not the guy that pretends to be Netflix.
I get it though. Some people want to share their media with all of their friends.
To test this, I disconnected my phone from WiFi and played a video. Here is what happened…
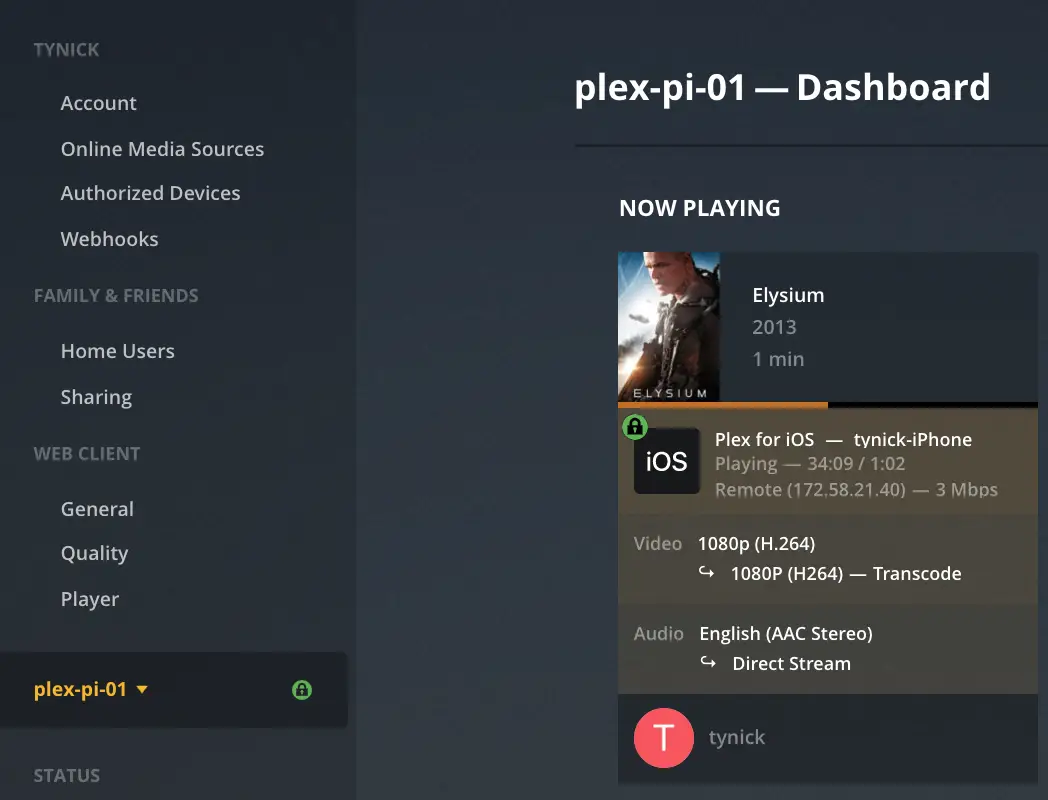
Here you can see I am off network and streaming a 1080 video that is being transcoded.
I watched it for over an hour. The video never stuttered and the quality looked great the entire time.
Can I Share My Plex Library With My Friends?
Yes, you can. Should you though?
If you are the type of Plex user that shares with all your friends, family and co-workers, you are definitely out of luck when it comes to transcoding on the Raspberry Pi 4. Unless of course you have 1 co-worker who is your only friend, also a family member and you don’t have plans to use Plex for yourself at all.
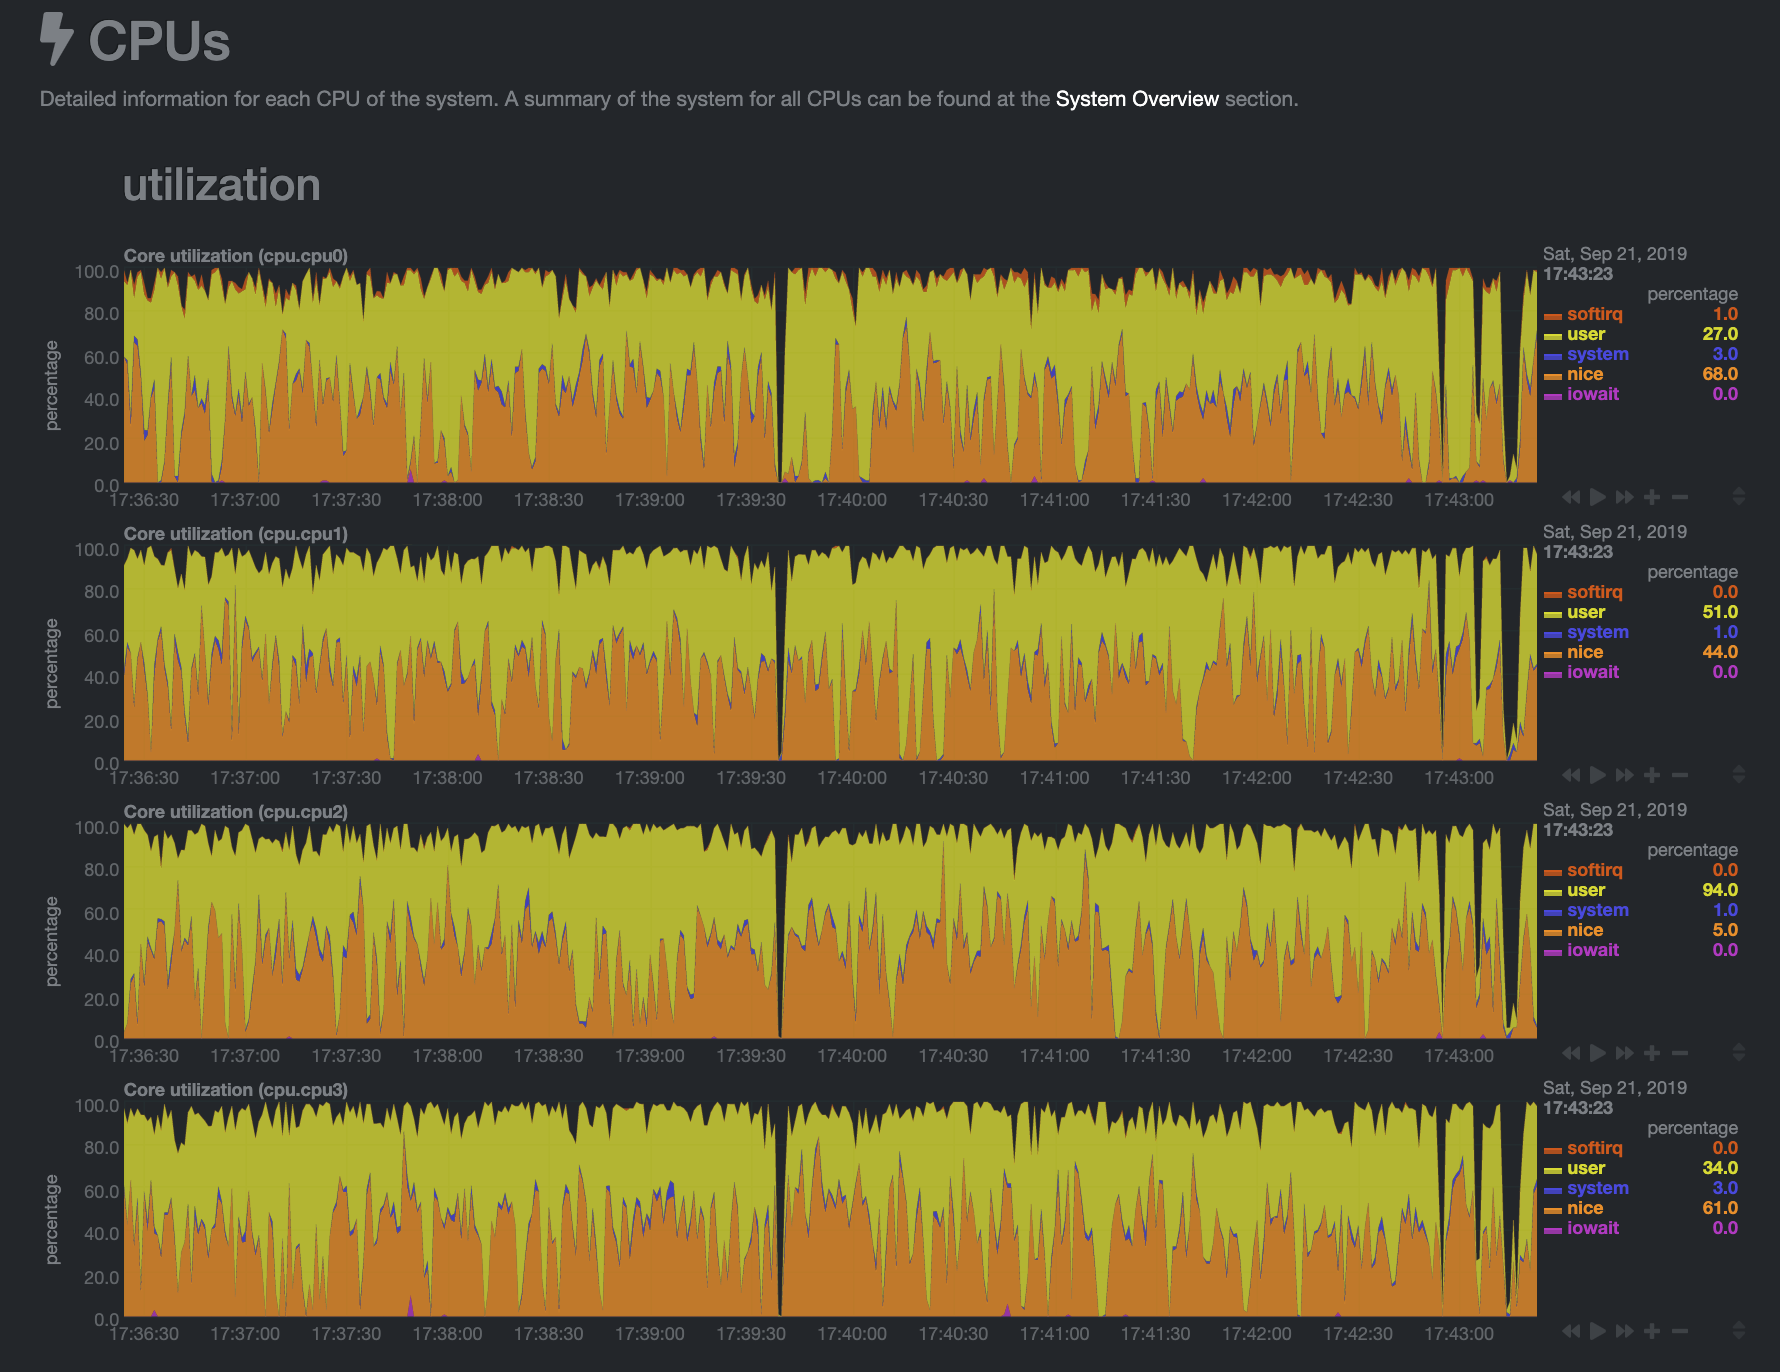
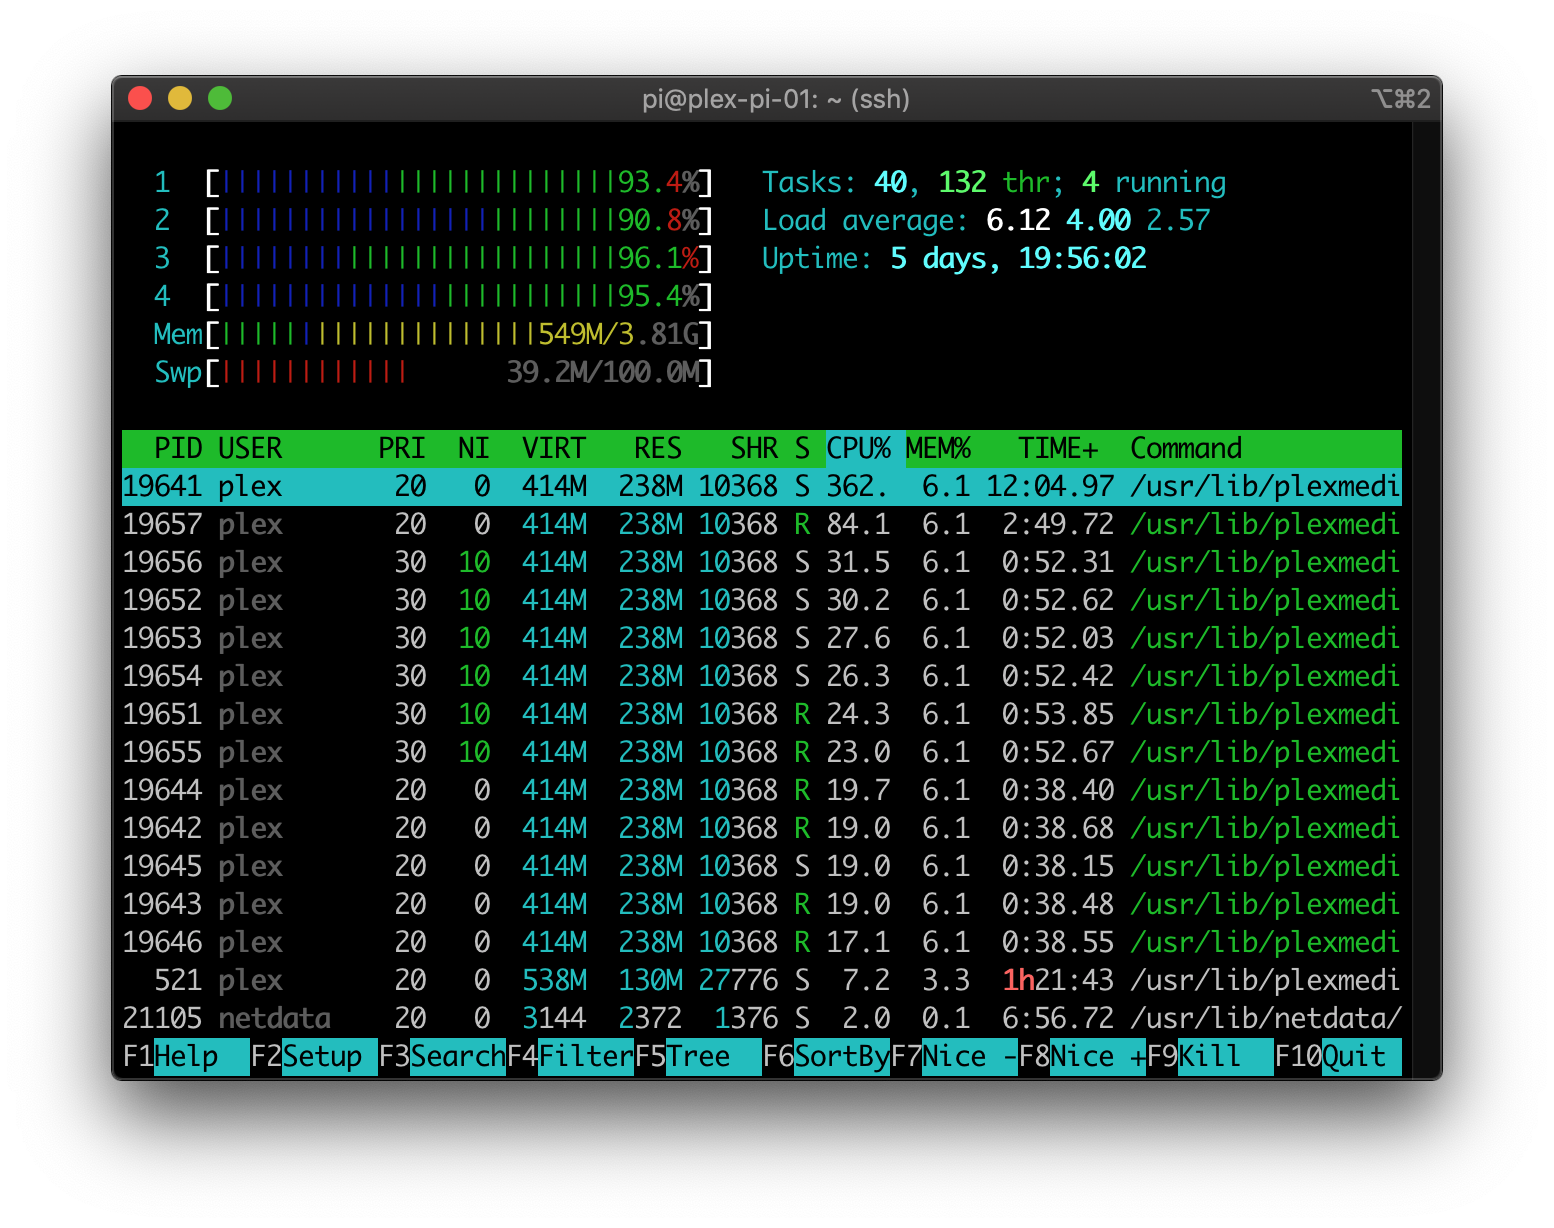
You can see that all four cores are pretty much pegged at 100% utilization the entire time.
Load average in htop was above 4.0 which is full utilization for this amount of cores.
Basically, it can and will transcode but it still isn’t going to compete with an enterprise grade server or even the old desktop or laptop with an x86 processor that is sitting in your closet.
The Raspberry Pi 4 is still much more power efficient than both of those devices.
If you don’t have a need for transcoding and do most of your Plex watching from home, just encode your files as something that your devices support.
I am able to stream from Plex Media Server to all 4 of my Apple TVs and my iPhone on my network without making the Raspberry Pi 4 sweat.
It’s still a great option if you do not need transcoding.
I definitely recommend it.
I’m Super Lazy…
If you are too lazy to read through all of that and just want a Plex Server running on your Raspberry Pi, I made another script specifically for you.
Run these commands and follow the prompts!
git clone git@github.com:tynick/pi_plex_installer.git
cd pi_plex_installer
./pi_plex_installer.sh
Enjoy and let me know if you have any issues with this tutorial. Twitter is best if you have any questions.
Subscribe to my mailing list below to be notified when I make a new post or follow me on Twitter. Either would be really appreciated.