Getting Started With ActionTiles For SmartThings
Getting Started With ActionTiles For SmartThings With Blue Iris
If you haven’t heard of ActionTiles before, it is a web app that allows you to create dashboards (ActionTile Panels) for SmartThings and other things in your home.
In this tutorial, I’ll go over the basics of getting setup with ActionTiles. You will be able to turn switches on and off, display local radar or forecasts, show SmartThings user presence and a few other cool things. I will also show you how to integrate Blue Iris into your ActionTiles dashboards.
This tutorial assumes that you already have a SmartThings hub setup with devices connected and a Blue Iris server with cameras setup.
If you don’t have a SmartThings Hub already, I recommend the SmartThings Hub 2nd Gen.
The SmartThings Hub 2nd Gen has a faster processor, more RAM and a battery backup that the SmartThings Hub 3rd Gen does not have.
The only reason I would recommend the SmartThings Hub 3rd Gen to you is if you don’t have an ethernet port available. This would allow you to connect via WiFi on the 3rd Gen. Other than that, I actually feel that the 3rd Gen is a step down from the 2nd Gen.
I believe they are starting to phase out the 2nd Gen. So you may not have a choice soon. Either one will work, it’s just my personal preference.
If you are brand new to home automation, checkout this post to find out easiest way to get started.
Add Location And Authorize ActionTiles In SmartThings
After you’ve created an account on ActionTiles.com and added your ActionTiles License Key, the first thing we need to do is add a Location to ActionTiles. You can have one Location per ActionTiles License.
Head over to the My Locations section in the ActionTiles sidebar menu.

Once you are at the My Locations section, click the + button in the bottom right corner to add a location.
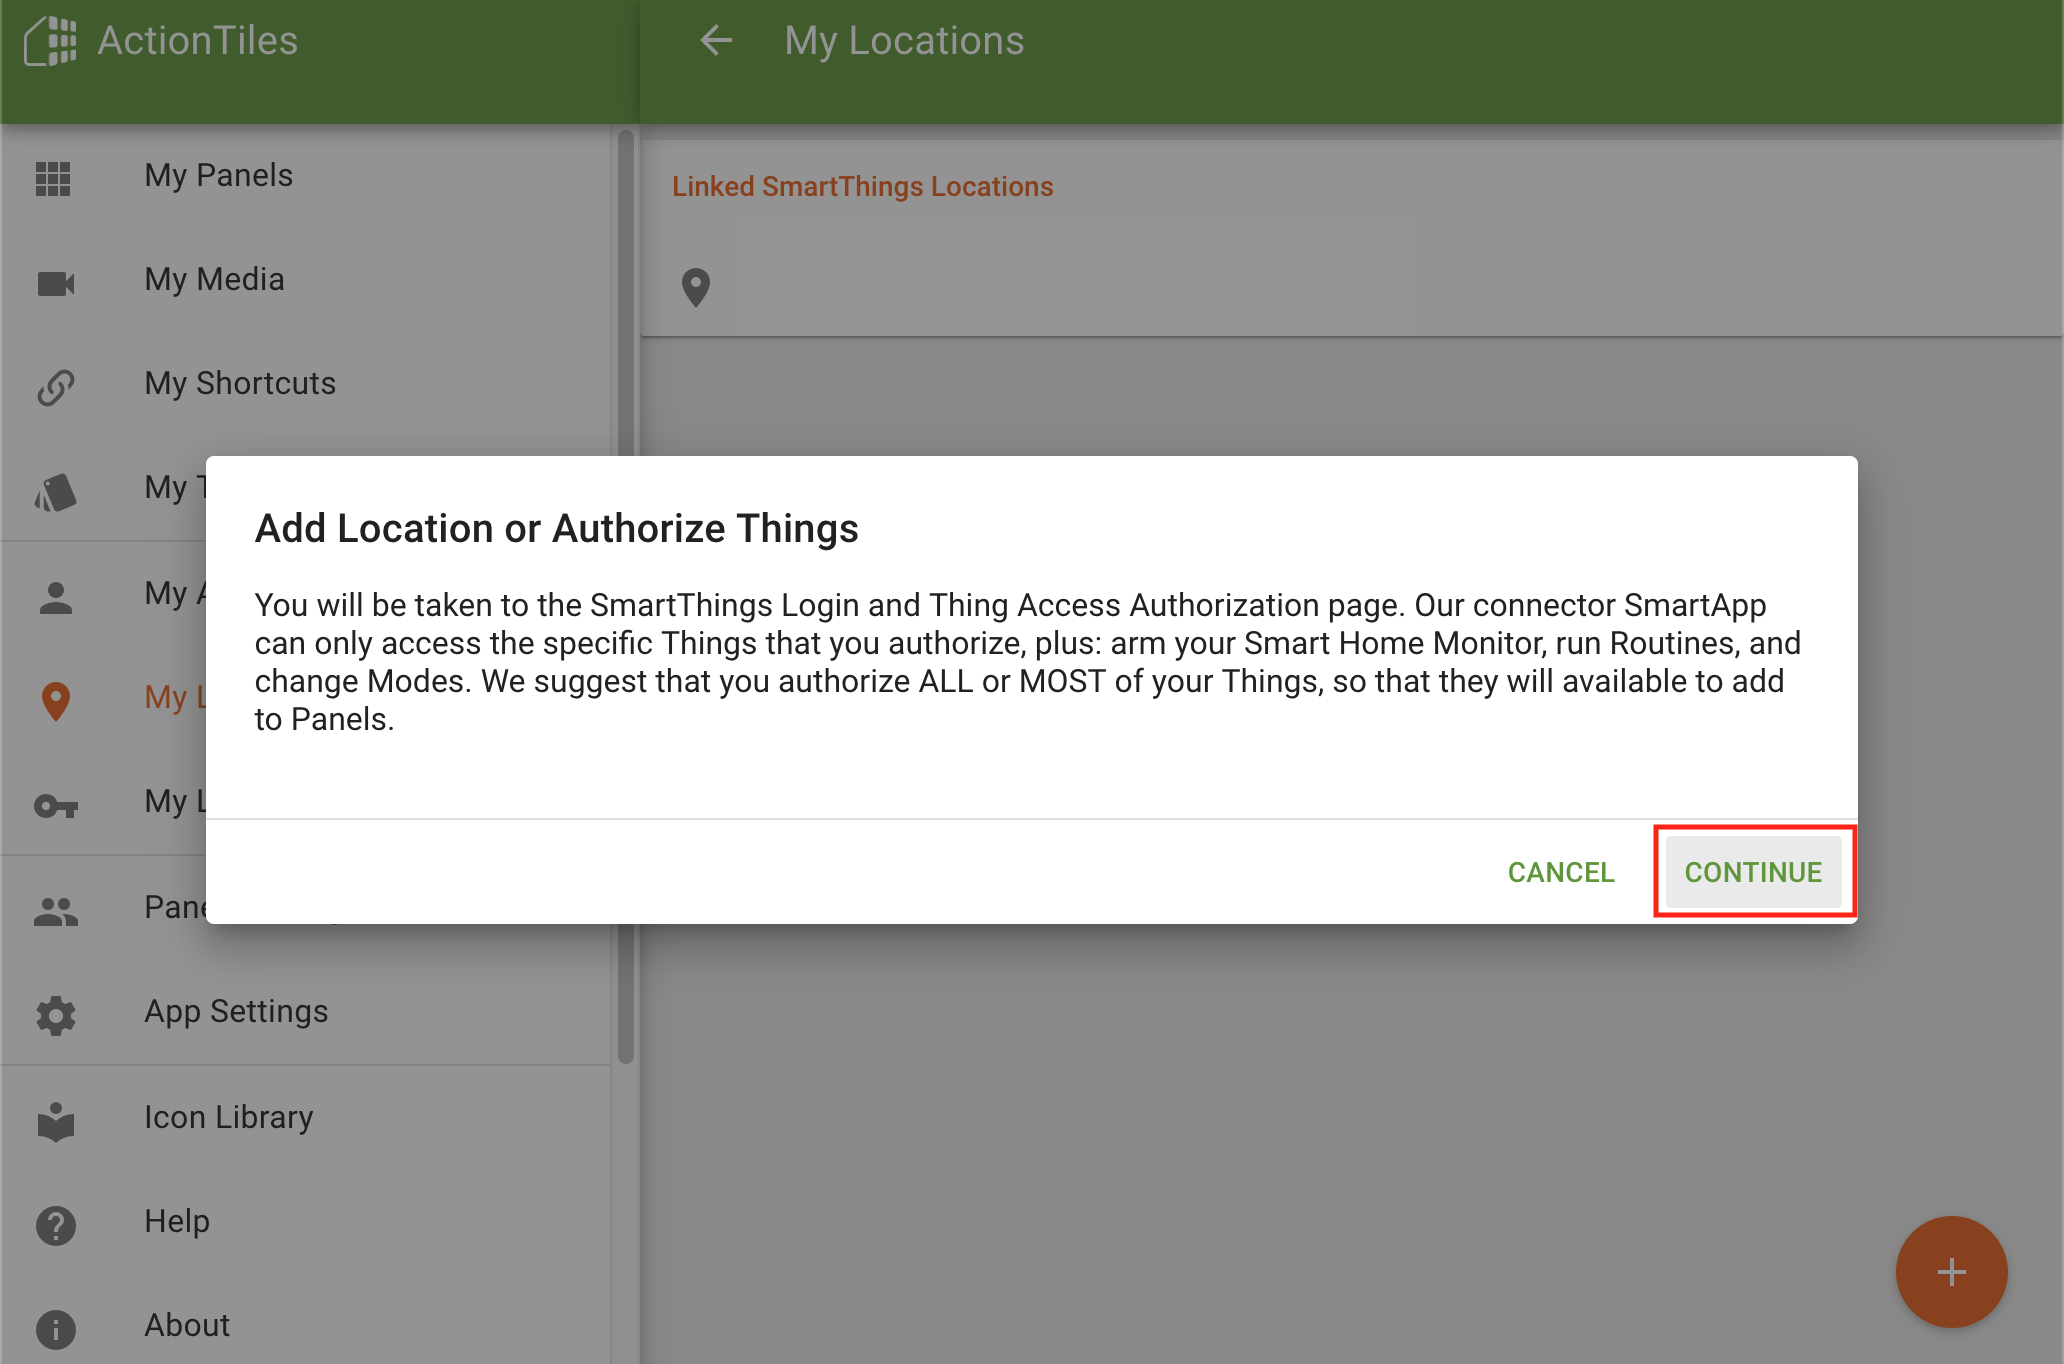
Click CONTINUE and you will be taken to your SmartThings account.
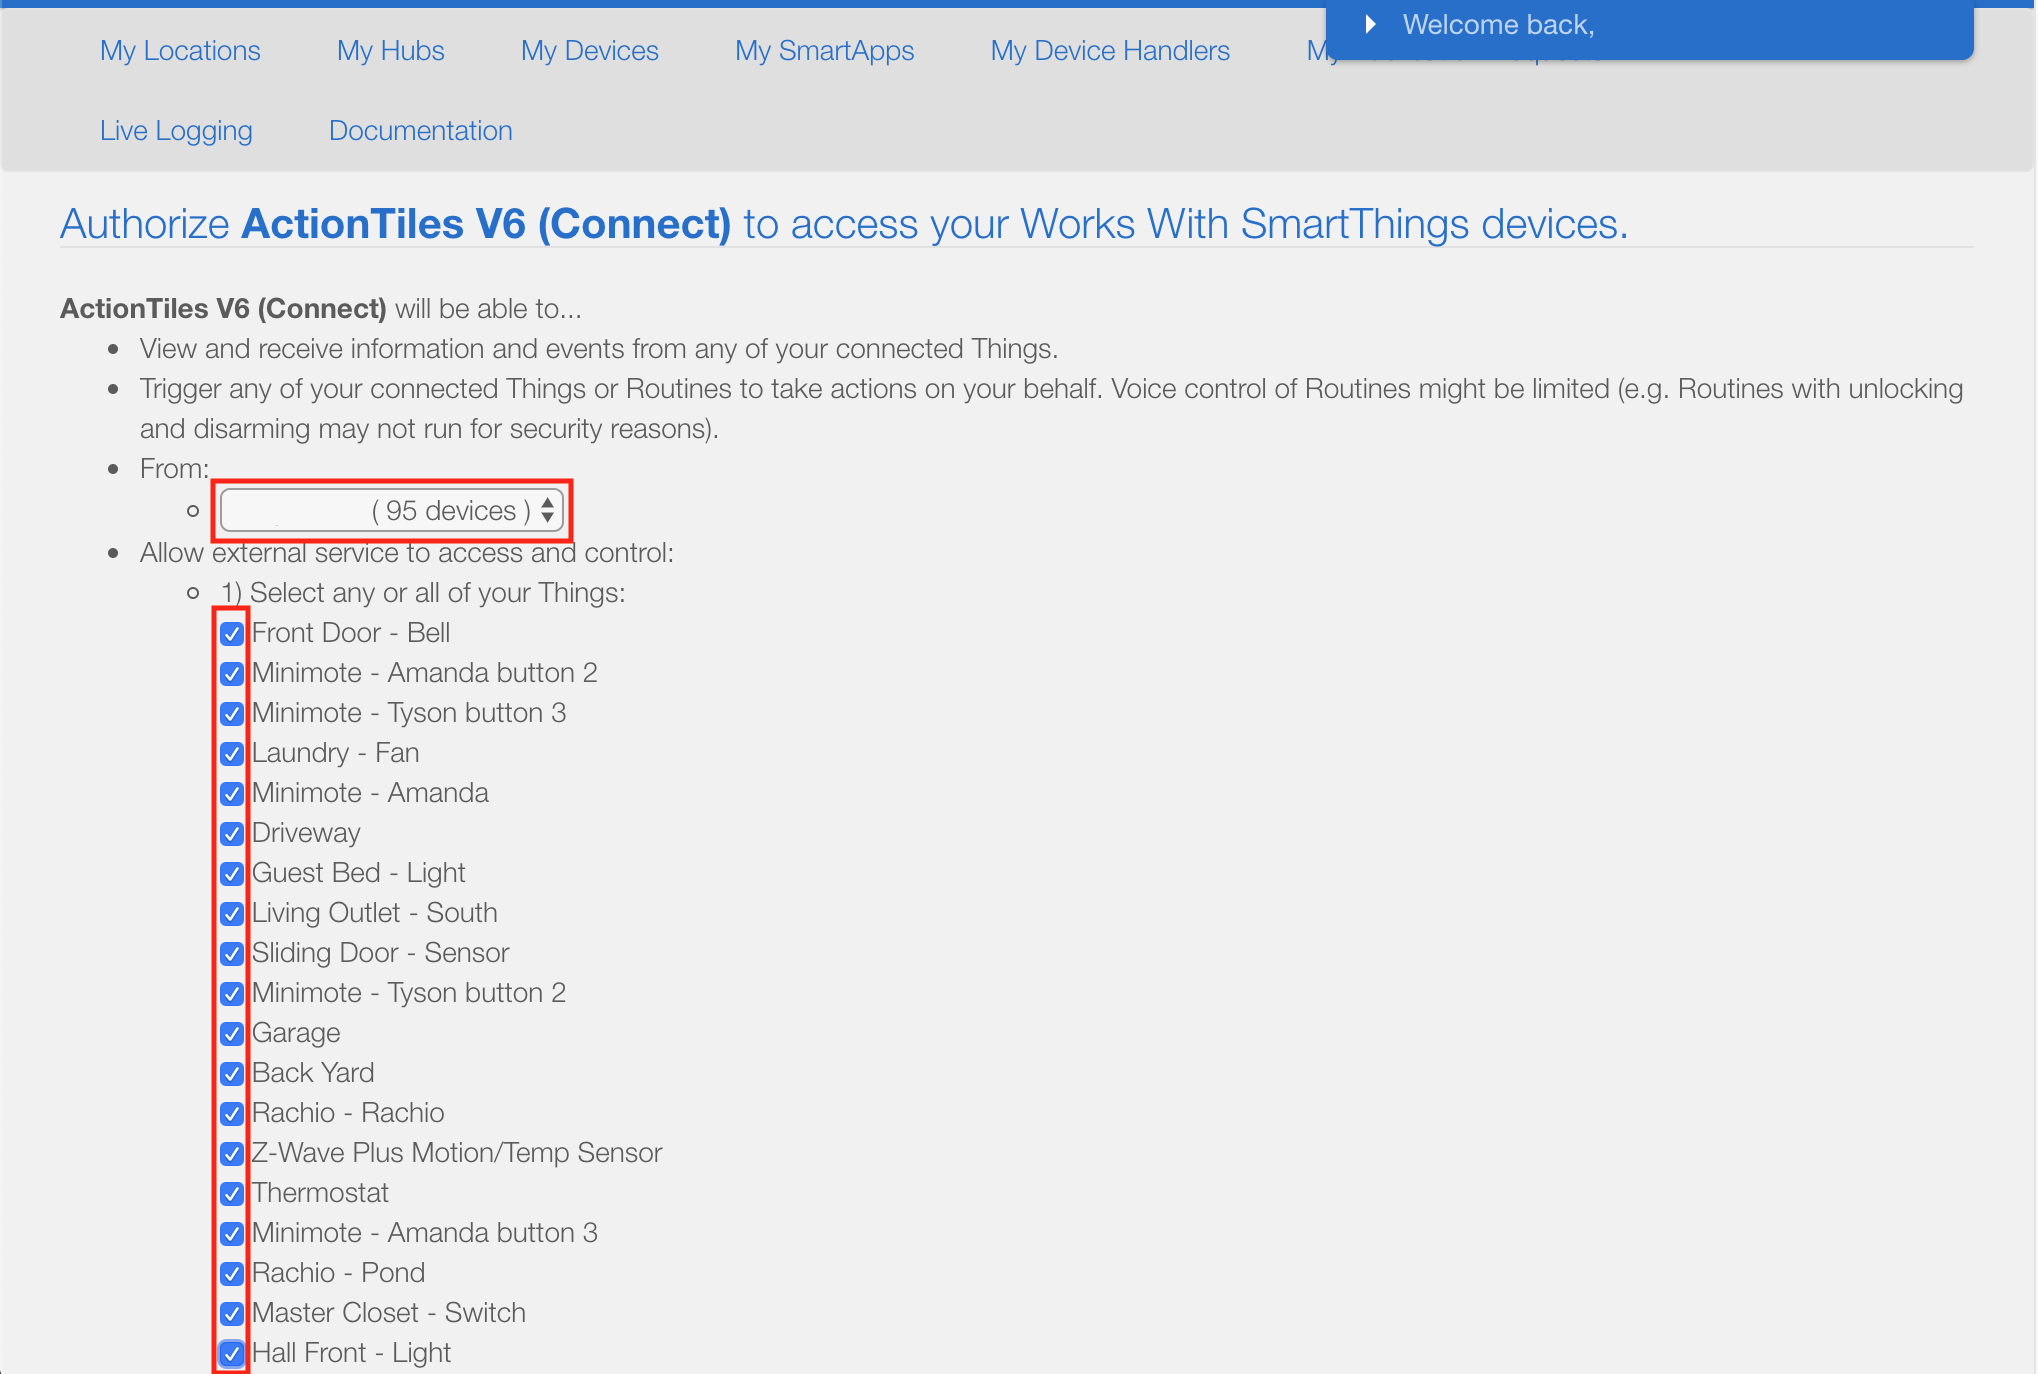
Select your location from the dropdown menu and then select all the devices you want ActionTiles. I suggest selecting everything you have.
I have no idea why Samsung doesn’t have a “select all” option. It’s very annoying if you have as many devices as I do.
Once you’ve selected all the devices you want in ActionTiles, select AUTHORIZE at the bottom of the page.
After purchasing your license, apply your license on this page.
ActionTiles Panels
Now that we’ve authorized ActionTiles in SmartThings, we can begin building our first ActionTiles Panel.
A Panel is one of the initial building blocks in ActionTiles.
We will fill a Panel with Tiles later on.
You can view 1 Panel at a time in ActionTiles. Each Panel can be thought of as it’s own dashboard.
Panels can contain different things for different purposes.
For instance, you could build a Panel to control and monitor different parts of your house. One for the first floor and another for the second floor.
You could use one Panel for controlling switches and another for monitoring camera feeds.
It’s completely up to you how you organize things in ActionTiles. Just do whatever suits your setup the best.
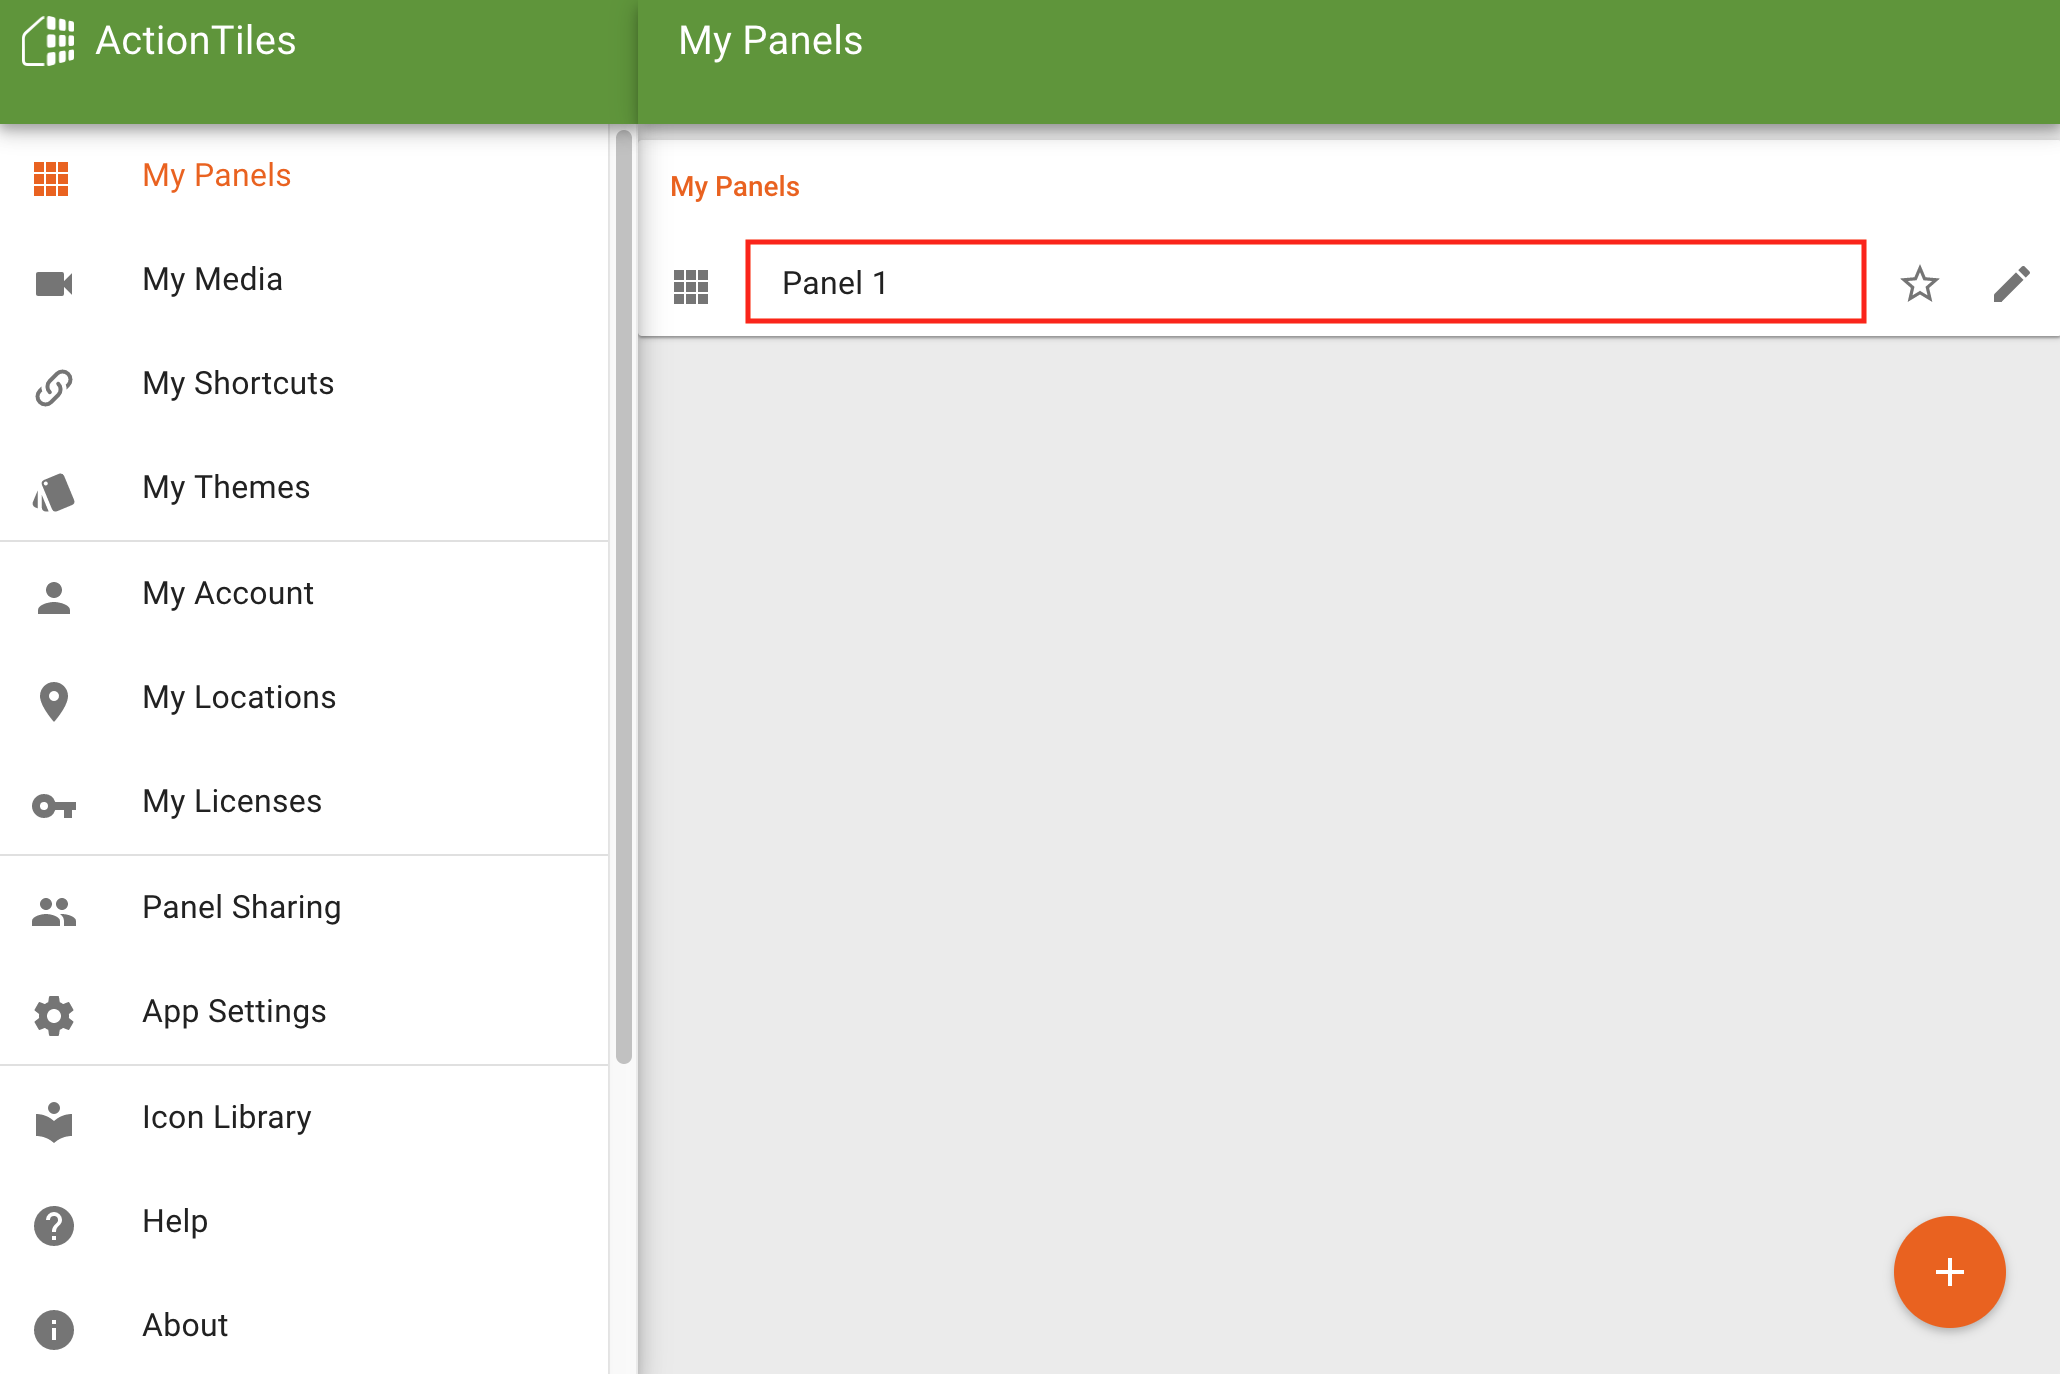
Let’s start by adding our first Panel.
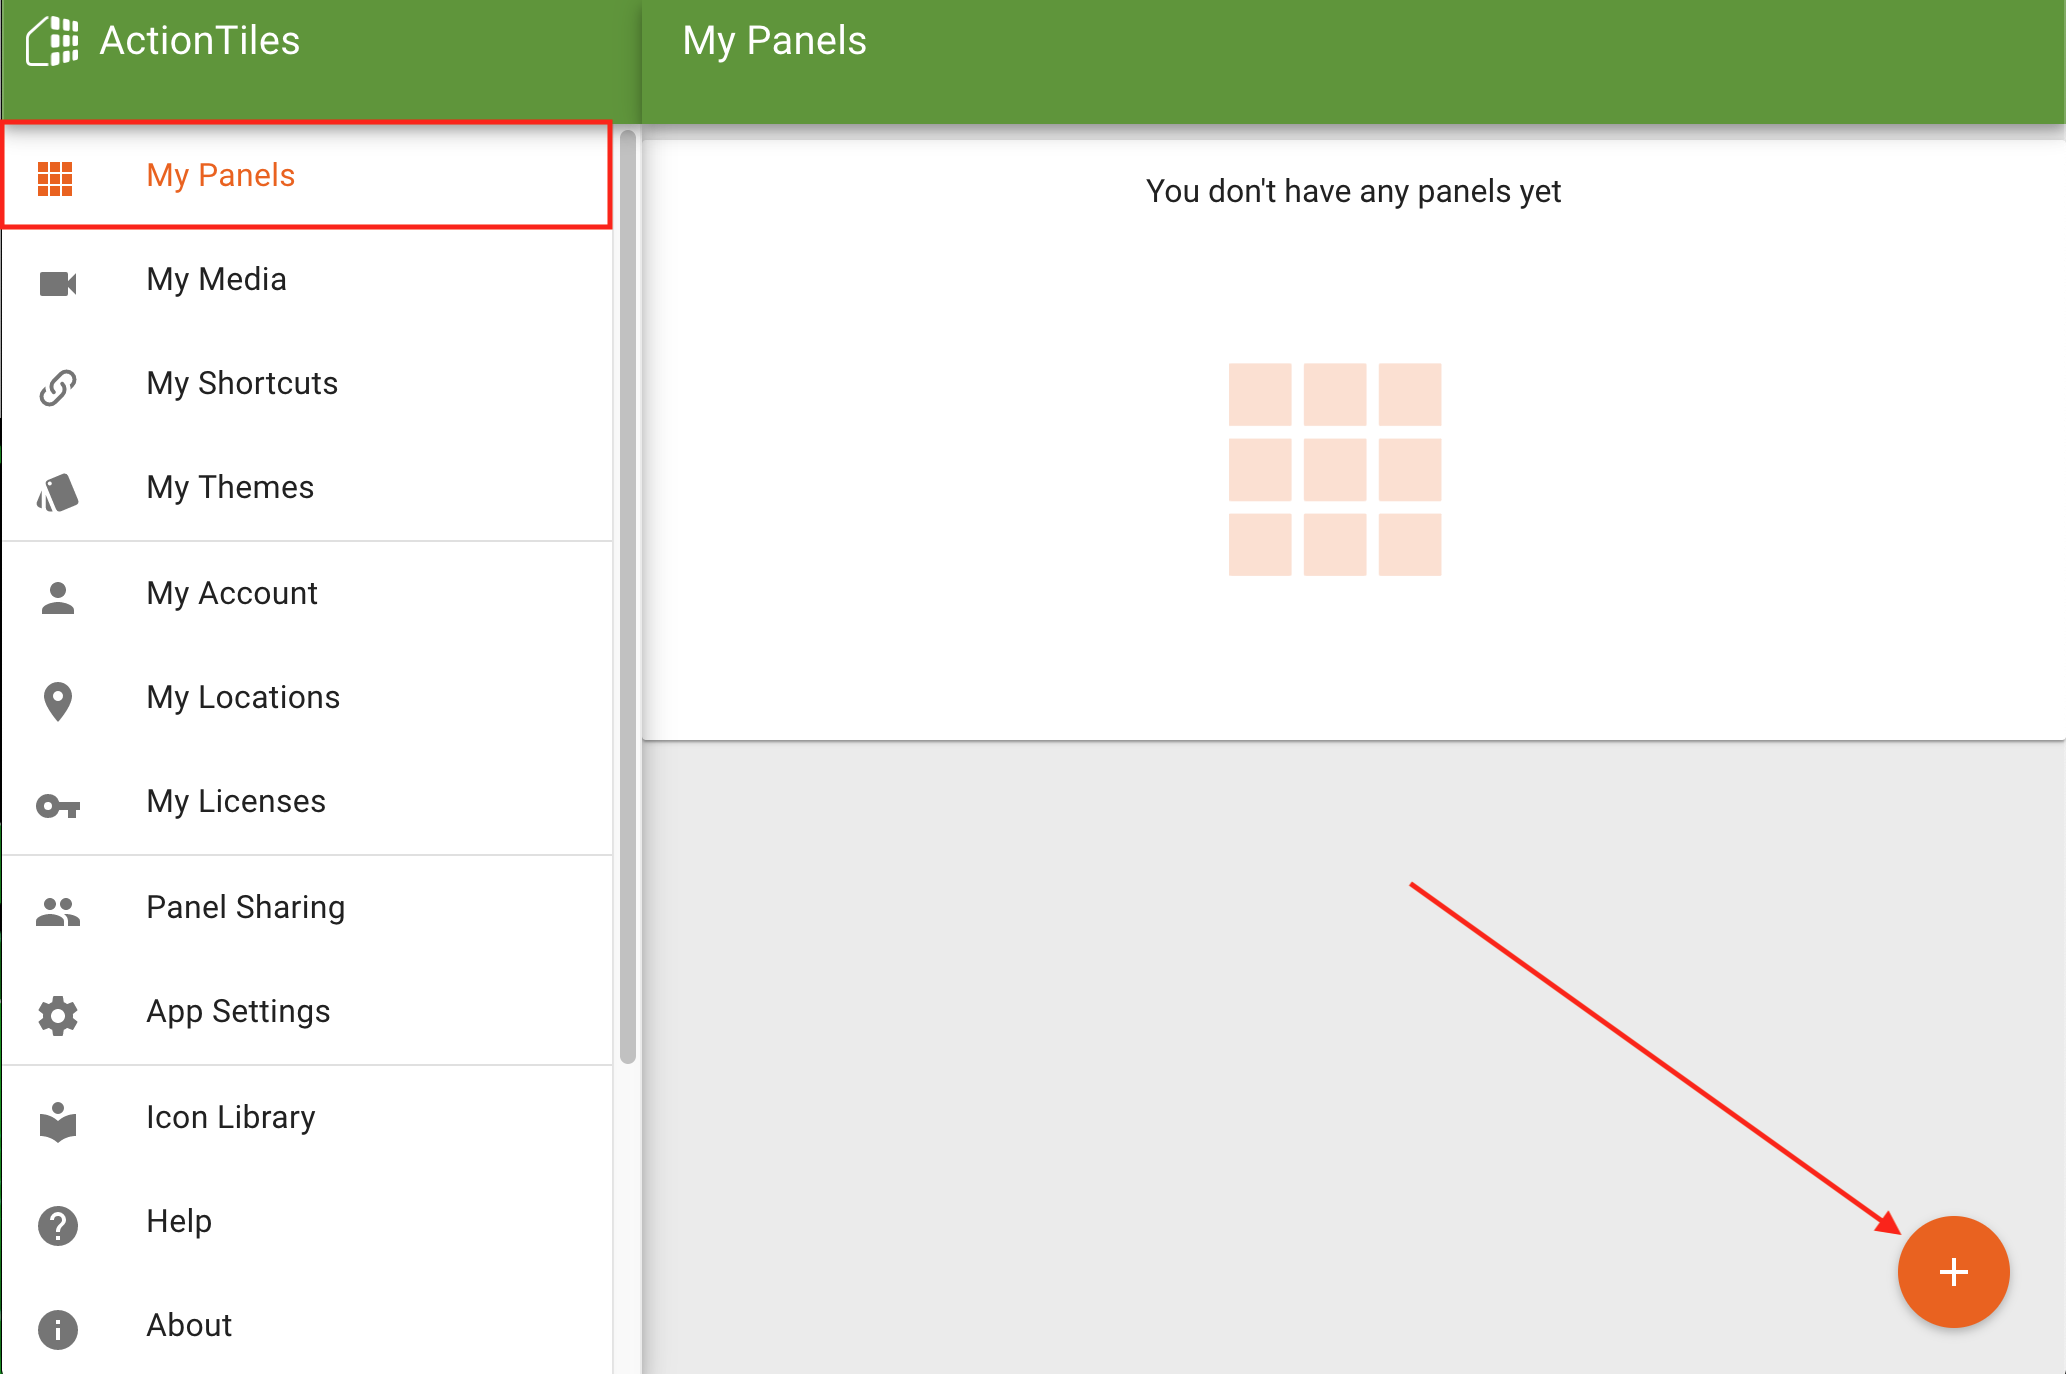
Select My Panels from the left side menu. Then click the + button in the bottom right corner to add a Panel.
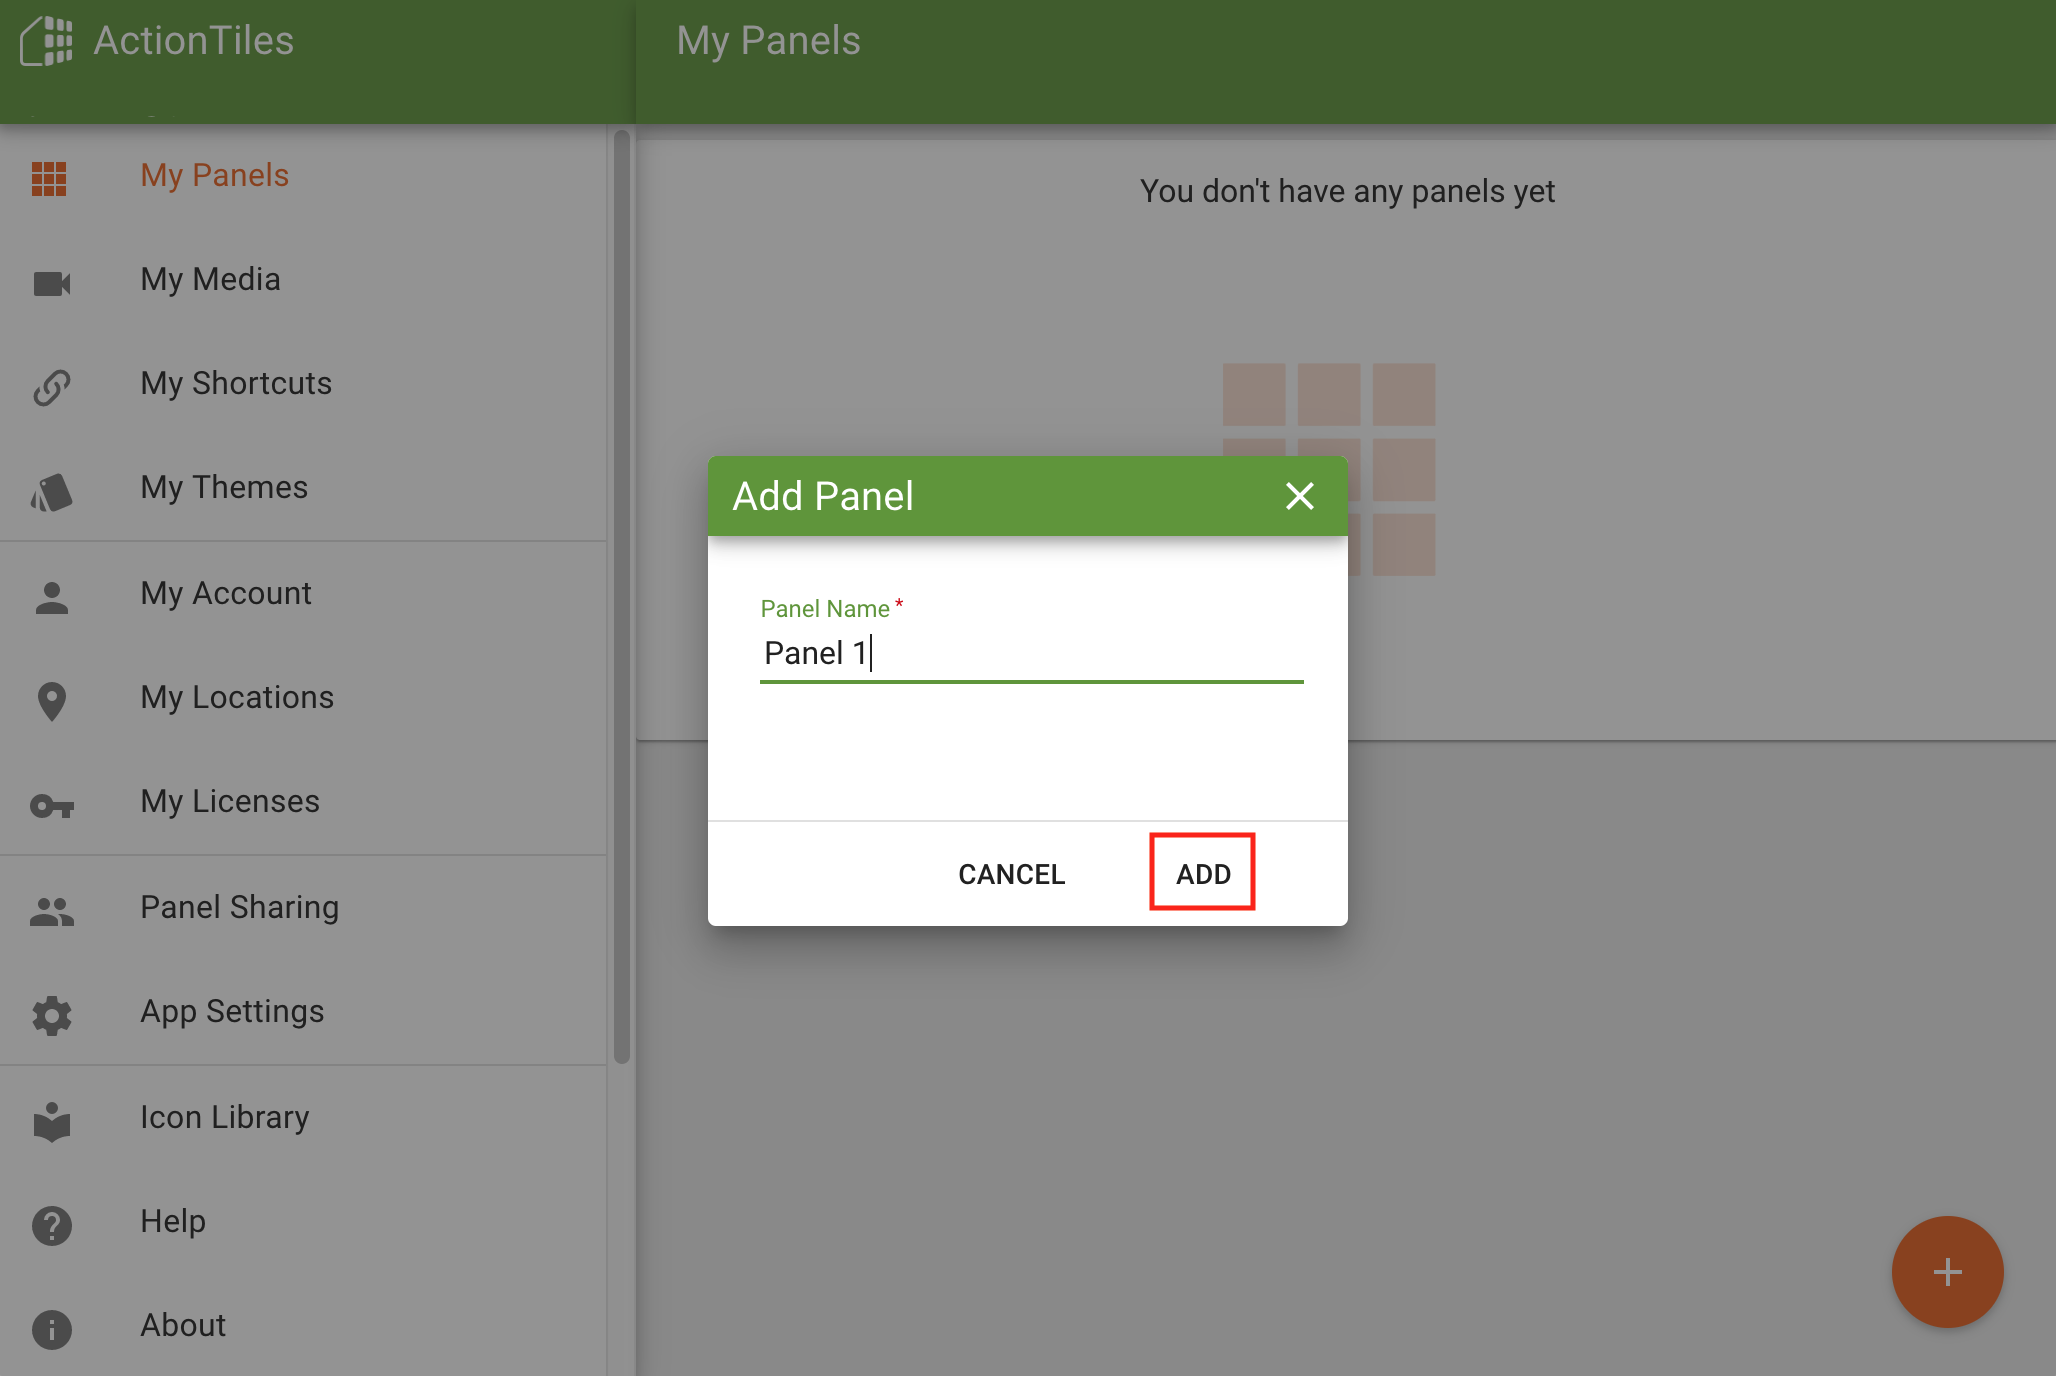
You can name the Panel whatever you’d like. Then click ADD.
ActionTiles Tiles
I want to give you a little Tile primer before we begin…
Tiles are laid out left-to-right and top-to-bottom within a Tileset.
A new Tileset will force a new row.
If double or triple height Tiles are used, Tiles that wrap to the next row will first fill in the blank spots on highest row of the Tileset before wrapping to the next row.
It may be helpful to set your tablet up next to your computer while you work with ActionTiles. You can view your changes instantly on the tablet as you make them on your computer.
Now that you are equipped with that info, we can start adding to our Panel.
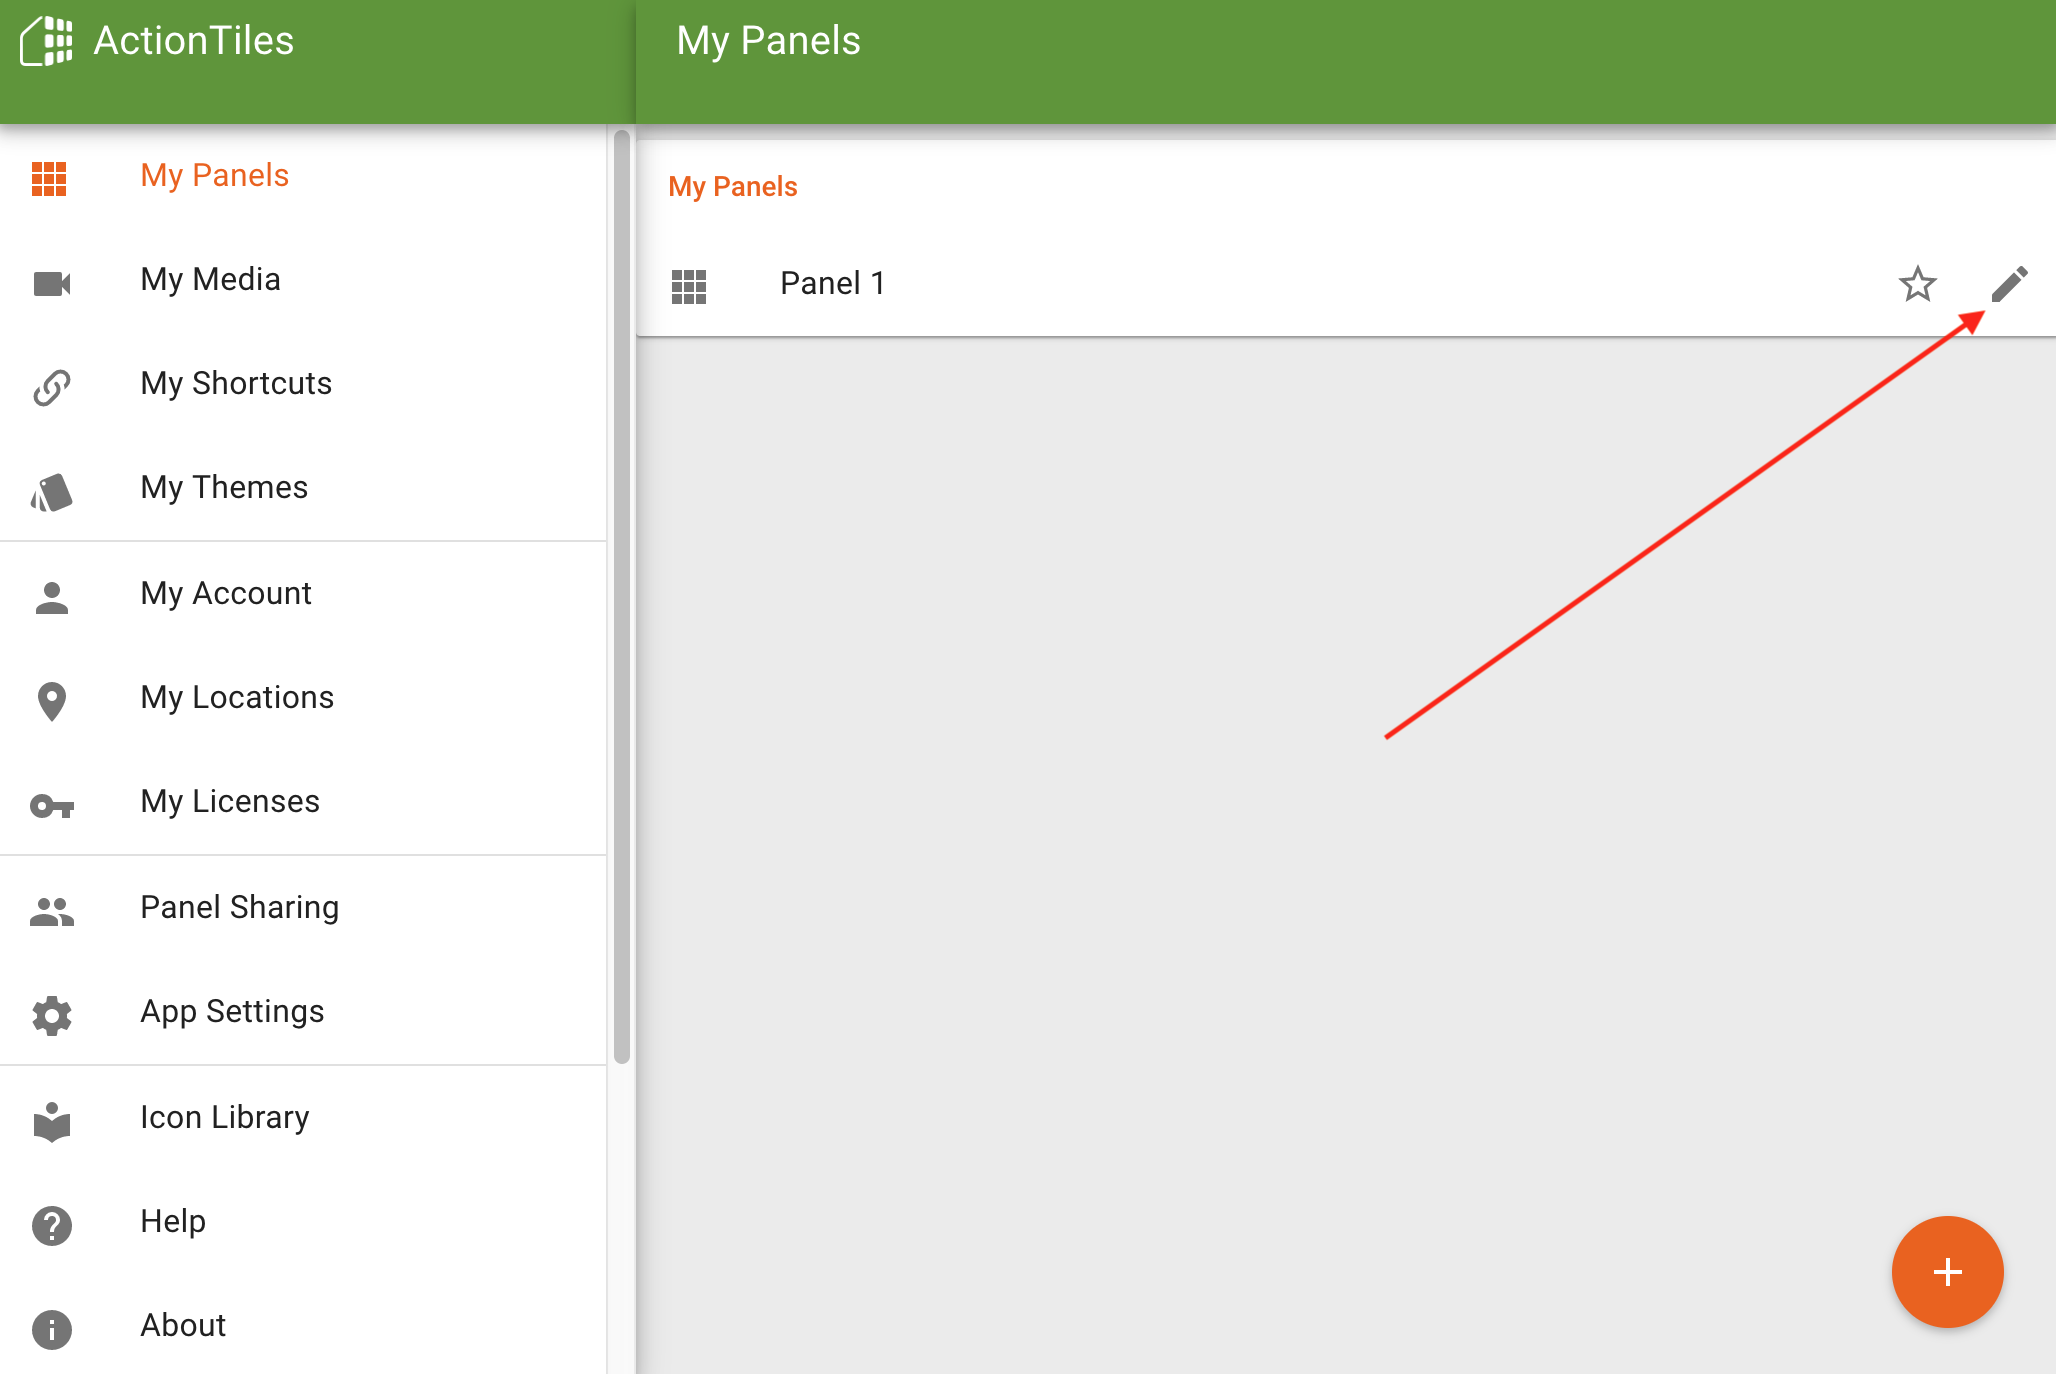
Click the edit Panel button.
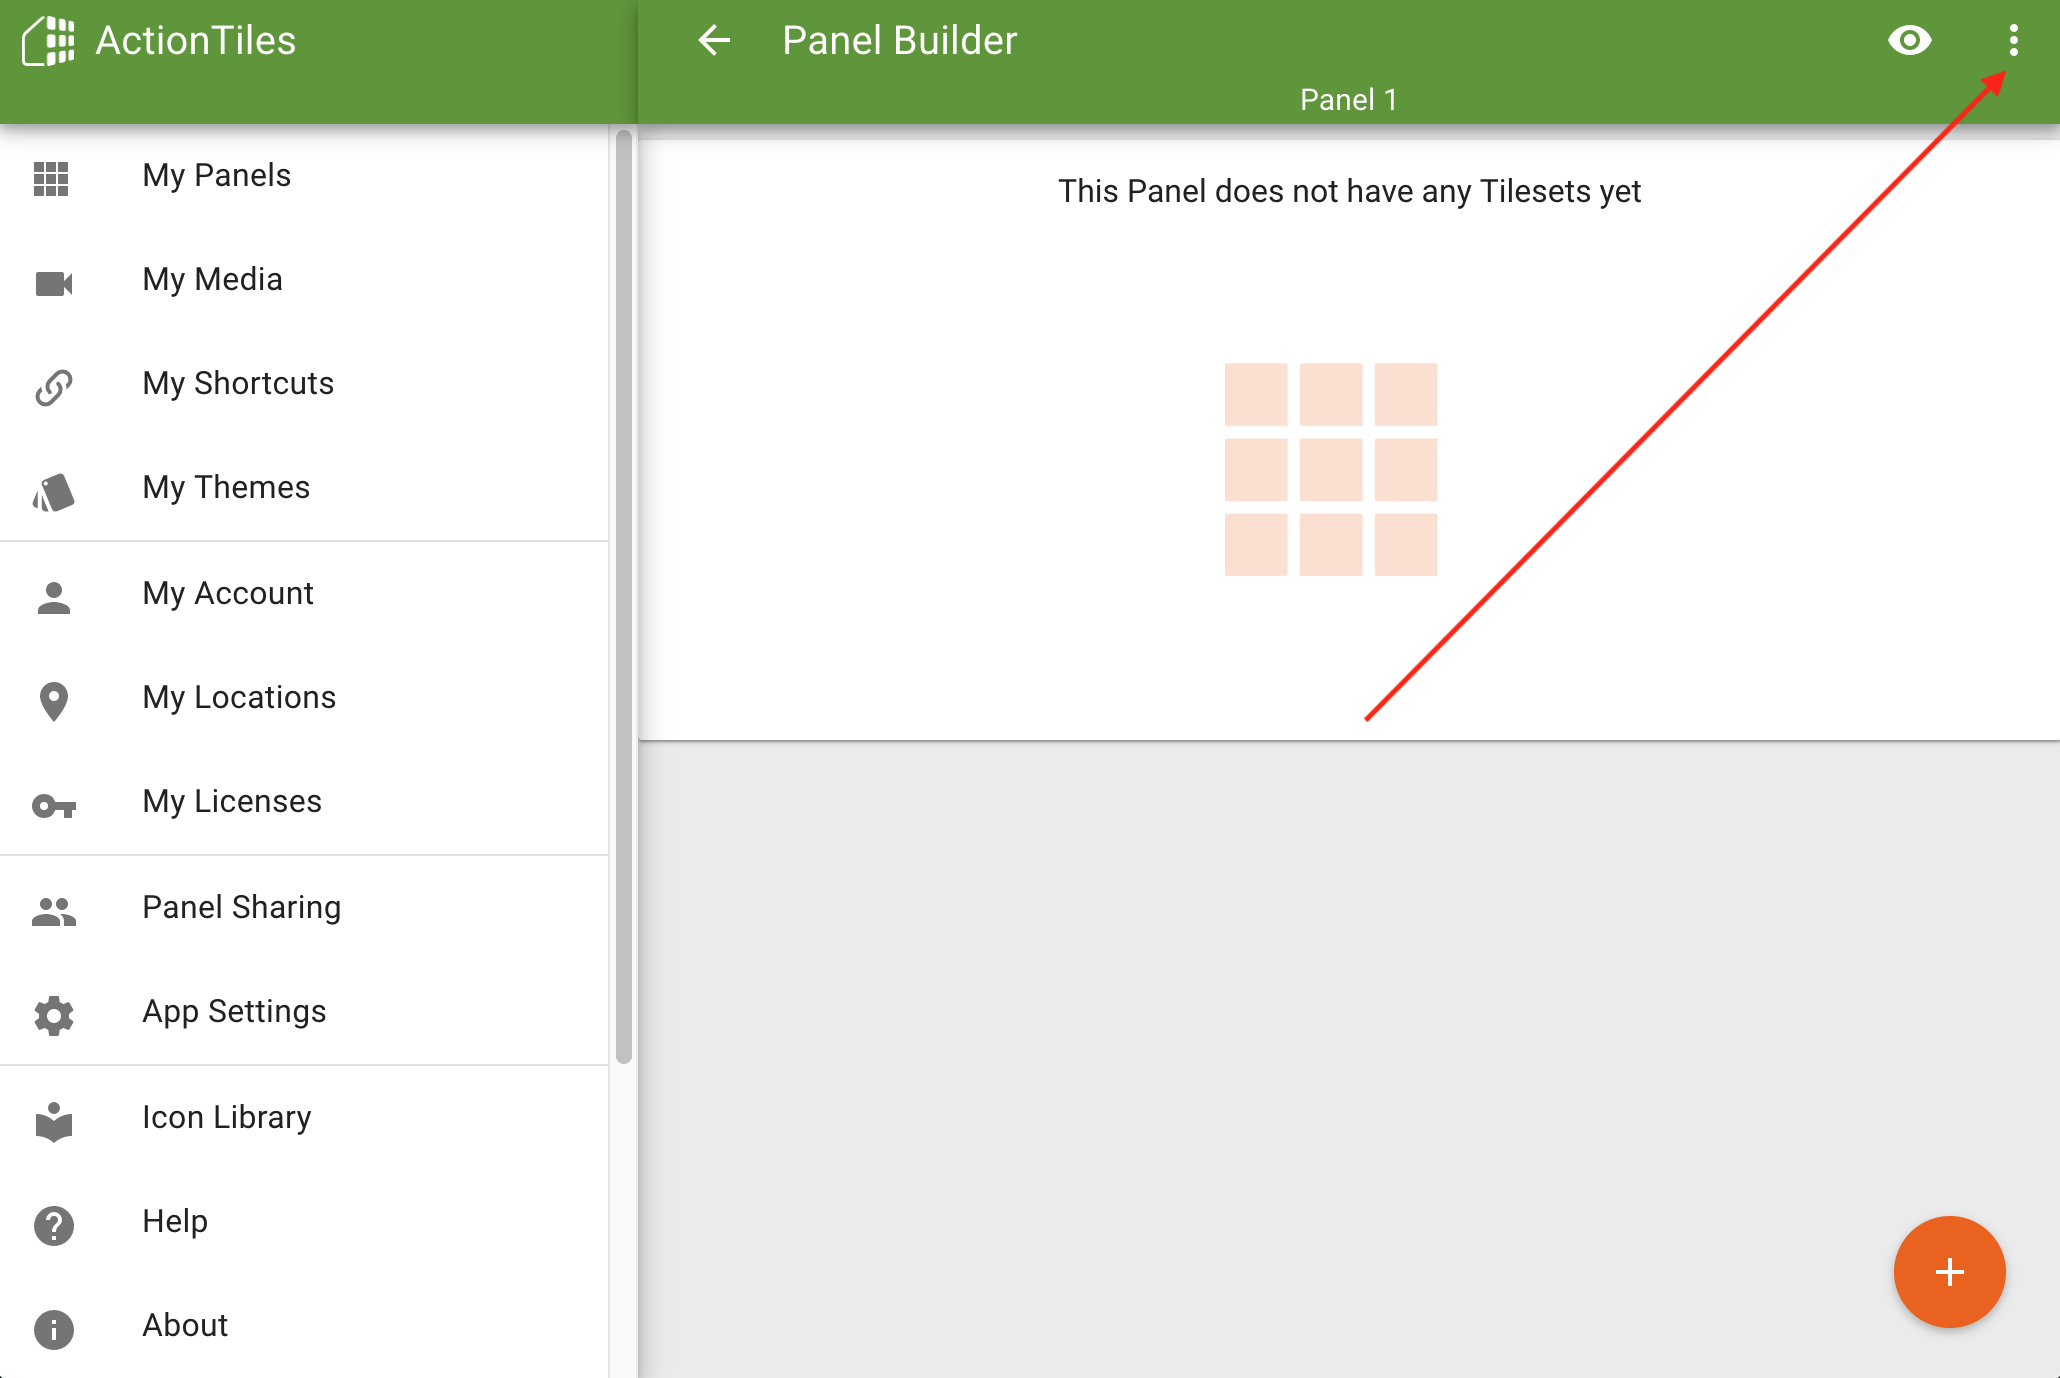
We are now in the ActionTiles Panel Builder. Click the dotted menu button in the top right corner.
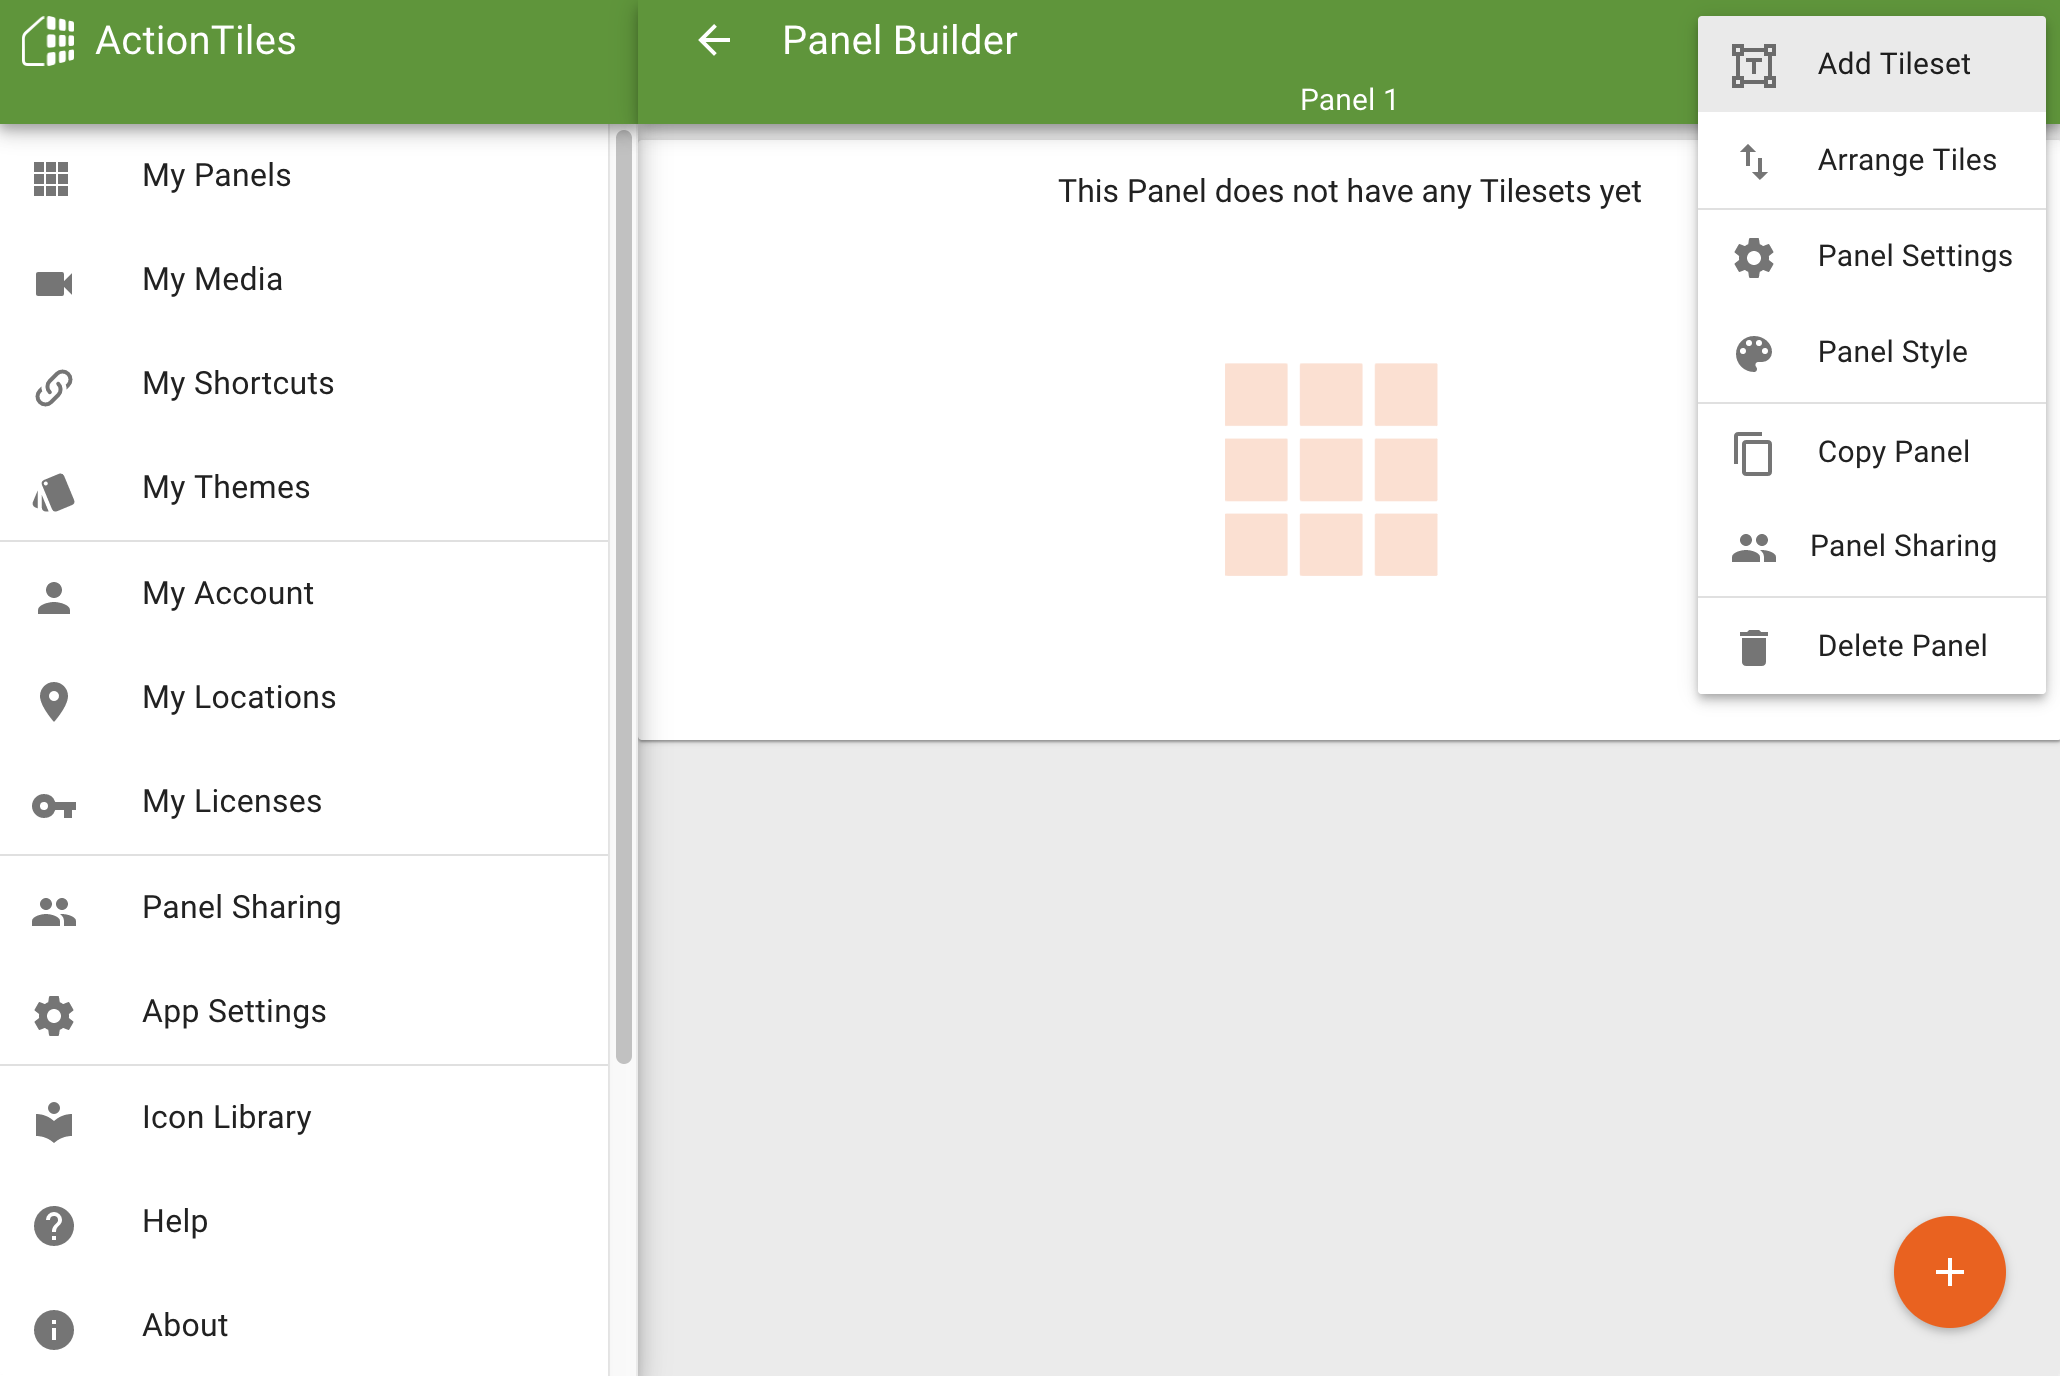
Click Add Tileset from the menu.
ActionTiles Presence Tileset
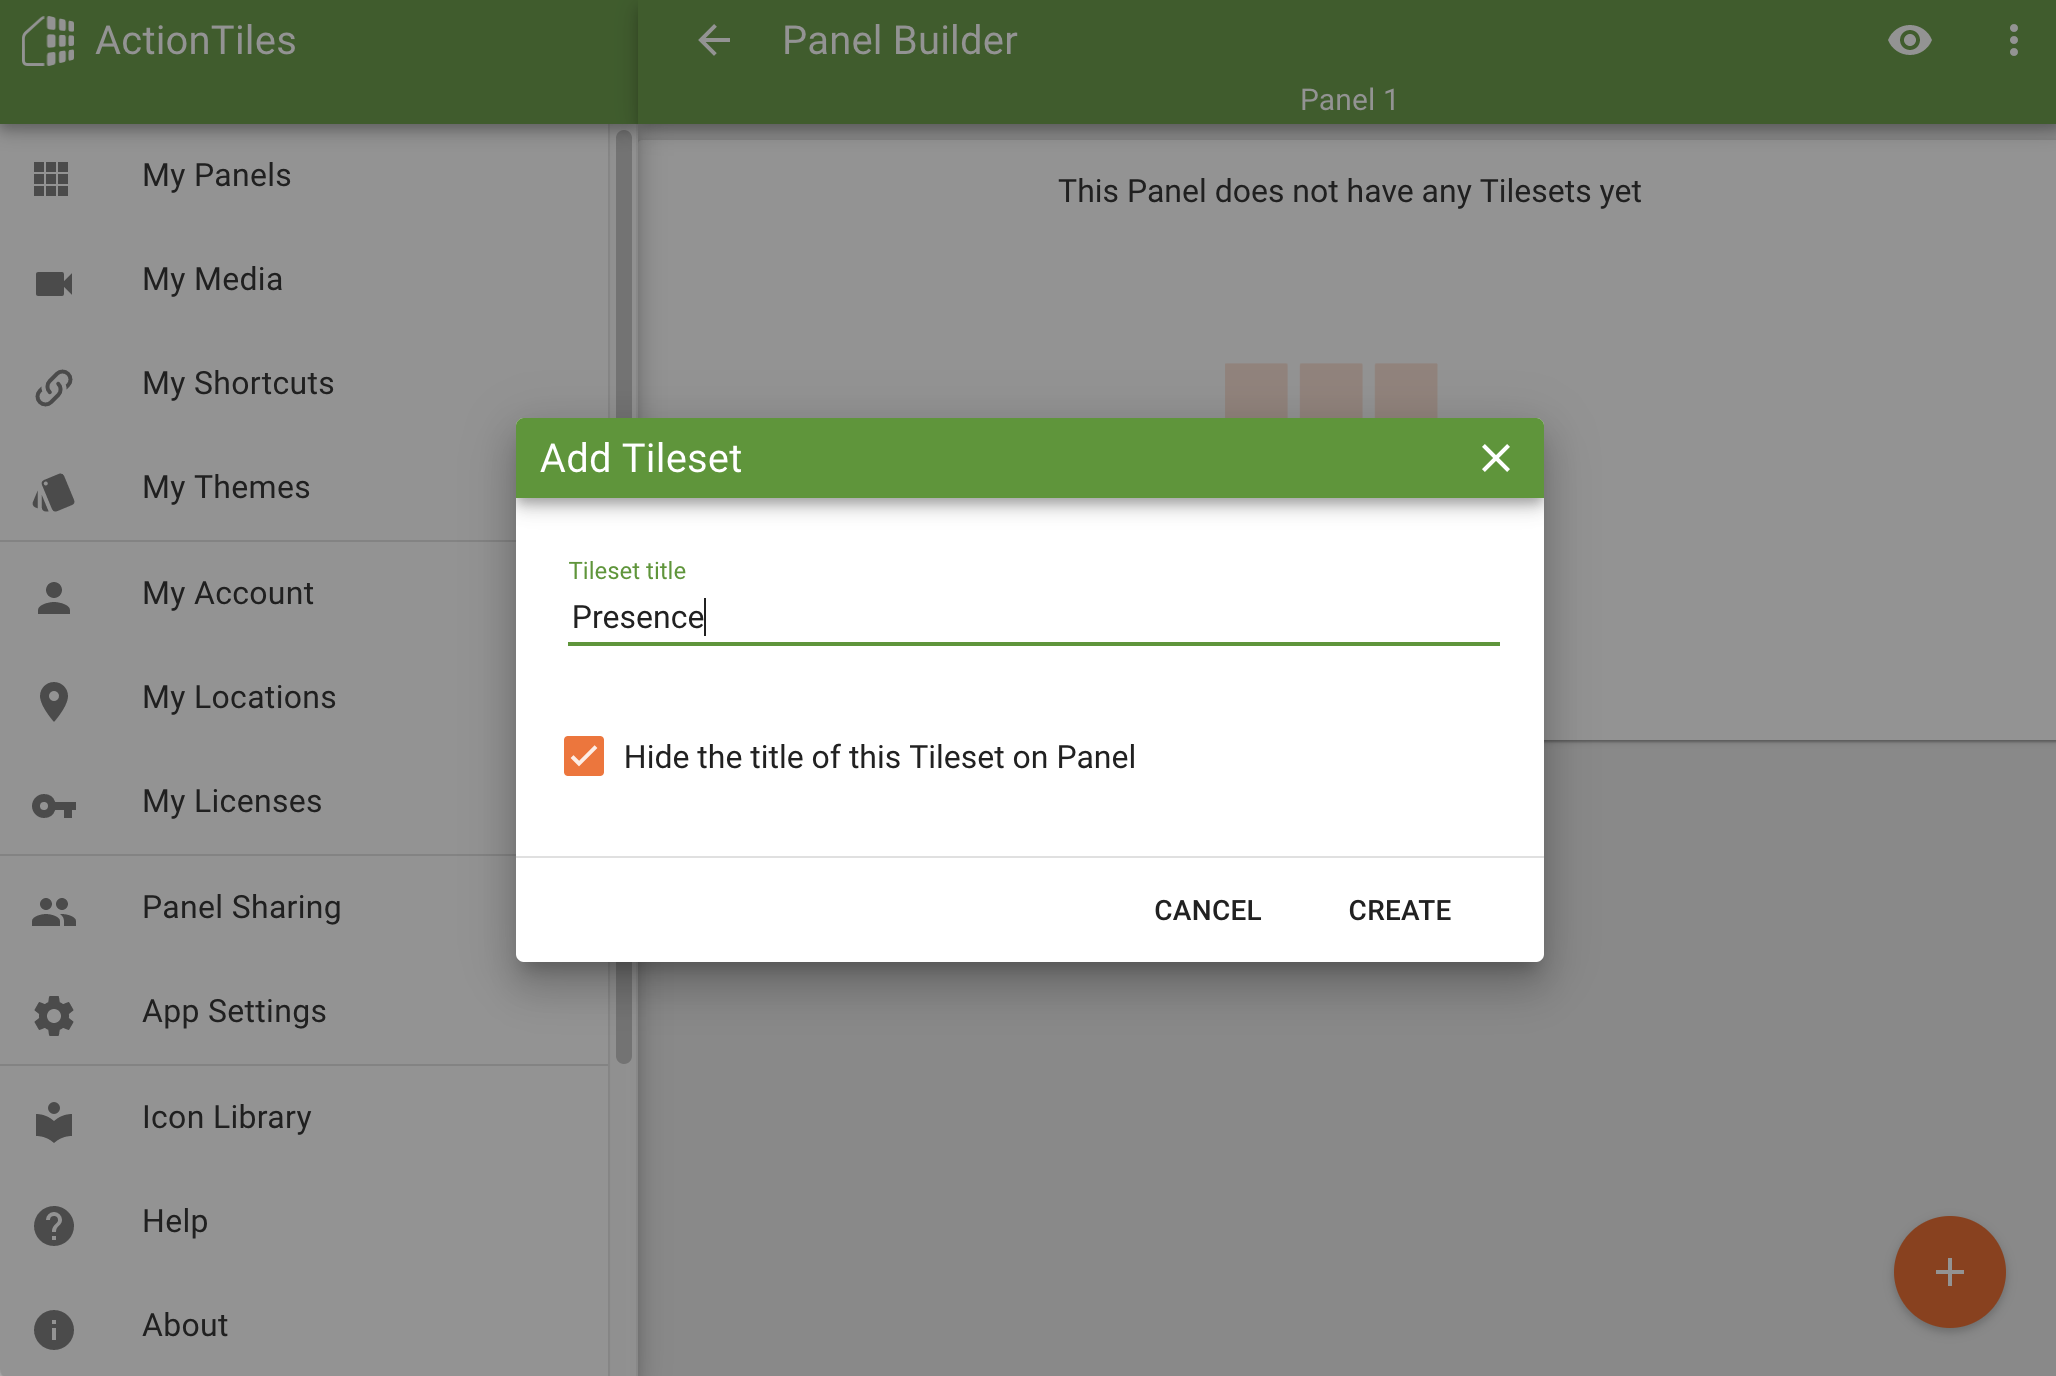
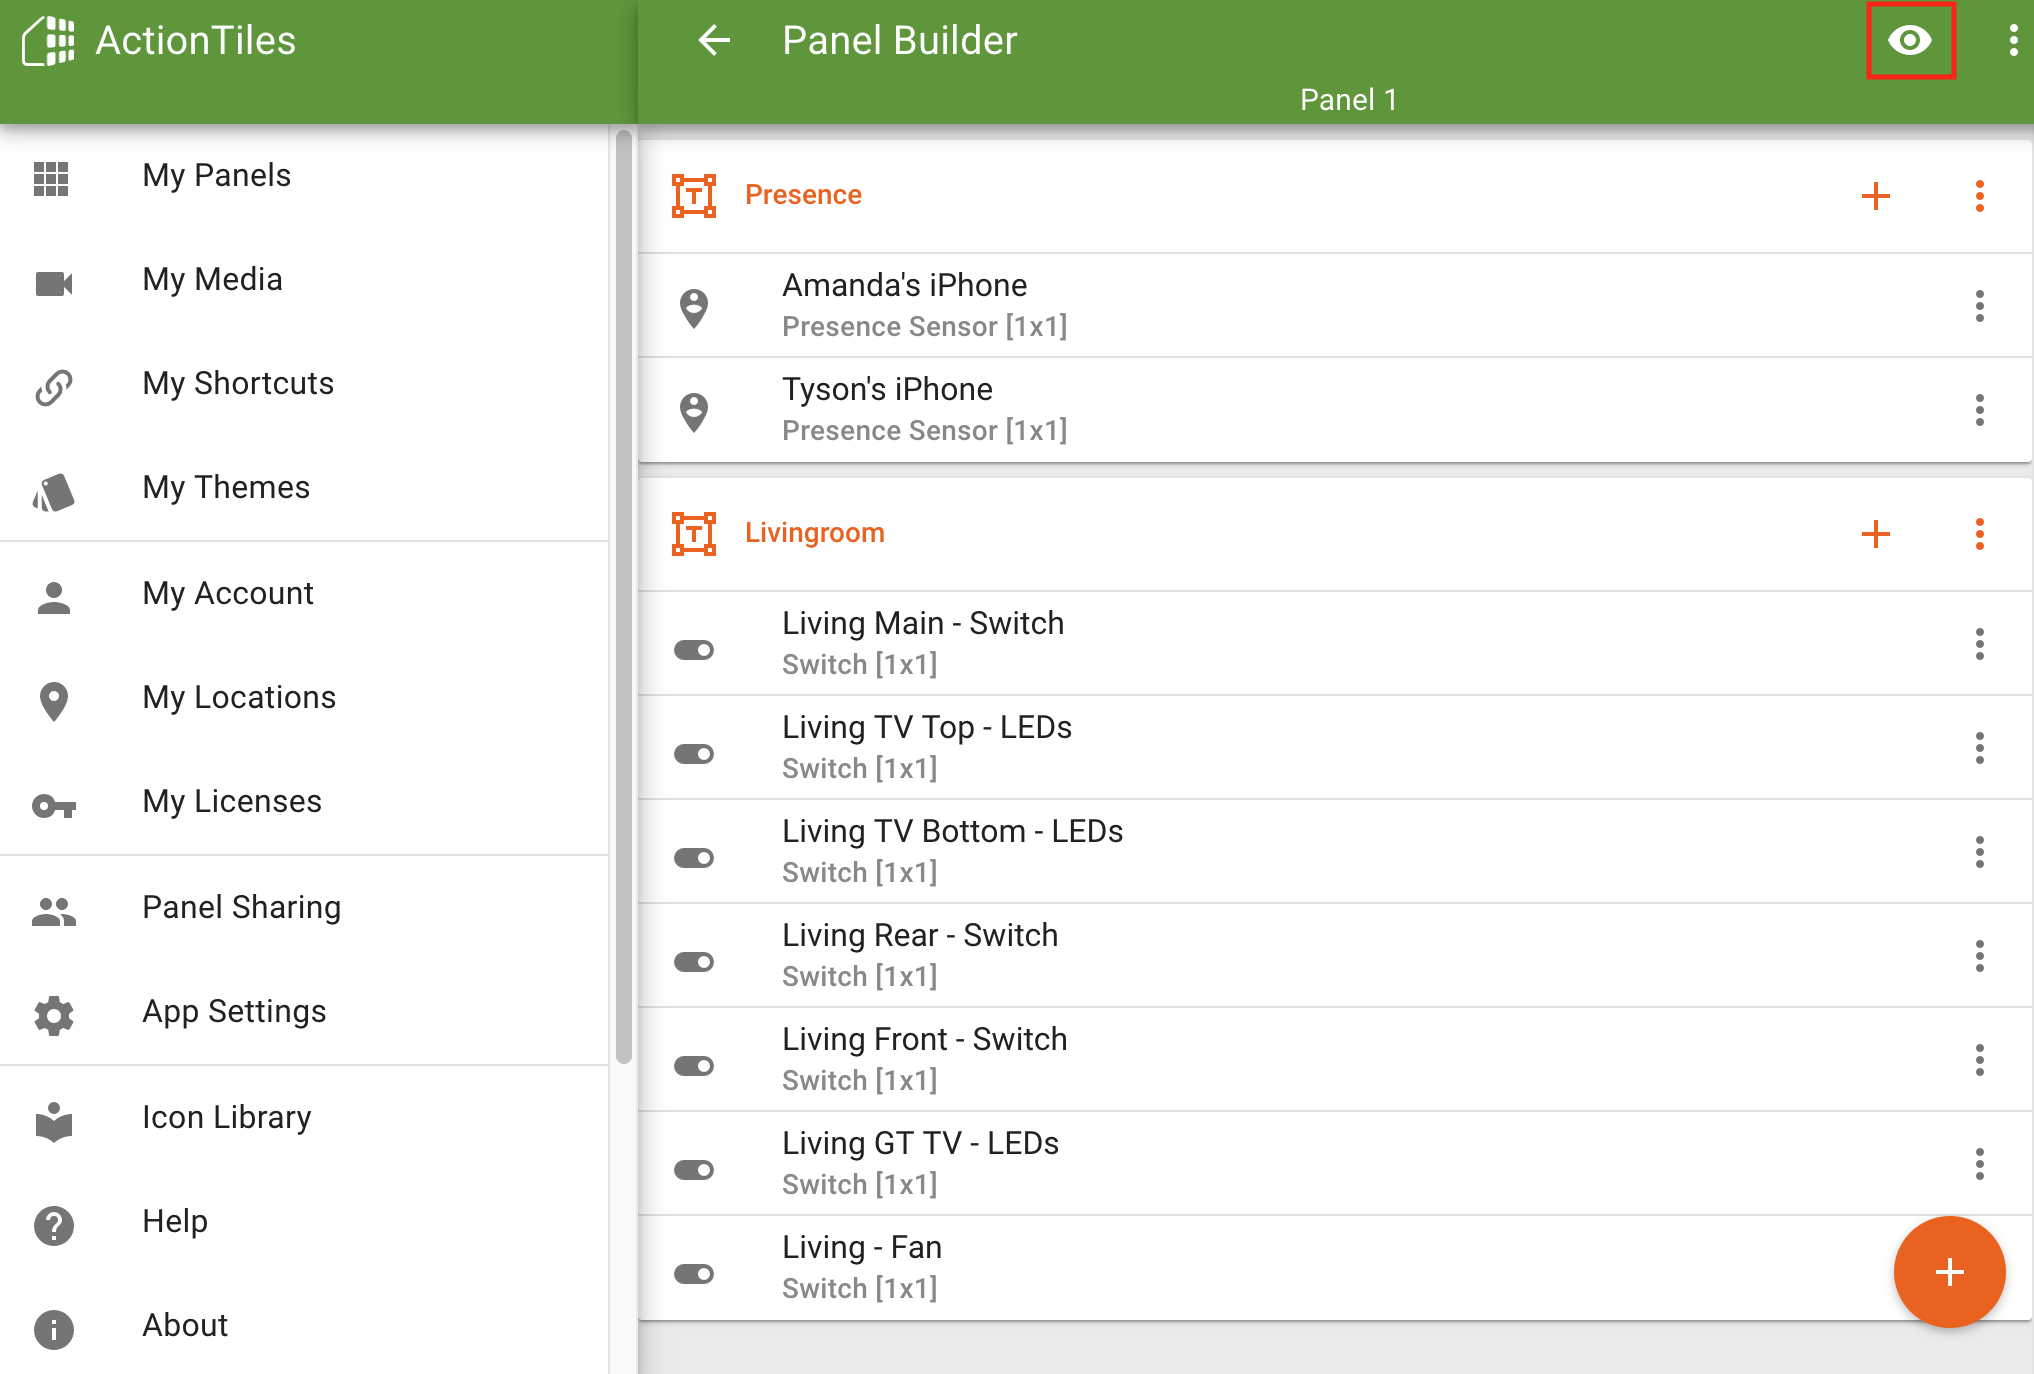
We are going to start by adding a Tileset for showing presence of people in your home. Name the Tileset Presence and click CREATE.
You are welcome to hide the title of the Tileset if you’d like. Showing Tileset titles can be helpful when doing something like adding a few different rooms on one panel and you want it to be obvious what Tiles control different rooms.
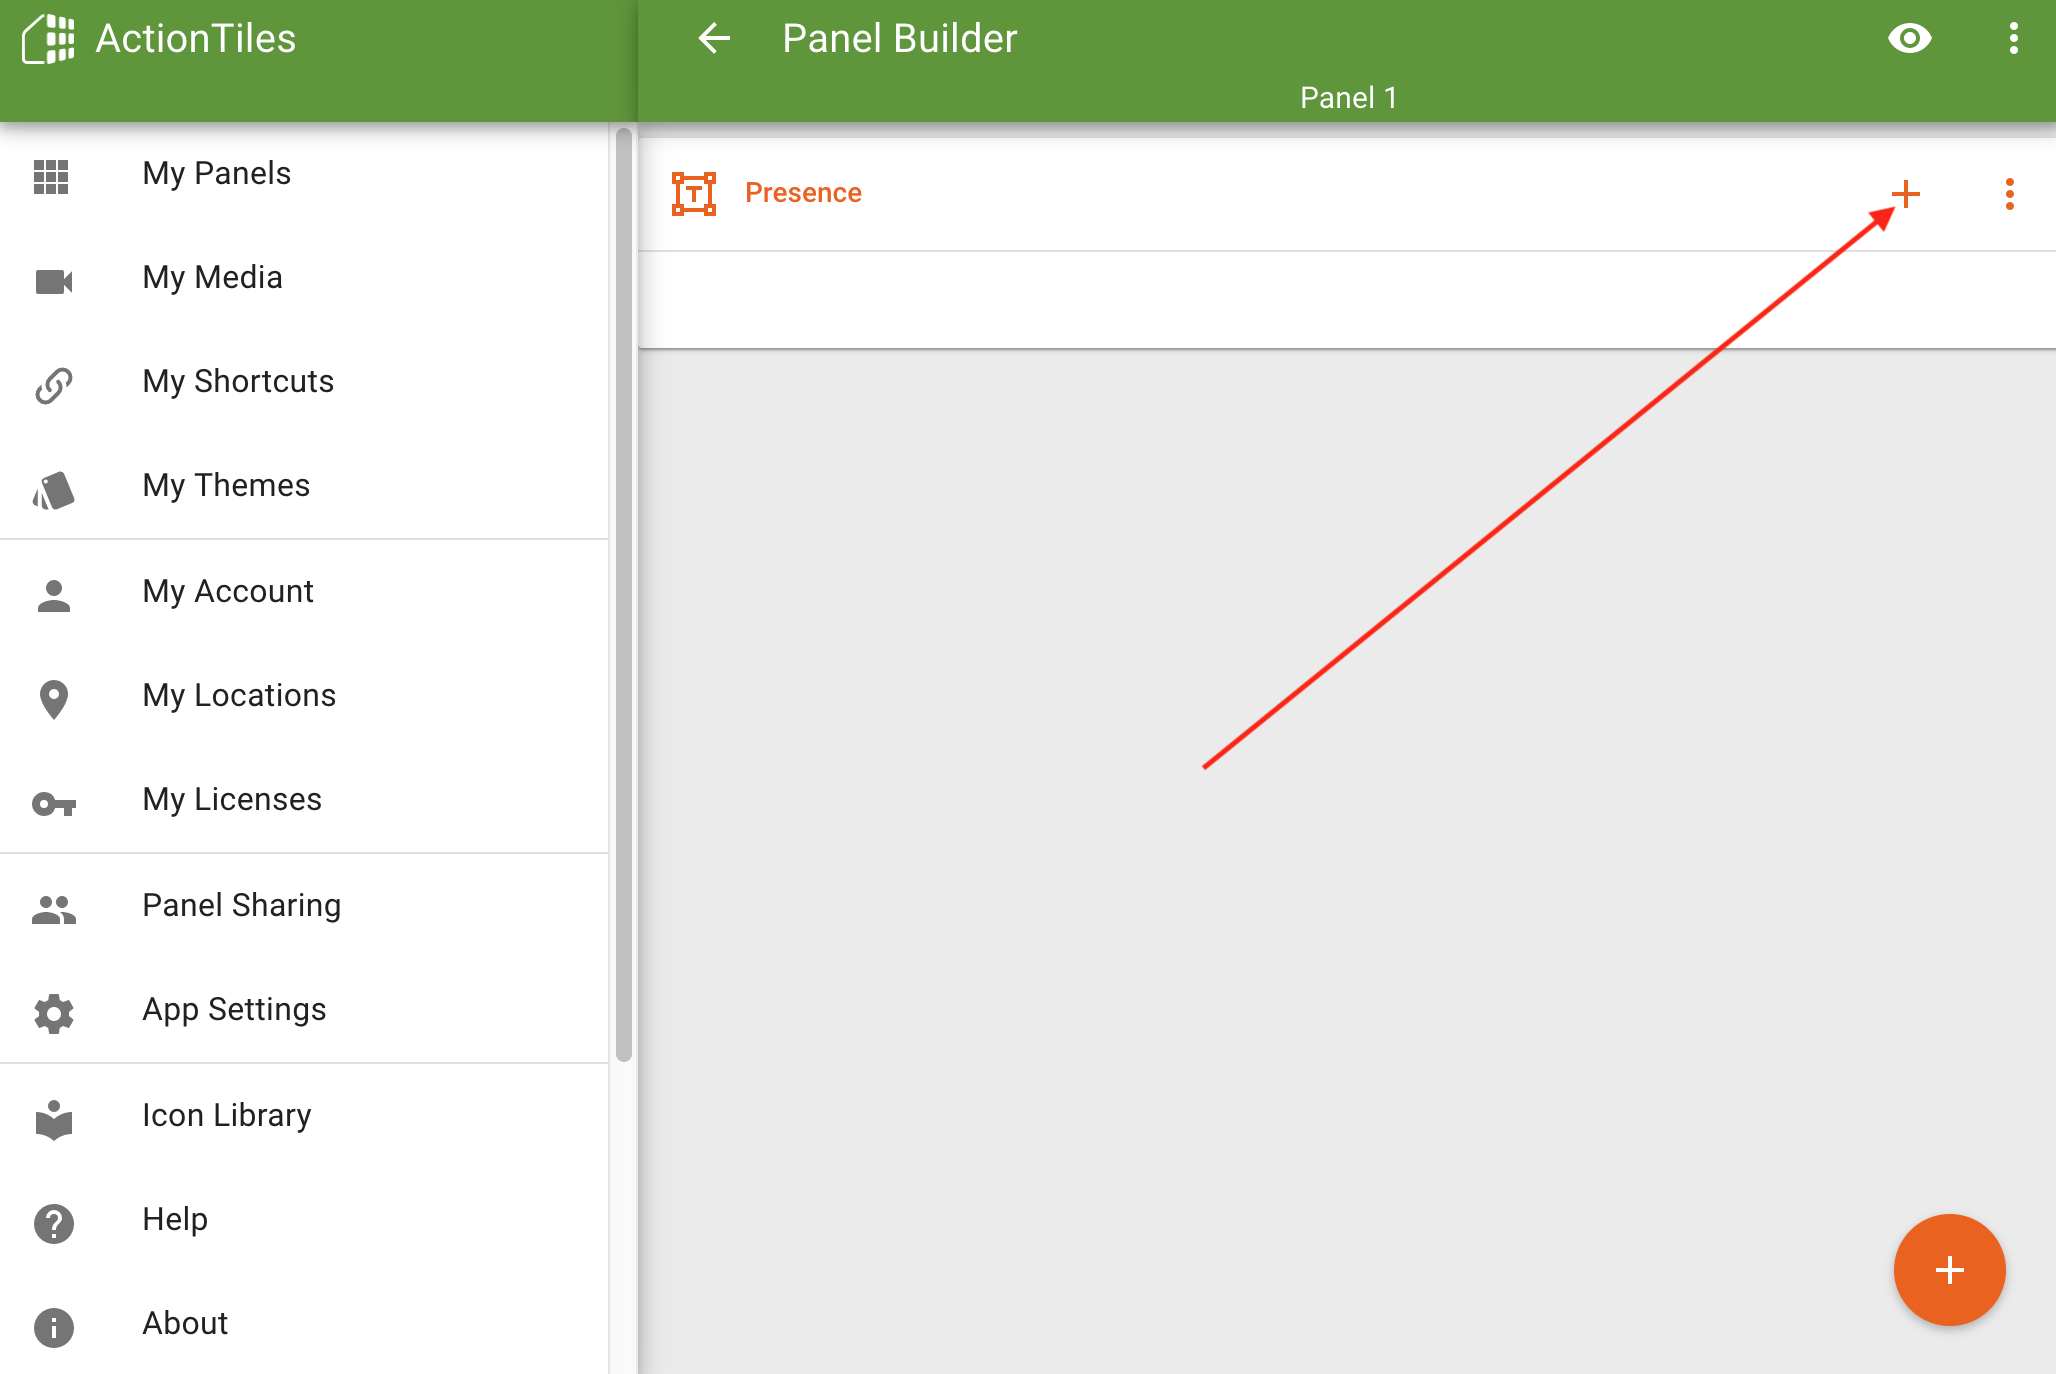
Click the + button so we can add a Tile to our Presence Tileset.
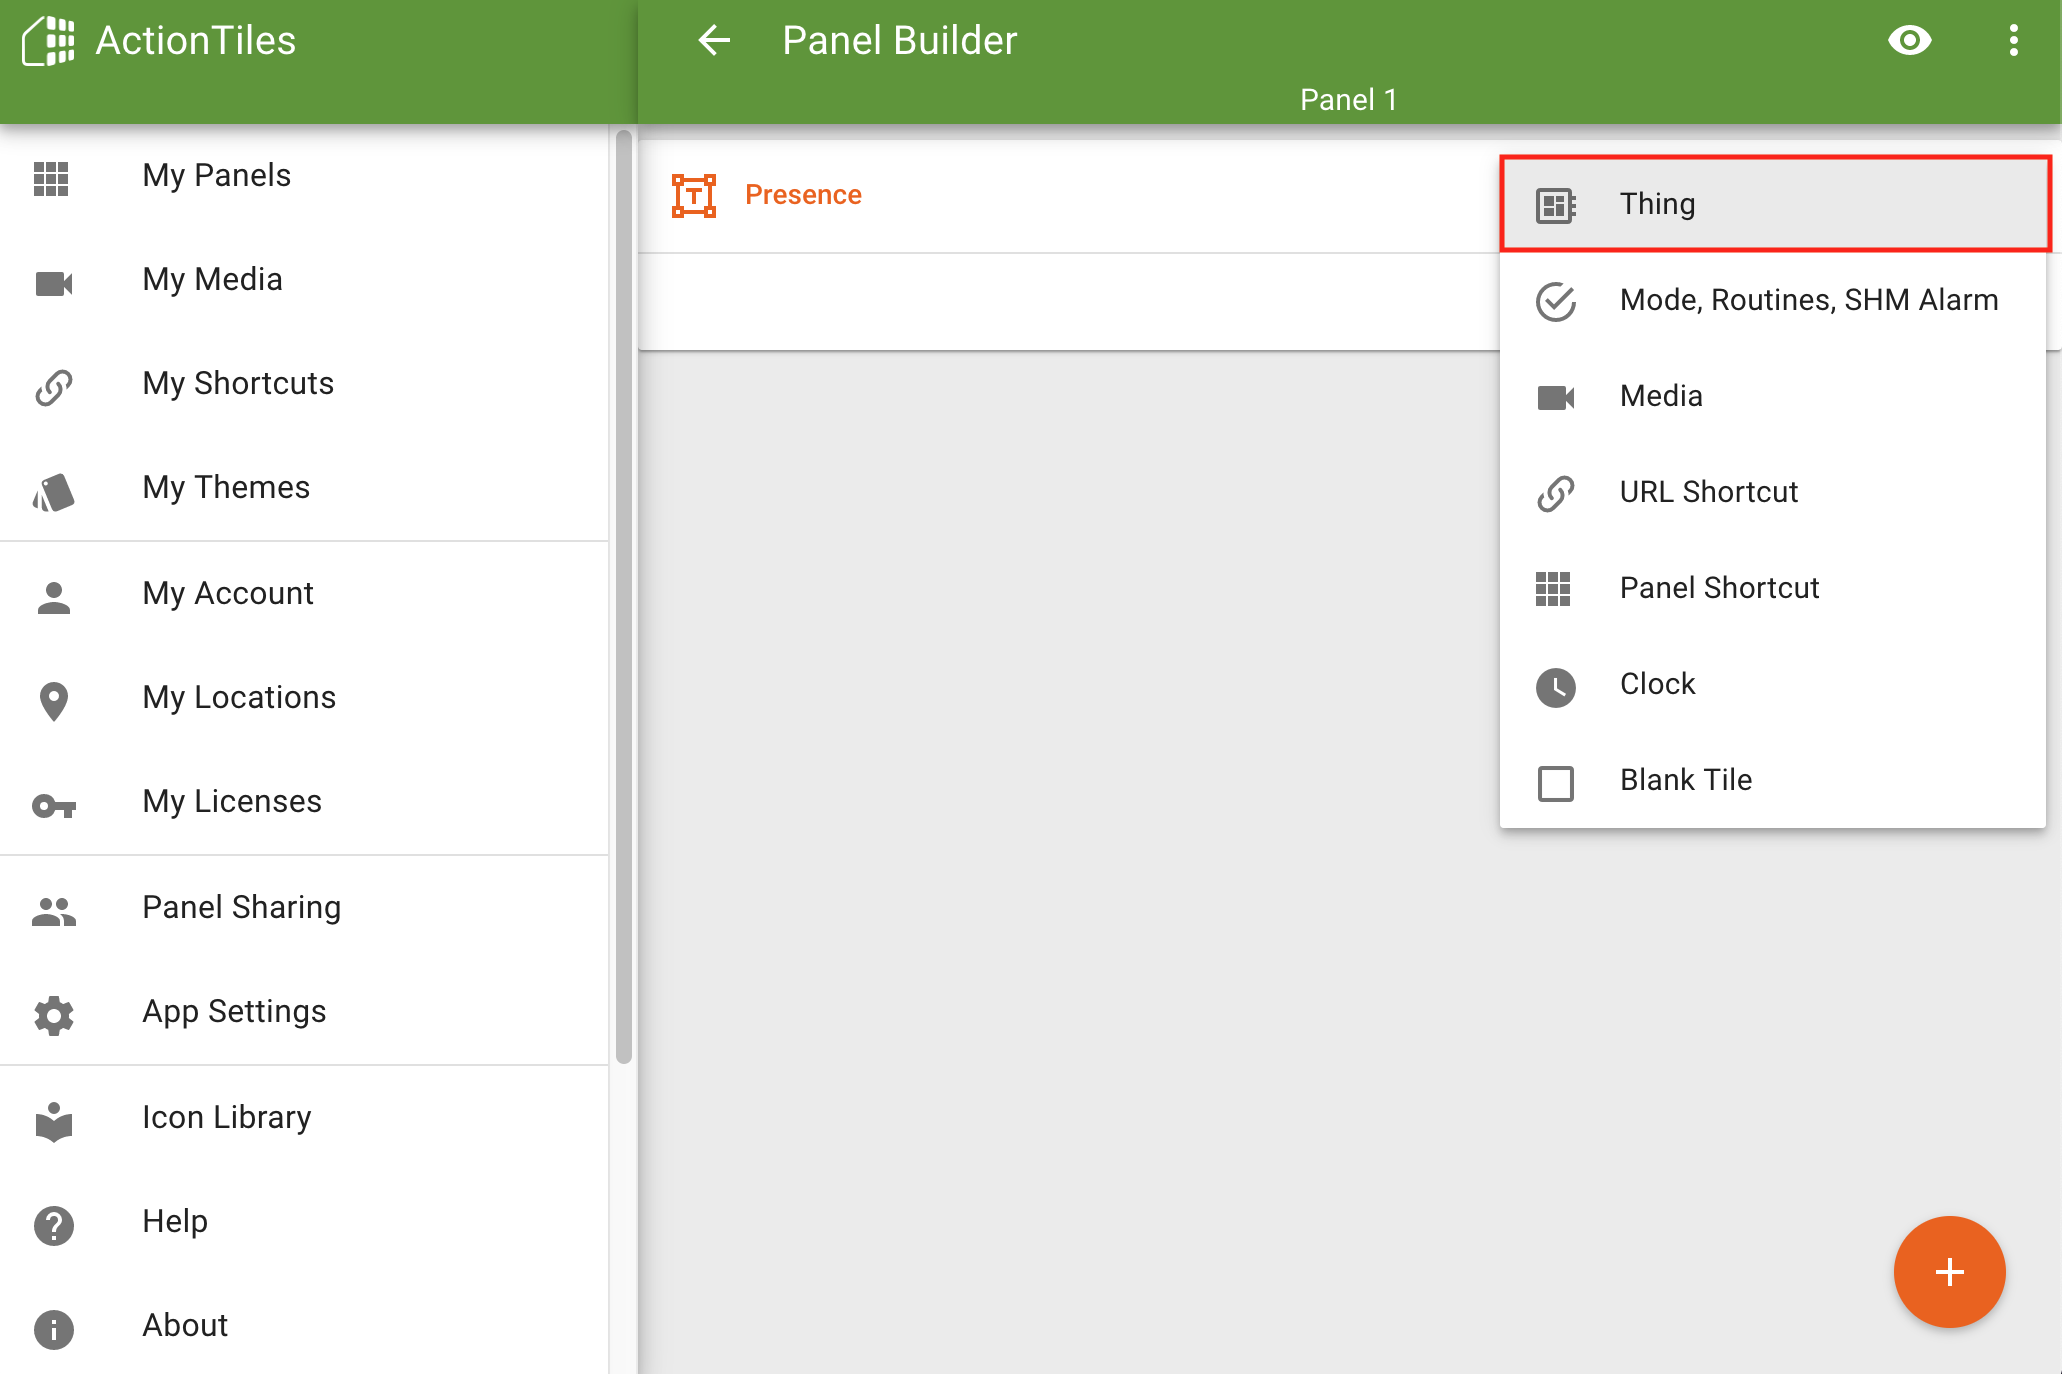
We are going to select Thing from the menu.
You should now see a list of all your SmartThings devices.
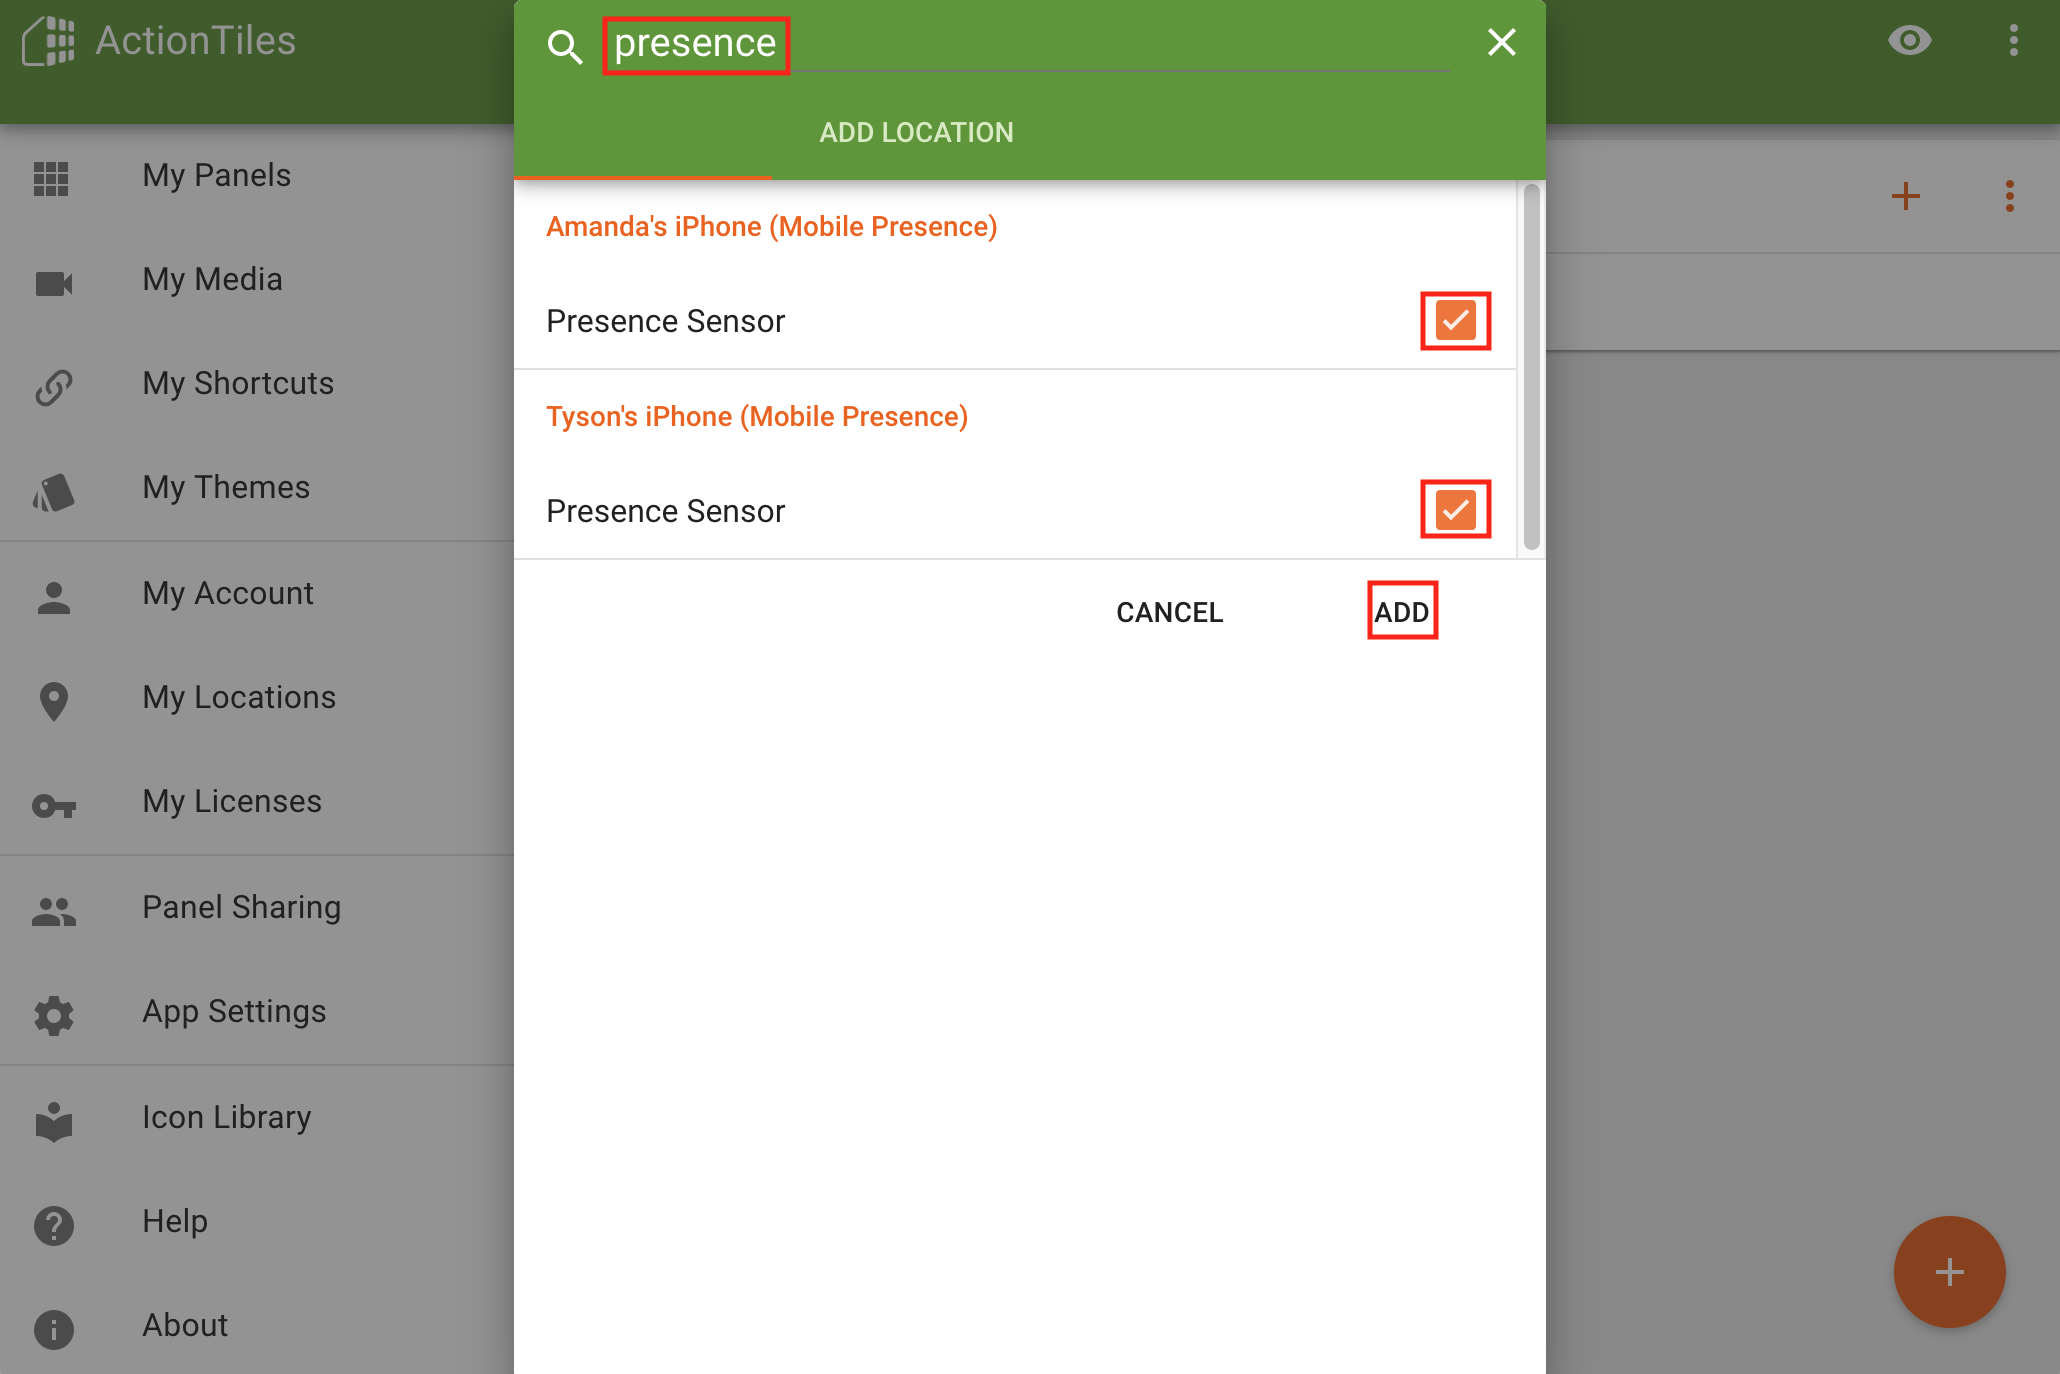
You can use the search at the top to find all presence sensors. Check all the presence sensor boxes and then click ADD.
If you go back to the My Panels section, you can click anywhere on the Panel name and it will open that panel.
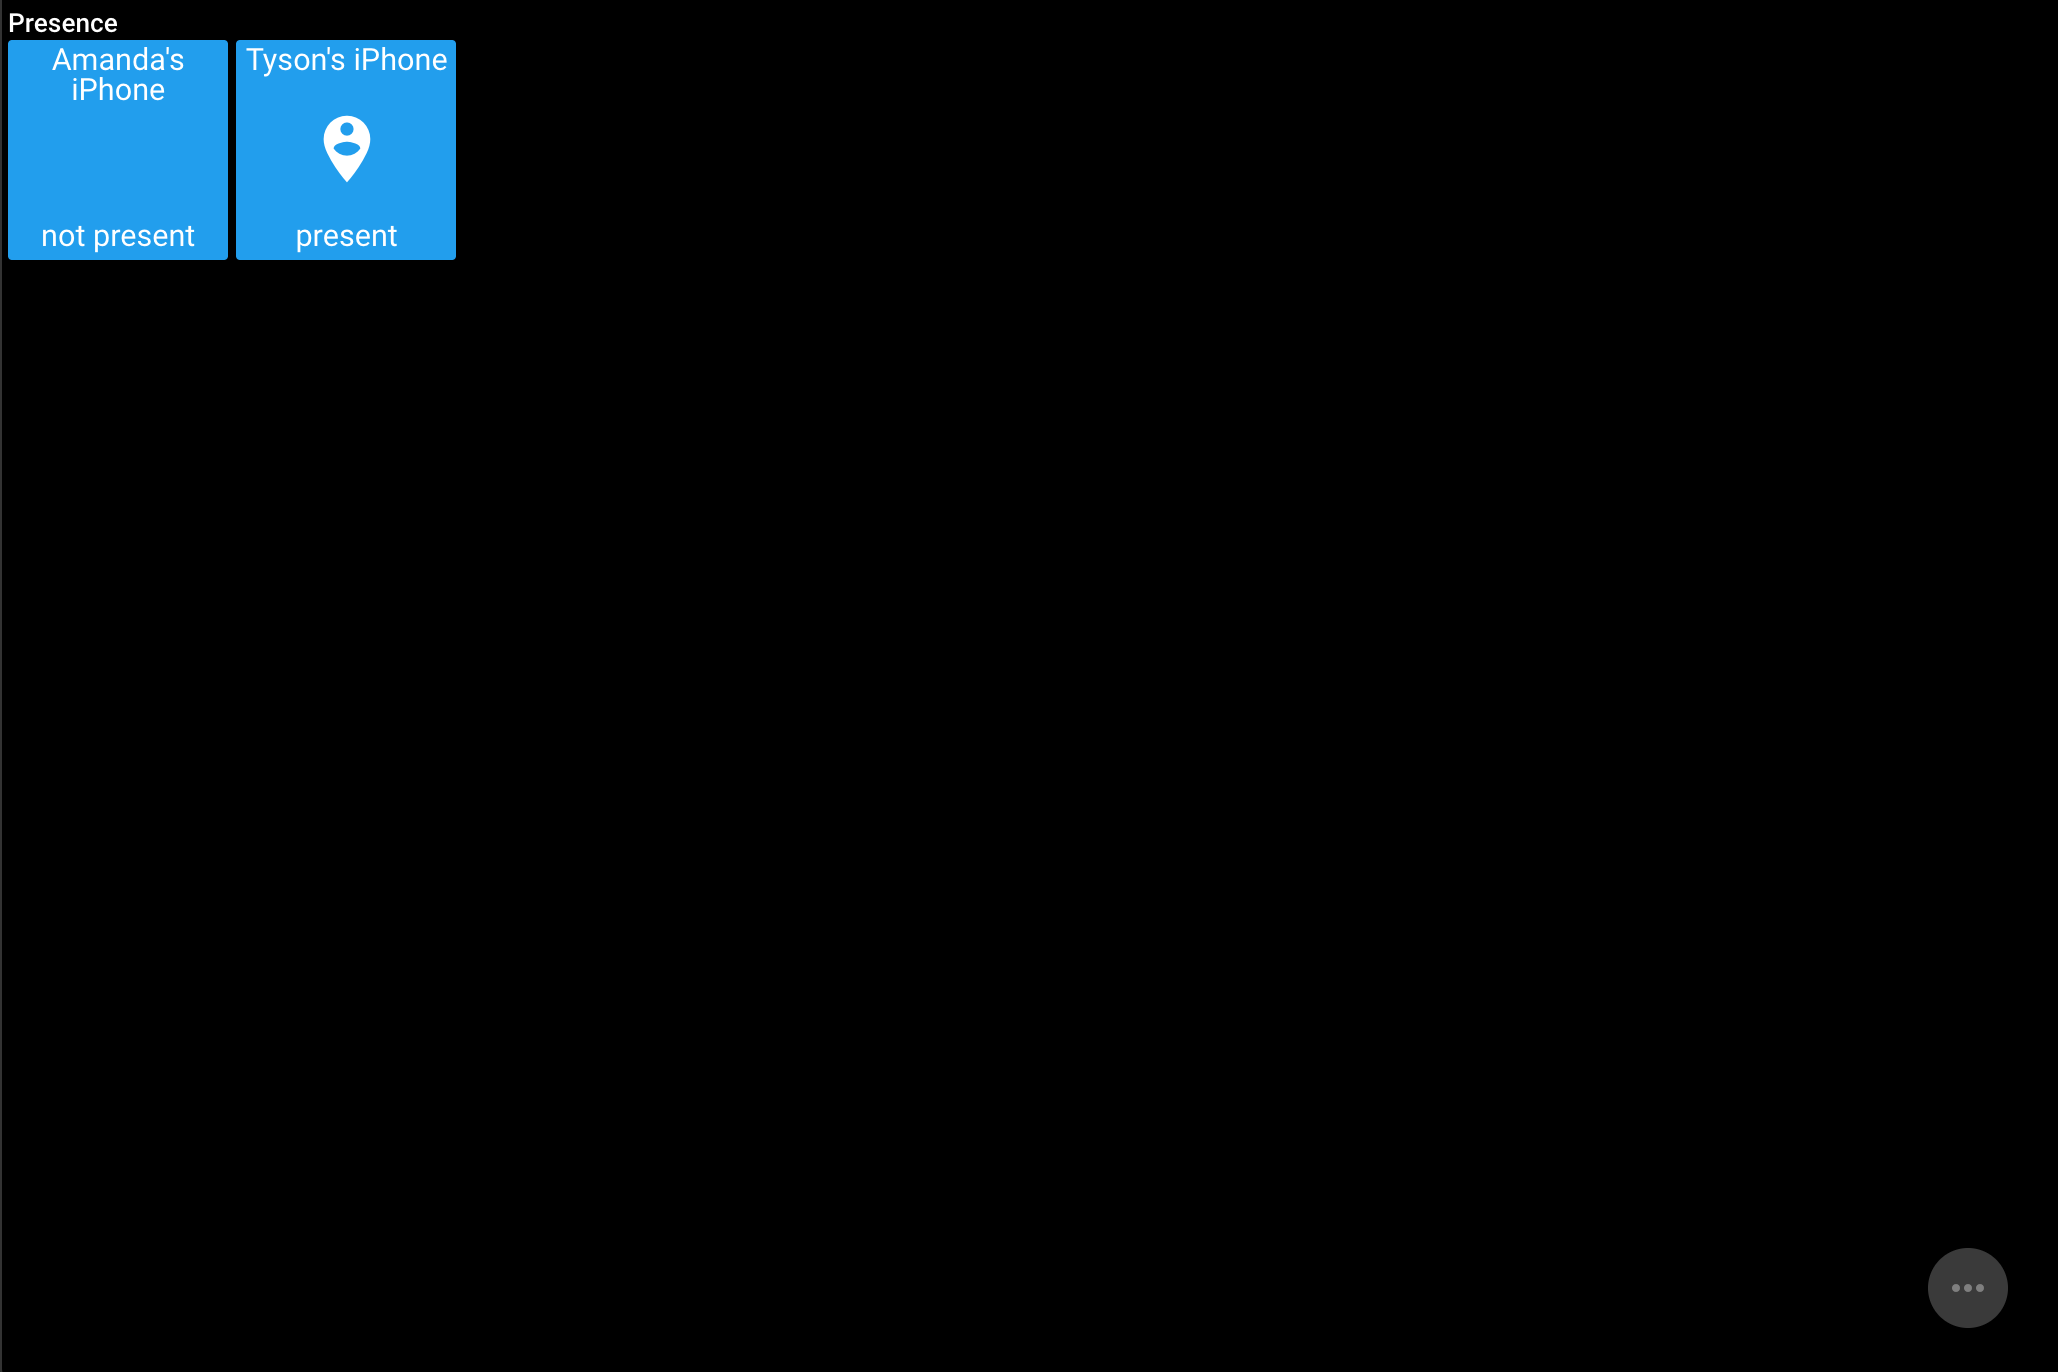
This is what our Panel looks like so far. ActionTiles pulls the info from SmartThings and shows that I am home but my wife is not home. Pretty awesome, huh?
Now that you know how Panels, Tilesets and Tiles work, let’s keep adding do it.
ActionTiles Switches Tileset
Go back to the Panel Builder and add another Tileset. I am going to name this one “Livingroom”.
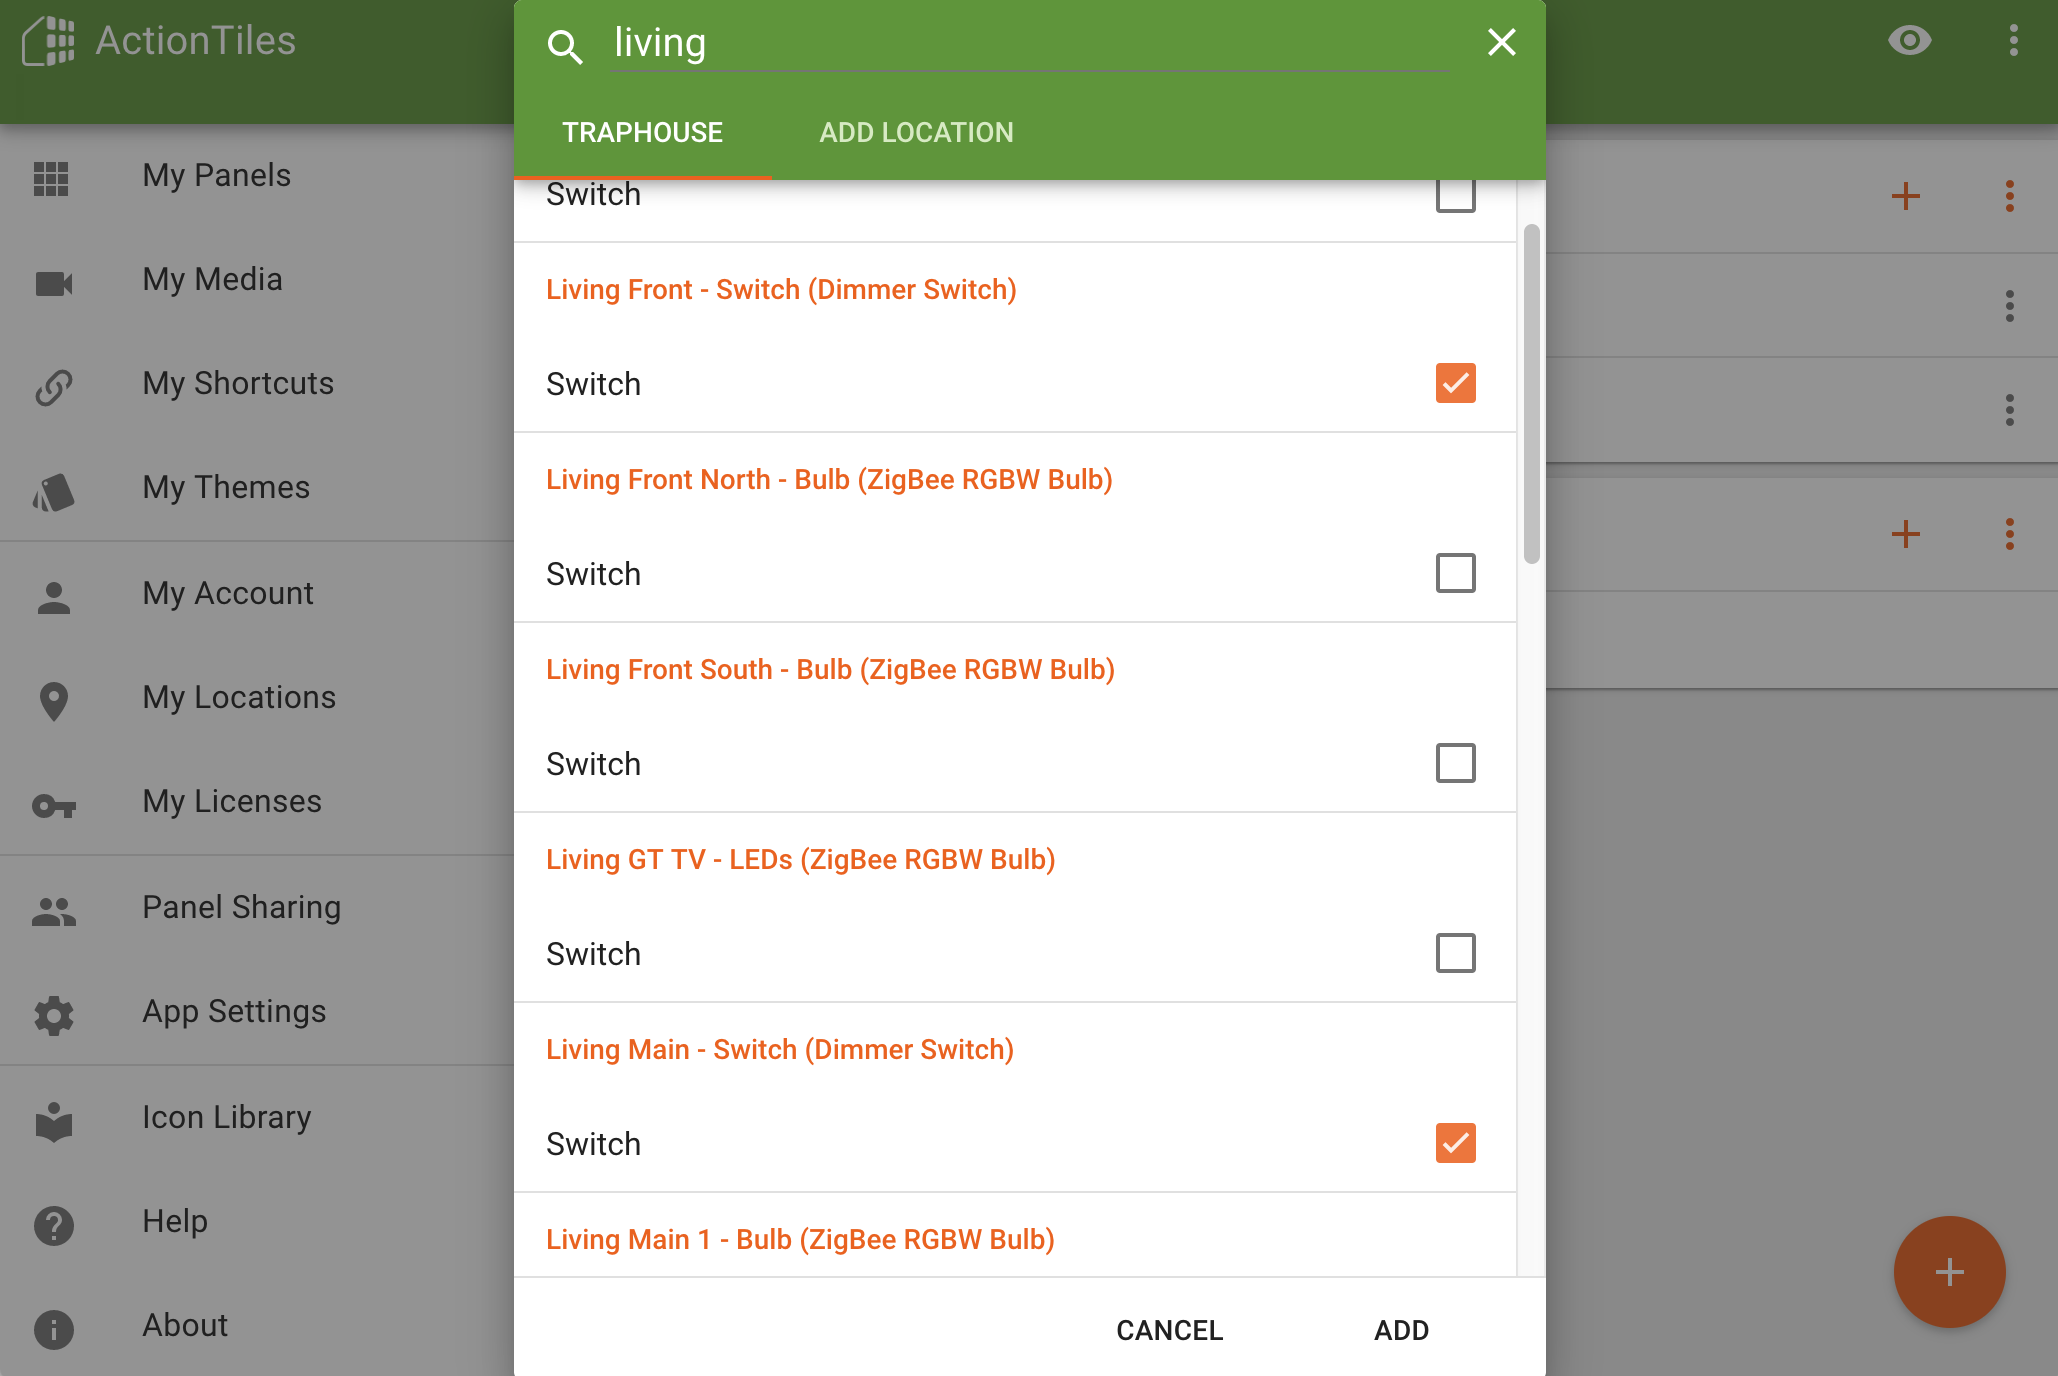
I’m going to select all of my livingroom switches for this tileset.
Now we’ve got two tilesets in this ActionTiles Panel. Let’s see what it looks like.
Note that you can also click the “eye” icon within the Panel Builder to view your Panel.
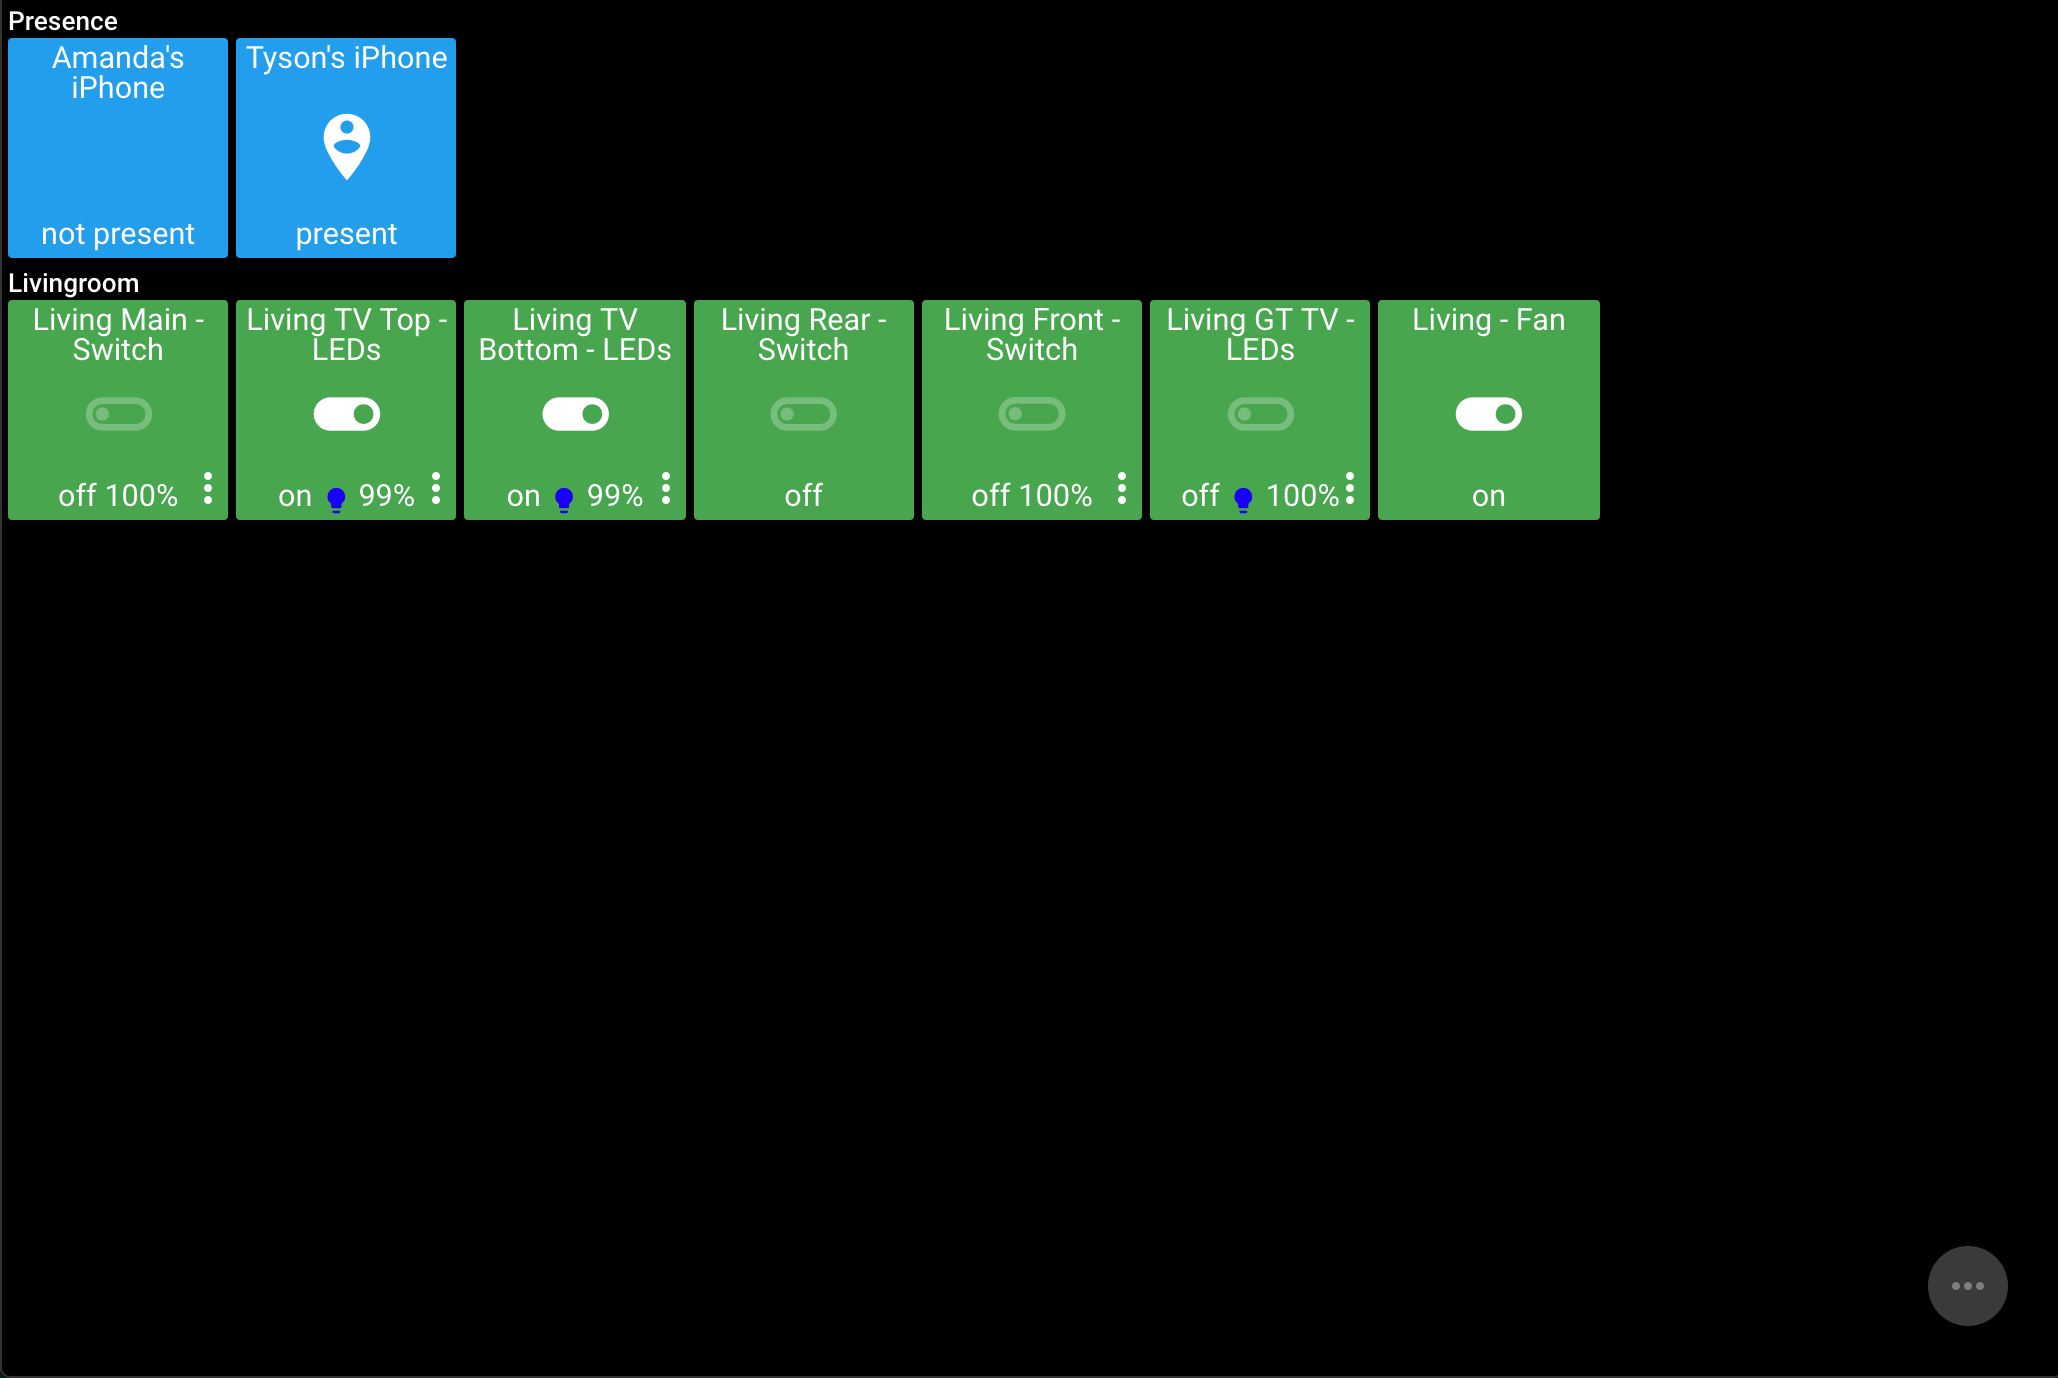
Now we have some switches added!
ActionTiles shows you if the switches are on or off and even the percentage for dimmer switches. You can touch the tile to toggle the switch or press the ... if you want to adjust dimmer intensity.
You should have a pretty good grasp on adding Tilesets and Tiles now.
Let’s move on to adding Tiles that aren’t SmartThings devices…
Blue Iris in ActionTiles
This part of the tutorial assumes that you have a Blue Iris server and cameras already setup.
We are going to add camera feeds to our Panel.
The first thing we need to do is add a user to Blue Iris with access to the cameras we want ActionTiles to use.
You can use your normal user, but for security reasons it really isn’t recommended. You should always make a new user with the least amount of permissions needed for that user.
In our case, we certainly don’t need ActionTiles to have admin access. It just needs to be able to see the camera feeds.
Let’s create a new user with just those permissions.
Creating a Blue Iris user for ActionTiles
Click the Options button in Blue Iris.
It is a little gear icon that looks like this
 .
.
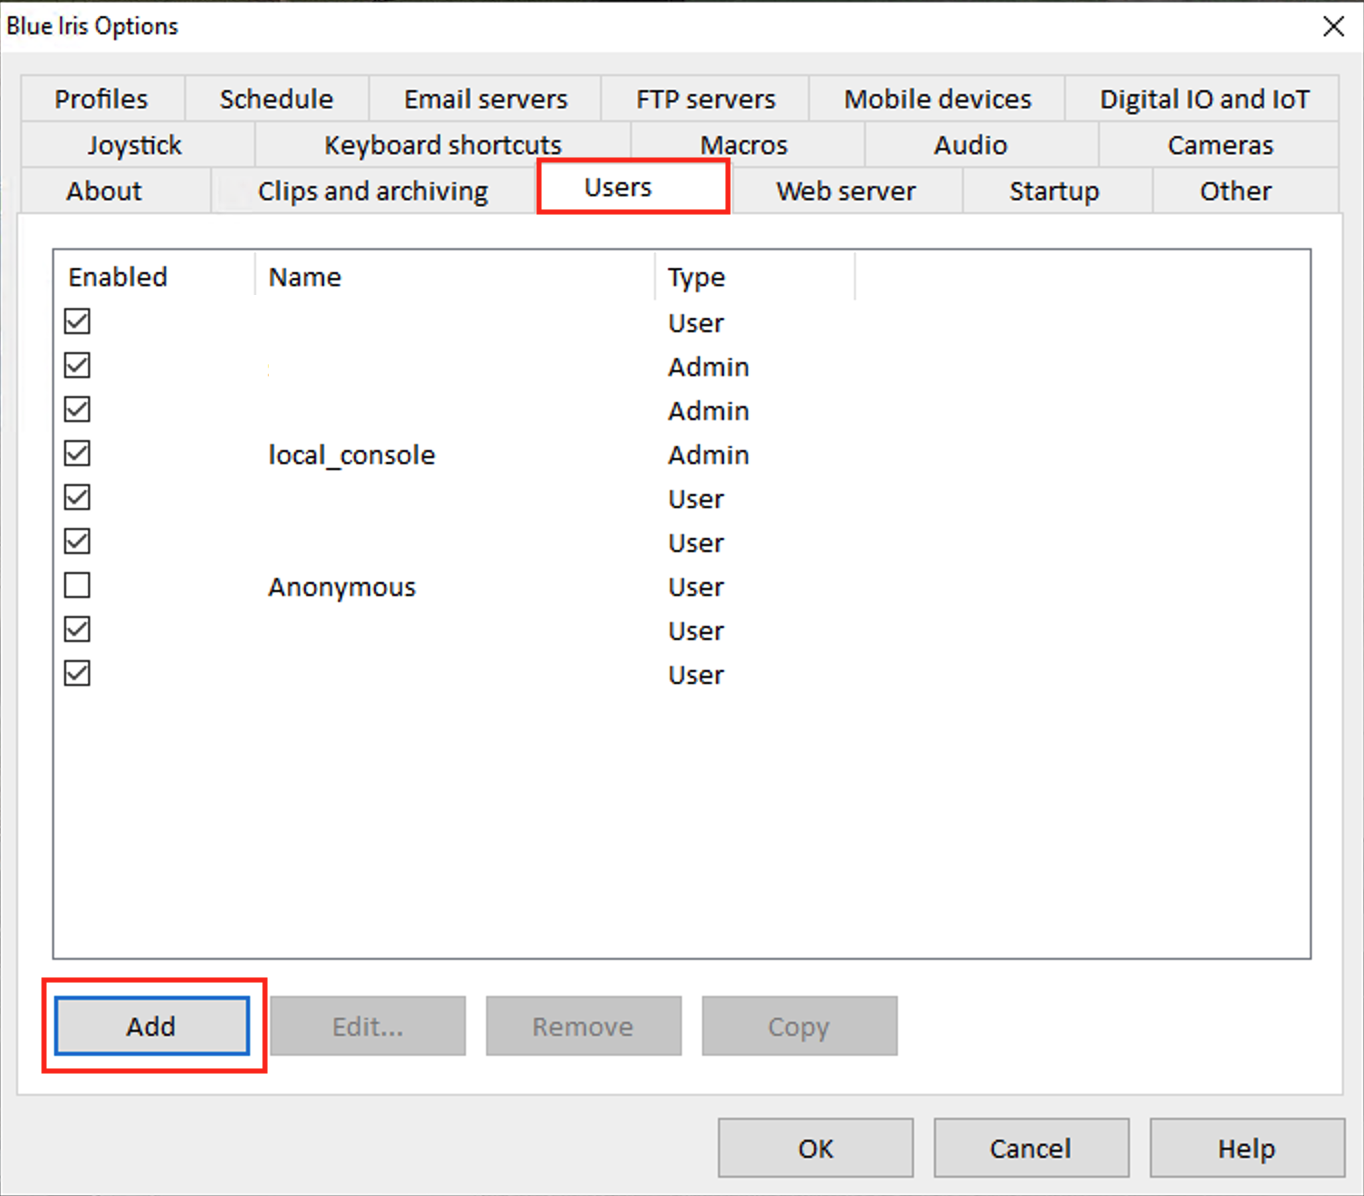
After opening Blue Iris Options, click the Users tab and then Add.
The marked options are really all you should need.
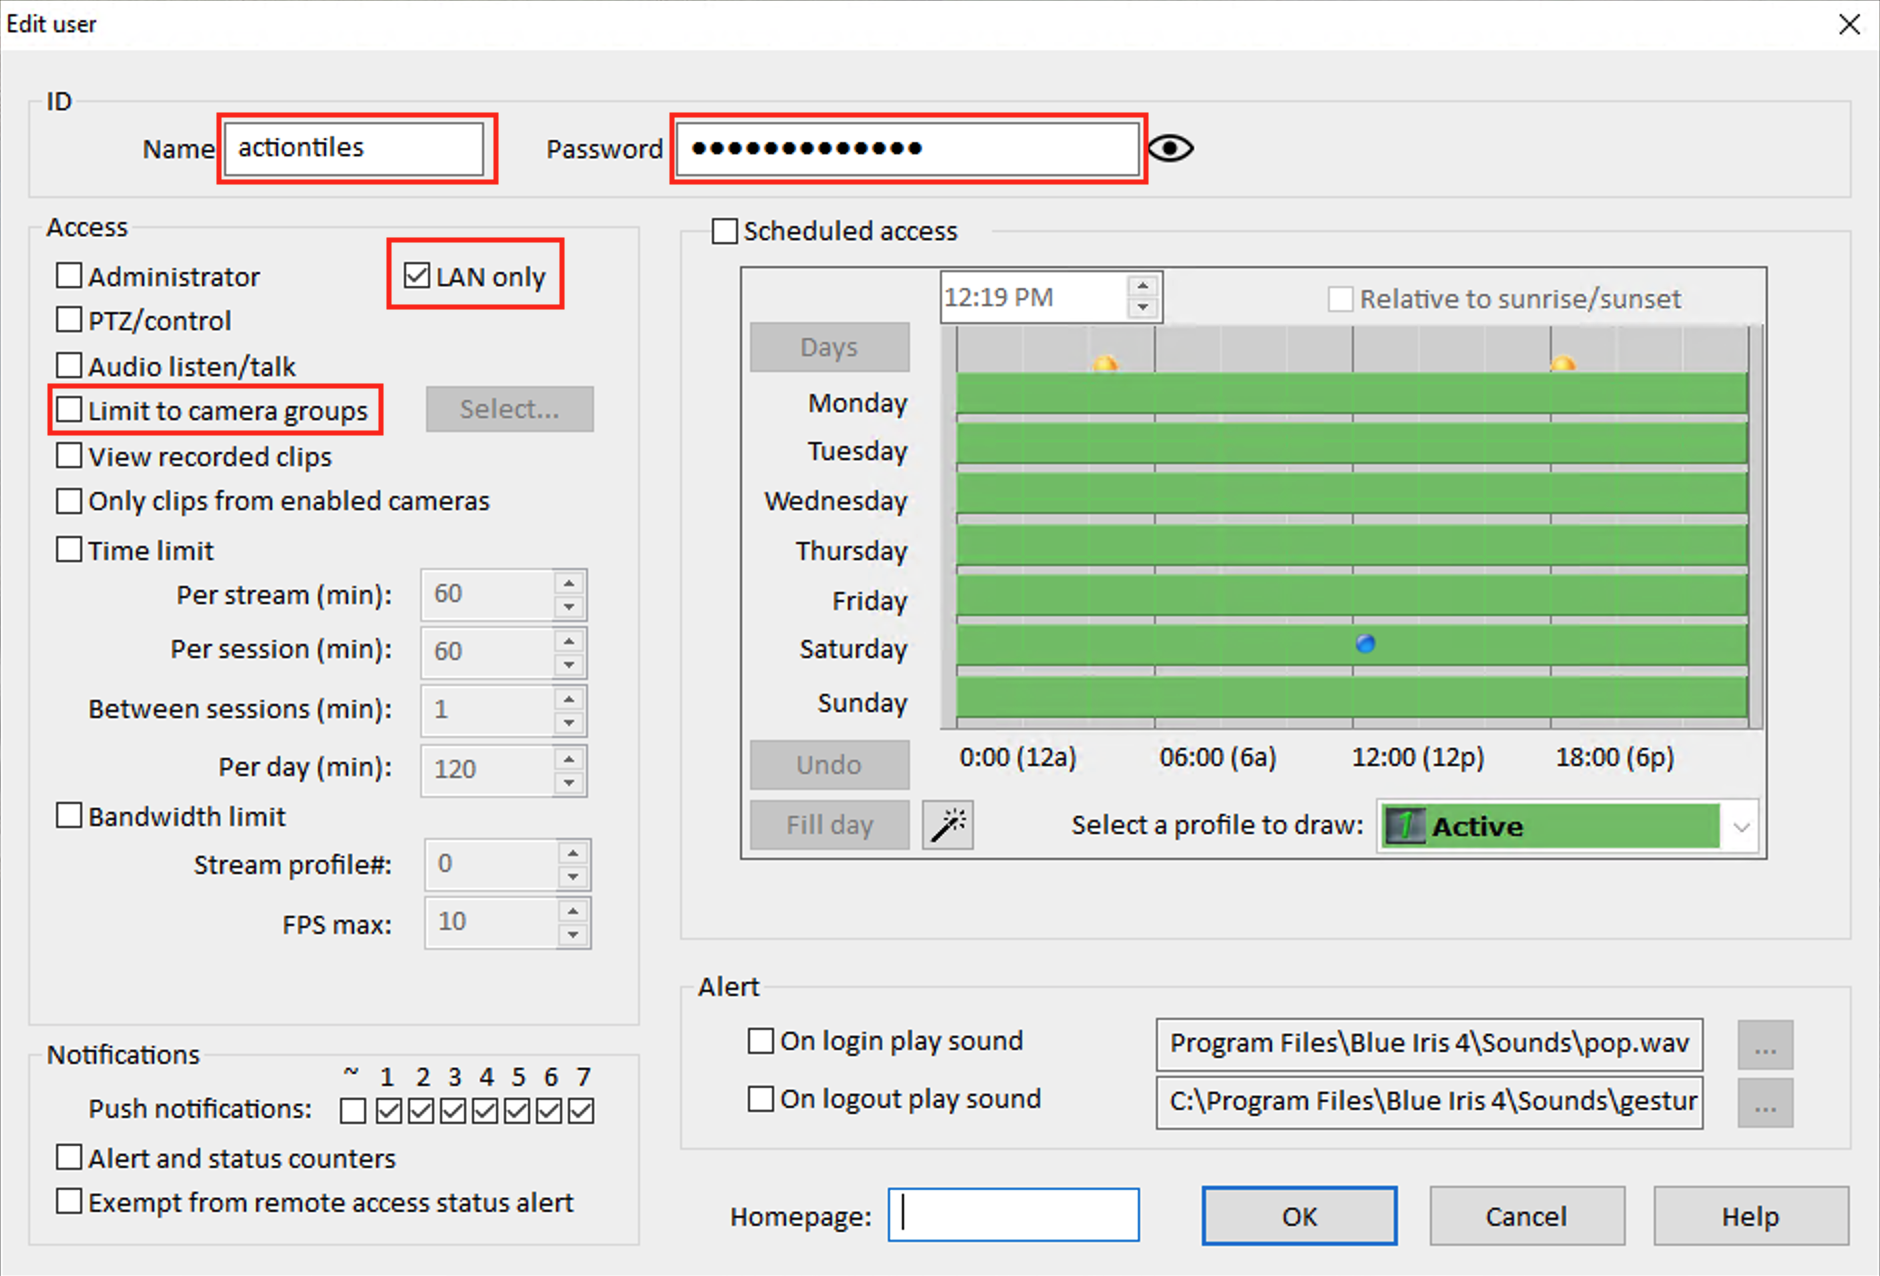
Name your user and enter a password.
You can select LAN only. This will allow the user to access the cameras ONLY when it is on the local network. Meaning that no one can login to this user account from the public internet.
You can check Limit to camera groups if you dont want the user to have access to all of your cameras. In my situation, I do want it to have access to all cameras.
A quick note on Blue Iris user creation for people that will be using Chrome (and all Android Webview browsers, and perhaps others). They do not allow embedded feeds using HTTP authentication. So you will need to create your user with no password. It is very important that you check the box for LAN only if you do this. That will ensure that the public internet cannot view your Blue Iris feeds. You should be aware that anyone on your local network would be able to see those camera feeds if they had the correct URL.
Click OK when you are finished.
We are going to add a Blue Iris camera to ActionTiles now!
Adding Blue Iris Cameras To ActionTiles
To add a camera to ActionTiles, we first need to get the camera Short name.
Within Blue Iris, right click on a camera feed. The top option that pops up should be Camera properties.... Click that.
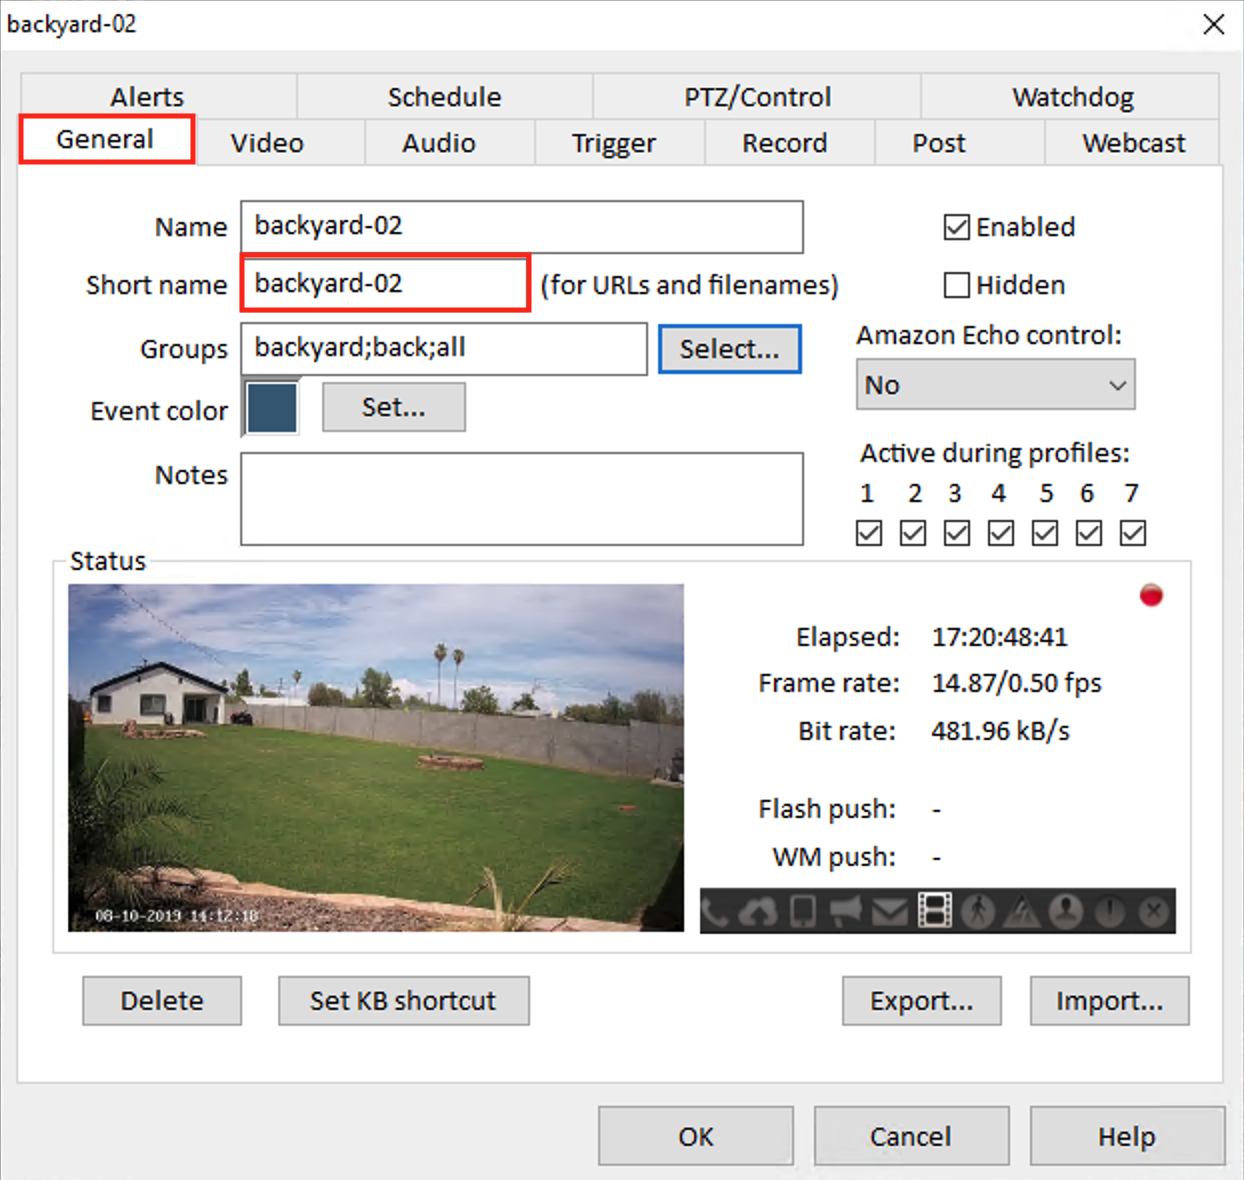
You should now see the camera properties for the camera you selected.
Under the General tab, you need to find the text box that contains the Short name. We need that to tell ActionTiles where to get the camera feed.
As you can see, my Short name is backyard-02. We will use that in just a moment.
Head back to ActionTiles and select My Media from the sidebar menu.
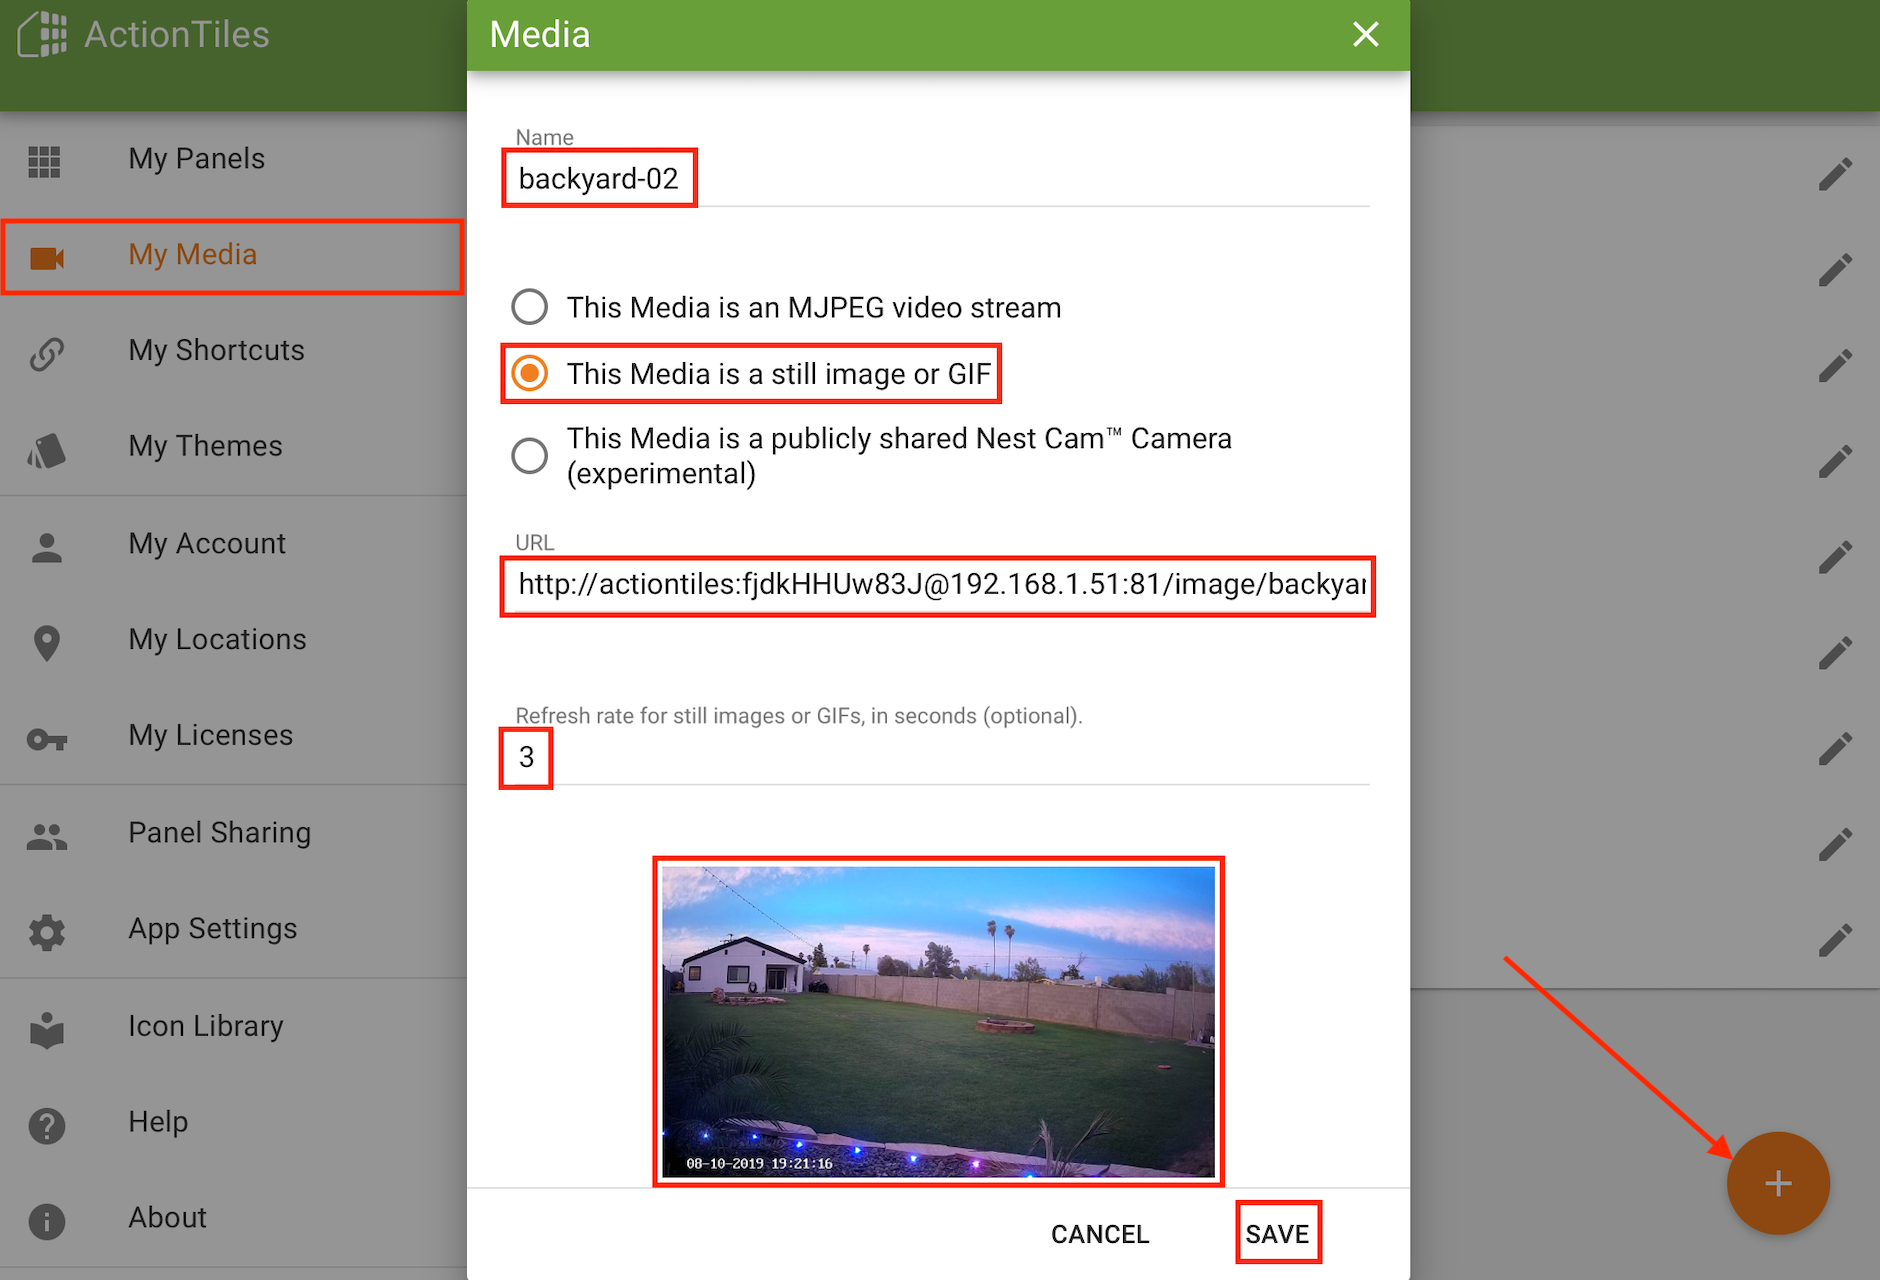
Click the + button in the bottom right corner to add Media.
Next give the media we are adding a name. The shortname we grabbed from Blue Iris will work just fine for this.
Select the This Media is a still image or GIF radio button.
Refresh rate is set to 3. This is the number of seconds that will go by before ActionTiles grabs another still image of the current video feed from Blue Iris.
Keep in mind that too low of a Refresh rate could put a real strain on your Blue Iris server if you have many cameras being polled at the same time. If 3 is too low, just keep upping it until you are comfortable.
As you probably noticed, I havent told you what to put in the URL field. I saved it for last because it is the most complicated. I will explain building your URL now.
This is what my URL for this camera looks like. I’ll break it down so it’s easier to understand.
http://actiontiles:fjdkHHUw83J@192.168.1.51:81/image/backyard-02?q=70&s=70
| URL Segment | Meaning |
|---|---|
http:// | Protocol we are using. You are probably familiar with this one if you’ve ever used a web browser. |
actiontiles:fjdkHHUw83J | Separated by :, this is where you put the username and password we created in Blue Iris. <username>:<password>. |
@ | Sends the credentials to the Blue Iris server in the HTTP headers |
192.168.1.51:81 | Separated by :, this is where you put the IP address and port number of your Blue Iris server. Your’s will almost certainly be different than mine. <blueirisIP>:<blueirisPort> is the format. |
/image/backyard-02 | This is the path of the resource we want. The resource we want is a current image of the camera with the shortname of backyard-02. |
? | This is a separator that means the resource path ended and the query parameters are going to begin. |
q=70&s=70 | These called query parameters. They specify that we want our image to have 70% quality & 70% size of the original image. You can adjust those numbers if you’d like to change the image quality. |
After you build your URL, you should be able to paste it into the address bar of your web browser and see the still image.
When you’ve verified that it works in a web browser, you can now paste that into the URL portion of the ActionTiles Media we are adding.
If you did it correctly, you should see a preview of the camera below Refresh rate.
Once you get the first URL built, you should only need to swap out the camera shortnames to build a new URL for a different camera.
I’m going to add a few more cameras to My Media.
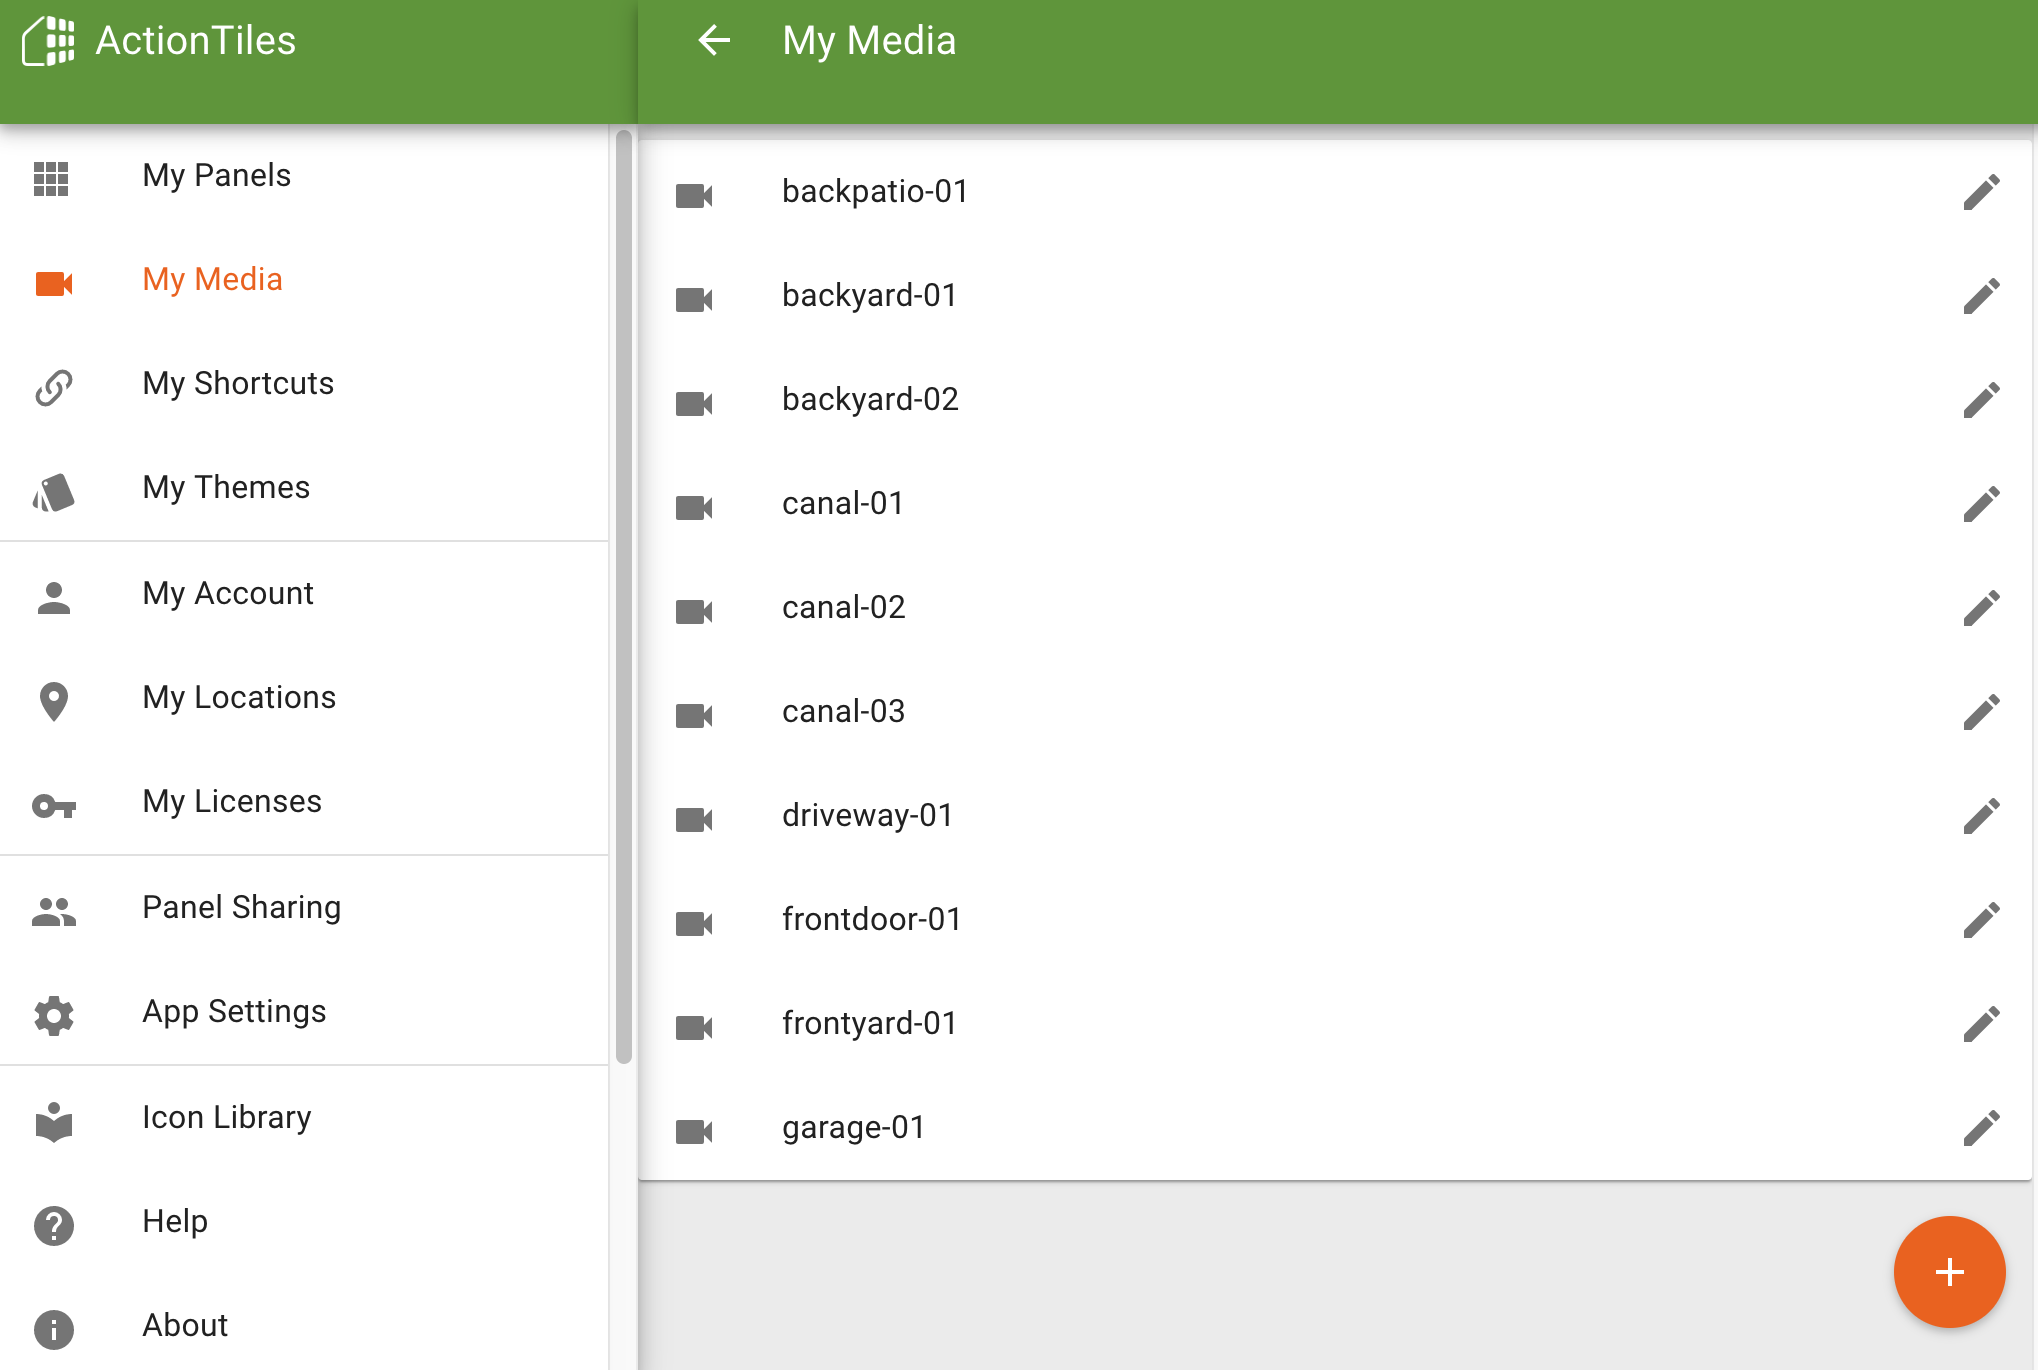
You should have all of your cameras added now.
Let’s go back to My Panels and add them to the Panel we created.
Go to the Panel Builder and add a Tileset named “Media”.
Click the + button within your new Tileset so that we can add a camera.
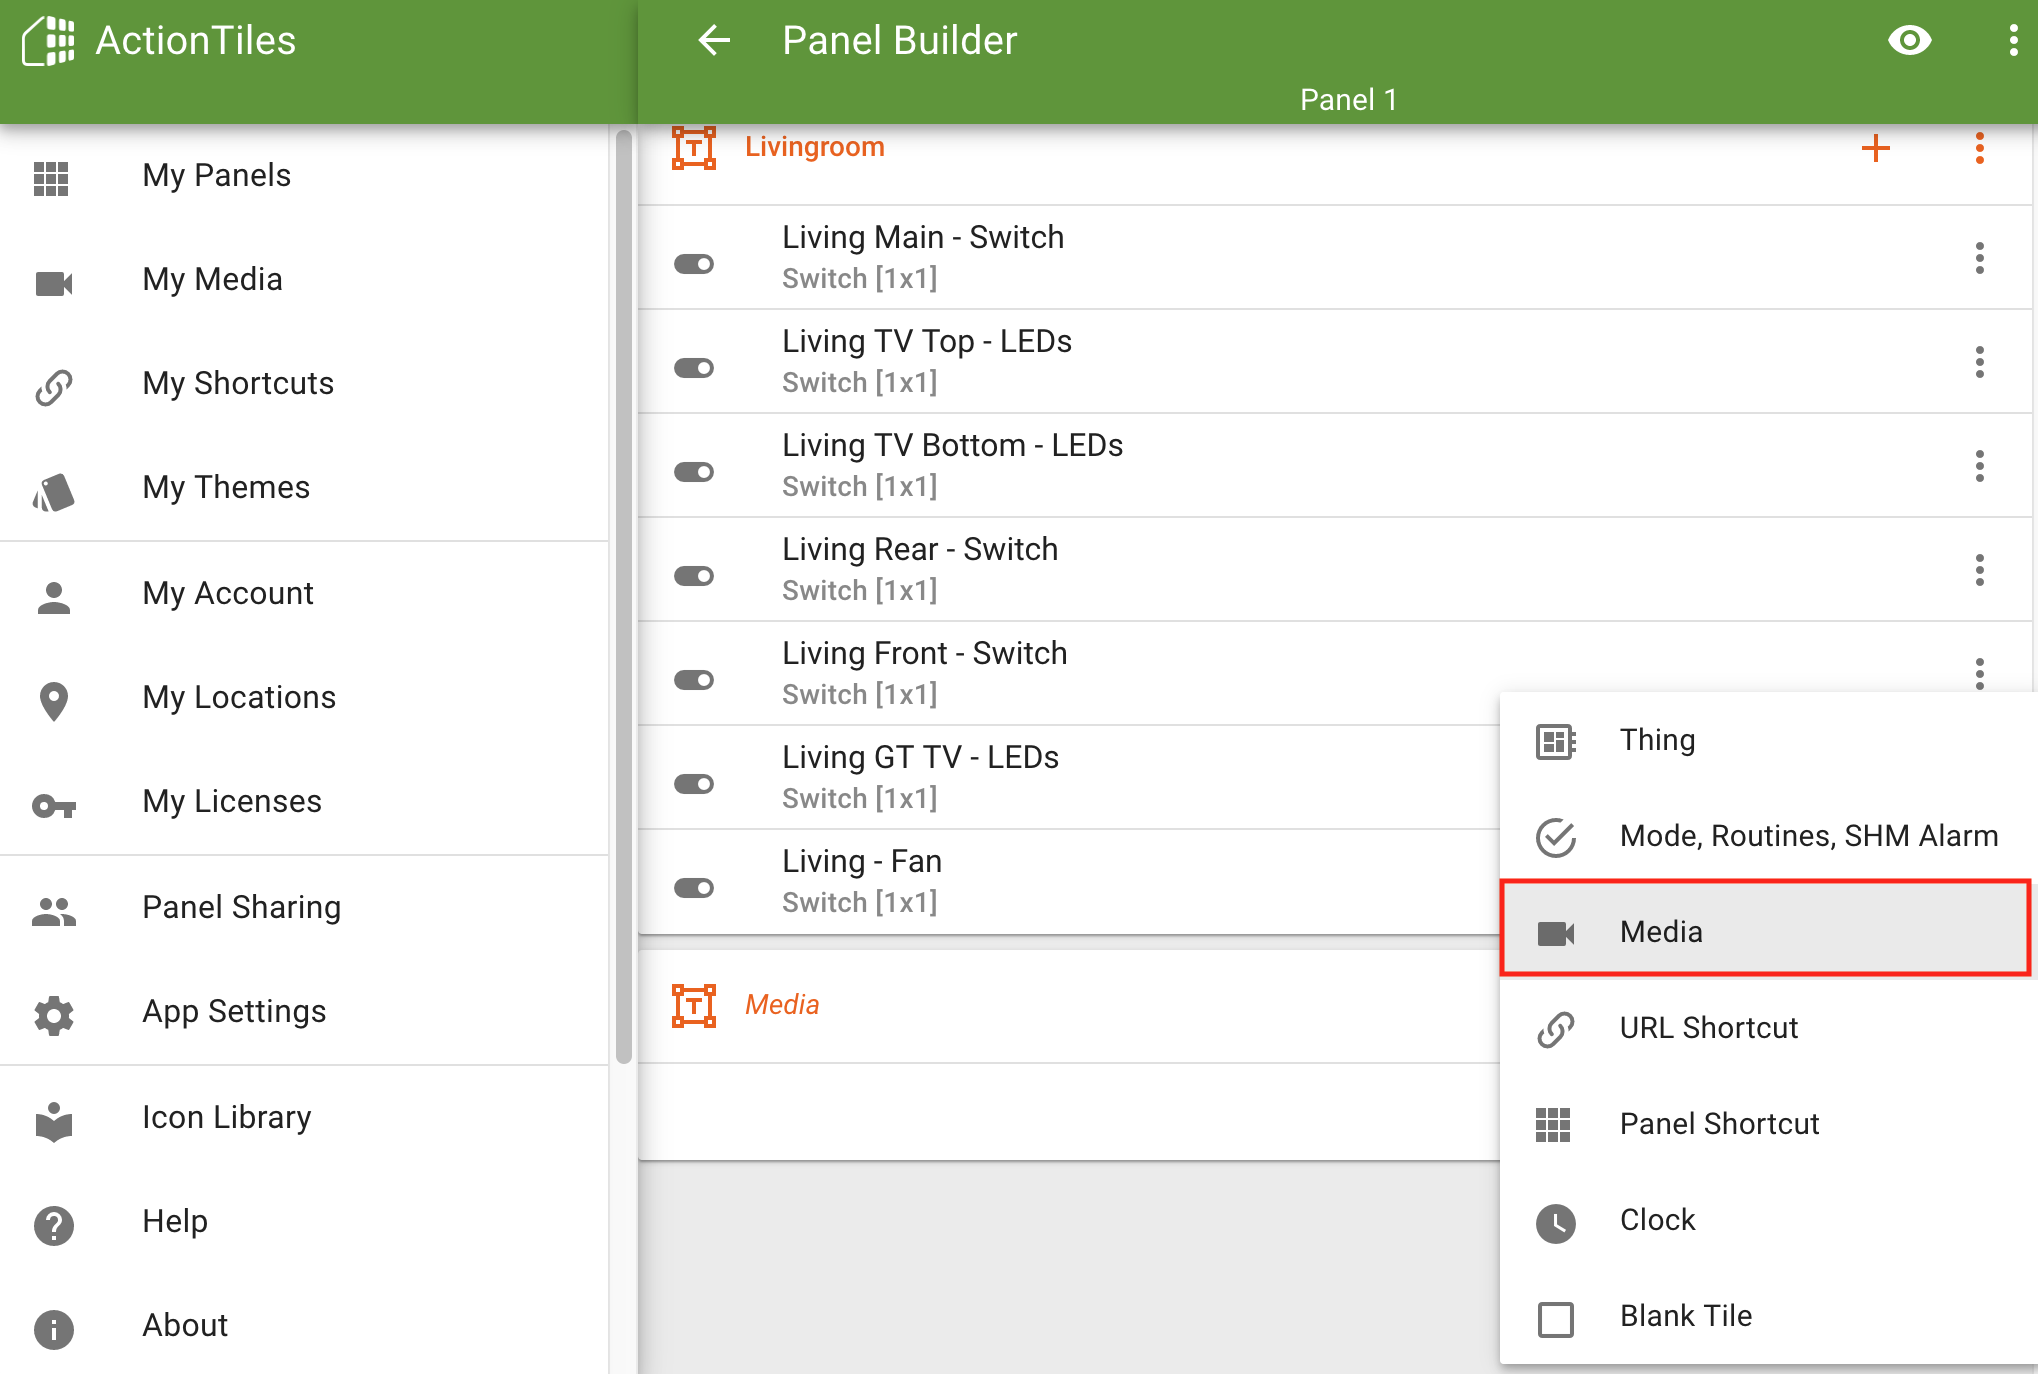
This time we are going to select Media.
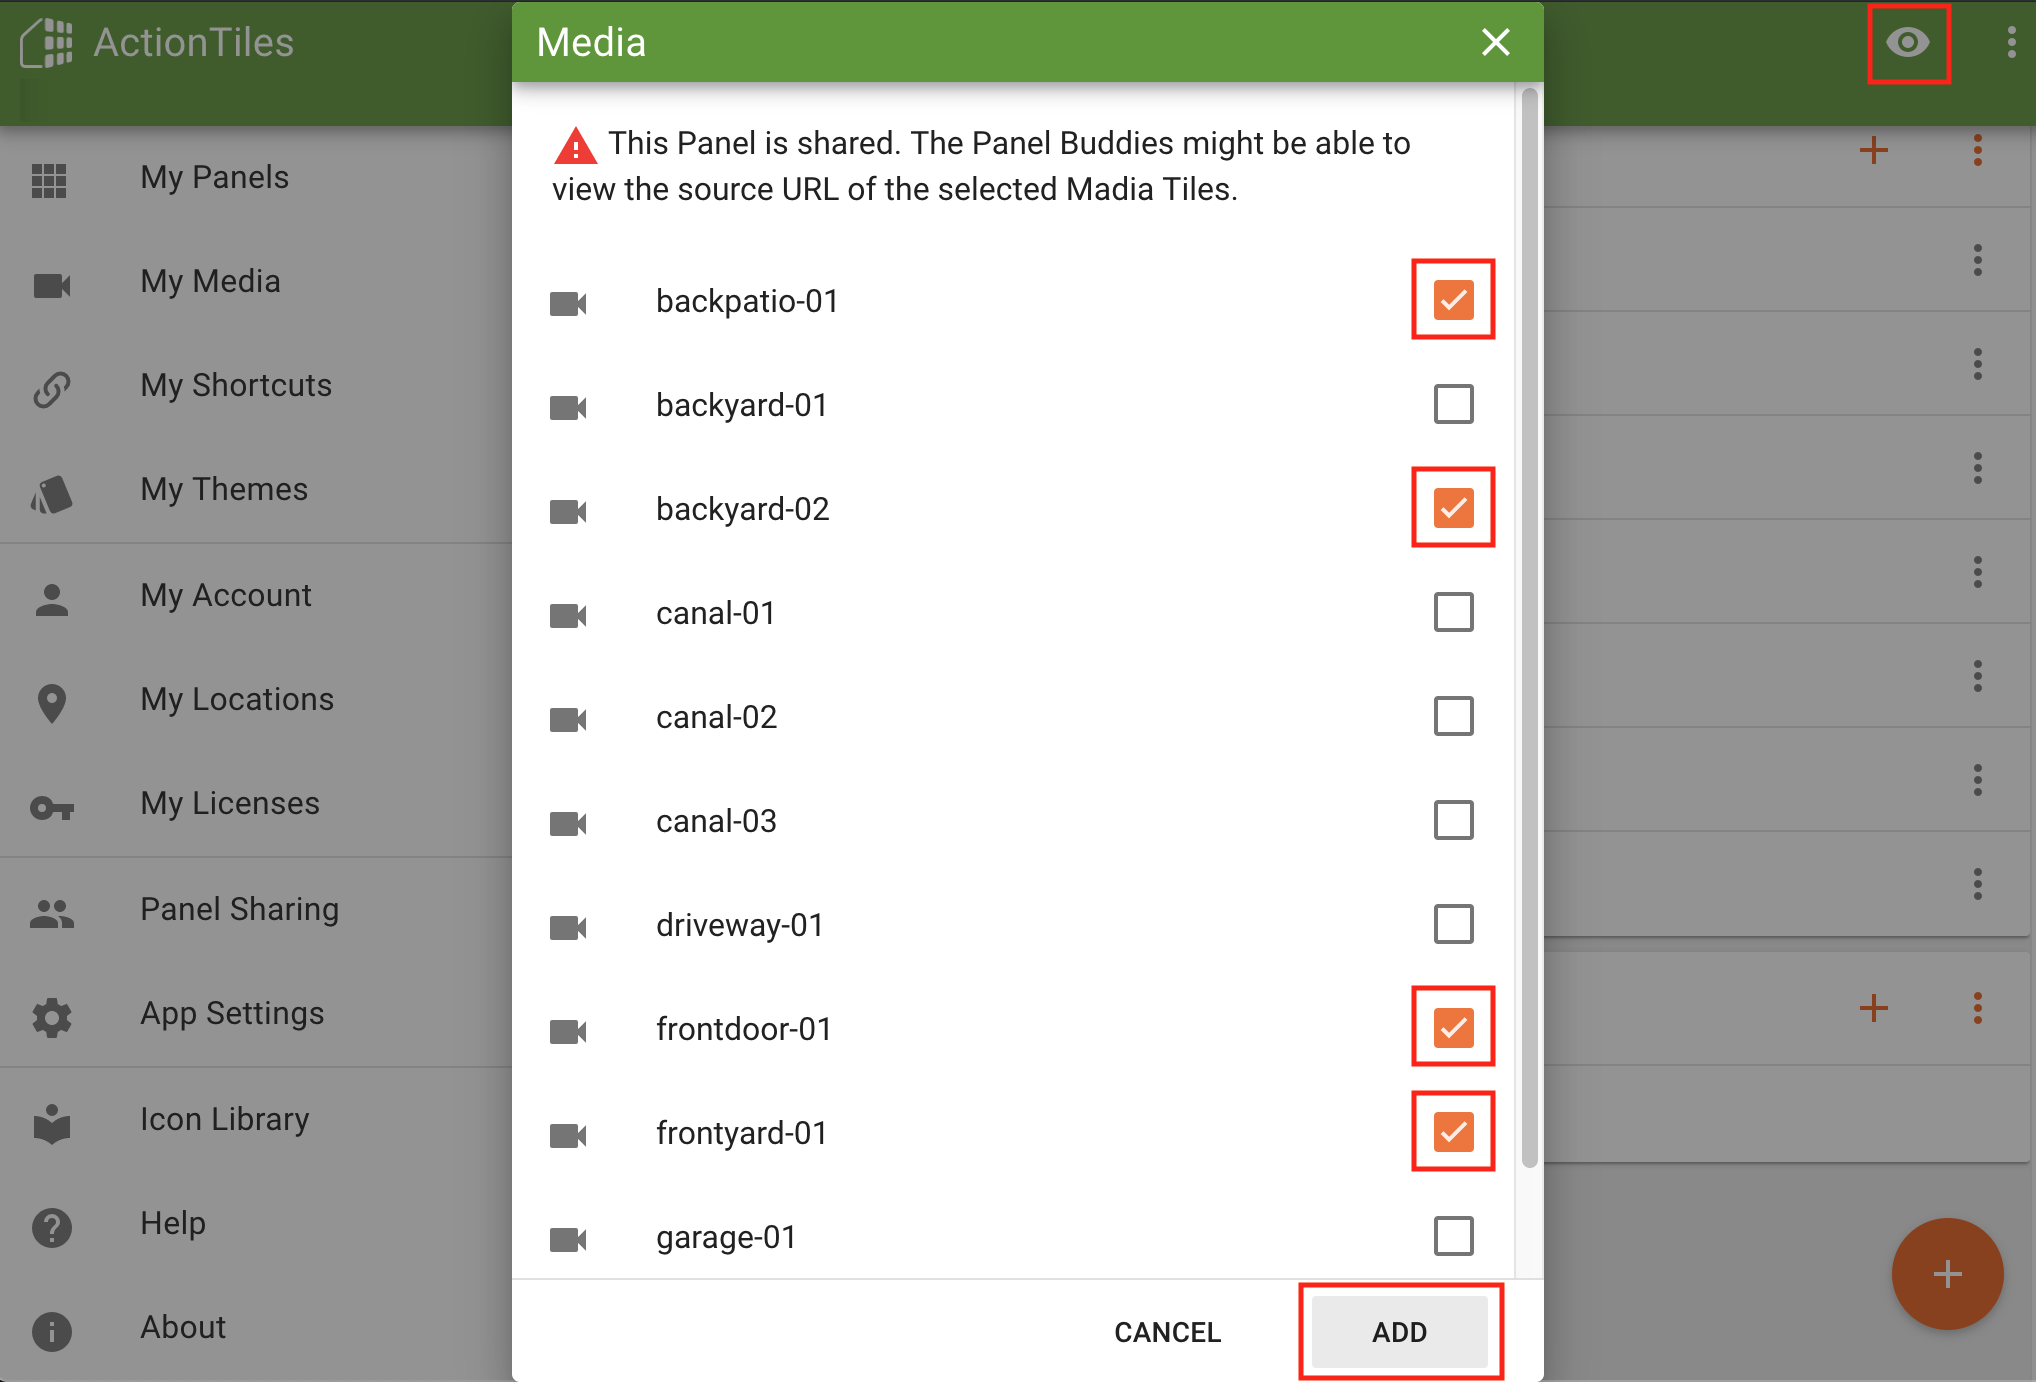
Select the cameras that you want to show up in this Tileset/Panel.
Next click ADD and then the “Eye” icon in the top right to view our Panel.
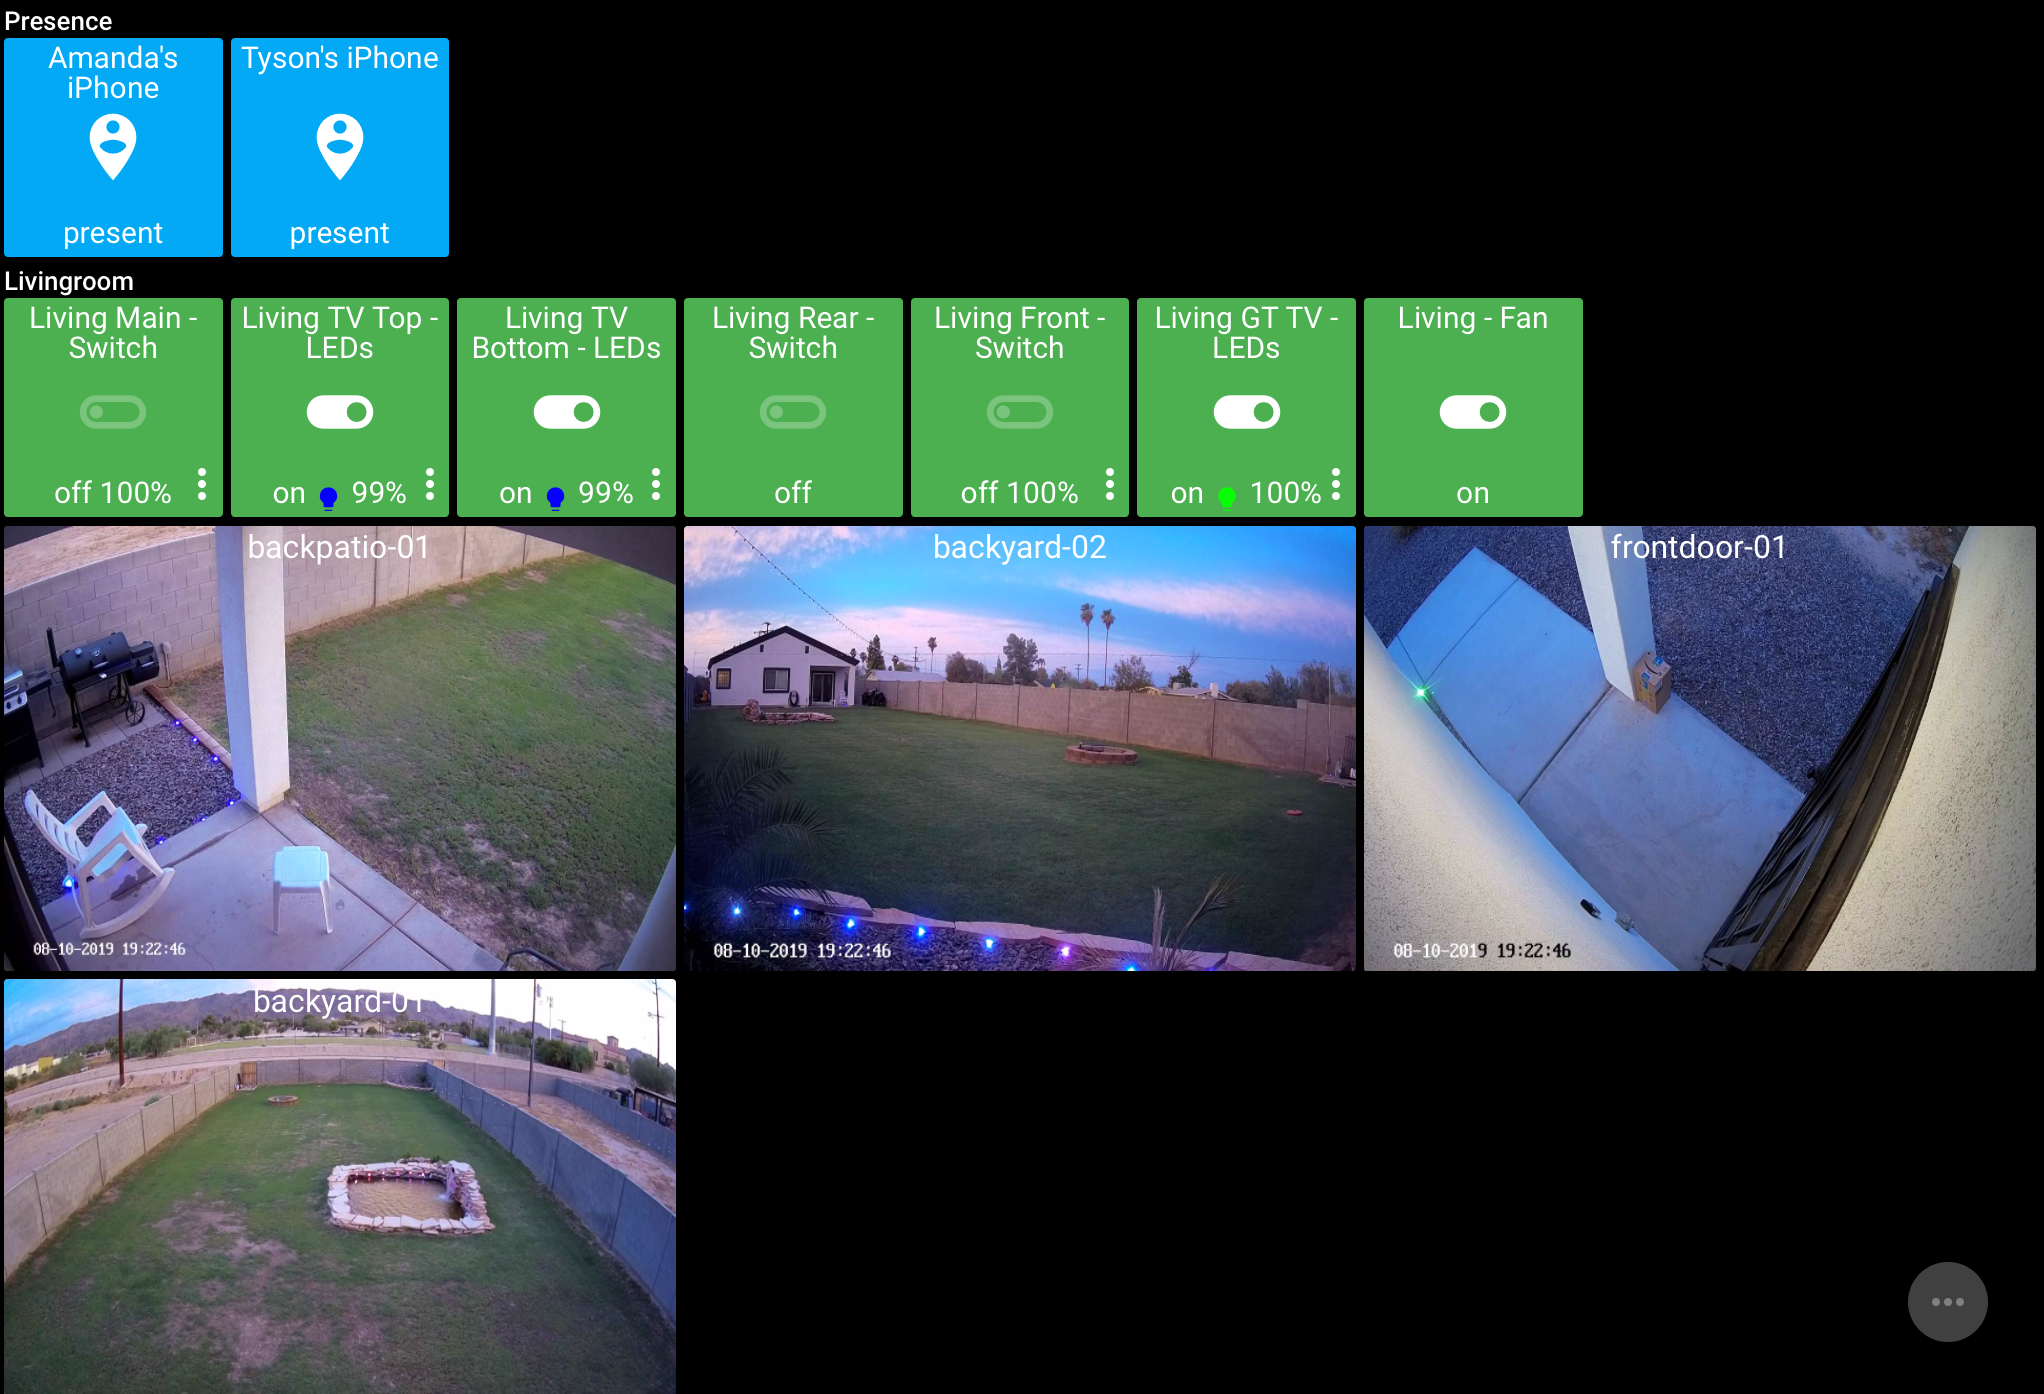
We can now see all of the cameras I added to the Tileset. This feels like the future of peepholes for doors.
If I didn’t have this, I would have to physically walk to my frontdoor and open it to find out that I have that Amazon package waiting for me. What kind of life is that?
You should now be comfortable adding cameras now. Let’s move on to adding a different type of media.
Adding Weather Feeds To ActionTiles
This one is going to take a little research on your part.
We are going to add a the weather forecast to our Panel now.
https://www.12news.com/10-day
That URL will take you to the webpage of a news station in Phoenix, AZ.
Near the top of the page you should see a static image of the 7 day forecast.
On this particular page, the URL for that image never changes. The news station simply overwrites the image with an updated image when weather forecasts change.
This means we can add that image to our ActionTiles Panel and it will give us the current weather.
Your job is to find something like this for your local weather.
Simply right click on the image and select Copy Image Address.
That address will be what you paste into the URL portion when creating the Media in ActionTiles.
Let’s try…
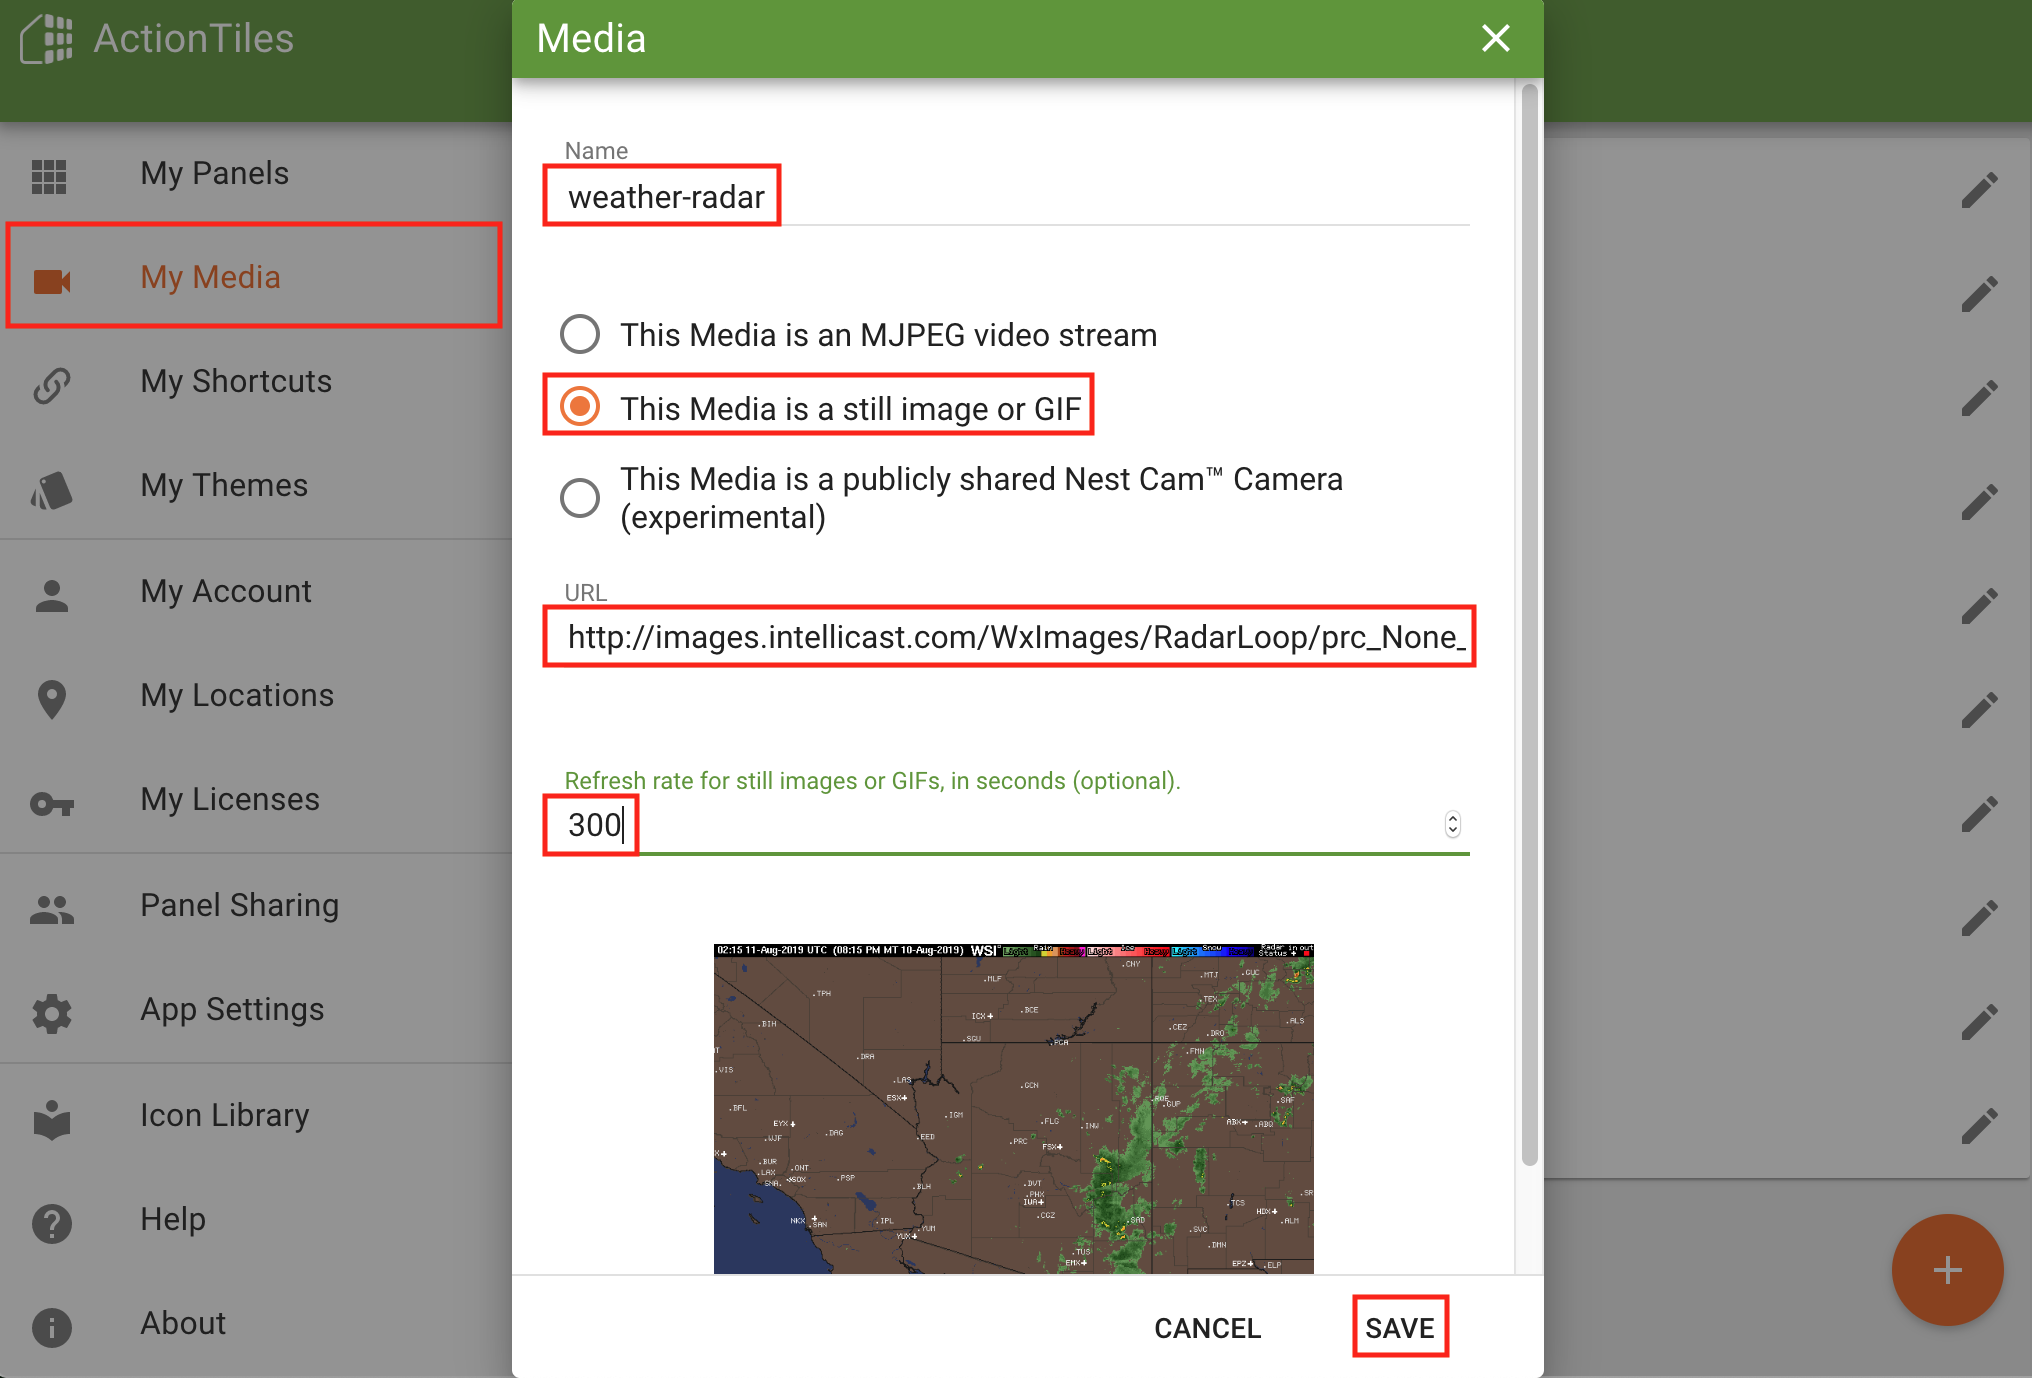
Add the weather image just like you added camera images.
I managed to find the URL for a gif that shows the current radar in my area.
I chose to set the Refresh rate to 300 which is 5 minutes. I don’t really see a need to pull the gif more often than that.
Add as many of these as you’d like to My Media and then add them to our existing “Media” Tileset.
ActionTiles also has a Media Tile Generator you can make use of if you are having trouble finding an existing radar or forecast image to use. This will allow you to add Weather, Calendars and News Feeds. It’s definitely worth checking out.
Other Types Of Tiles In ActionTiles
Let’s go over the other types of Tiles within ActionTiles before I send you on your way.
We have already covered Thing and Media. I’ll go over the others for you now.
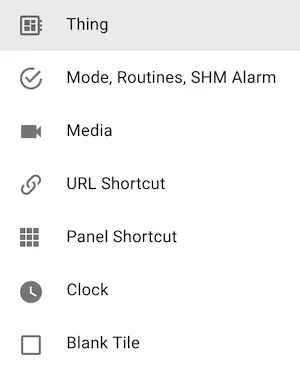
| Tile Type | Purpose |
|---|---|
Thing | Devices in SmartThings |
Mode, Routine, SHM Alarm | SmartThings Modes, Routines and SmartThings Home Monitor Alarms |
Media | Images or video streams |
URL Shortcut | Shortcut to any URL(webpage) |
Panel Shortcut | Shortcut to a different Panel |
Clock | Easy way to add a clock Tile |
Blank Tile | Simply a blank Tile. These are mainly used for organizing your Tilesets and Panels |
Summary
ActionTiles is capable of much more than what we have covered here today.
You are off to a great start though. Just play with it and have fun building your Panels.
Don’t forget to arrange your Tiles by clicking the ... in the top right corner and then selecting Arrange Tiles. This will allow you to move your Tilesets and Tiles around.
This really helps clean things up and make them look nicer.
You can also change the size of the Tiles in your Panels. This is necessary sometimes to make everything fit in an orderly fashion.
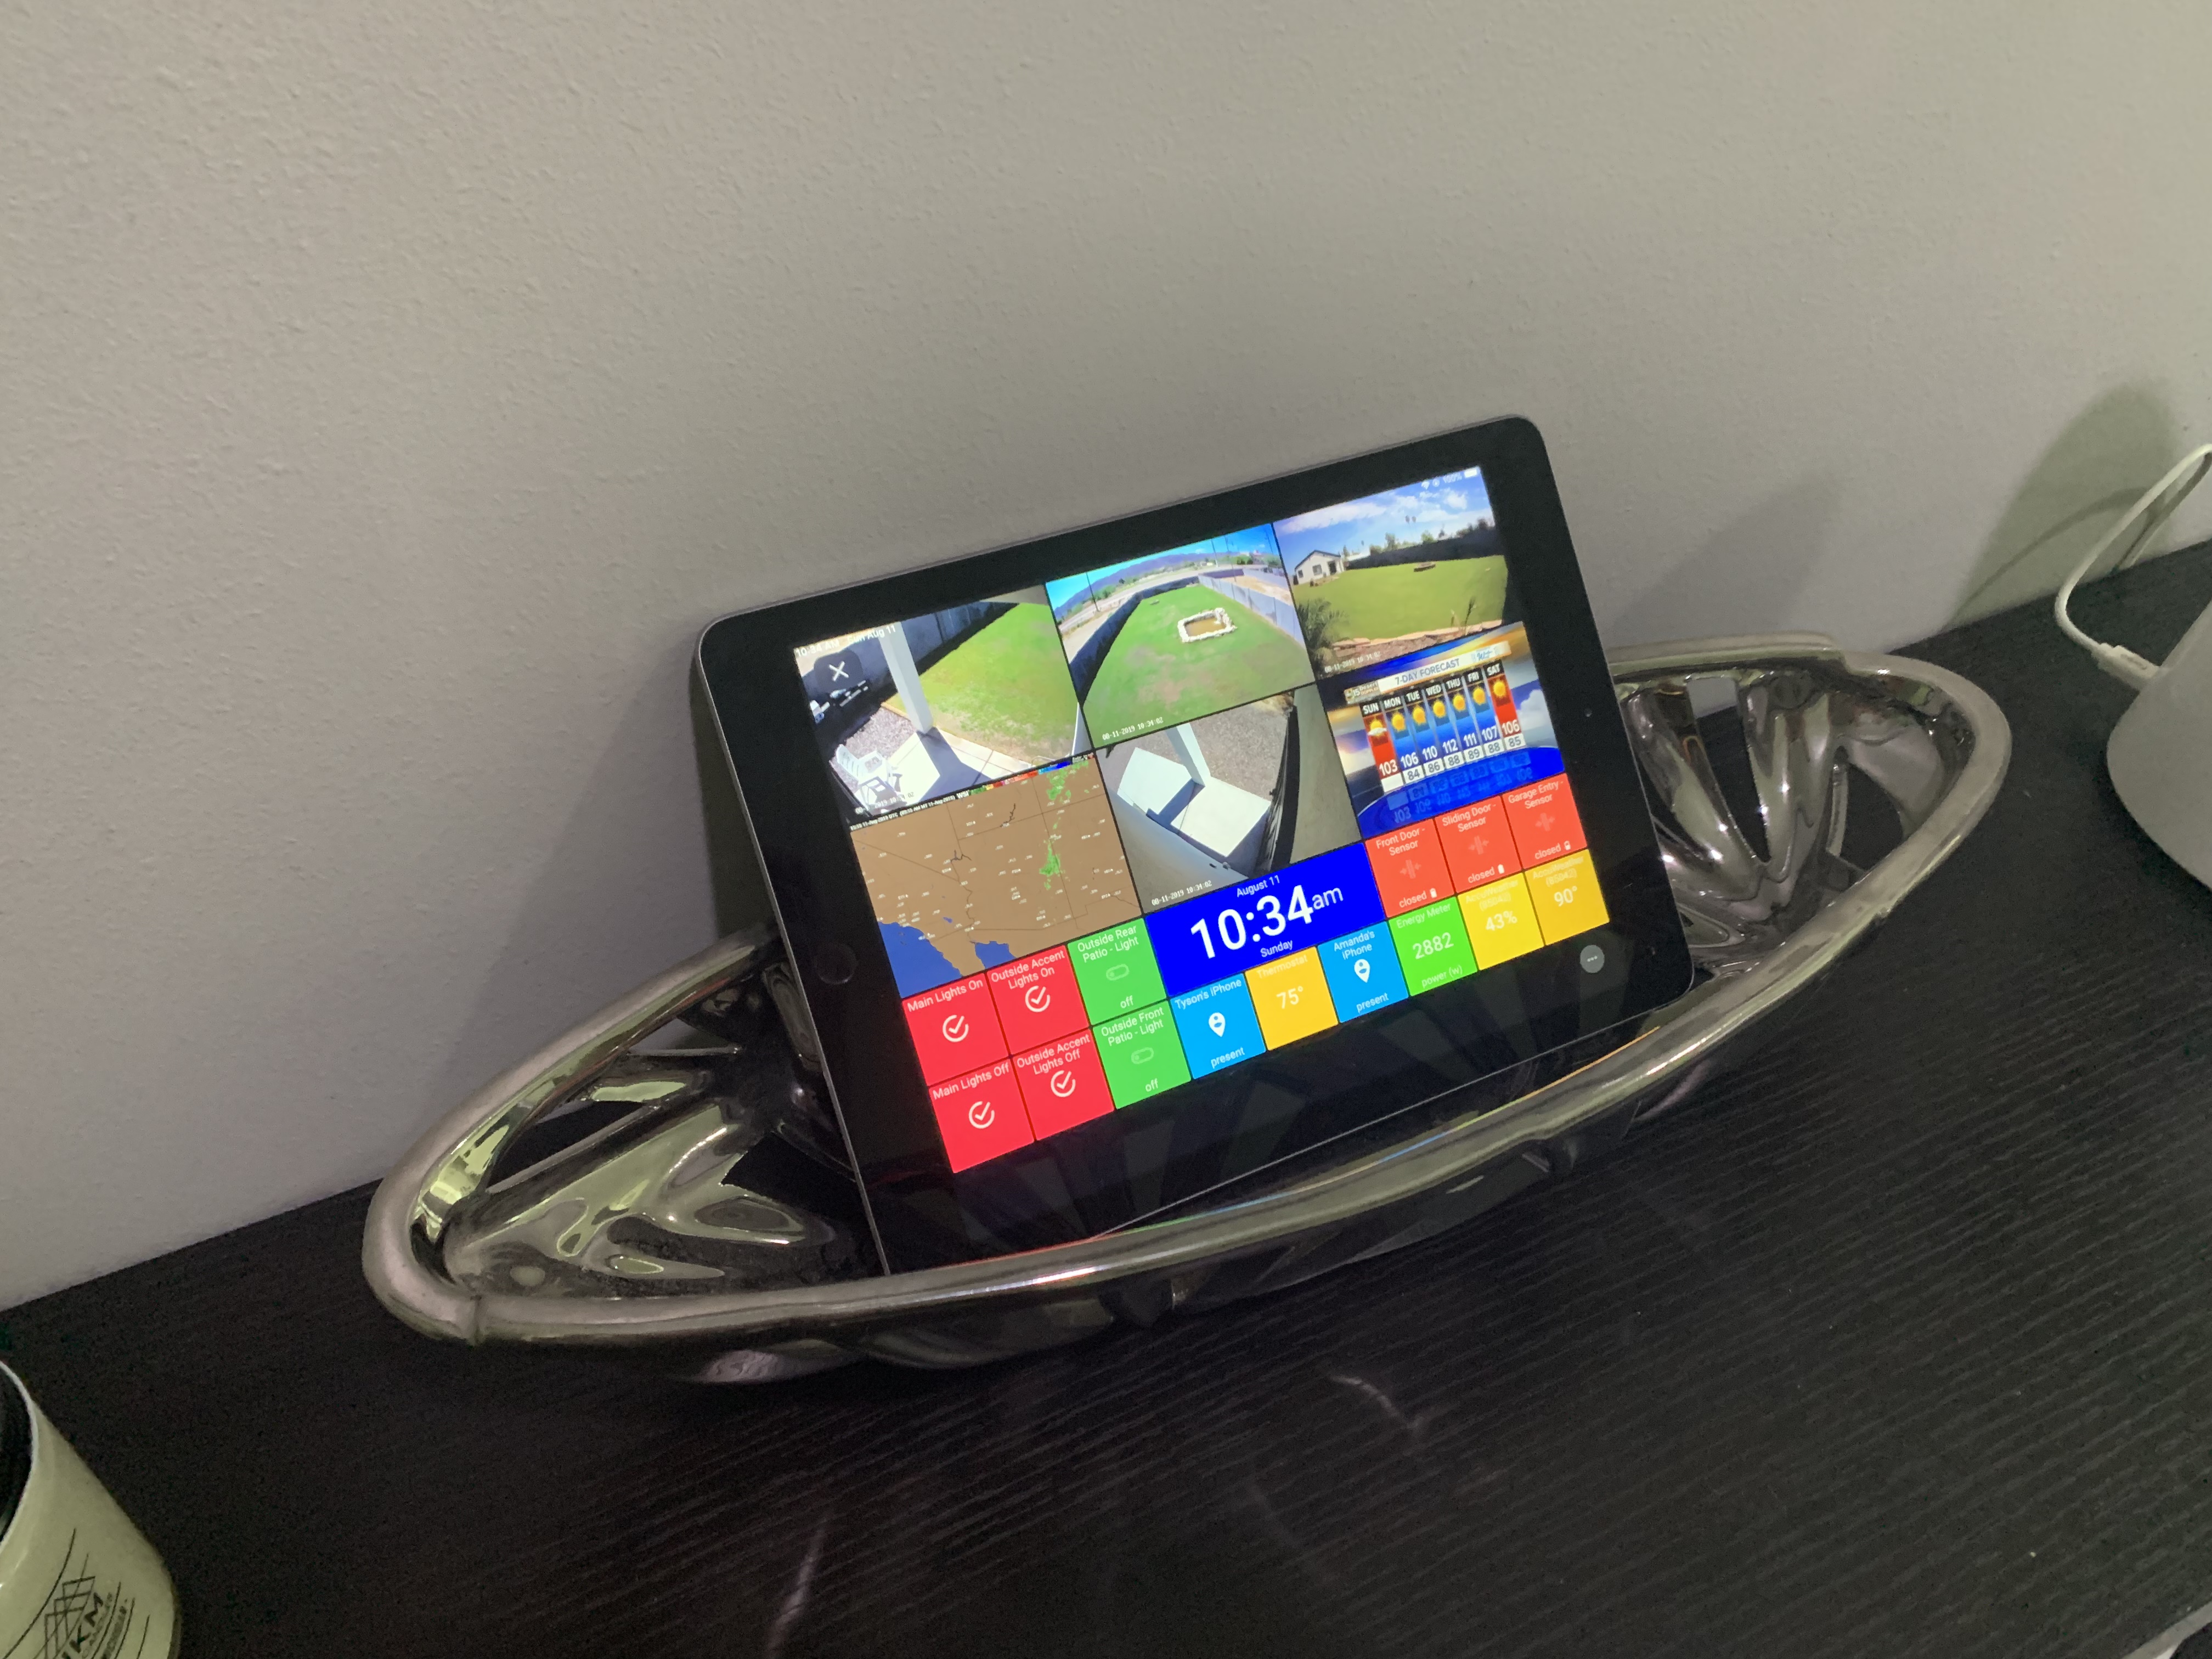
Here is what I came up with based on what we learned today…

I have ActionTiles running on an iPad that sits on the table near the front entrance in my home. This allows me to see who is at the front door before opening it.
It’s also convenient for checking the weather or turning things on or off as I am leaving and arriving.
If you are looking to do this project without much of a budget, you can get one of these tablets for a really great price. ActionTiles only requires a web browser to work.
Eventually I would like to get something like this Powered In-Wall iPad Mount and install it near the same location. I’ve also seen a few in-wall mounts that are powered by PoE.
I’ll update this post when I take that plunge.
Please subscribe to my mailing list below to be notified when I make a new post or follow me on Twitter if you have a chance. Either would be really appreciated.
Thanks for reading!