Blue Iris Automated Snapshots With AWS S3 And Slack Integration
Blue Iris Automated Snapshots With AWS S3 And Slack Integration
Why?
I will start this post with an explanation of why I have this weird setup running…
I am sort of a lawn care nerd. I bought my house about 2 years ago and I’ve been working on the yard ever since.
The idea came because I wanted to be able to see progress over time.
The script takes snapshot of my yard every single day and uploads it to AWS S3.
After it uploads to S3 it will alert me in my home Slack workspace to let me know it’s complete.
I use slack a lot at home for my homelab to report things. I even have my own Slack bot that I use to control some things at home.
Once it is in S3, I use another script to pull down the images and organize them into a timelapse automatically. I will work on another post for that soon.
It might seem boring and weird but this is how I watch the grass grow…
I had a problem and I solved it by using 3 different technologies I use frequently. It was a fun project and it works well for me
Project Overview
I’ve been running this setup at home for a while now. I decided I’d clean up the code a bit and open source it in case someone else finds it useful.
Other uses for this might be something like counting cars on a street or parking lot every day at a certain time. Whatever your reason, I made a tutorial to show you how.
This tutorial will show you how to automatically take snapshots of your Blue Iris cameras. It will then upload the snapshot to an AWS S3 bucket and report success or failure to a Slack channel of your choosing.
If you don’t already have an AWS account, head over to Amazon Web Services(AWS) to sign up for a free 12 month trial. This includes almost all of their services.
We are only going to be using S3, which is the object storage offering from AWS. The AWS Free Tier will allow you to have 5 GB of Standard Storage, 20,000 Get Requests and 2,000 Put Requests for AWS S3. That should be more than enough for this project.
You will need a working Blue Iris server and cameras already setup. I assume you already have that if you are here now. If you haven’t heard of Blue Iris but are in the market for software to run your network cameras, definitely check it out. My only complaint is that it requires Windows.
The last thing you need is a Slack Workspace. Go here to create a new workspace. The free tier will work just fine for this.
The bash scripts that run this whole thing are really pretty simple. It just takes a little bit of configuration in Blue Iris, AWS and Slack to get everything setup.
My Blue Iris snapshot automation runs on one of the 10 PoE Powered Raspberry Pi 4 Model B (4GB) in my homelab.
All installation instructions will assume you are using a Raspberry Pi running Raspbian. It will probably work on other Linux distros but that is the only place I have tested it.
Let’s get started!
Equipment Used
| Part | Comment | Link |
|---|---|---|
| Intel NUC i5 | I am using an Intel NUC as my Blue Iris server. | https://amzn.to/2OnNjyh |
| Amcrest Outdoor PTZ POE Camera | This is my newest camera and my first PTZ cam. I’m really liking it so far. | https://amzn.to/32YDoEw |
| Intel NUC i5 | I am using an Intel NUC as my Blue Iris server. | https://amzn.to/2OnNjyh |
| Raspberry Pi 4 4GB Kit | Running all of my automation jobs. Including this one. | https://amzn.to/2HWL16L |
| Micro SD Card | These are the SD cards I use in my Pis. They have been very stable for me so far. | https://amzn.to/2Q85FXY |
| Power Supply | All of my Raspberry Pis are using a Raspberry Pi PoE HAT. Although the Raspberry Pi kit linked above comes with a standard power supply so this isn’t needed. | https://amzn.to/2N6FfE0 |
Setting Up A Slack Incoming Webhook
The snap.sh bash script uses an incoming webhook to send messages to your Slack channel.
I created a new channel in Slack for this to report to. I named my channel #cam-snaps. You can name your channel whatever you’d like as long as you edit the $slack_channel variable in snap.sh.
If you are signed into your Slack workspace in your browser, go to the App Directory and add the Incoming WebHooks Slack Integration.
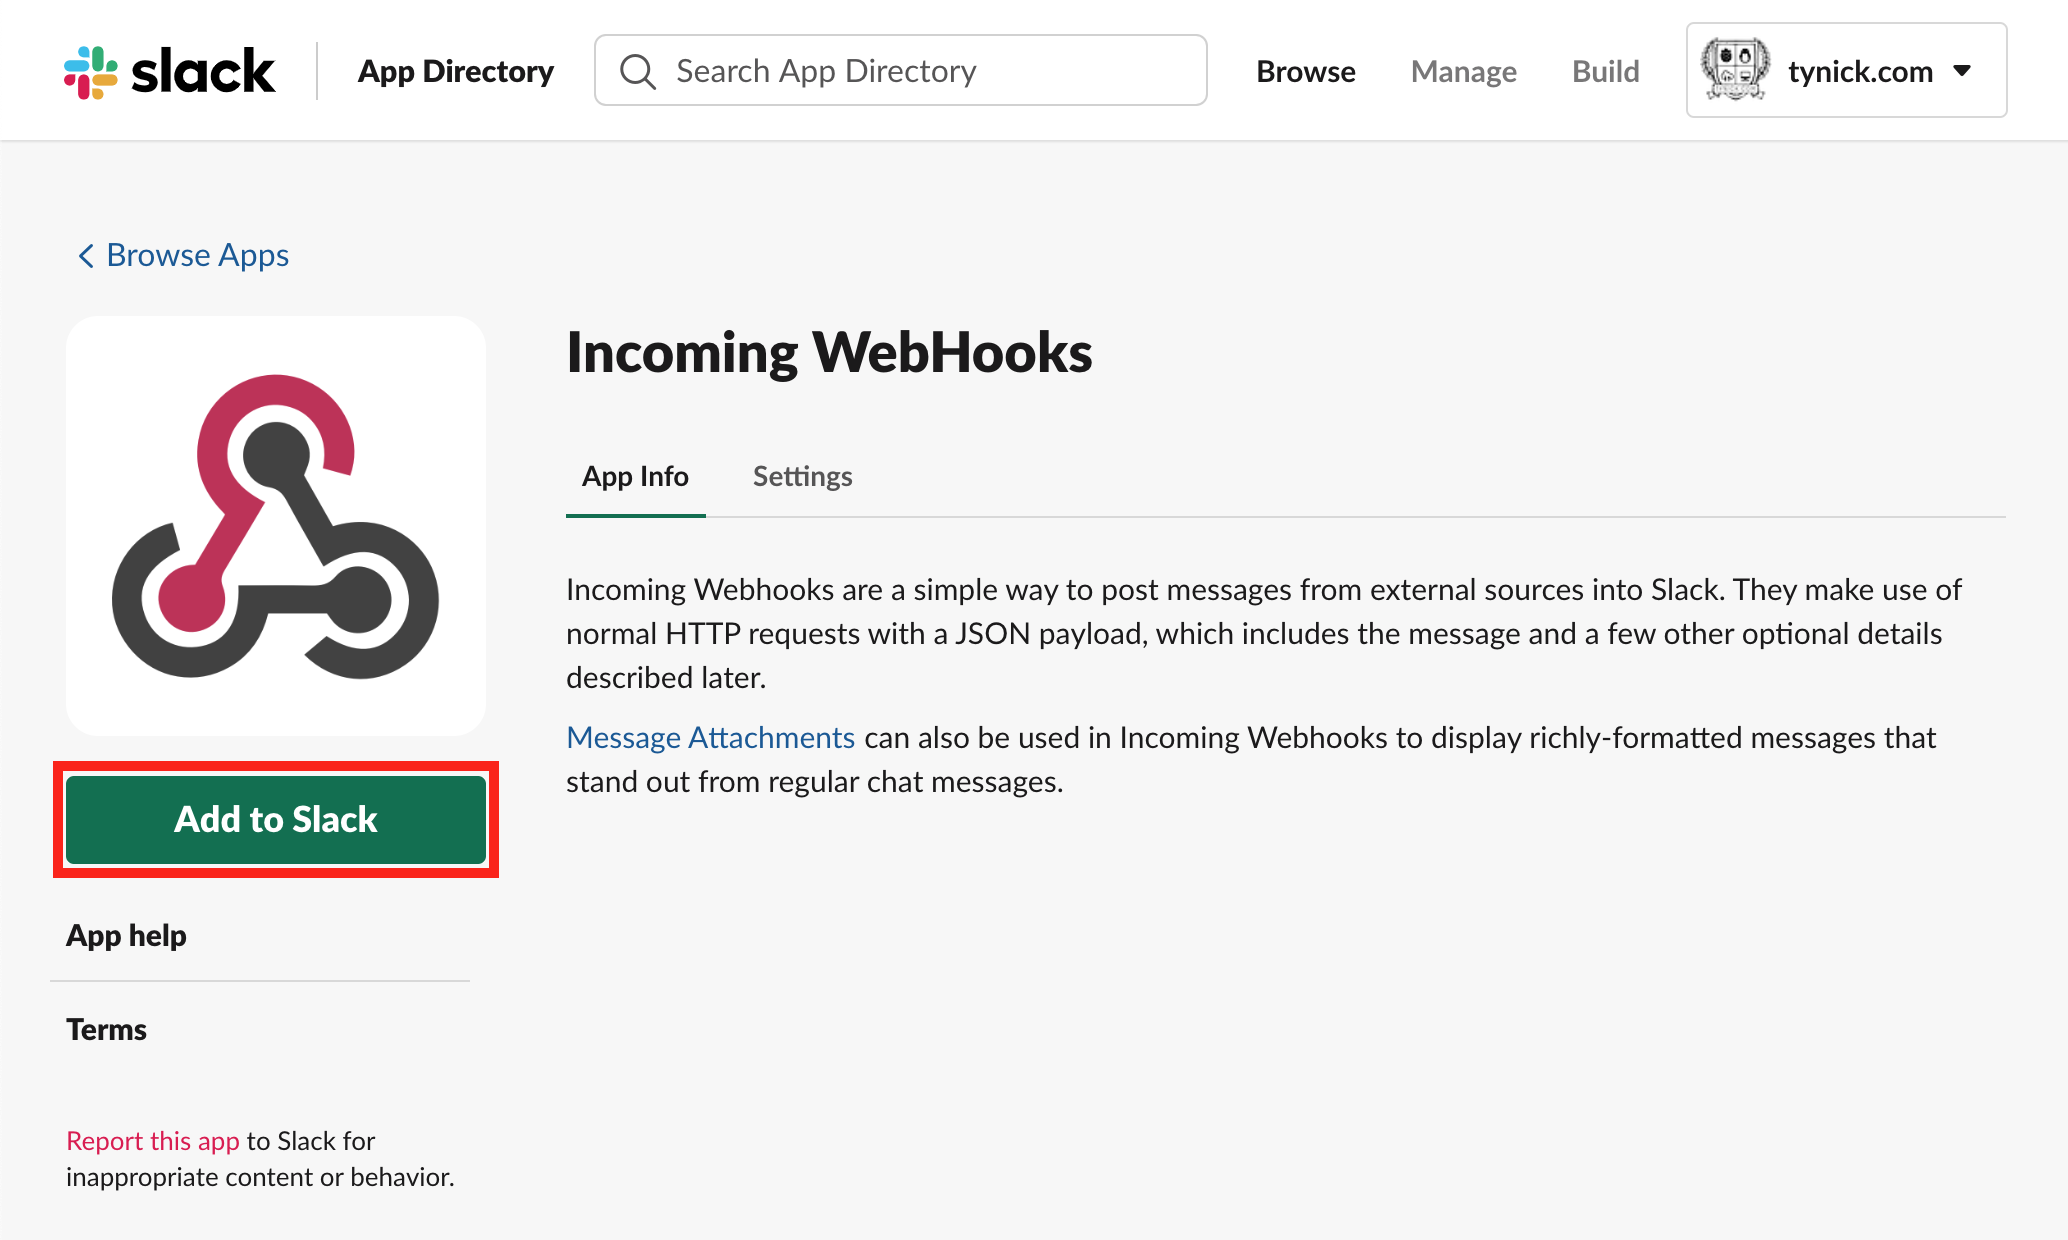
Click Add to Slack.
Now we will configure the Slack webhook.
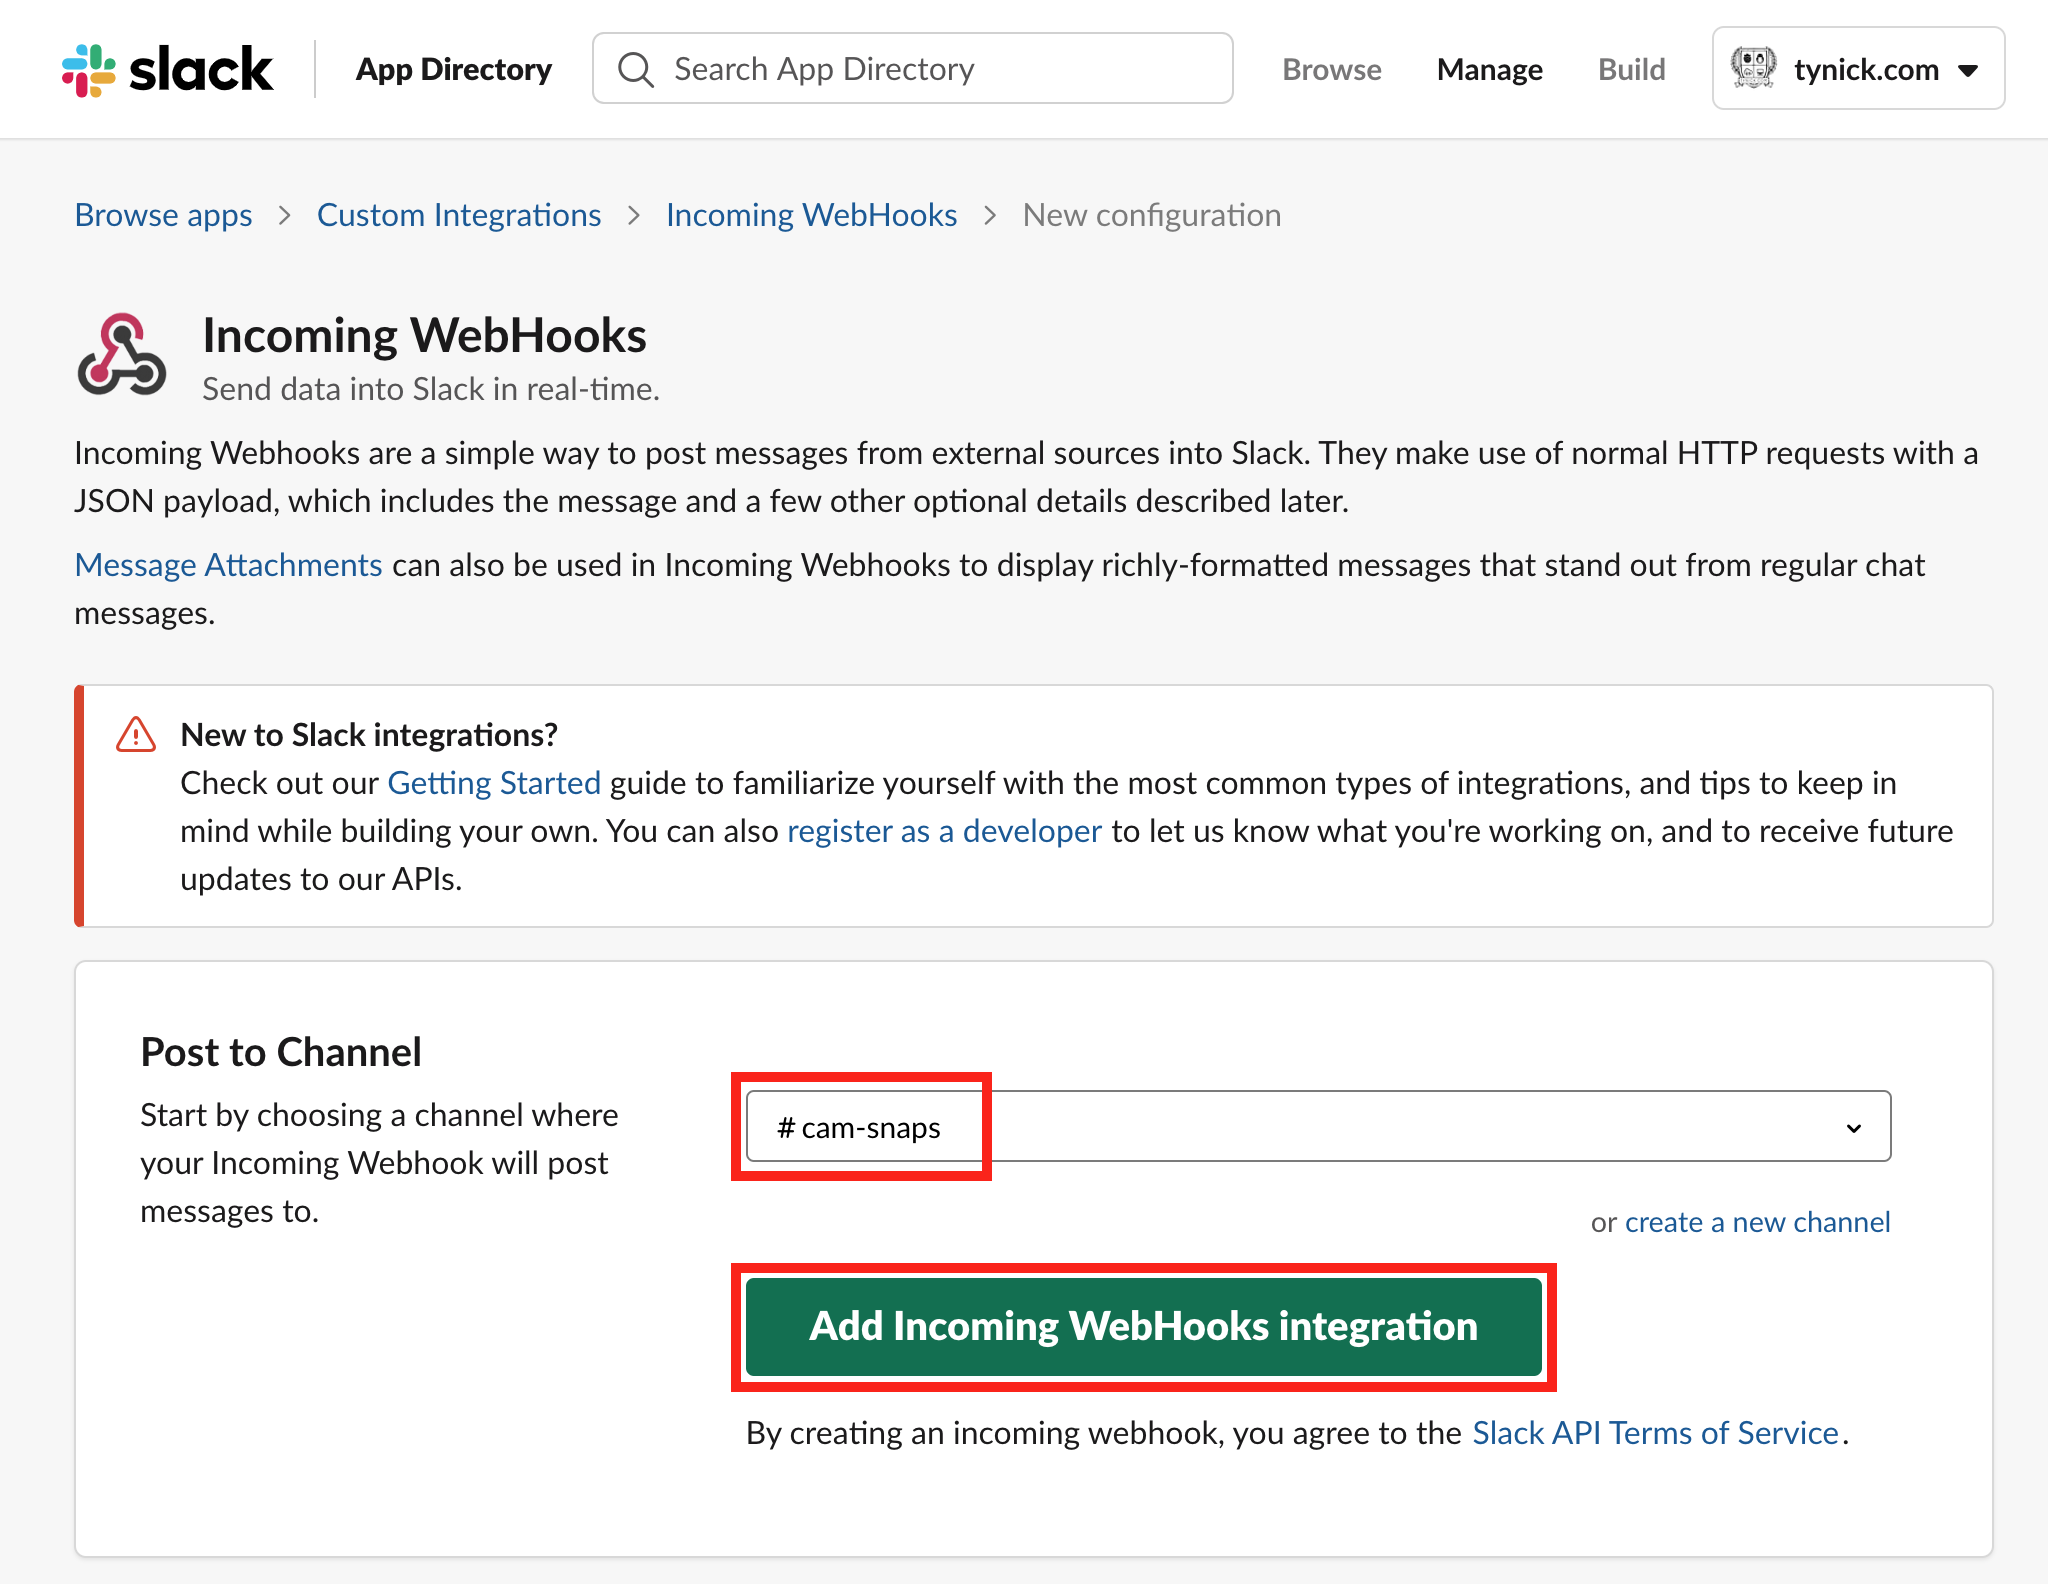
Select the channel you are going to report to from the dropdown and then click Add Incoming WebHooks integration.
The channel you select from the dropdown isn’t really that important. This can be changed later from this page or you can specify a different channel in the JSON data when you call the webhook.
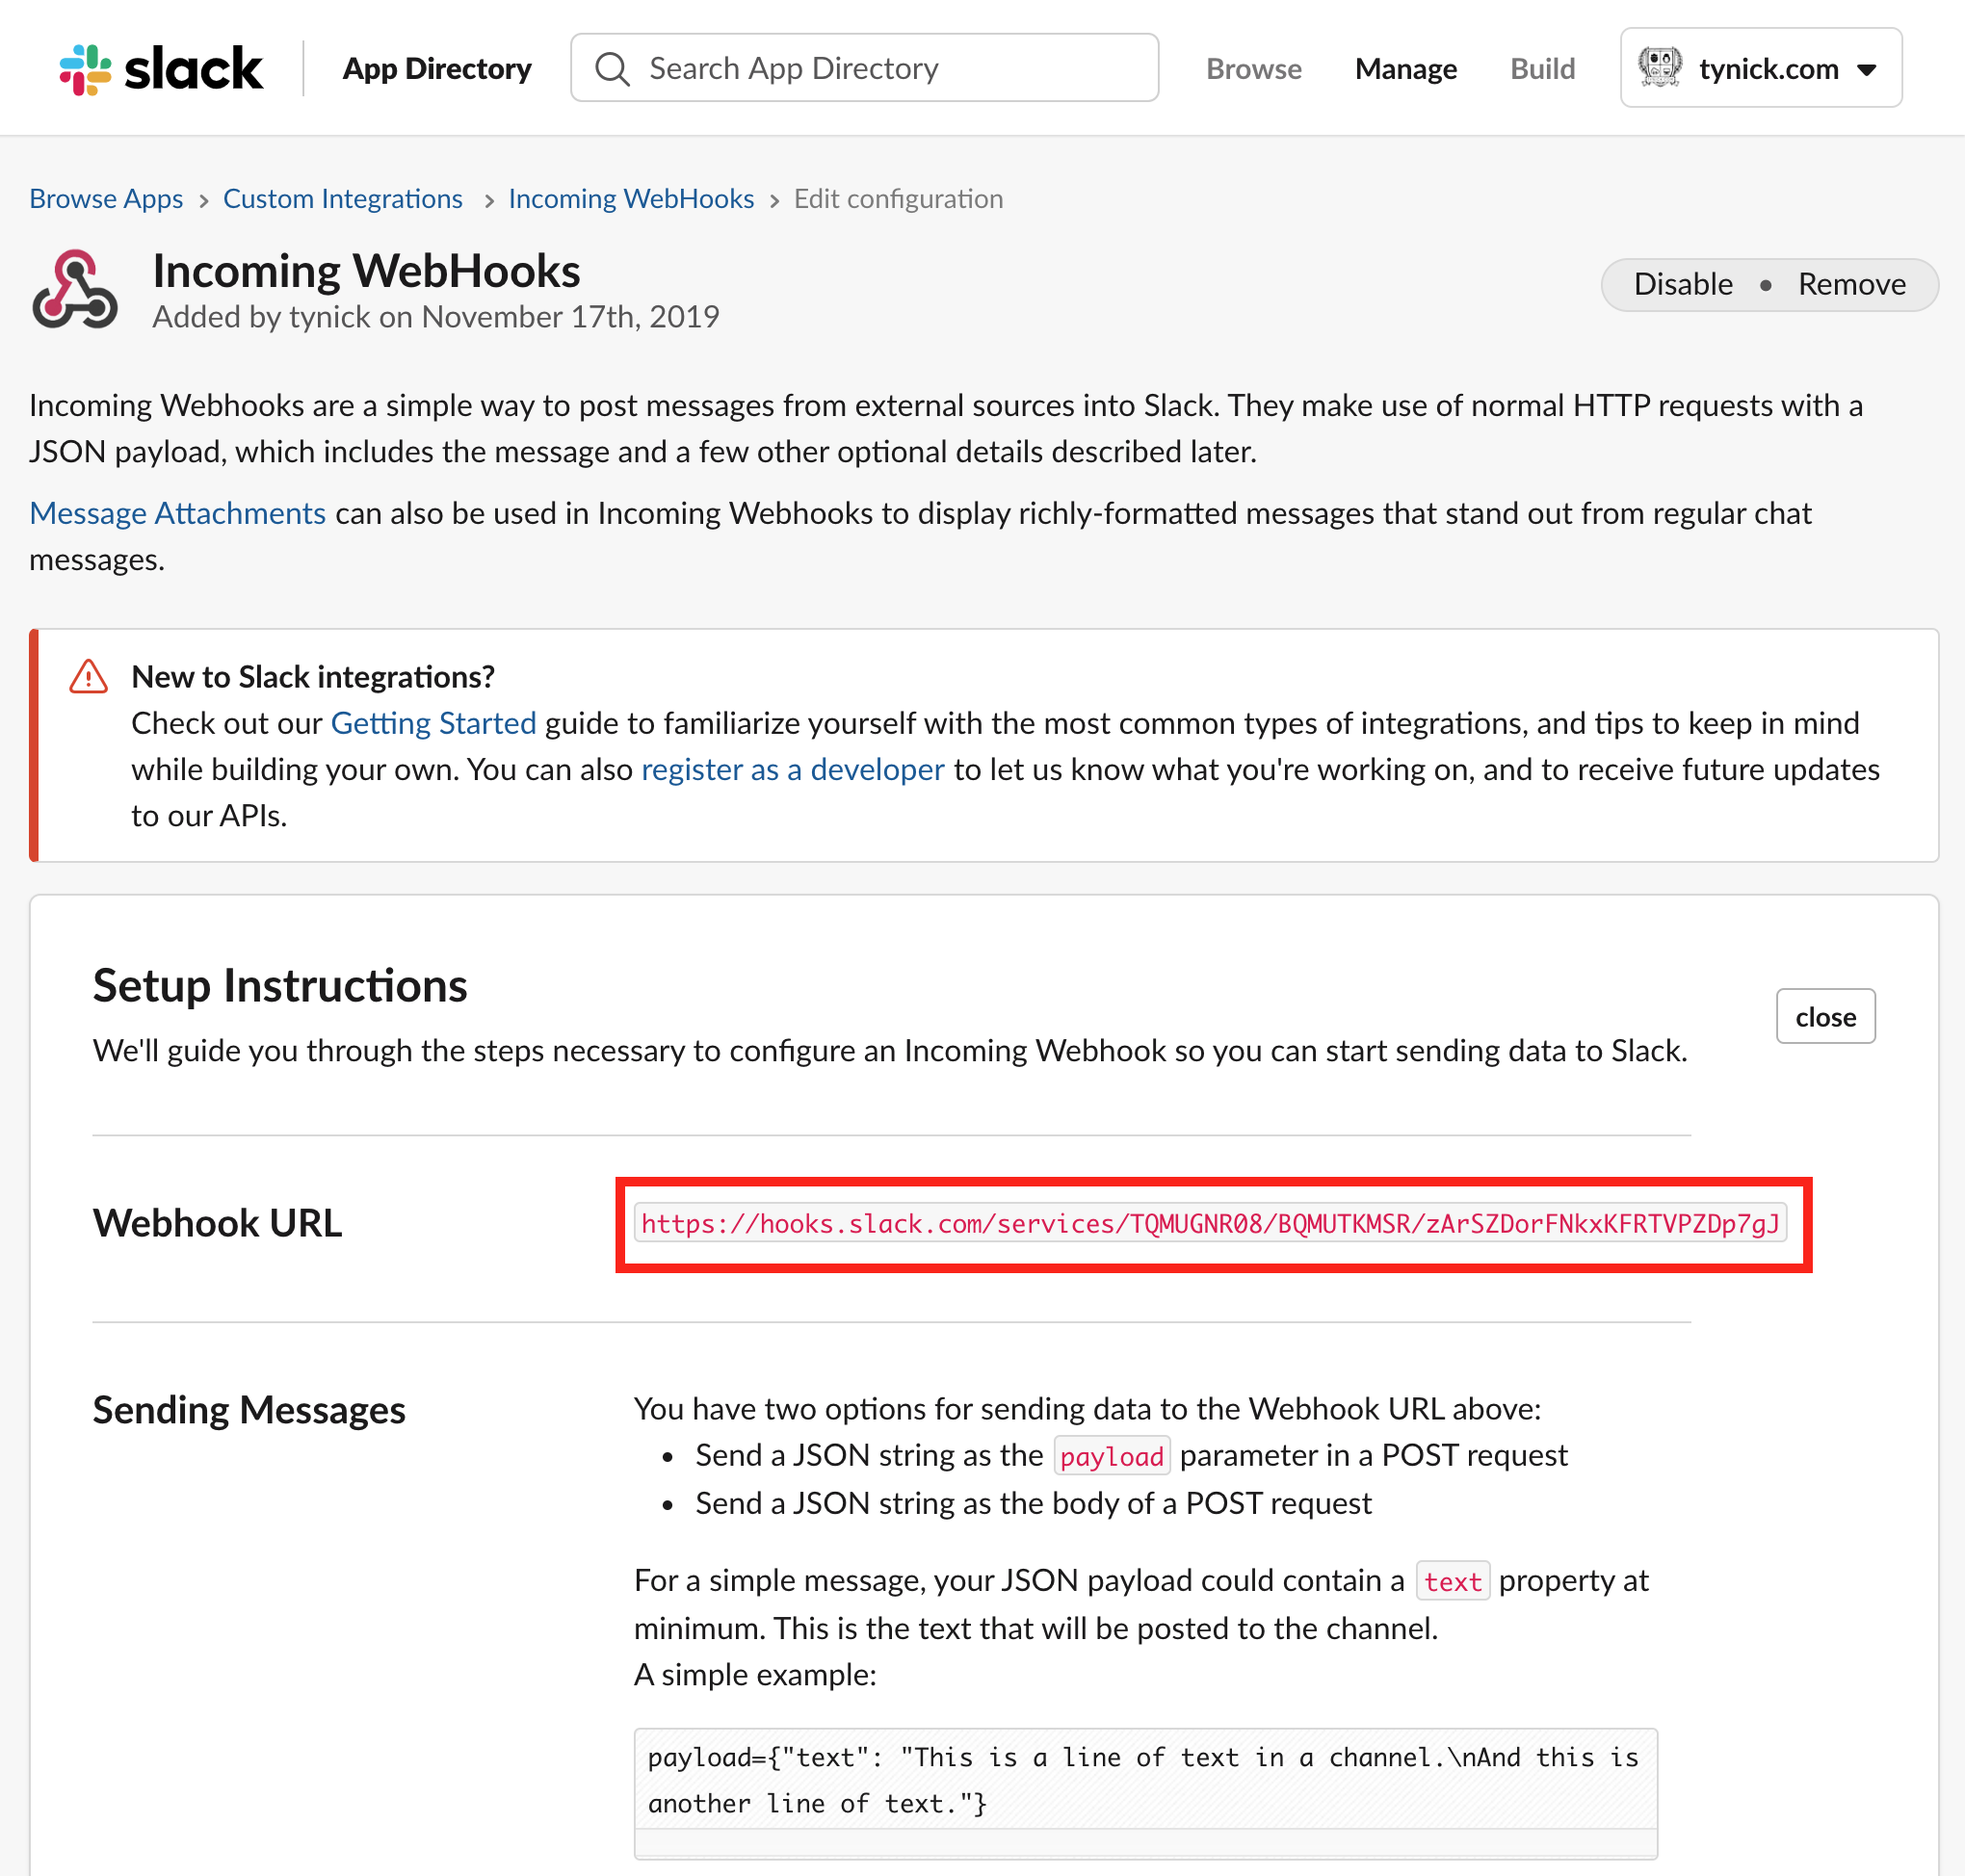
Our webhook has been created.
Save the Webhook URL for later. You will need it when we configure the script.
It is important that you keep this URL safe. Do not commit it to any public repos. Anyone with this URL can post messages to your Slack workspace.
That’s all we need to do for Slack. Let’s move on to Blue Iris!
Setting Up Blue Iris
We just need to add a new user to Blue Iris for the purpose of taking snapshots.
Click the Options “gear” icon in the top left corner of Blue Iris.
You should now see a popup with a bunch of tabs.
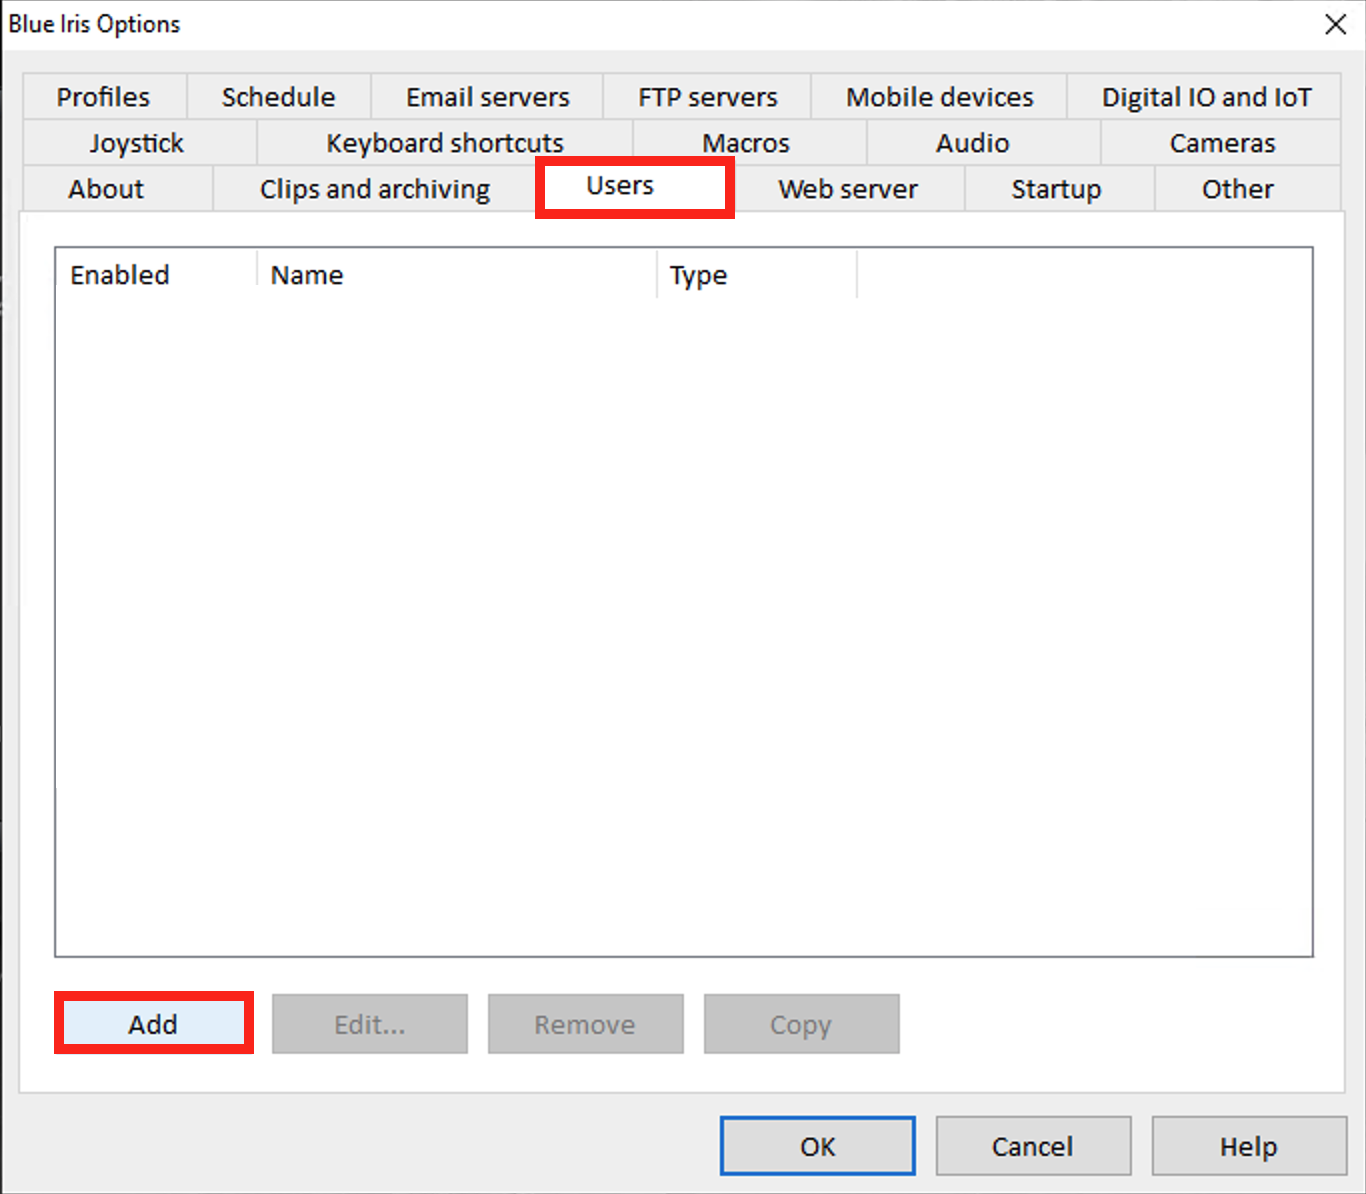
Select the Users tab and then click Add
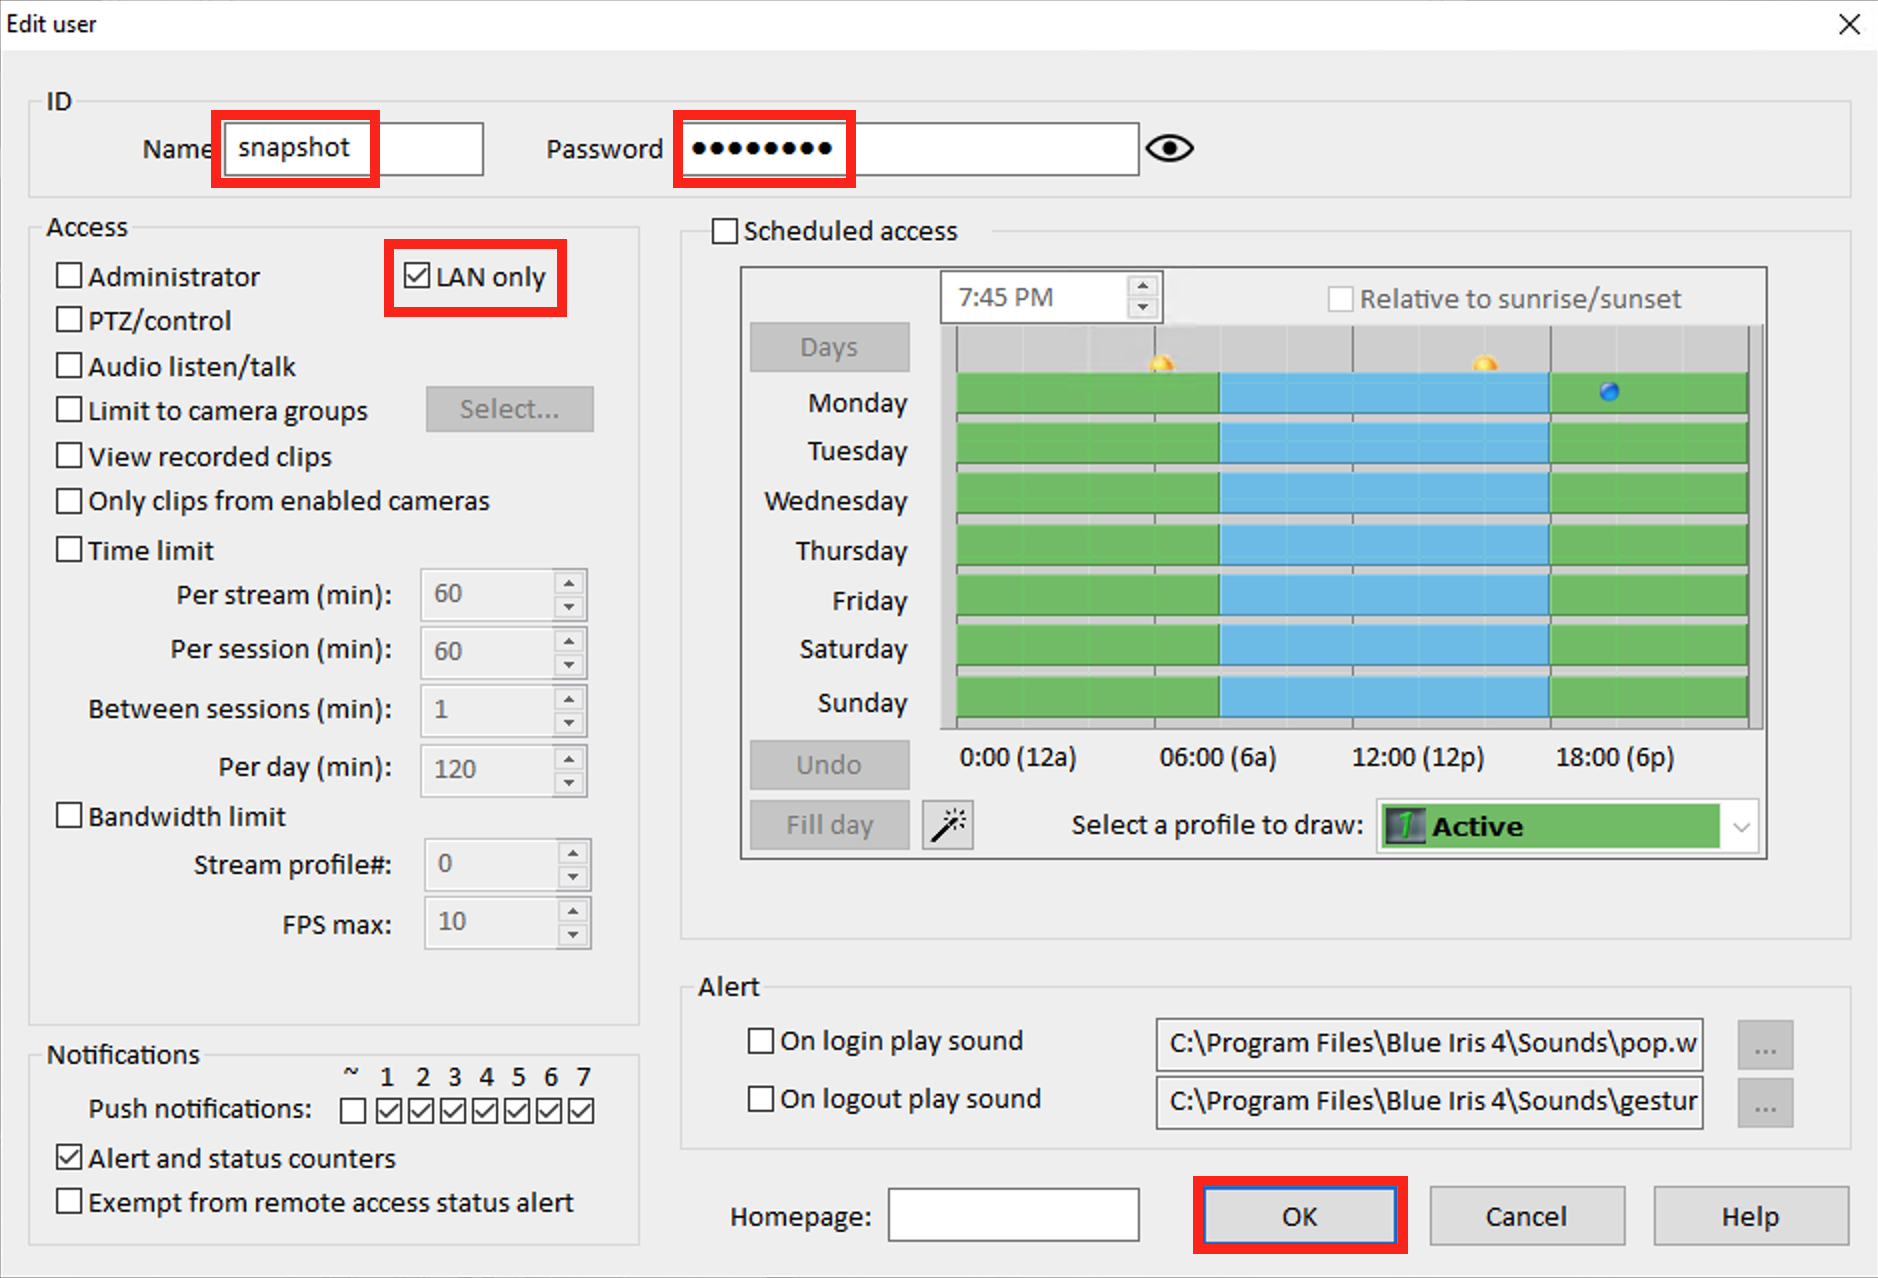
You should be at the Edit user screen now.
Start by adding a Name and Password.
Next make sure the only Access box that is checked is LAN only. This user doesn’t need any other permissions.
LAN only will prevent anyone from outside of your network from logging in as this user.
Since the Raspberry Pi authenticating as this user is on your network, that is perfect!
Click OK when complete and then OK again to close the Blue Iris Options.
That’s all for Blue Iris configuration.
Let’s move on to AWS.
Setting Up AWS
There are a few things we need to configure in AWS.
We will need an S3 bucket, IAM policy and an IAM user.
S3 buckets are used for object (snapshots in our case) storage.
IAM policies are a set of permissions that can be assigned to a user (or role or group, but don’t worry about that).
IAM users are just that. Users that you use for specific things. Uploading to an S3 bucket is our specific thing.
Creating A New S3 Bucket
Once you are logged into your AWS account, start by heading over to the AWS S3 console.
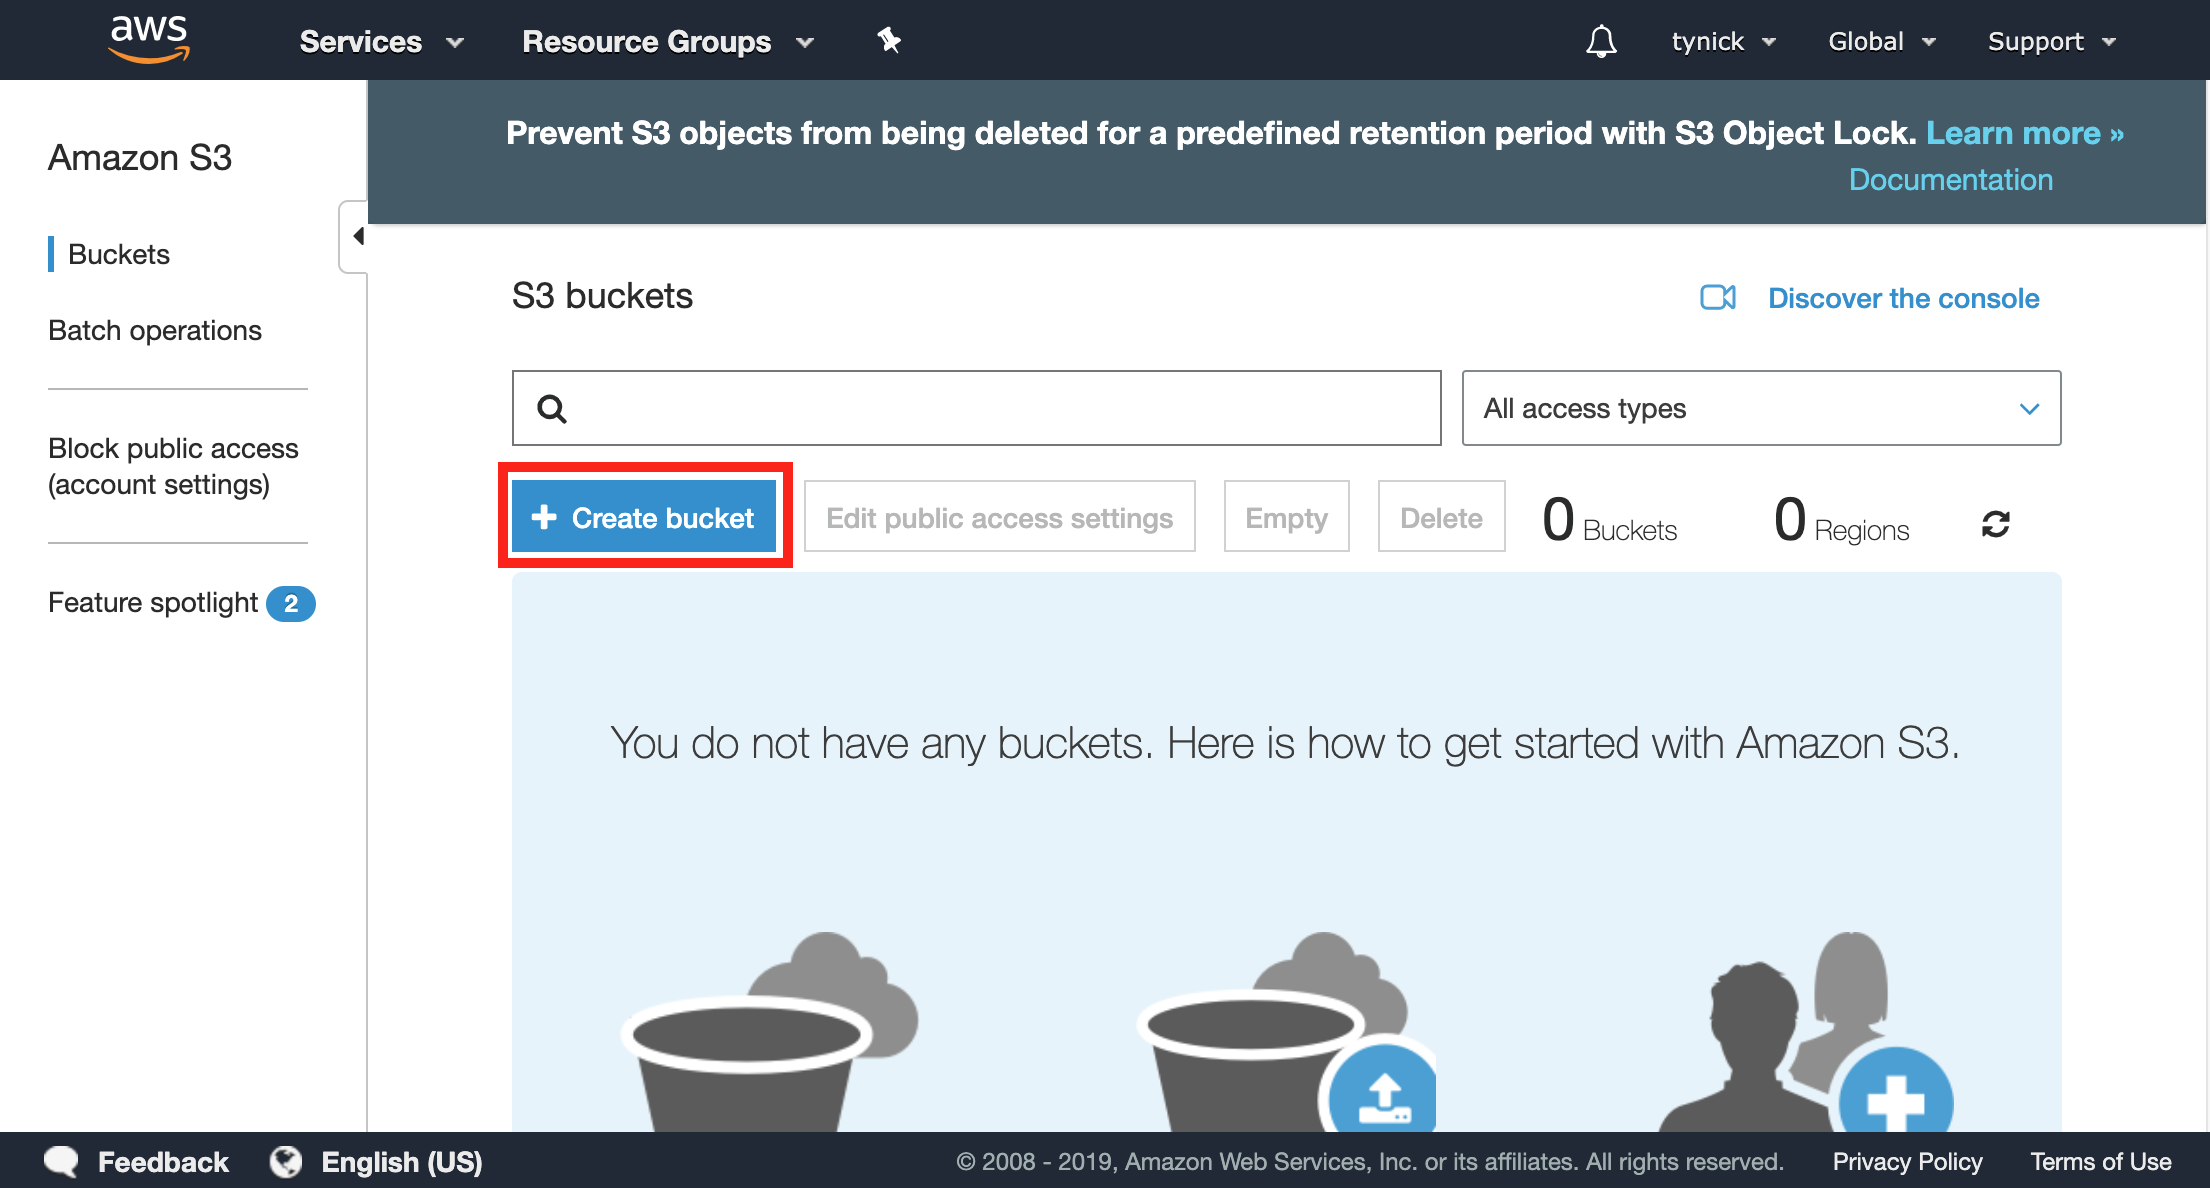
Click the + Create bucket button.
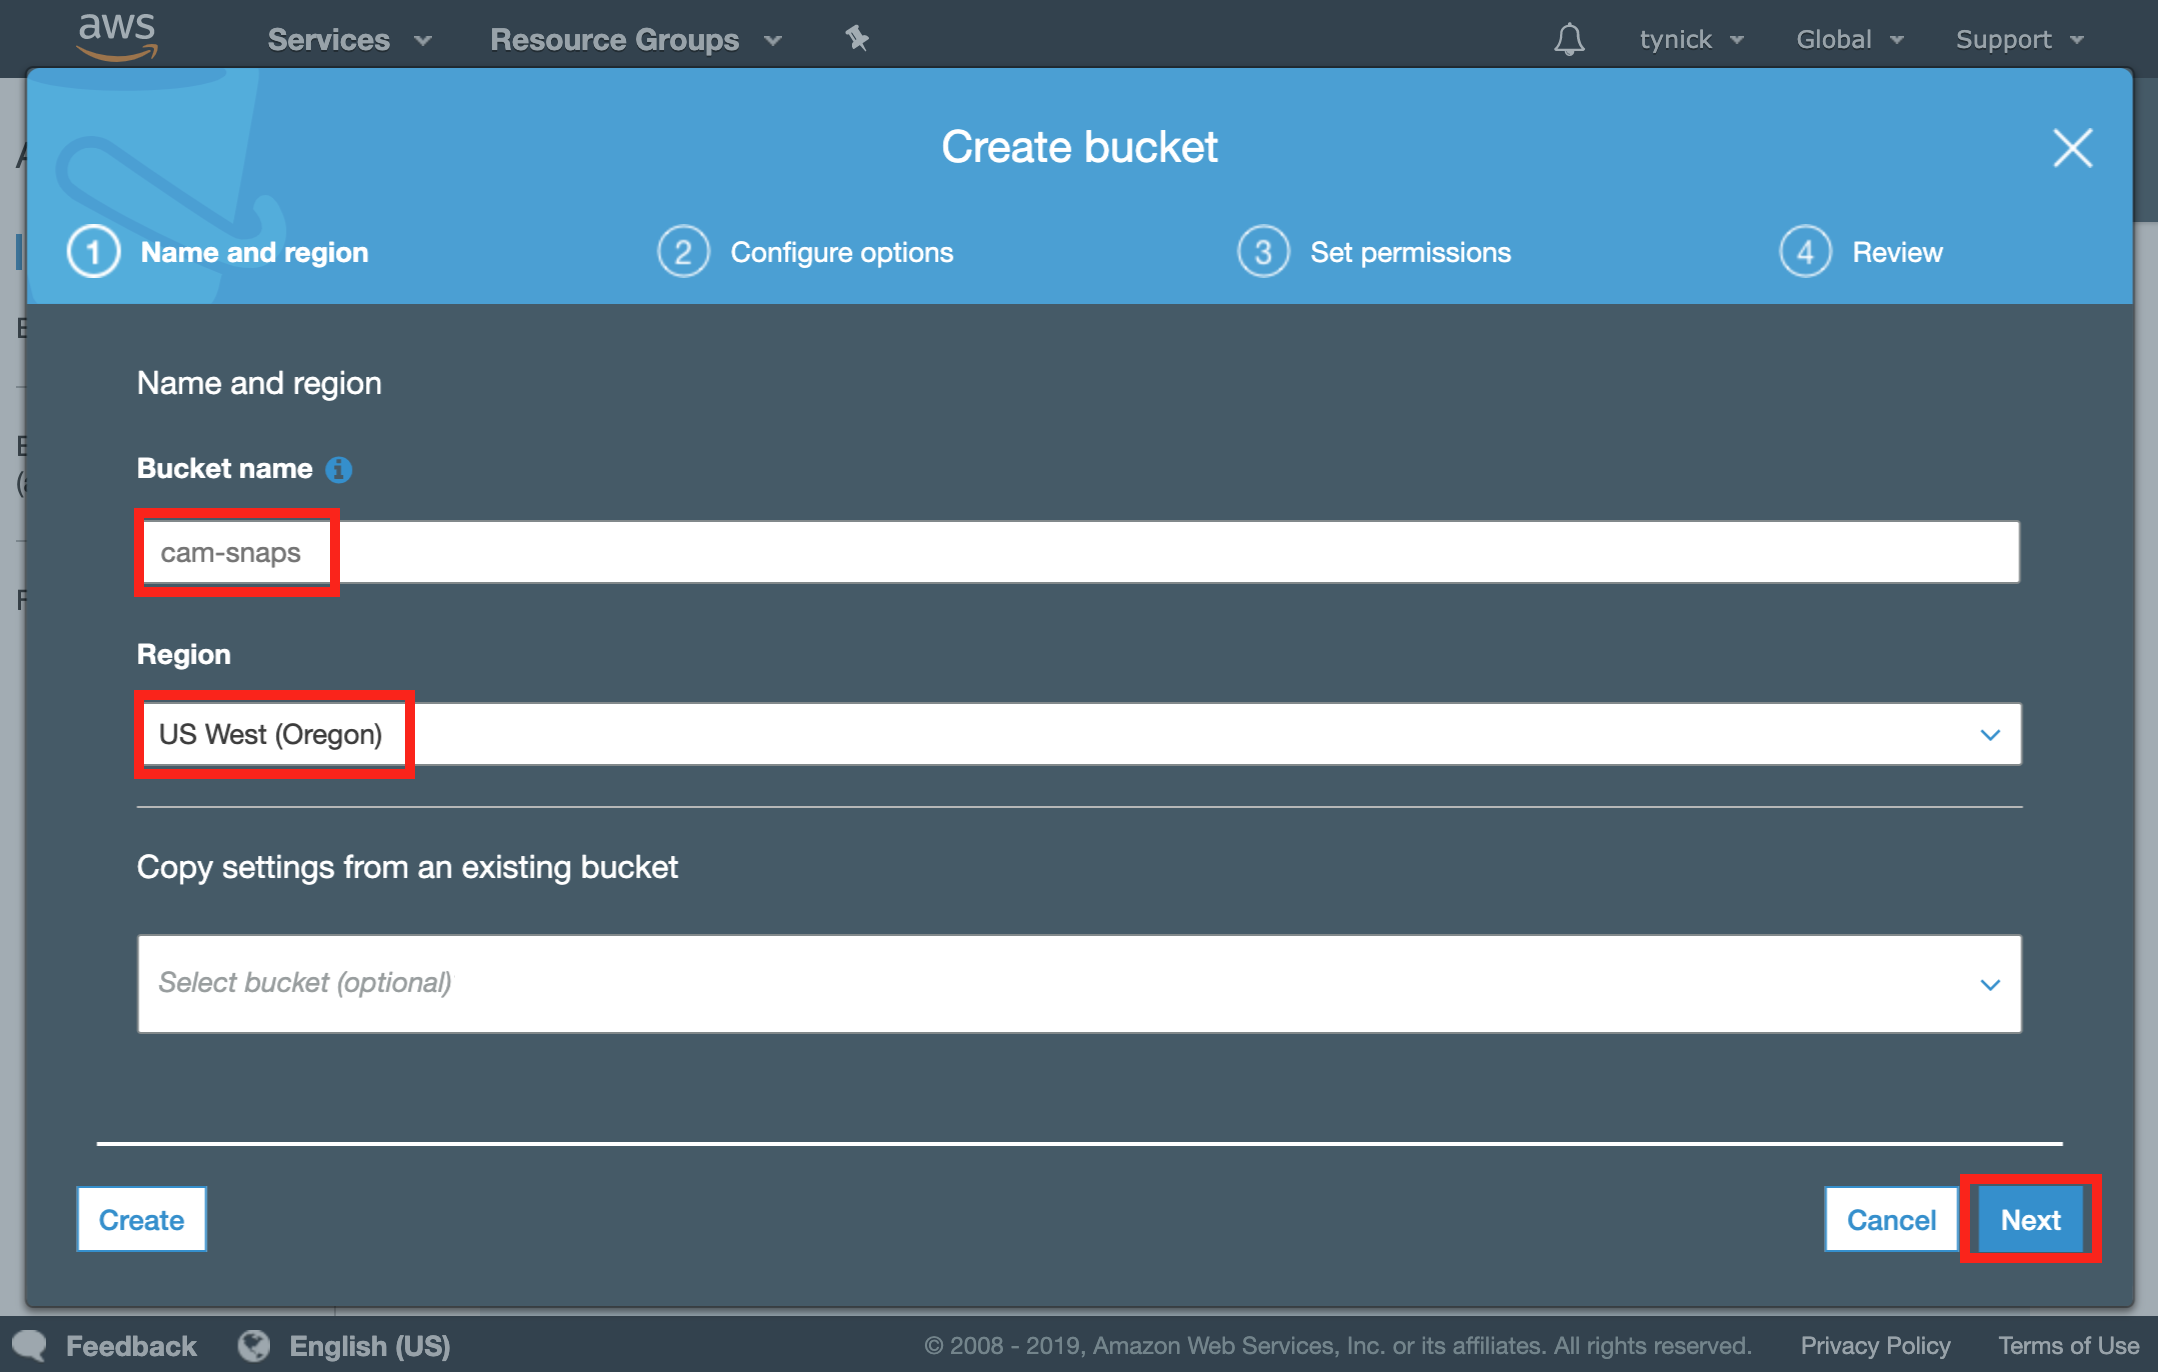
Enter a Bucket name and select the region closest to you.
Make sure you remember what region you selected as you will need it later on.
Your bucket name must be unique to the region you have selected. For example, you cannot use cam-snaps in the US West (Oregon) region because I already have.
Click Next when complete.
You can actually click Next 2 more times and then finally Create bucket.
By default, our bucket will not be public. That is fine because we don’t want it to be.
We are going to create a user with permission to upload and download from the bucket right after this.
After you clicked Create bucket you should have been taken back to your list of S3 buckets.
You should now see your newly created S3 bucket.
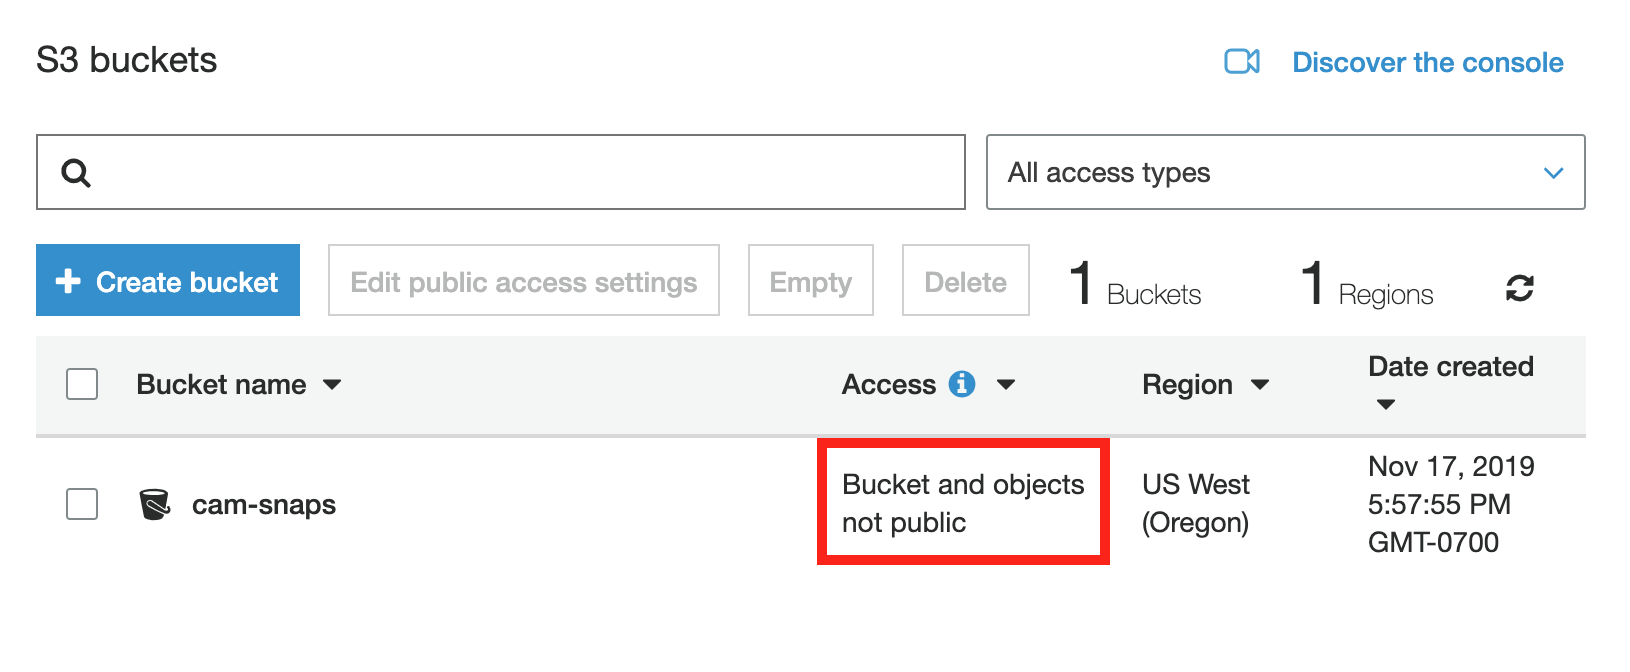
Notice that Access shows Bucket and objects not public. Makes you wonder how large companies have data breaches because they “accidentally” left their buckets open to the world…
Moving on!
Creating A New AWS IAM Policy
The next thing we need to do is create a new IAM policy with permission to upload and download from the bucket we just created. I am only adding download permissions for a future tutorial that will allow us to use our bucket to make a time lapse.
It is best practice to give the user only the permissions needed to get the job done.
Let’s create a new policy for this user to be sure that it only has access to do what we want it to do.
Open up the Policies section of the IAM Console.
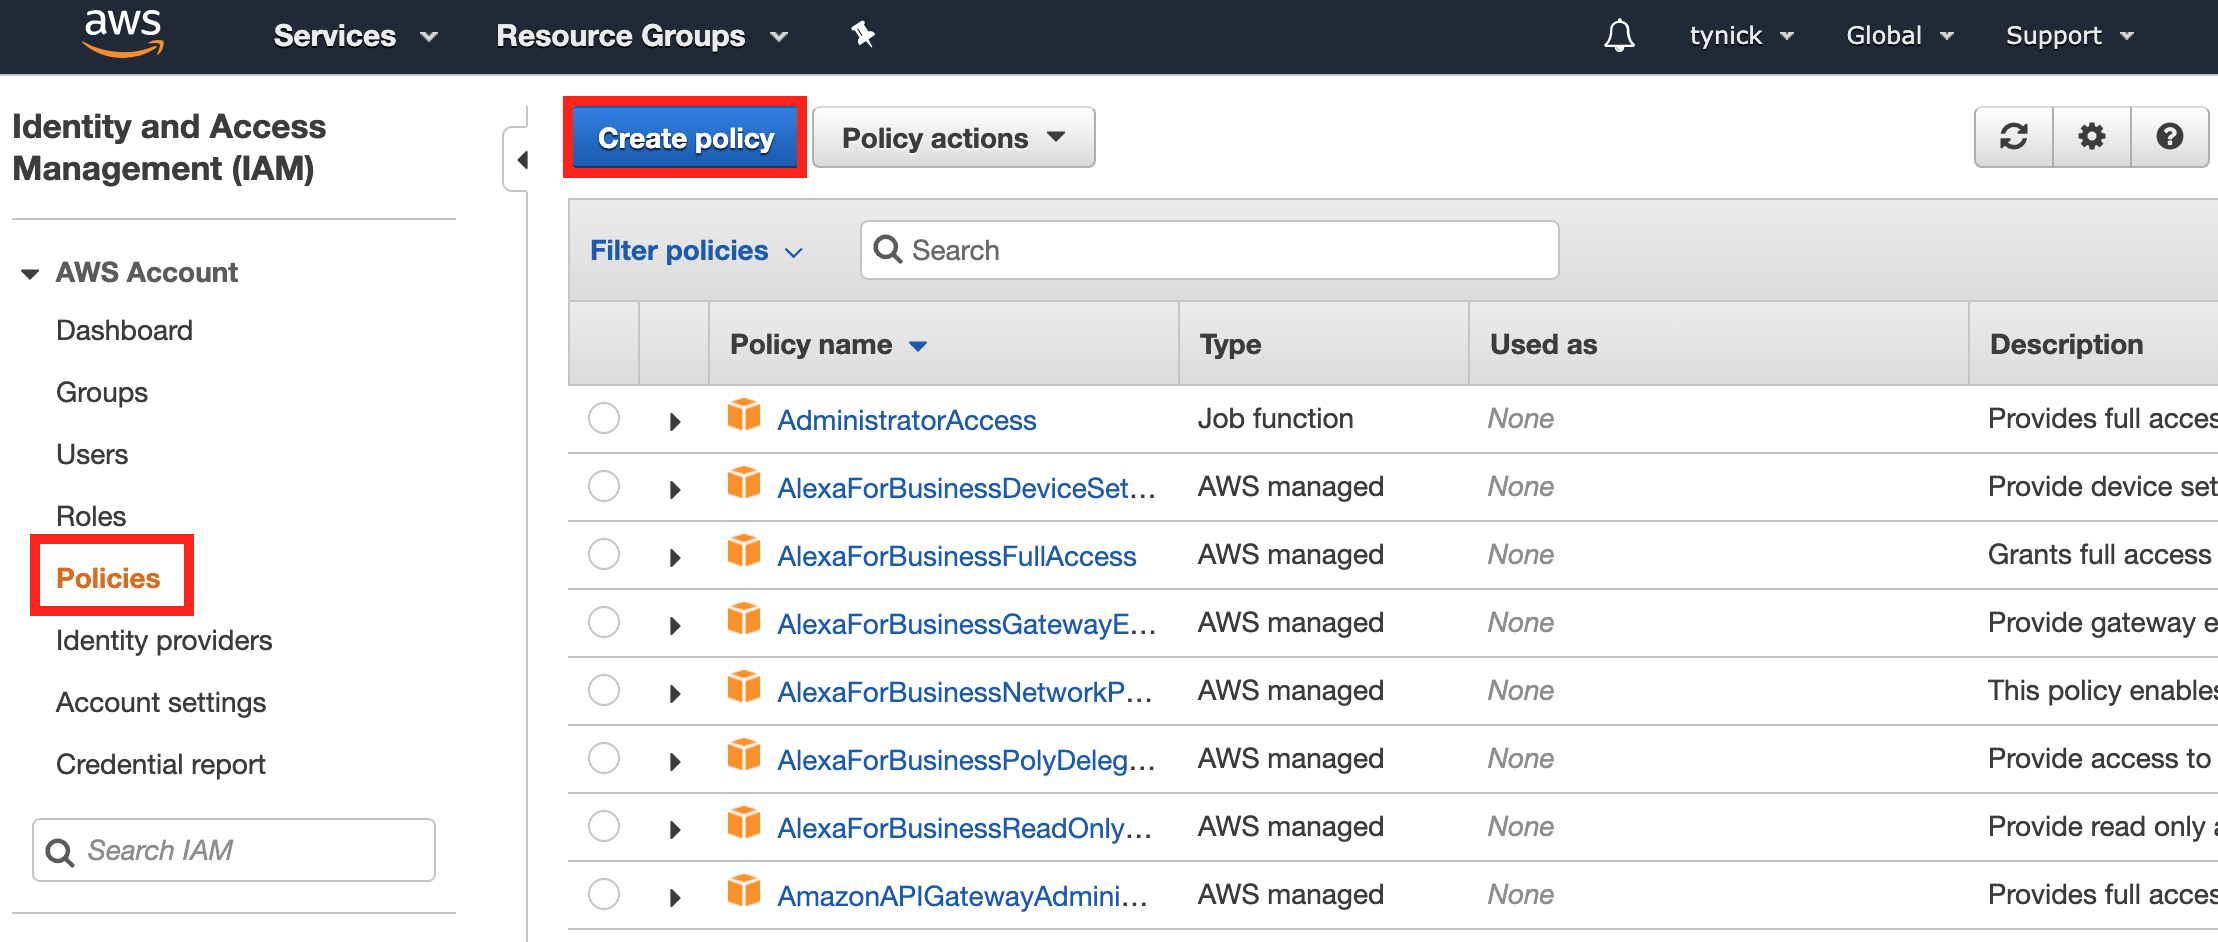
Select Create policy.
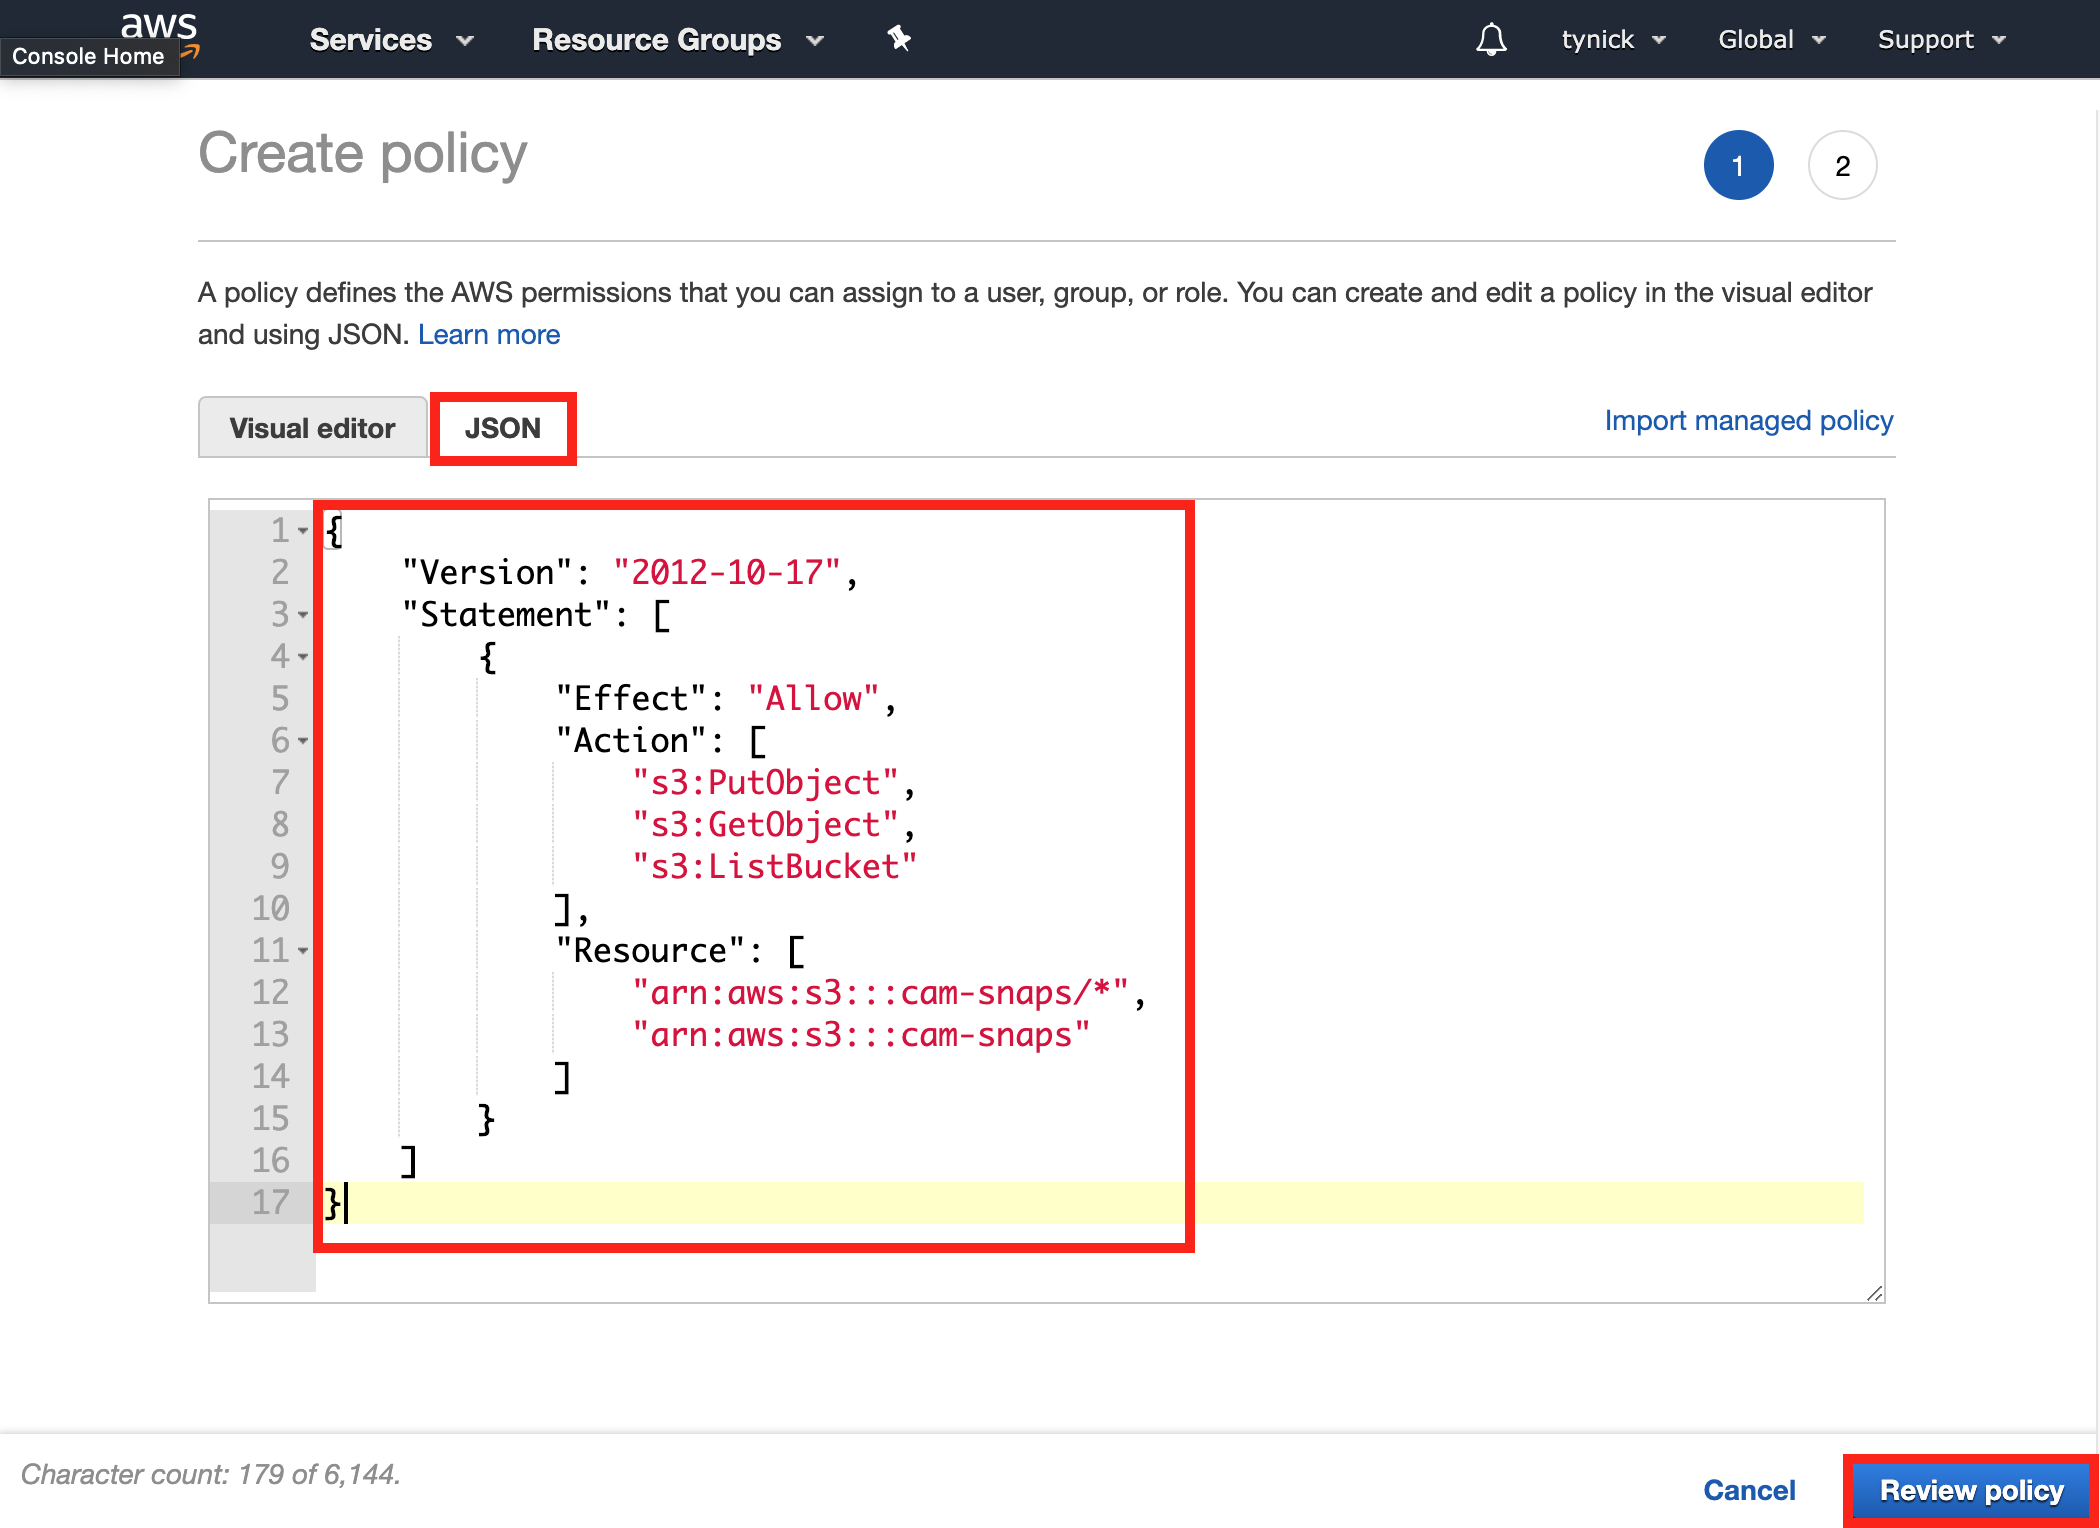
Select the JSON tab and paste the following snippet.
BE SURE TO REPLACE cam-snaps WITH THE NAME OF YOUR OWN BUCKET
{
    "Version": "2012-10-17",
    "Statement": [
        {
            "Effect": "Allow",
            "Action": [
                "s3:PutObject",
                "s3:GetObject",
                "s3:ListBucket"
            ],
            "Resource": [
                "arn:aws:s3:::cam-snaps/*",
                "arn:aws:s3:::cam-snaps"
            ]
        }
    ]
}
This policy allows the user to put, get and list objects (snapshots) in the specific bucket. These are the only permissions we need for our user.
Click Review policy when finished.
You will now be taken to another screen to verify and name your policy.
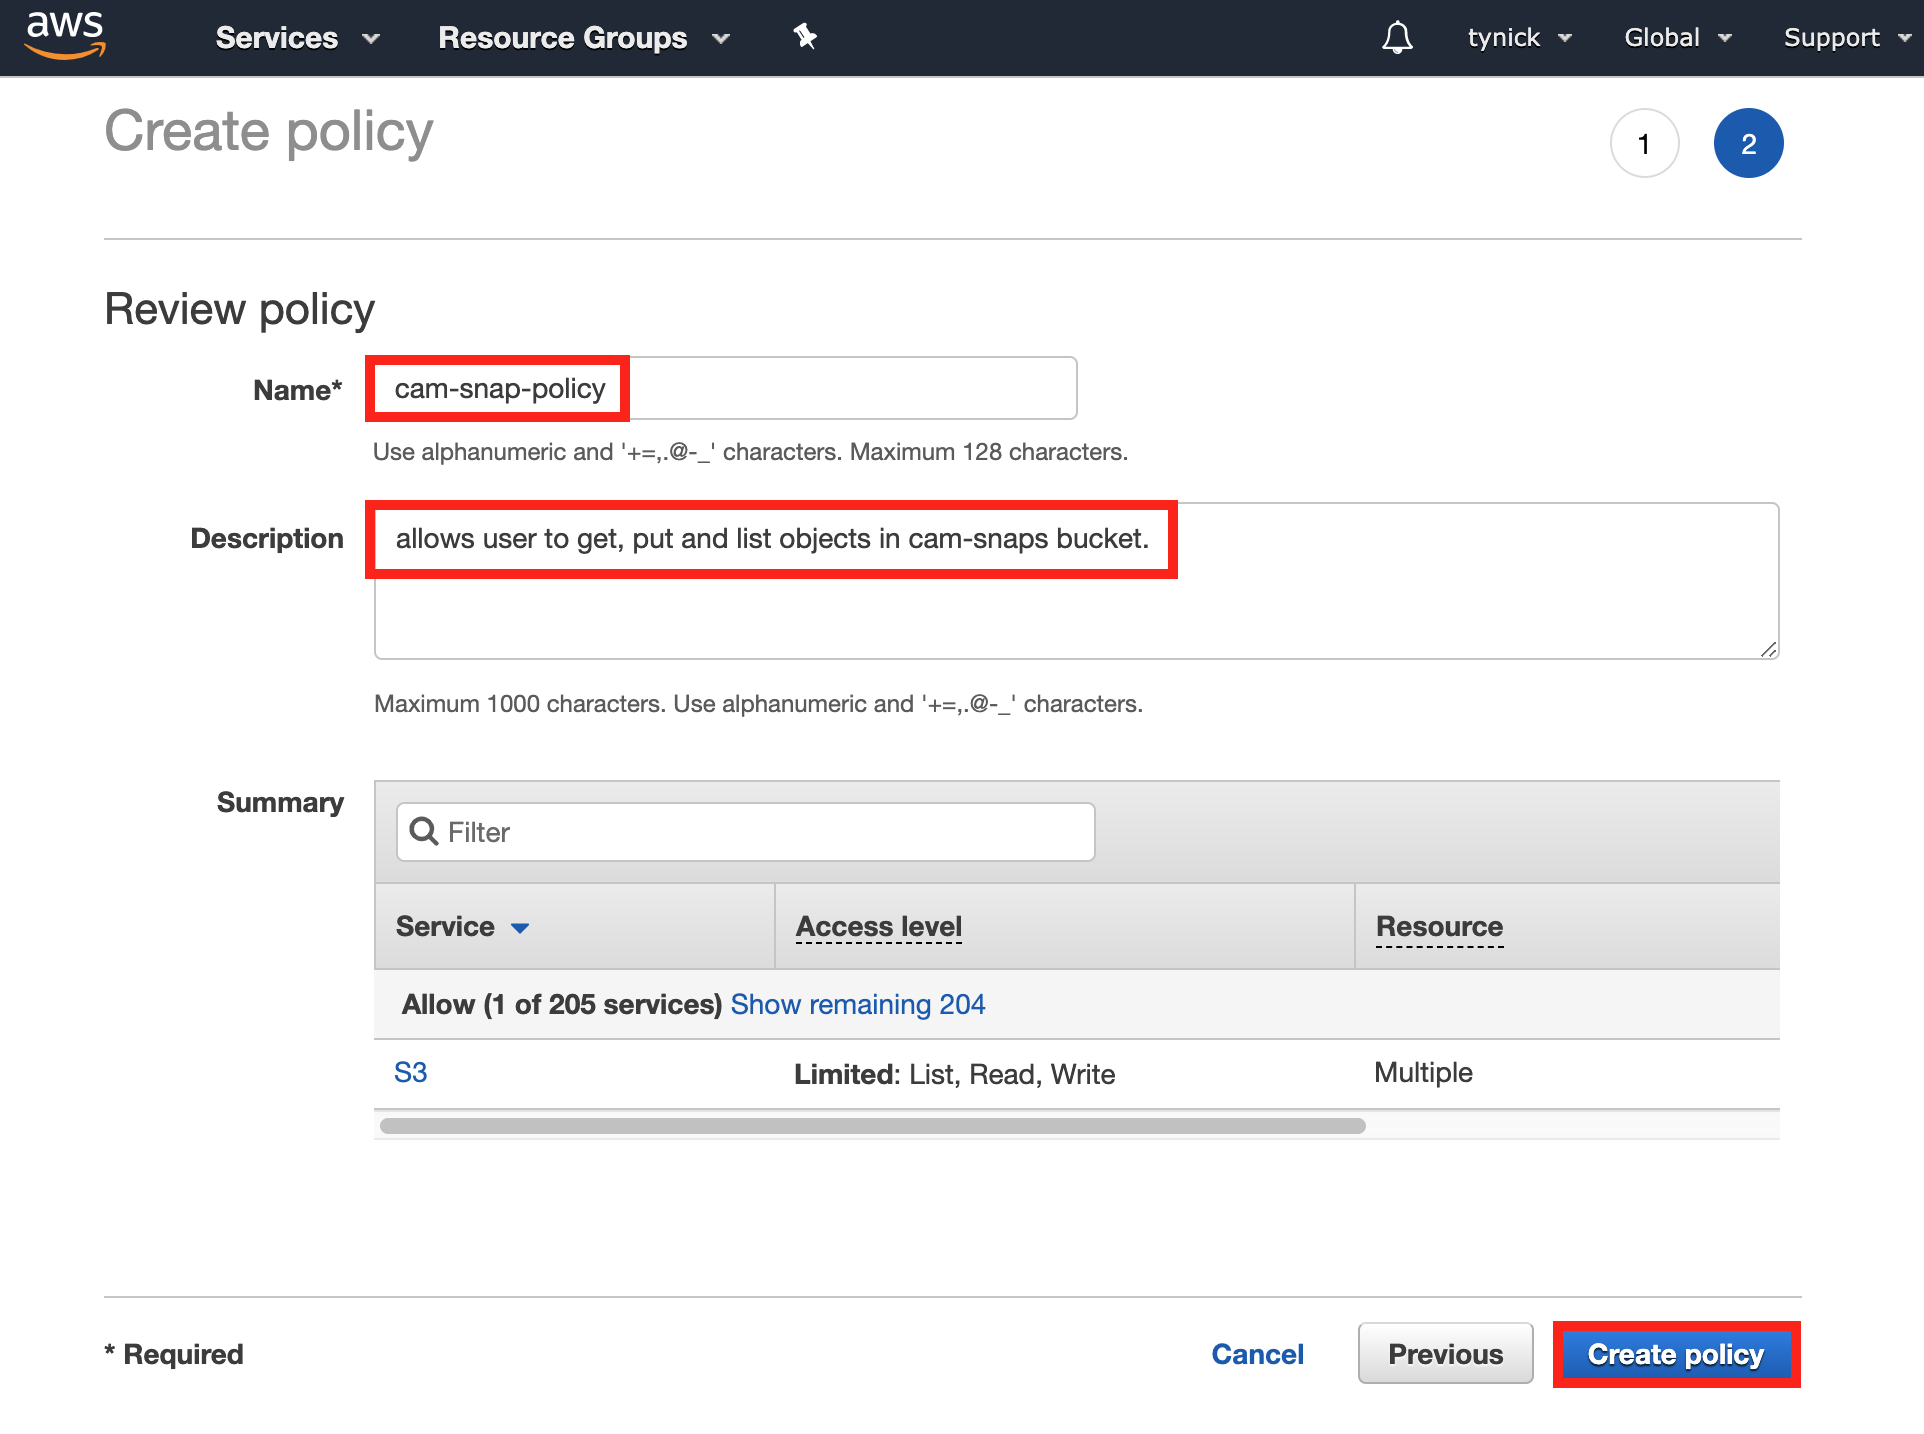
Add a Name and a meaningful Description to help you identify what this policy does later on. As an AWS admin, I promise this is beneficial.
Click Create policy when complete.
Creating A New AWS IAM User
Now it’s time to create a new IAM user and assign the policy we just made to the new user.
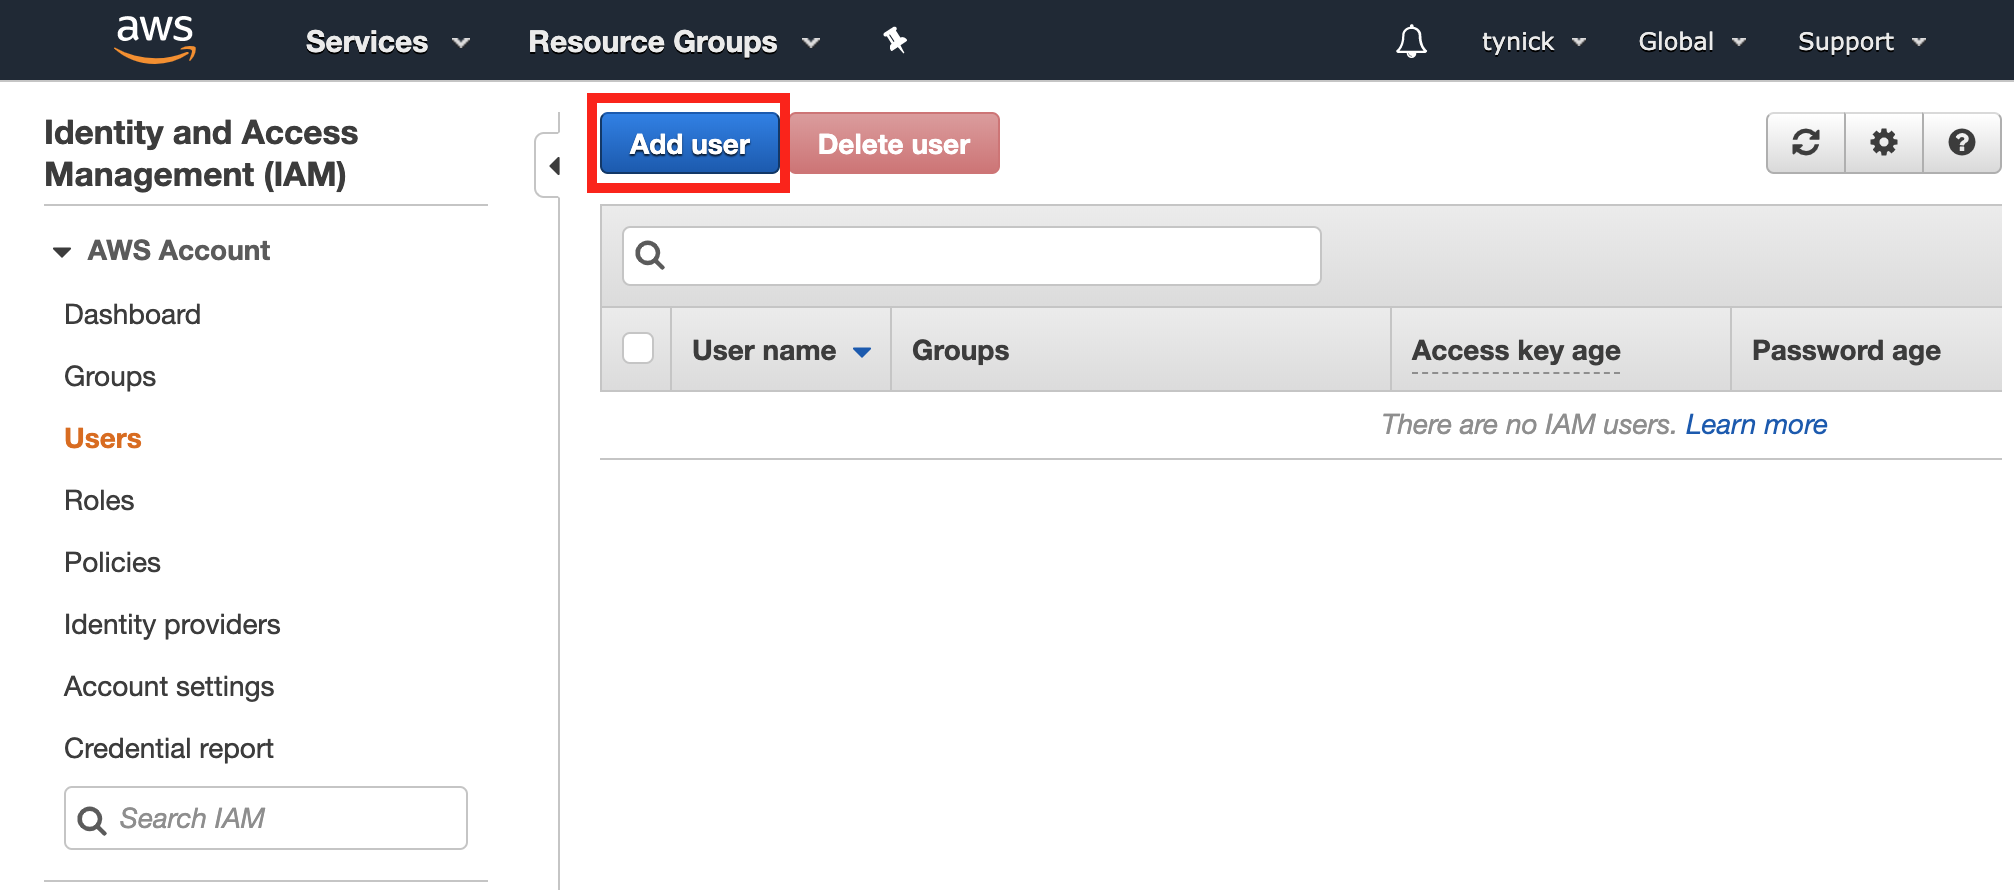
Select Users from the side menu of the IAM console and then click the Add user button.
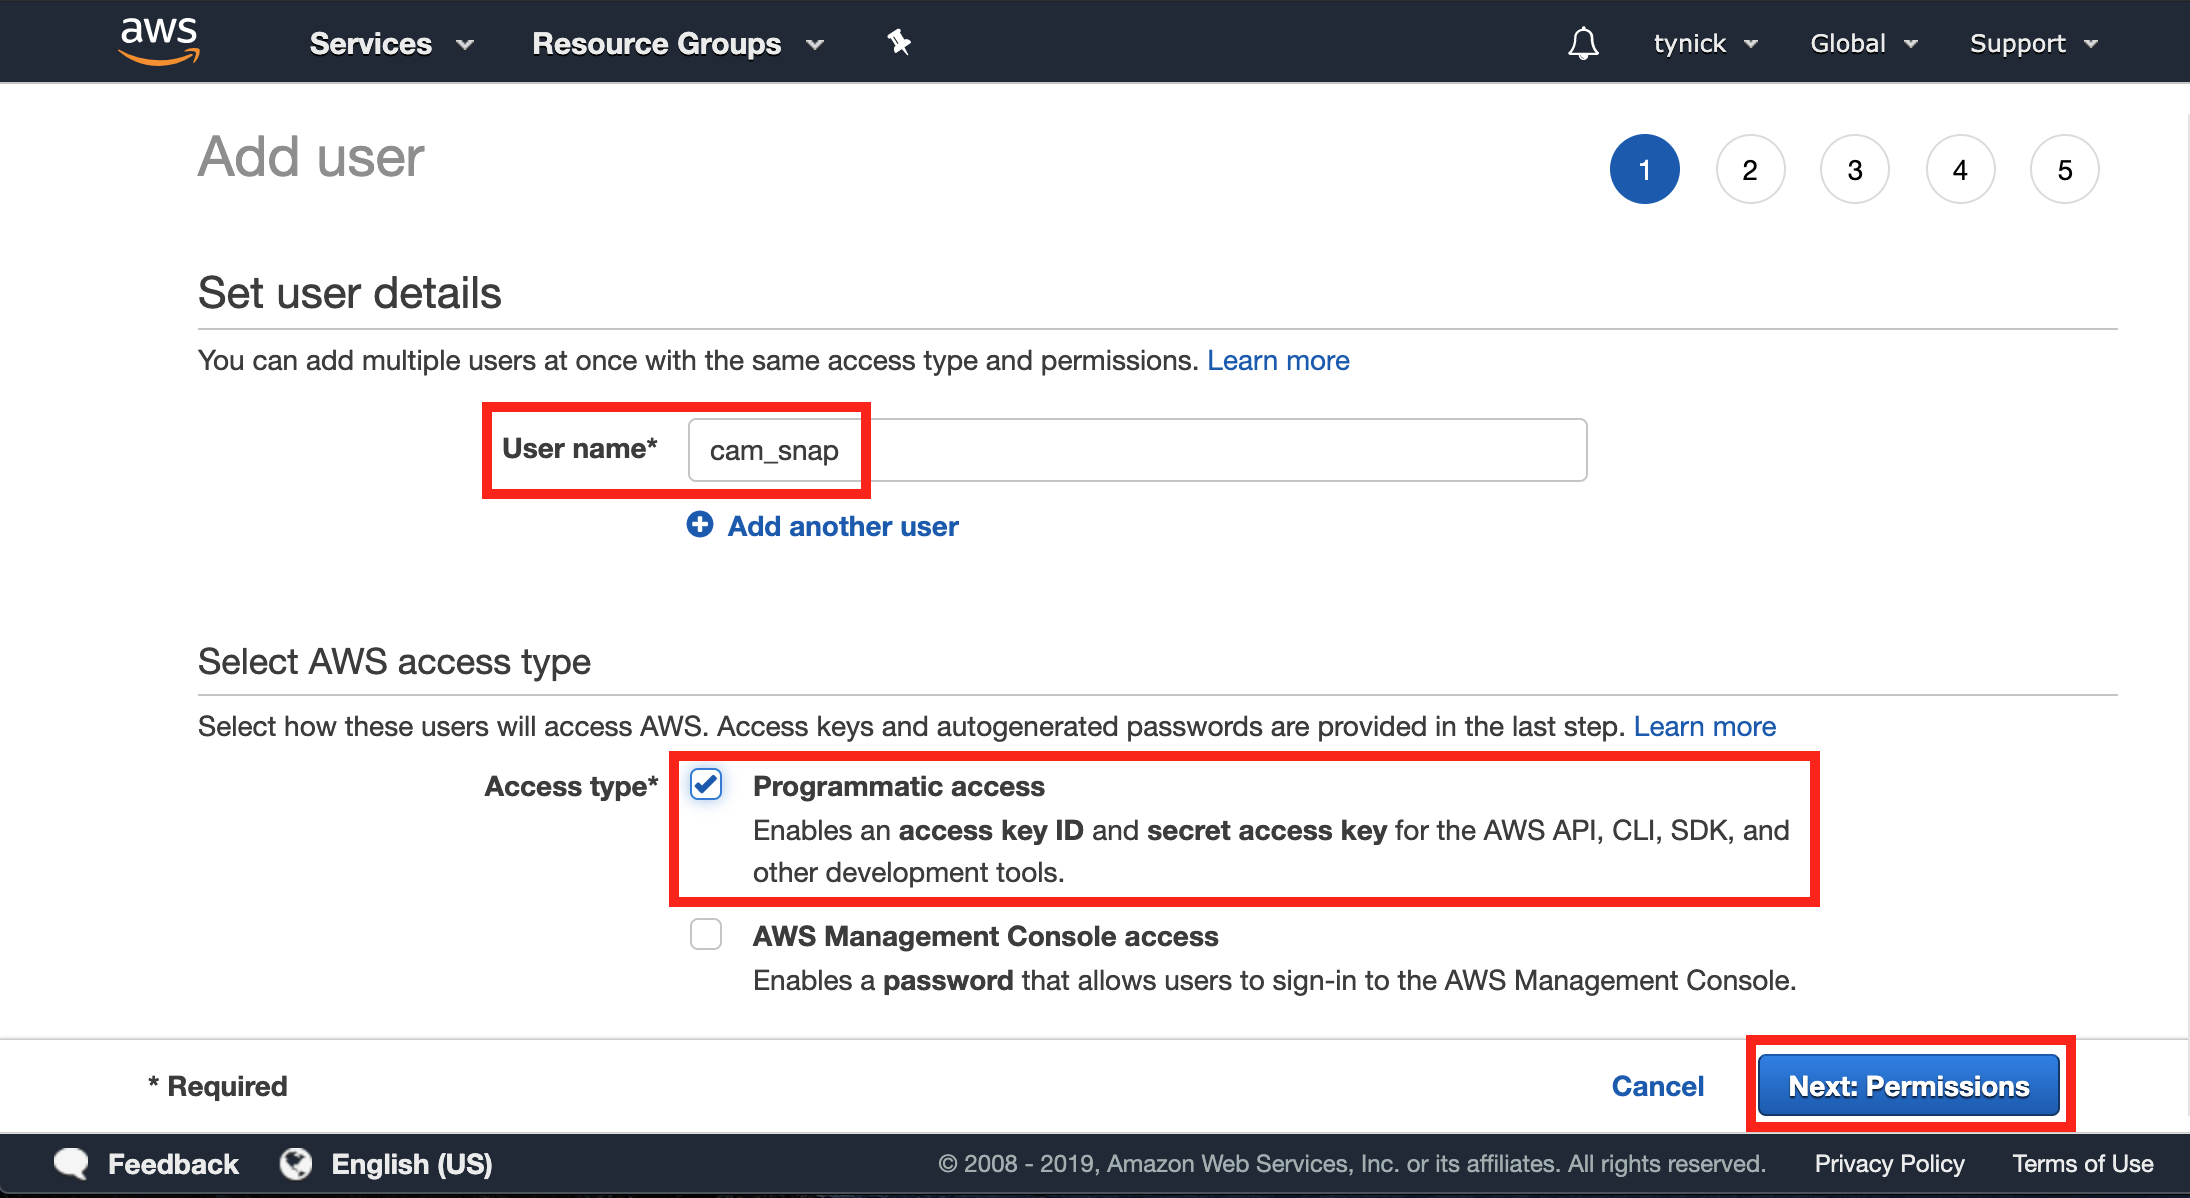
Enter a User name and check the Programmatic access box.
Click Next: Permissions when complete.
Here is where we use the policy we created in the previous step.
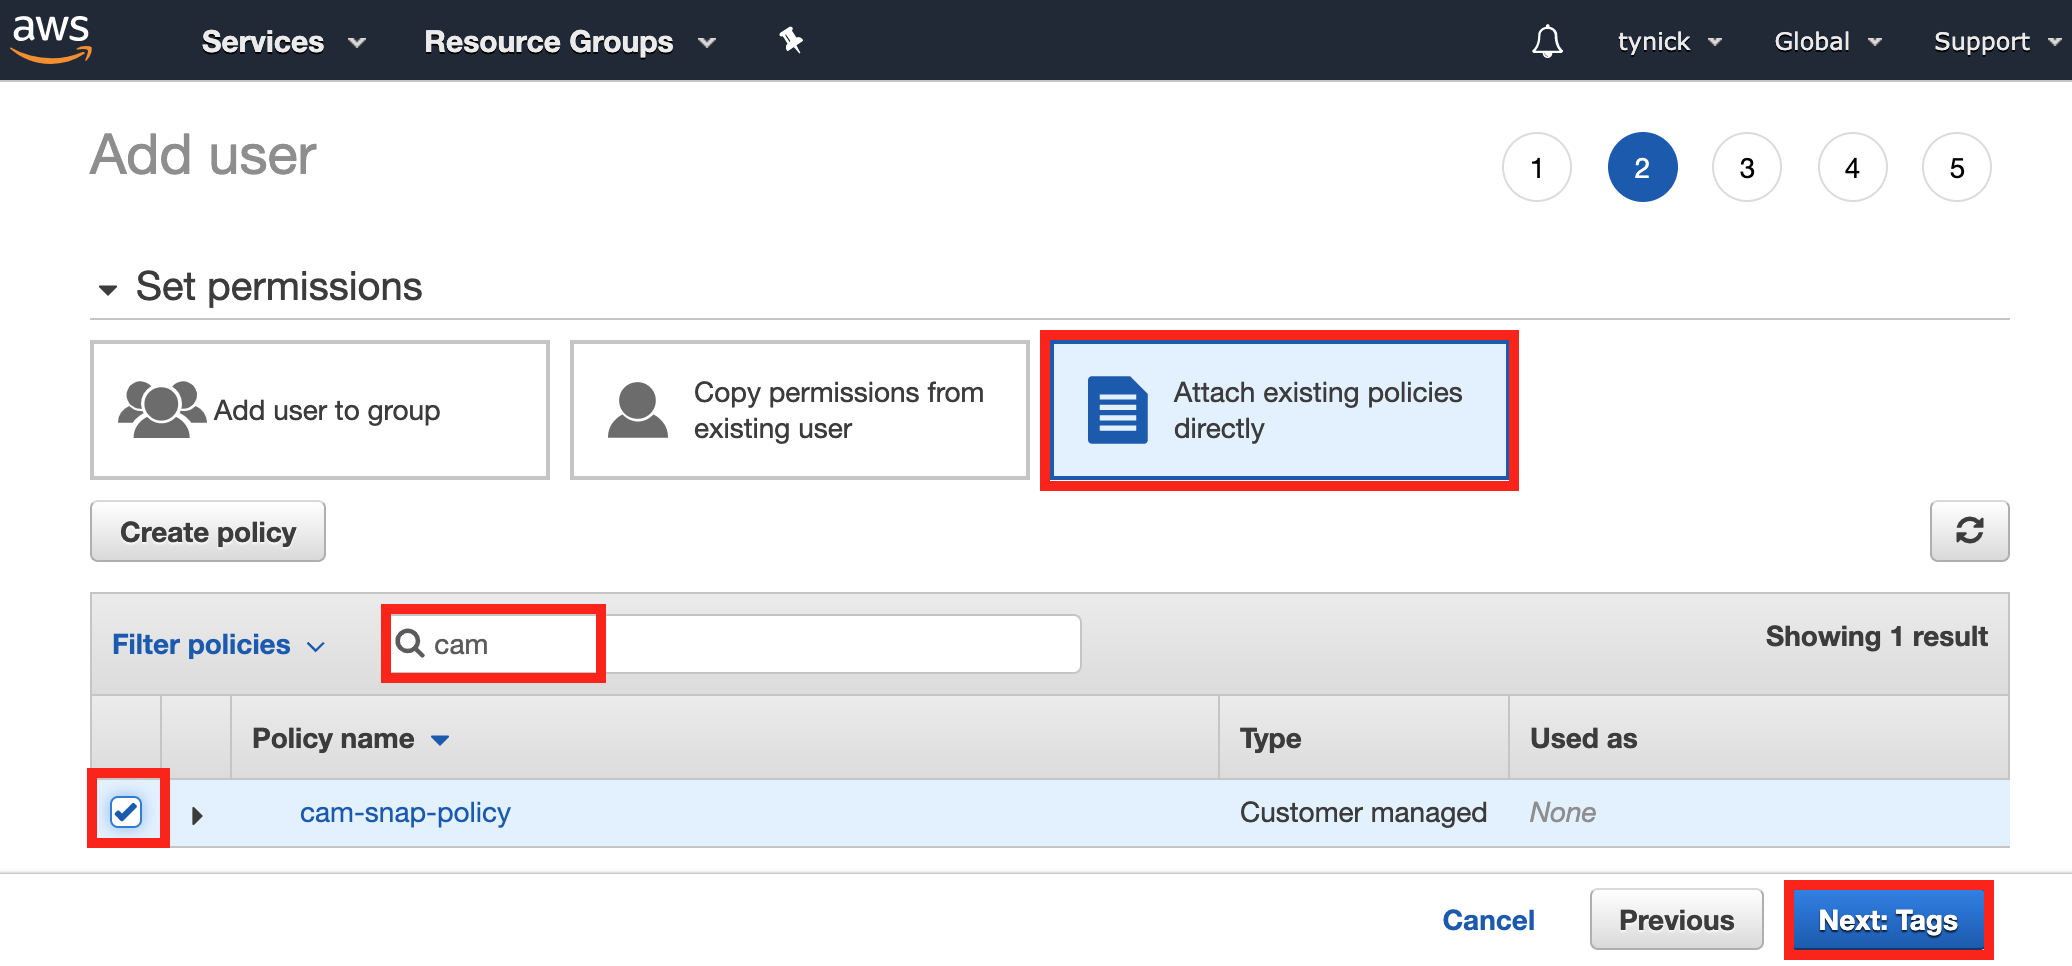
Select Attach existing policies directly.
You should see a long list of policies to select from. Almost all of these are existing policies that are automatically generated by AWS.
Use the search bar to filter out your policy. I simply typed cam and now my policy is the only one on the list.
Be sure to check the box for your policy.
Click Next: Tags when complete.
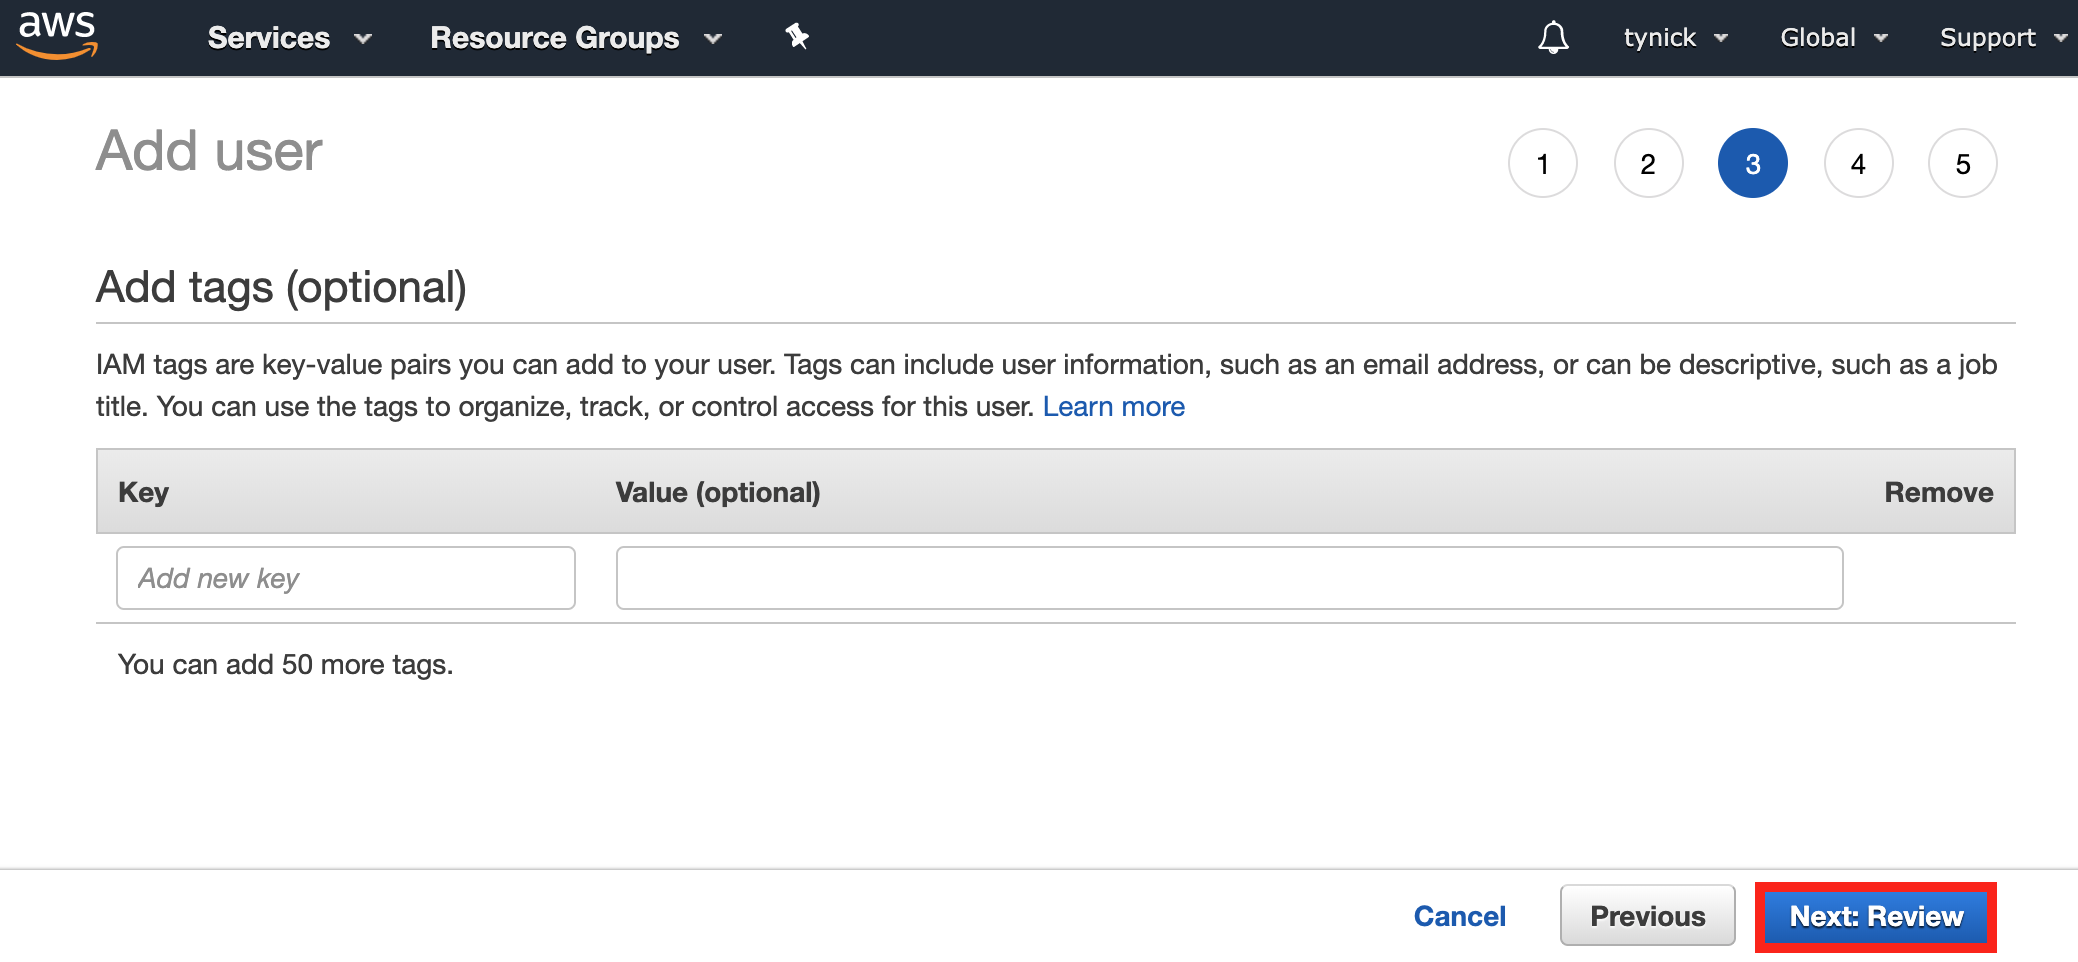
We aren’t going to use tags so you can click Next: Review to skip.
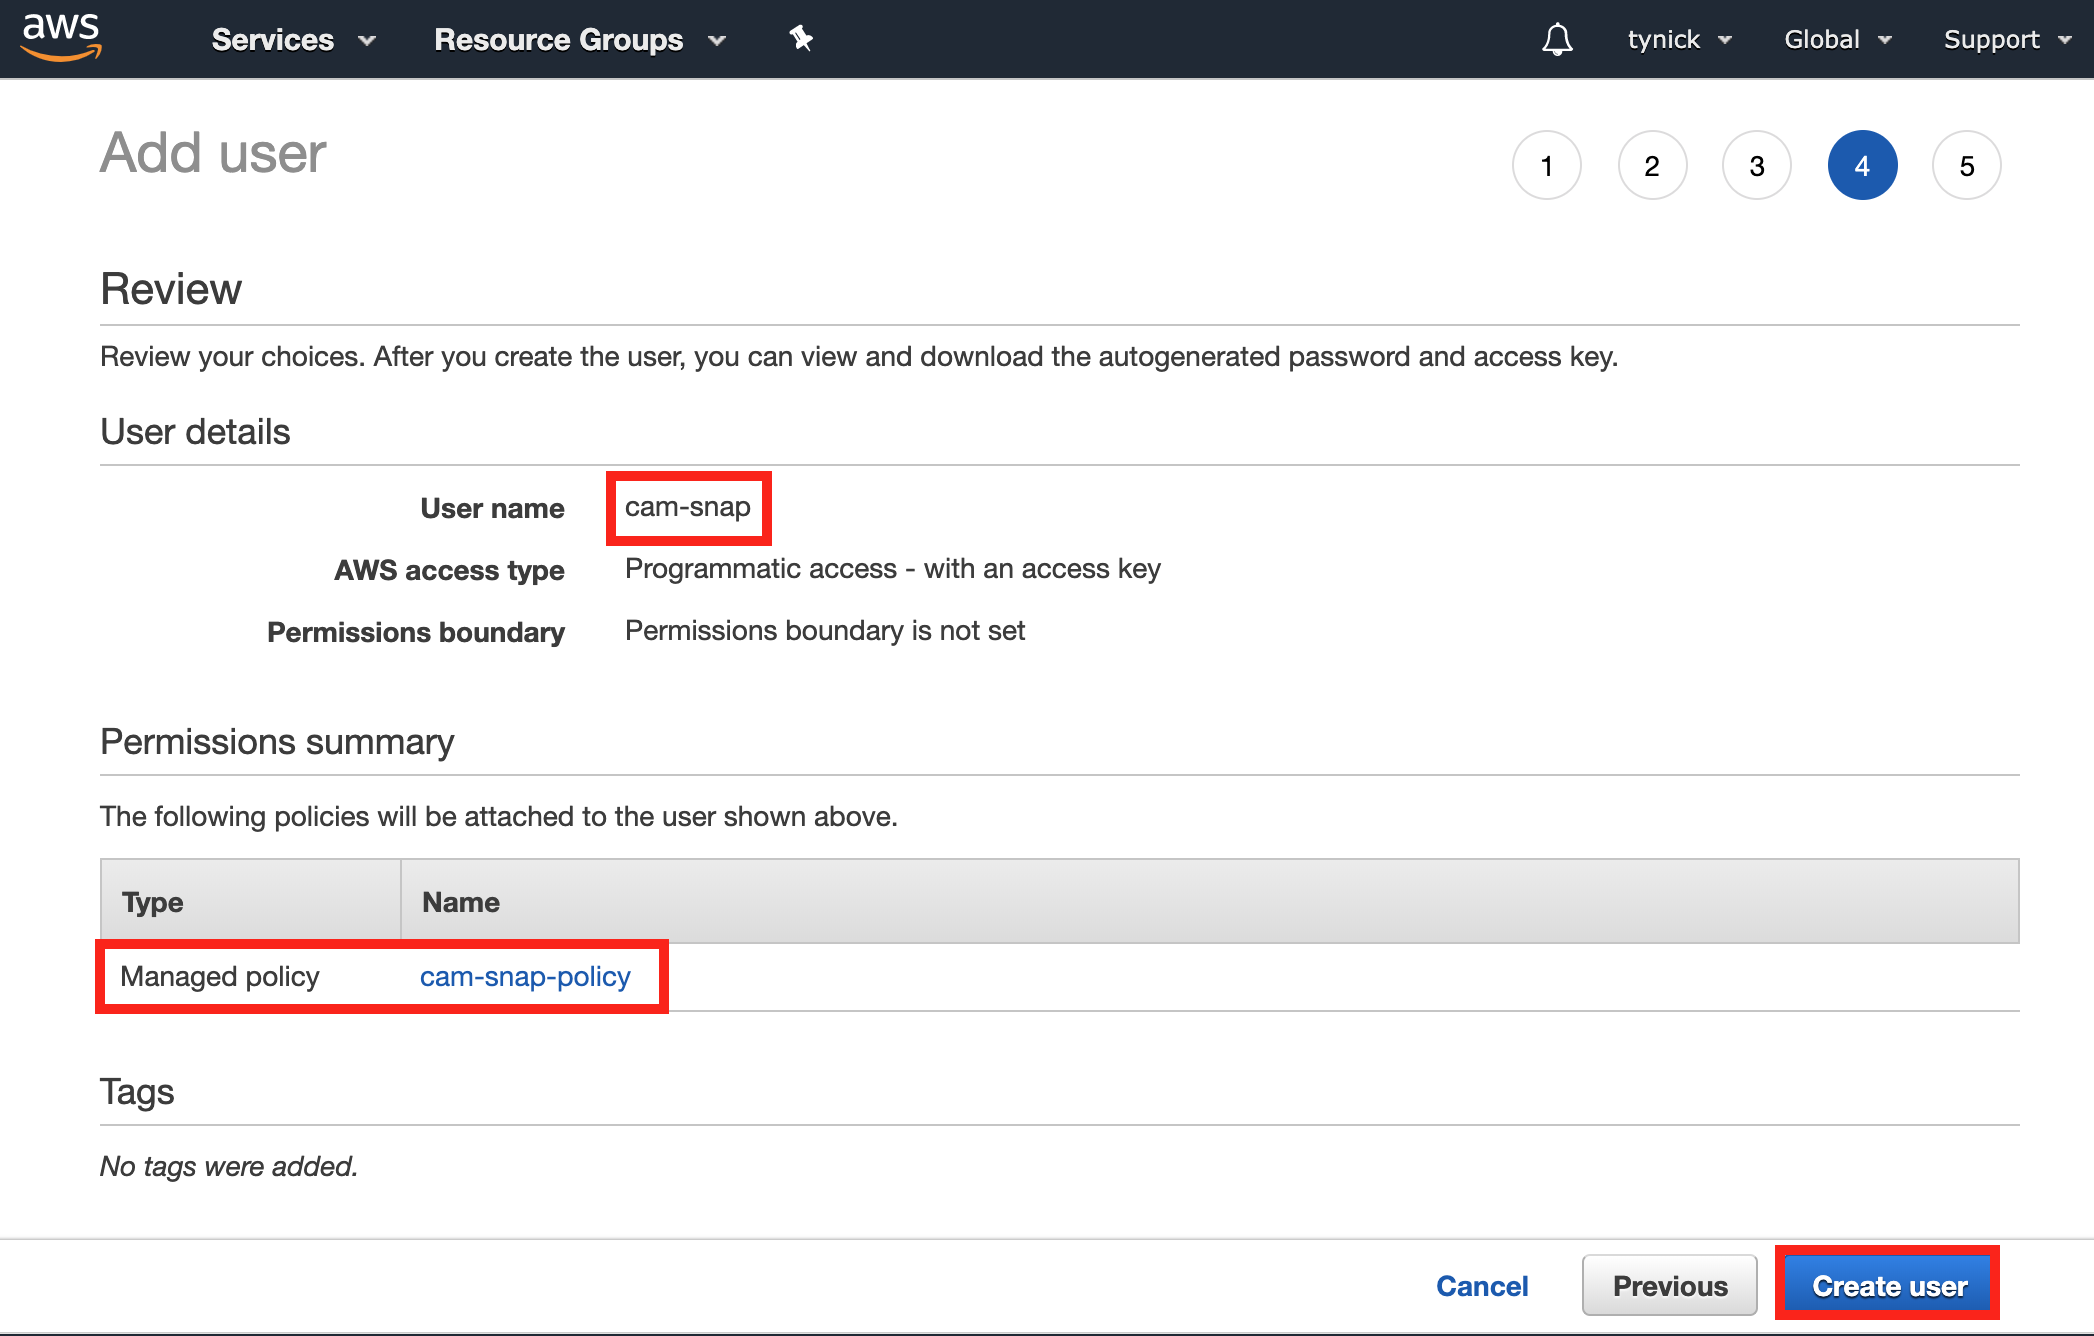
Verify your User name is correct and that you’ve attached the policy you made.
Click Create user when finished.
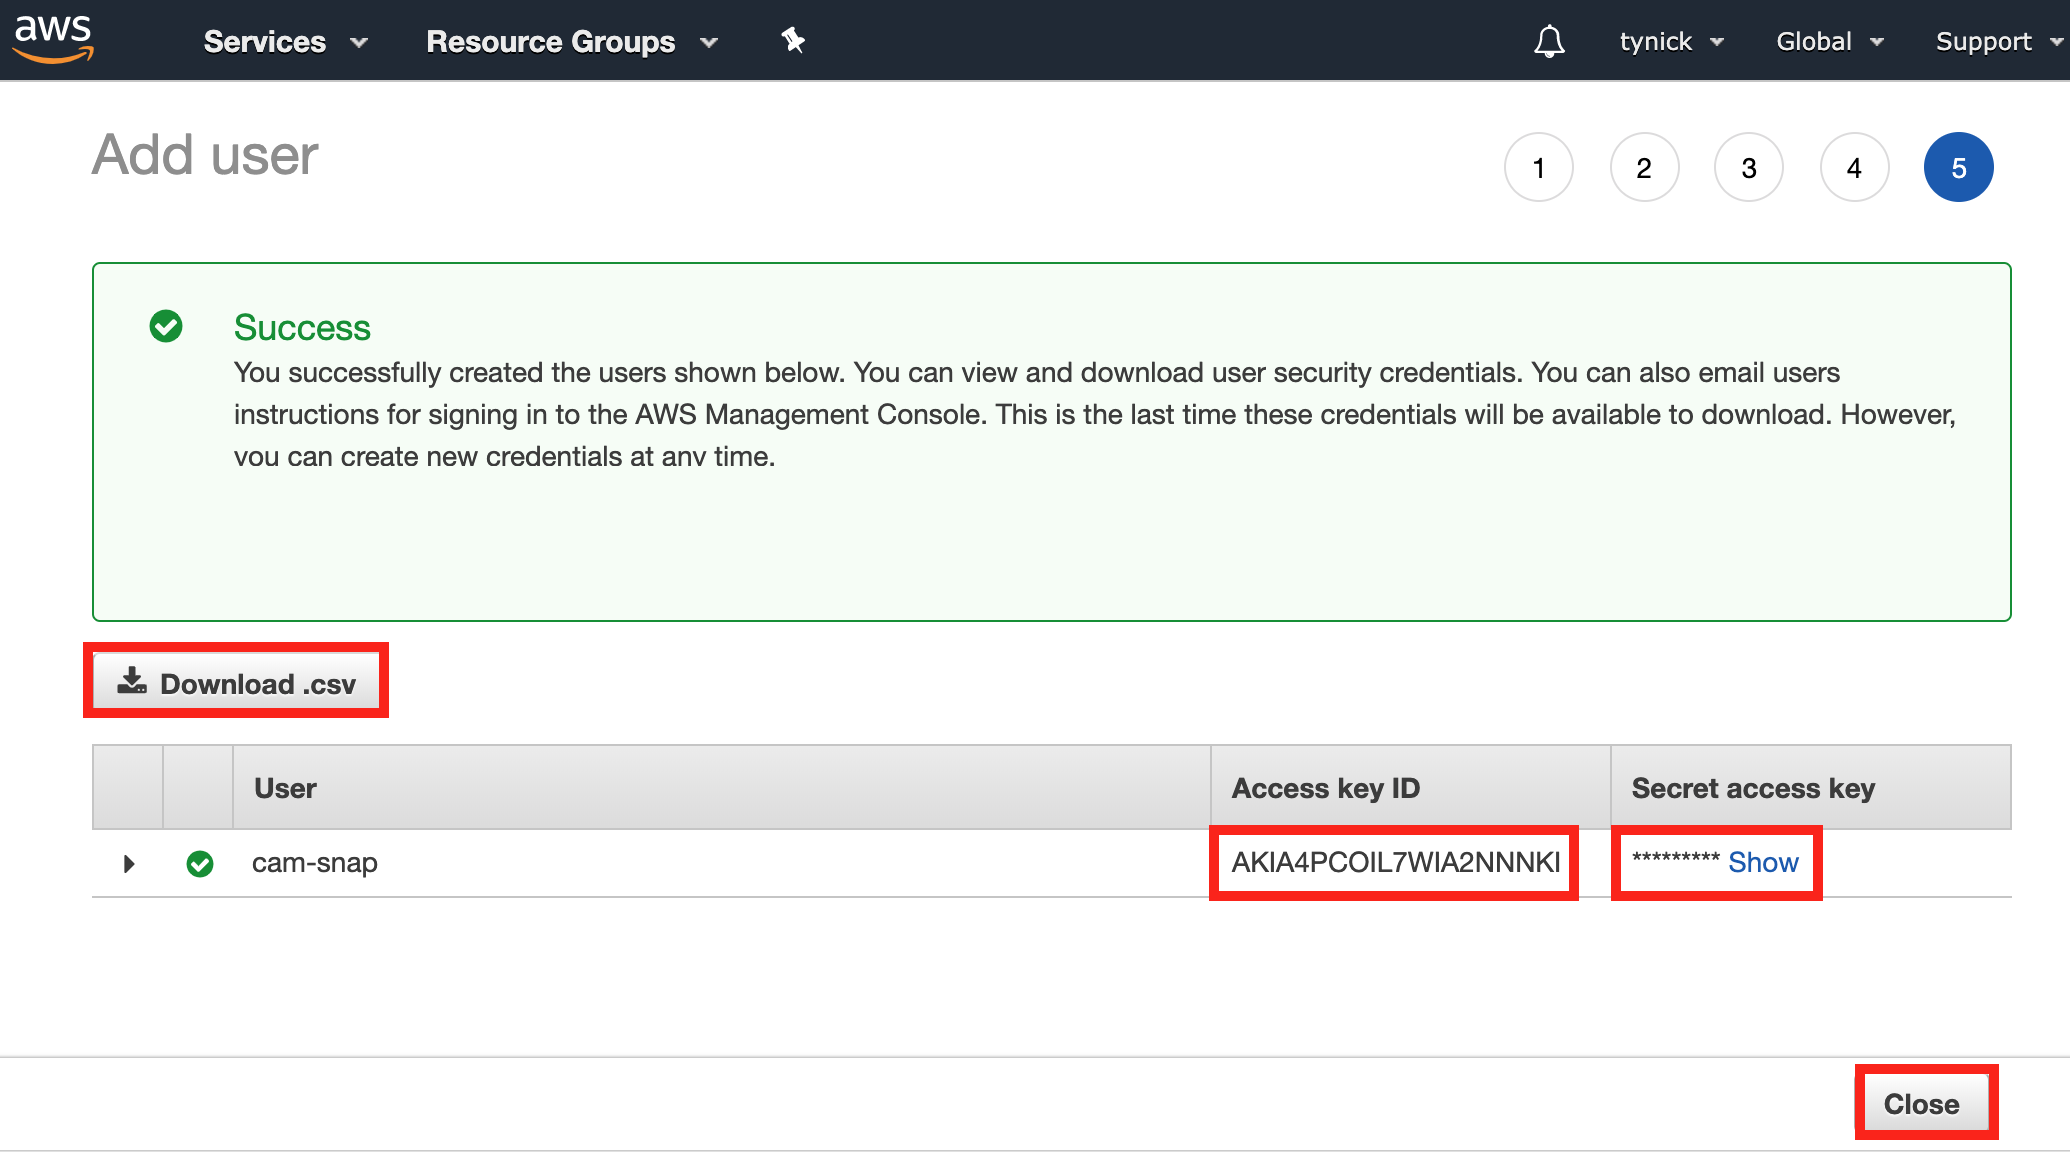
You should be taken to a screen to download your new user’s credentials.
Save the Access key ID and the Secret access key right now.
I highly suggest clicking the Download .csv button to save these for later.
Once you close this screen, you will not be able to come back to see the Secret access key and will need to generate a new one.
That’s all for the AWS Console. Let’s configure our Raspberry Pi and get everything working!
Raspberry Pi Setup
I am starting with a brand new install of Raspbian for this tutorial.
All commands will be ran by the default pi user unless I say otherwise.
Let’s start by updating out package repo and installing a few things.
sudo apt update
sudo apt install vim git python3-pip -y
Installing AWS CLI
AWS CLI is one of the dependencies in my bash script.
It allows us to talk to AWS to do things like upload our snapshots.
We are going to get AWS CLI installed and configured now.
One of the previous packages we installed was pip. We are now going to use it to install the AWS CLI package.
sudo pip3 install awscli --upgrade
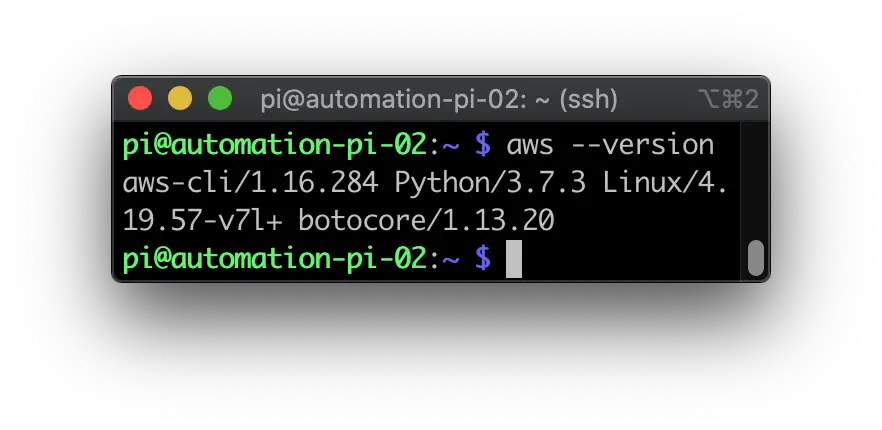
AWS CLI is now installed. You should be able to run the following command to verify that it is working.
aws --version
Configuring AWS CLI
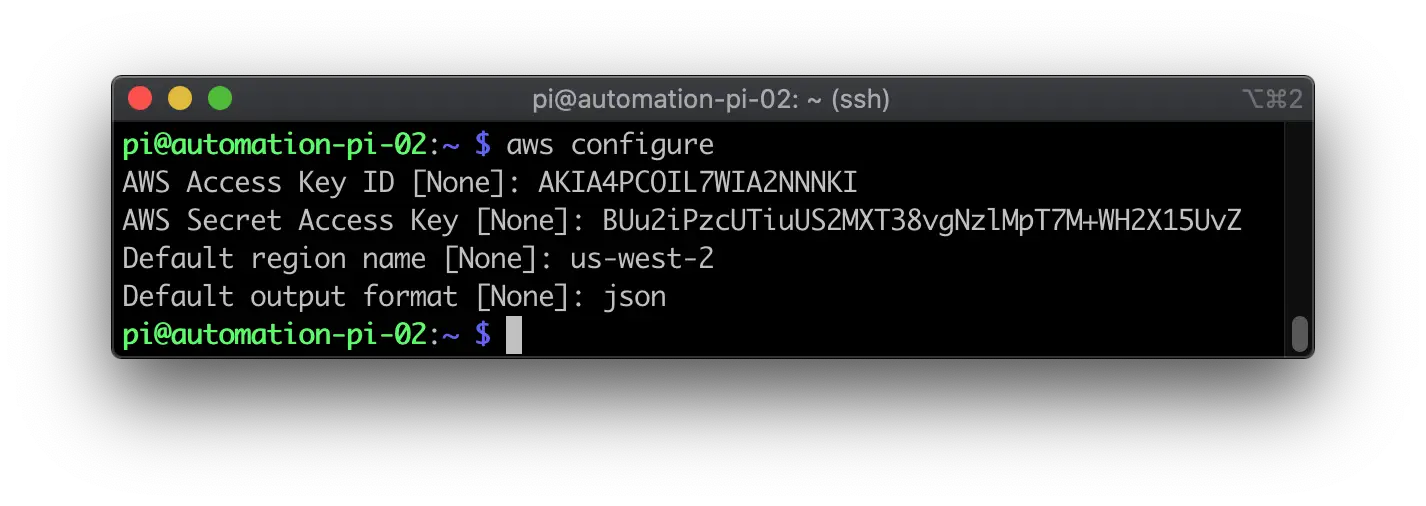
Now we need to setup AWS CLI with the user credentials we downloaded earlier. They should be in the .csv you downloaded.
Type the following command to configure AWS CLI.
aws configure
Fill out the information as you are prompted. It will look similar to my screenshot below.
For Default region name, reference the table below to get your region. If you are outside of the US, please reference this page to get your region..
| Region Name | Region |
|---|---|
| US East (N. Virginia) | us-east-1 |
| US East (Ohio) | us-east-2 |
| US West (N. California) | us-west-1 |
| US West (Oregon) | us-west-2 |
For example, I put my bucket in US West (Oregon), so the Default region name I used is us-west-2.
AWS CLI is now installed and configured with your new credentials. Nice work.
Configuring The Script
Now it’s time to actually get the code and set it up with everything we previously did.
Run the following command to pull the code from my GitHub repository.
git clone https://github.com/tynick/blue_iris_snapshotter.git
Change to the newly downloaded directory with the following command.
cd blue_iris_snapshotter
Open the snap.sh file and edit the following blocks of code with the information we have gathered throughout this tutorial.
Be sure not to miss anything or this script will most likely not work.
Edit the Blue Iris variables to reflect your user, password and IP. The port should be the default of 81 unless you’ve changed it.
# blue iris variables
bi_user='snapshot'
bi_password='password'
bi_ip='192.168.1.51'
bi_port='81'
Here you can change things like Slack channel and emoji. Be sure to paste the Slack webhook URL you saved earlier.
# slack variables
slack_username=$(hostname)
slack_channel='cam-snaps'
slack_emoji="🎦"
slack_webhook='https://hooks.slack.com/services/x/x/x'
We just need the name of your newly created AWS S3 bucket here.
# aws variables
bucketname='cam-snaps'
Once you finish, you can close this file.
Now we will move onto the snap_wrap.sh file.
It’s a pretty short bash script. Its only job is to run the snap.sh script and tell it what cameras to take snapshots from.
Open snap_wrap.sh and edit the file to reflect the short names of the cameras you want a snapshot from.
# run for each camera you want a snapshot of
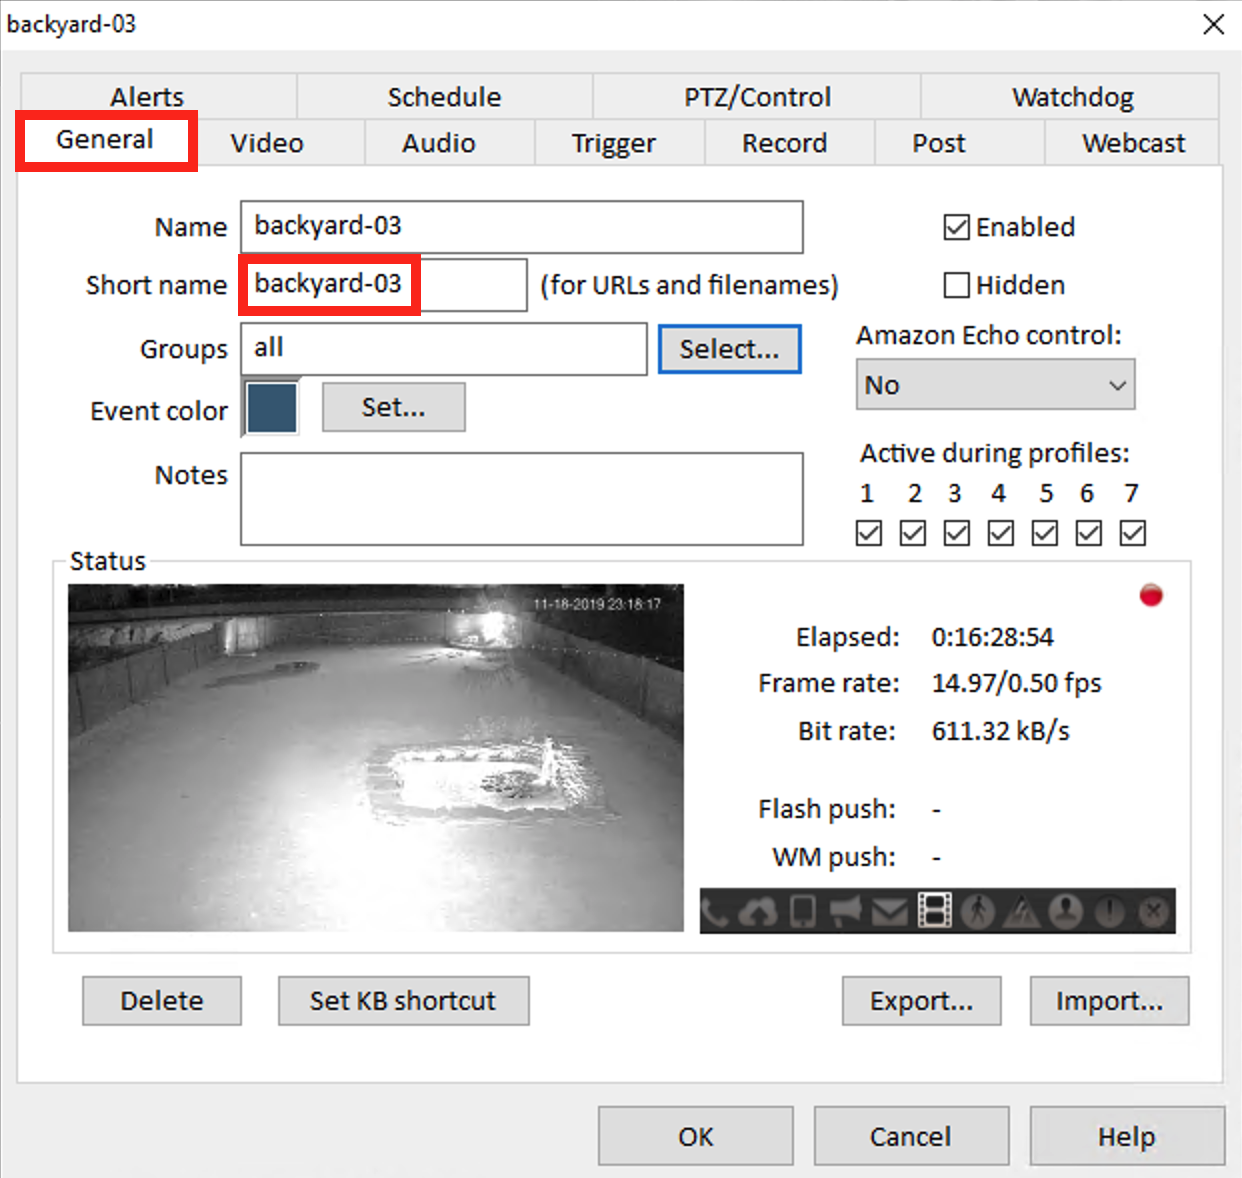
"${my_dir}"/cam_snap.sh backyard-03
"${my_dir}"/cam_snap.sh backpatio-01
If you don’t know your camera short names, you can get by right clicking on the camera feed and selecting Camera properties... in Blue Iris.
Get the short name for each camera you’d like to take snapshots of.
You can close snap_wrap.sh once you’ve added all of your camera short names.
Make sure you are in the blue_iris_snapshotter directory and run the following command to run the script.
./snap_wrap.sh
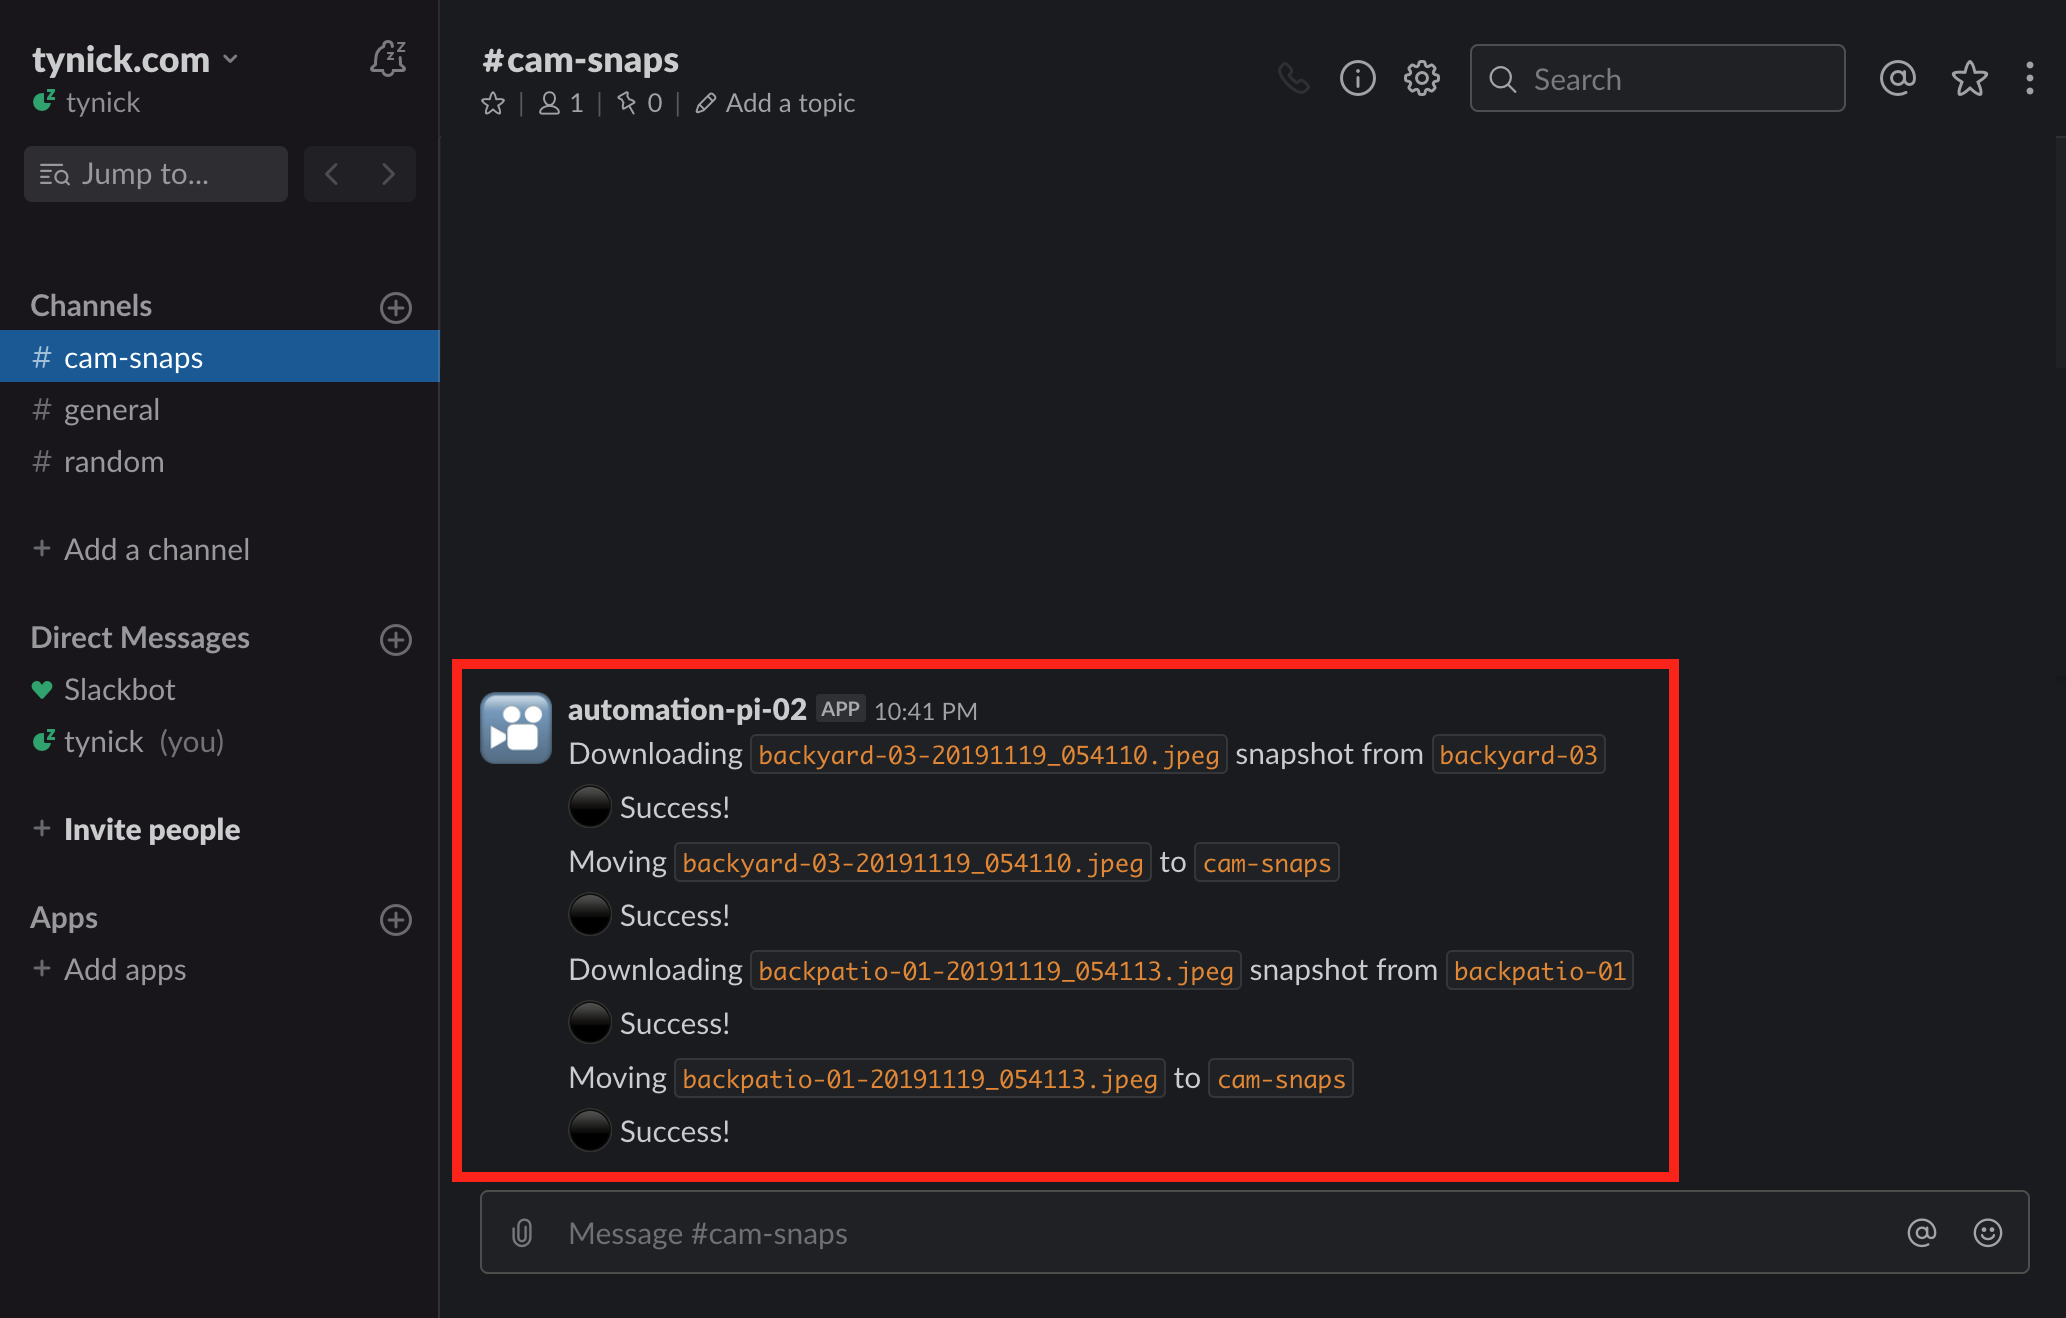
Open up your Slack channel now.
If all went well, you should see something similar to my screenshot.
You can go back to AWS S3 to verify your files to verify your files are in the bucket. There should be a separate directory for each camera.
The only thing left to do is setup the script to run automatically.
Configuring cron
We are now going to setup what is called a cronjob.
If you aren’t familiar, cron is used to schedule jobs. In our case, it will run snap_wrap.sh at the same time everyday.
Run the following command to open the crontab editor.
crontab -e
Paste this line at the bottom of the file.
0 13 * * * /home/pi/blue_iris_snapshotter/snap_wrap.sh
That line tells cron to run snap_wrap.sh at 1:00pm every single day.
You can use crontab guru to check your cronjobs to see how frequently they will run. Paste 0 13 * * * in there to verify.
Celebrate
Congratulations! You successfully configured AWS IAM, AWS S3, Blue Iris and a Slack Webhook.
I know this was a pretty long tutorial. If you aren’t familiar with all of these technologies it might have been pretty daunting.
If you are having trouble, go back in the tutorial and make sure you did everything as I did. I followed this tutorial myself after I made it to verify everything worked as expected.
It’s still entirely possible that I screwed something up. So get ahold of me on Twitter after you’ve double checked everything.
Hope you had fun and learned a few things.
Checkout my PoE Powered Raspberry Pi homelab if you want to see where all of this runs.
Subscribe to my mailing list below to be notified when I make a new post or follow me on Twitter.