How to Create S3 Static Website With HTTPS (It's so easy)
Today we are going to run through the steps to get a static website running on AWS. We will use the following AWS services to get this task done.
Click this Amazon Web Services(AWS) link. It will take you to sign up for a free 12 month trial. This includes almost all of their services.
The AWS Free Tier includes 5 GB of Standard Storage, 20,000 Get Requests and 2,000 Put Requests for AWS S3. AWS CloudFront gives you 50 GB of Data Transfer Out and 2,000,000 HTTP or HTTPS Requests in the free tier.
If you are just starting out, it’s unlikely your website will have enough traffic to cost you much of anything for a while under the AWS Free Tier.
For this tutorial, you will need to purchase a domain name. A .com will probably cost you $12.
#1 Buying A Domain Name
First you will need to buy a domain name. We are deploying our site with AWS so we will use Amazon Route 53 as our registrar just to keep everything in the same ecosystem.
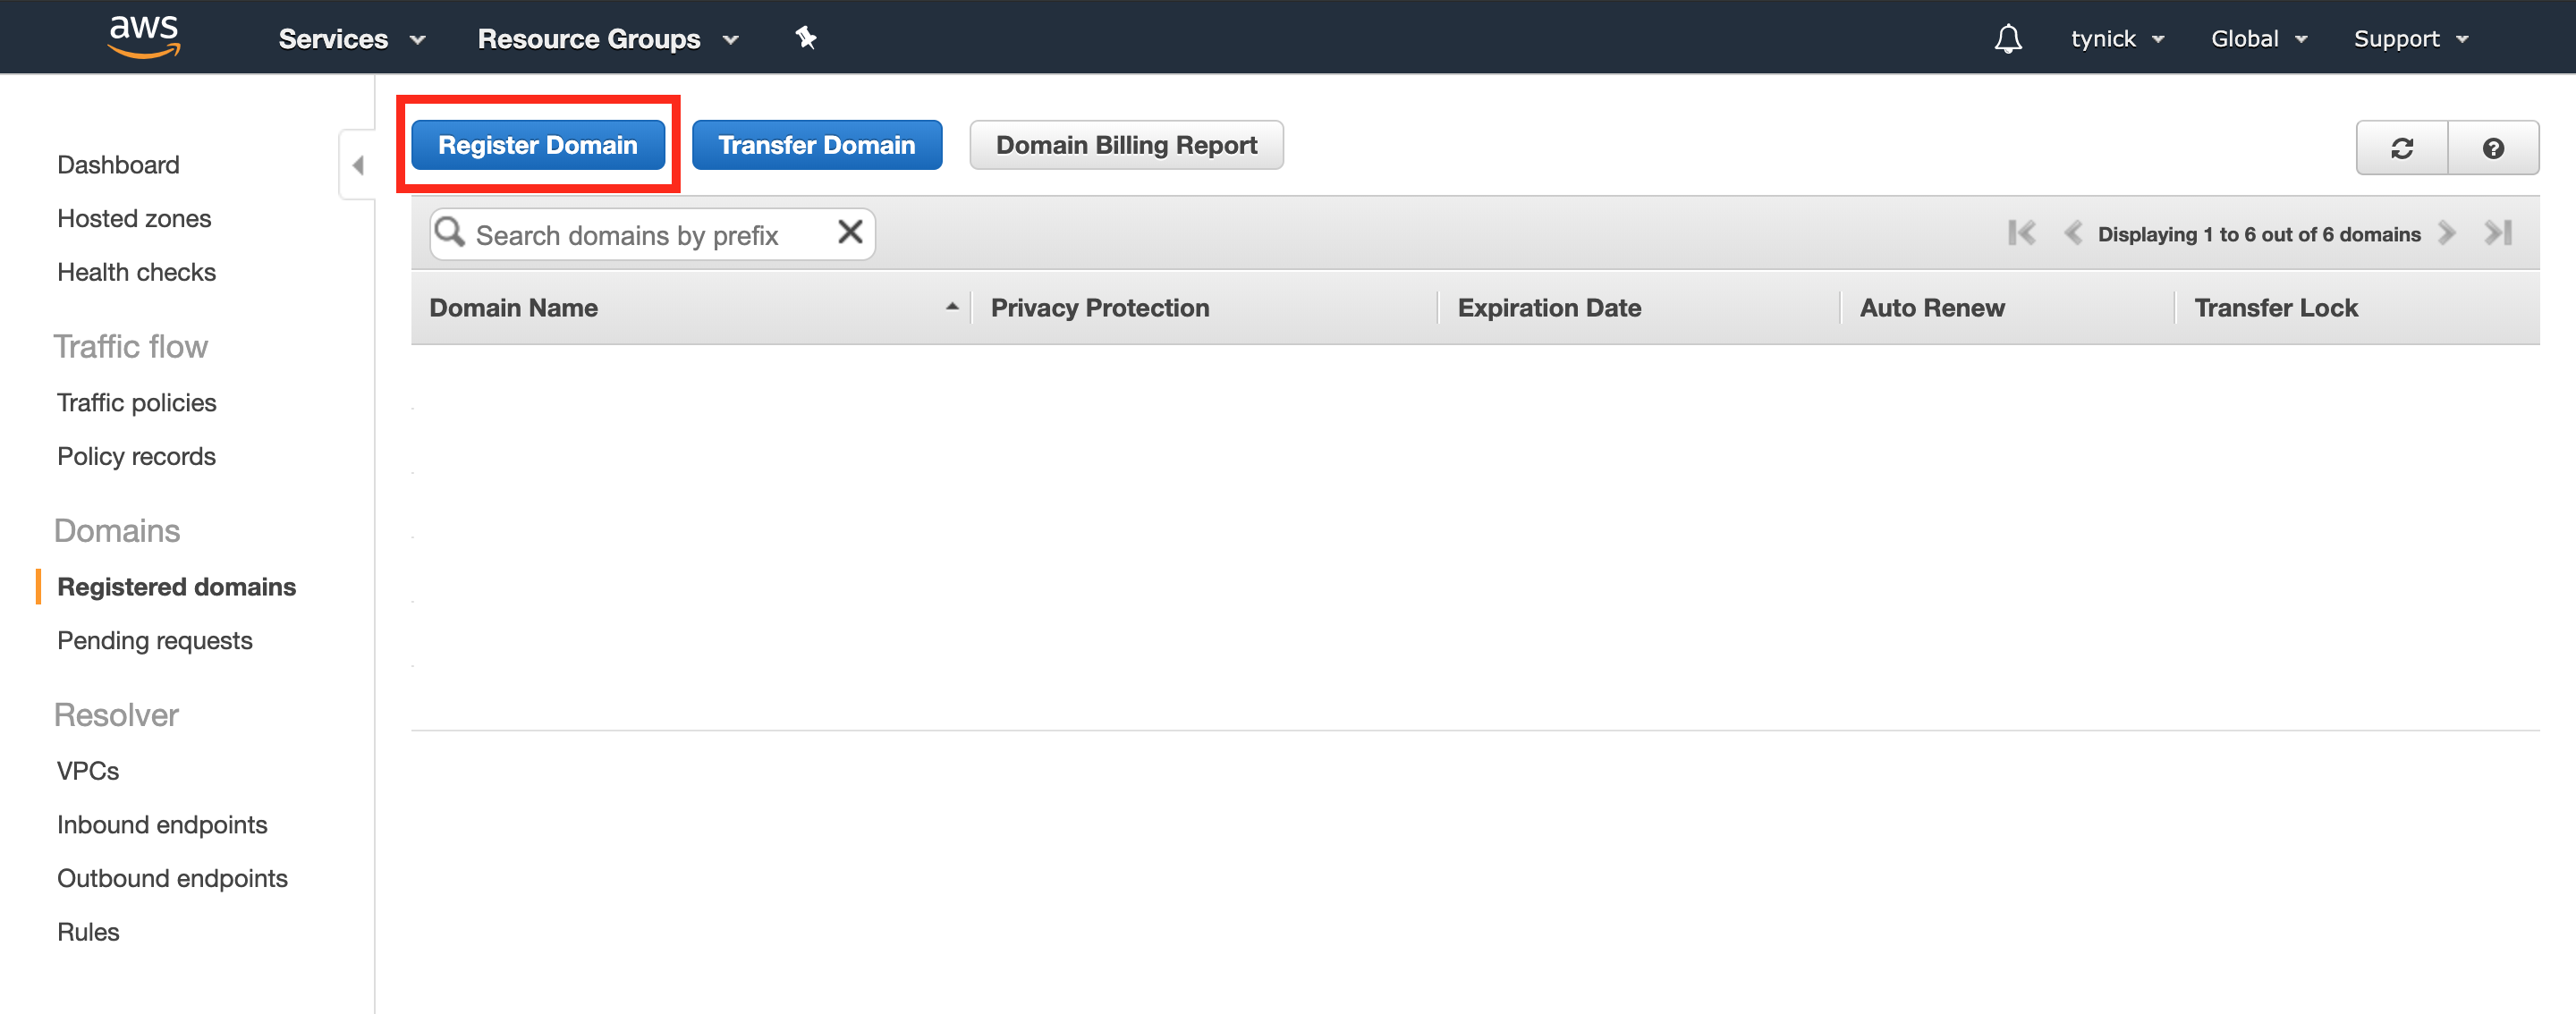
Click “Register Domain”. Find an available domain name that you like and add it to your cart.
You will now be prompted to enter all of your contact information.
Be sure to check the radio button at the bottom of this page to enable “Privacy Protection”. This will hide your contact information from anyone doing a domain name lookup. Run whois tynick.com on the command line if you want to see what that looks like. Just know that if you don’t check this radio button, you will receive a lot more spam than you usually do.

Click “Continue” at the bottom of that page.
On the next page you will…
- Verify that all of your contact information is correct.
- Decide if you want to setup automatic renewal of your domain name.
- Agree to terms and conditions.
Click “Complete Purchase” when you have done all of that.
Assuming you did everything correctly, you now own a domain name.
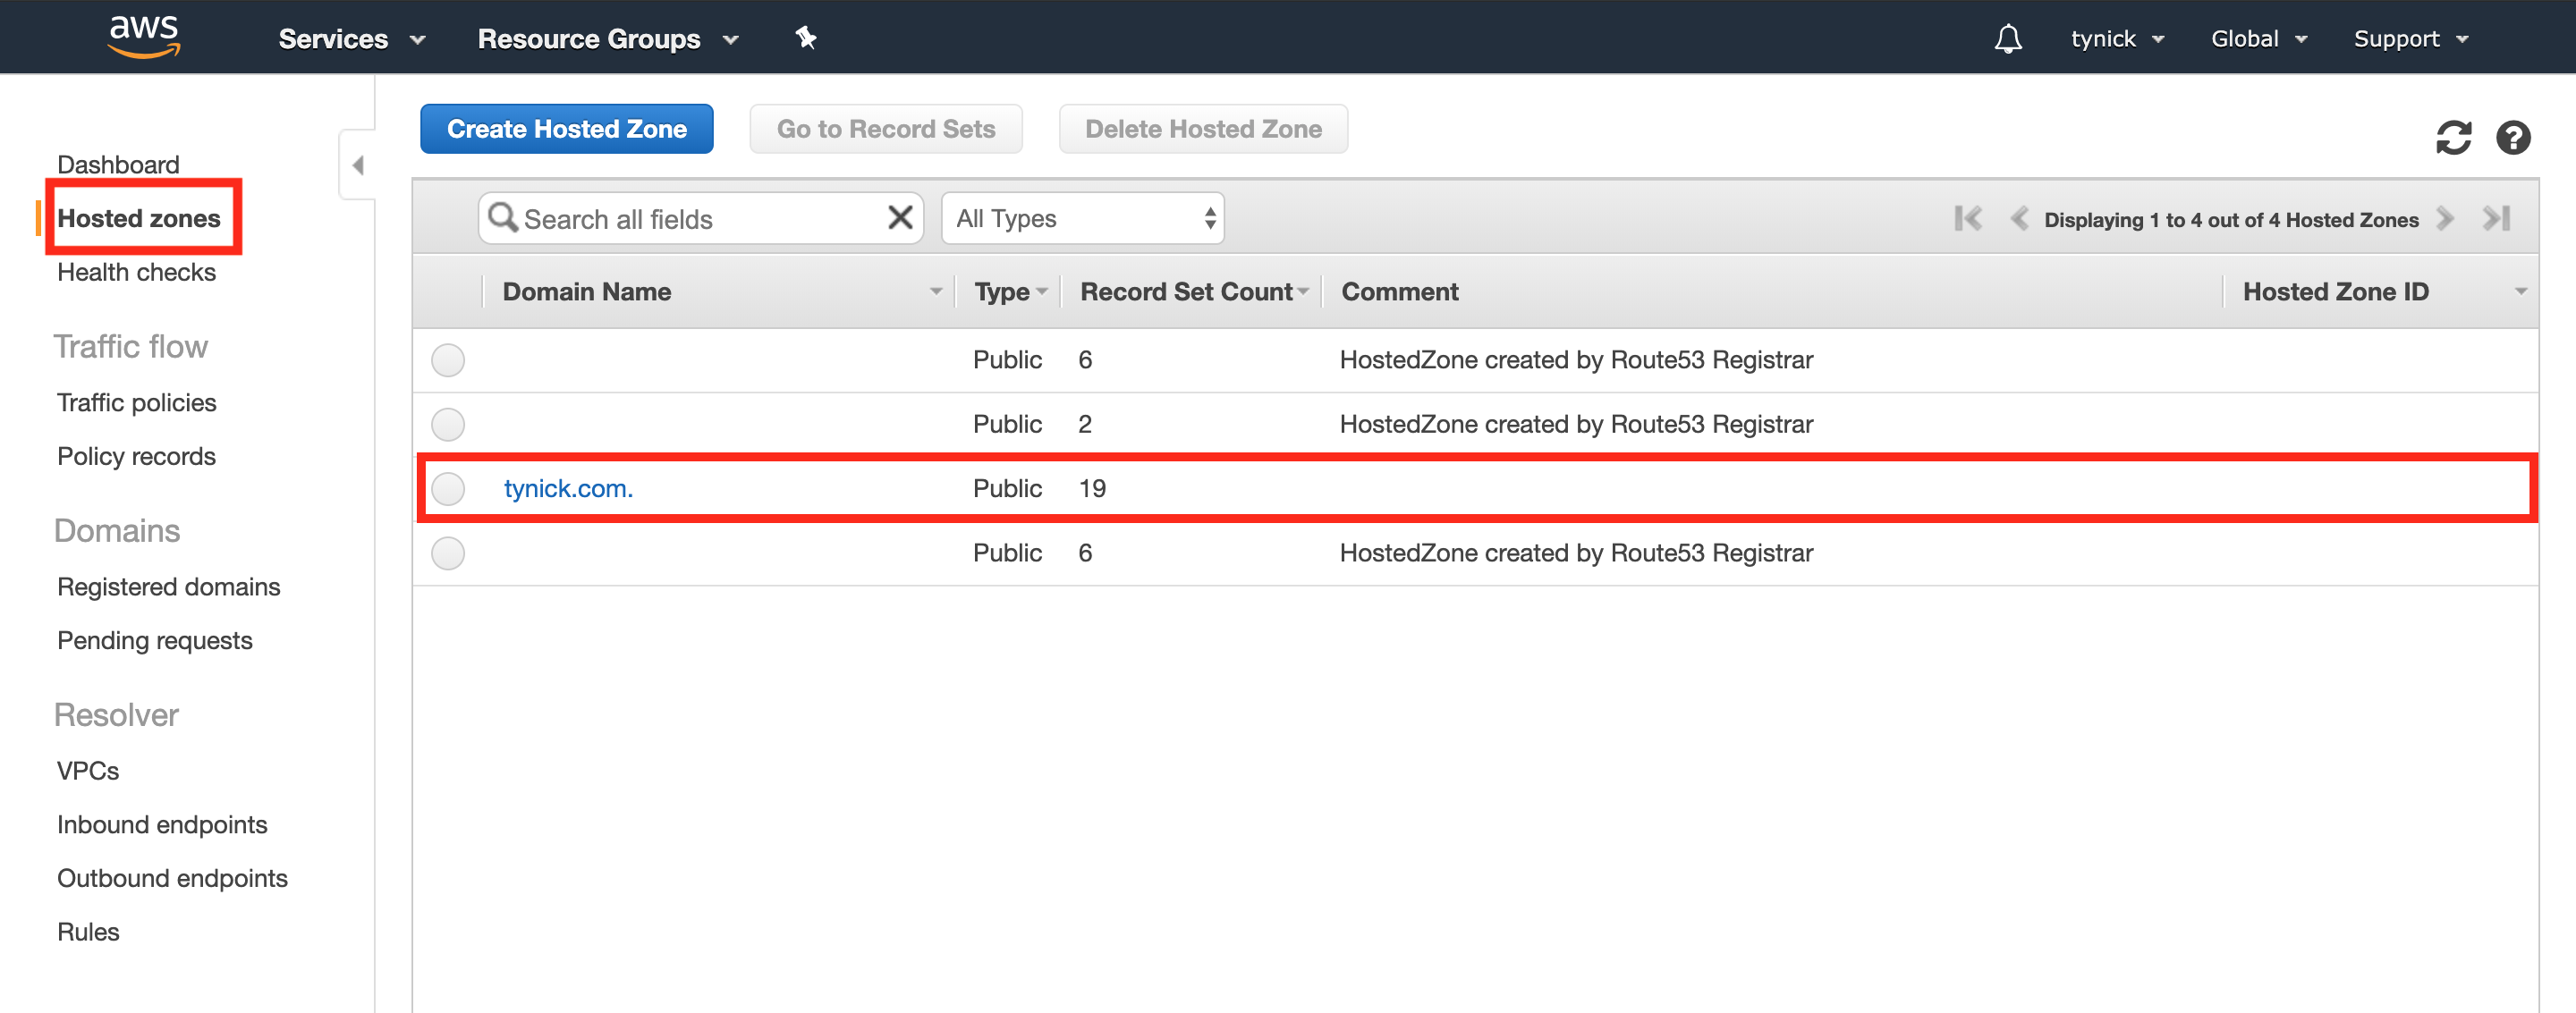
After a bit you should be able to go into “Hosted Zones” on the left side menu of Route 53 and see your new domain name. This is where the DNS records for your domain name are kept. We will get back to those later. For now just verify that you did purchase the domain name and it is showing as a hosted zone.
#2 Request A Certificate
Now that we have our domain name and we are able to create DNS records for it, we can request our certificate for CloudFront. This will allow us to serve traffic over HTTPS.
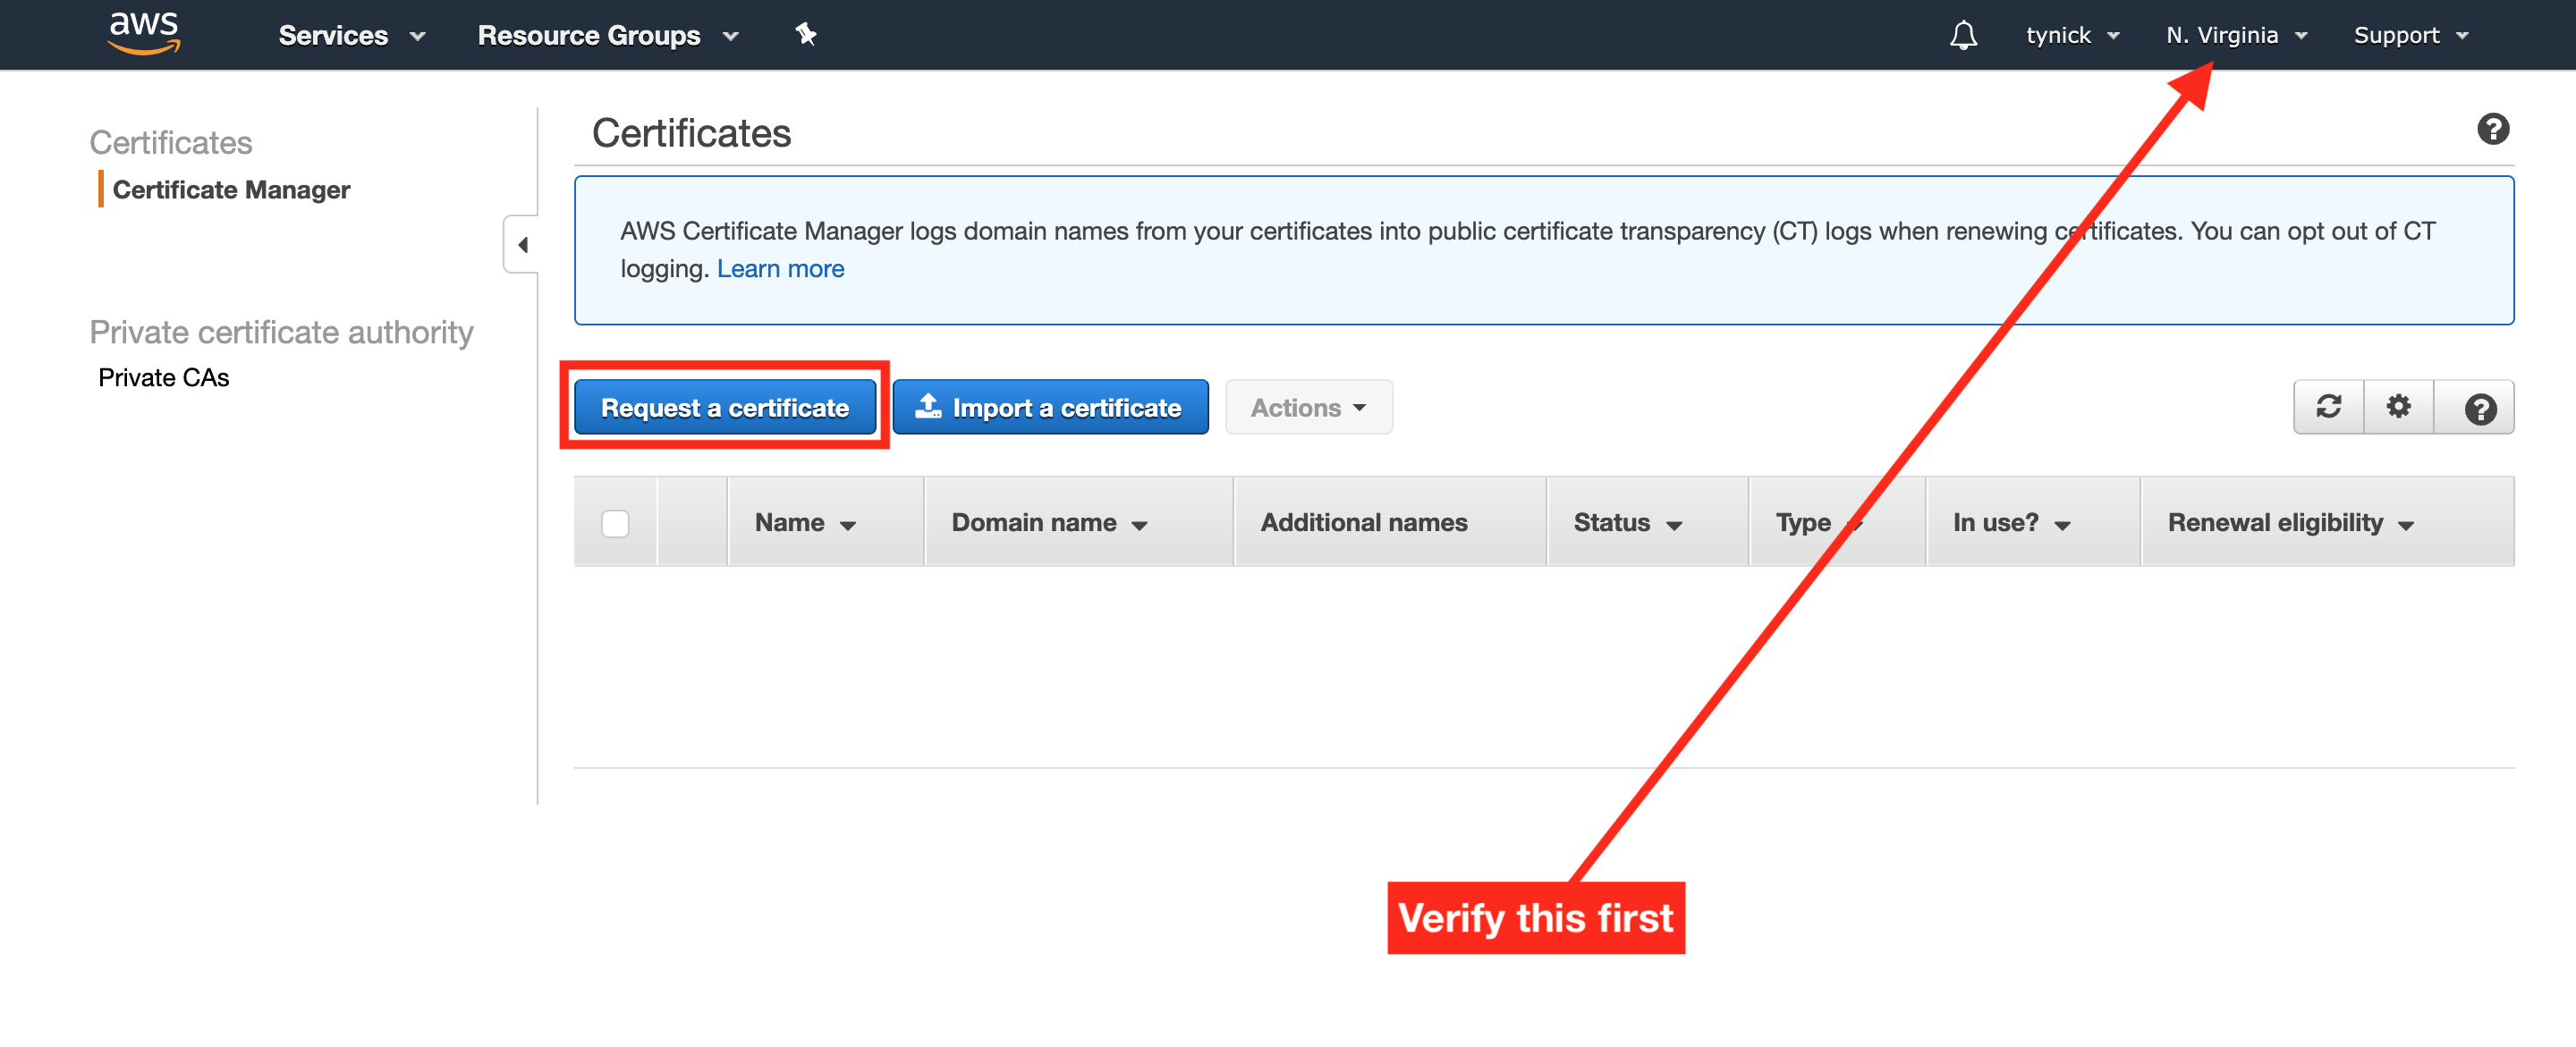
You can now head over to the Certificate Manager service within AWS.
I want to note that you must be in the us-east-1(N. Virginia) region for this. ACM Supported Regions
To use an ACM Certificate with Amazon CloudFront, you must request or import the certificate in the US East (N. Virginia) region. ACM Certificates in this region that are associated with a CloudFront distribution are distributed to all the geographic locations configured for that distribution.
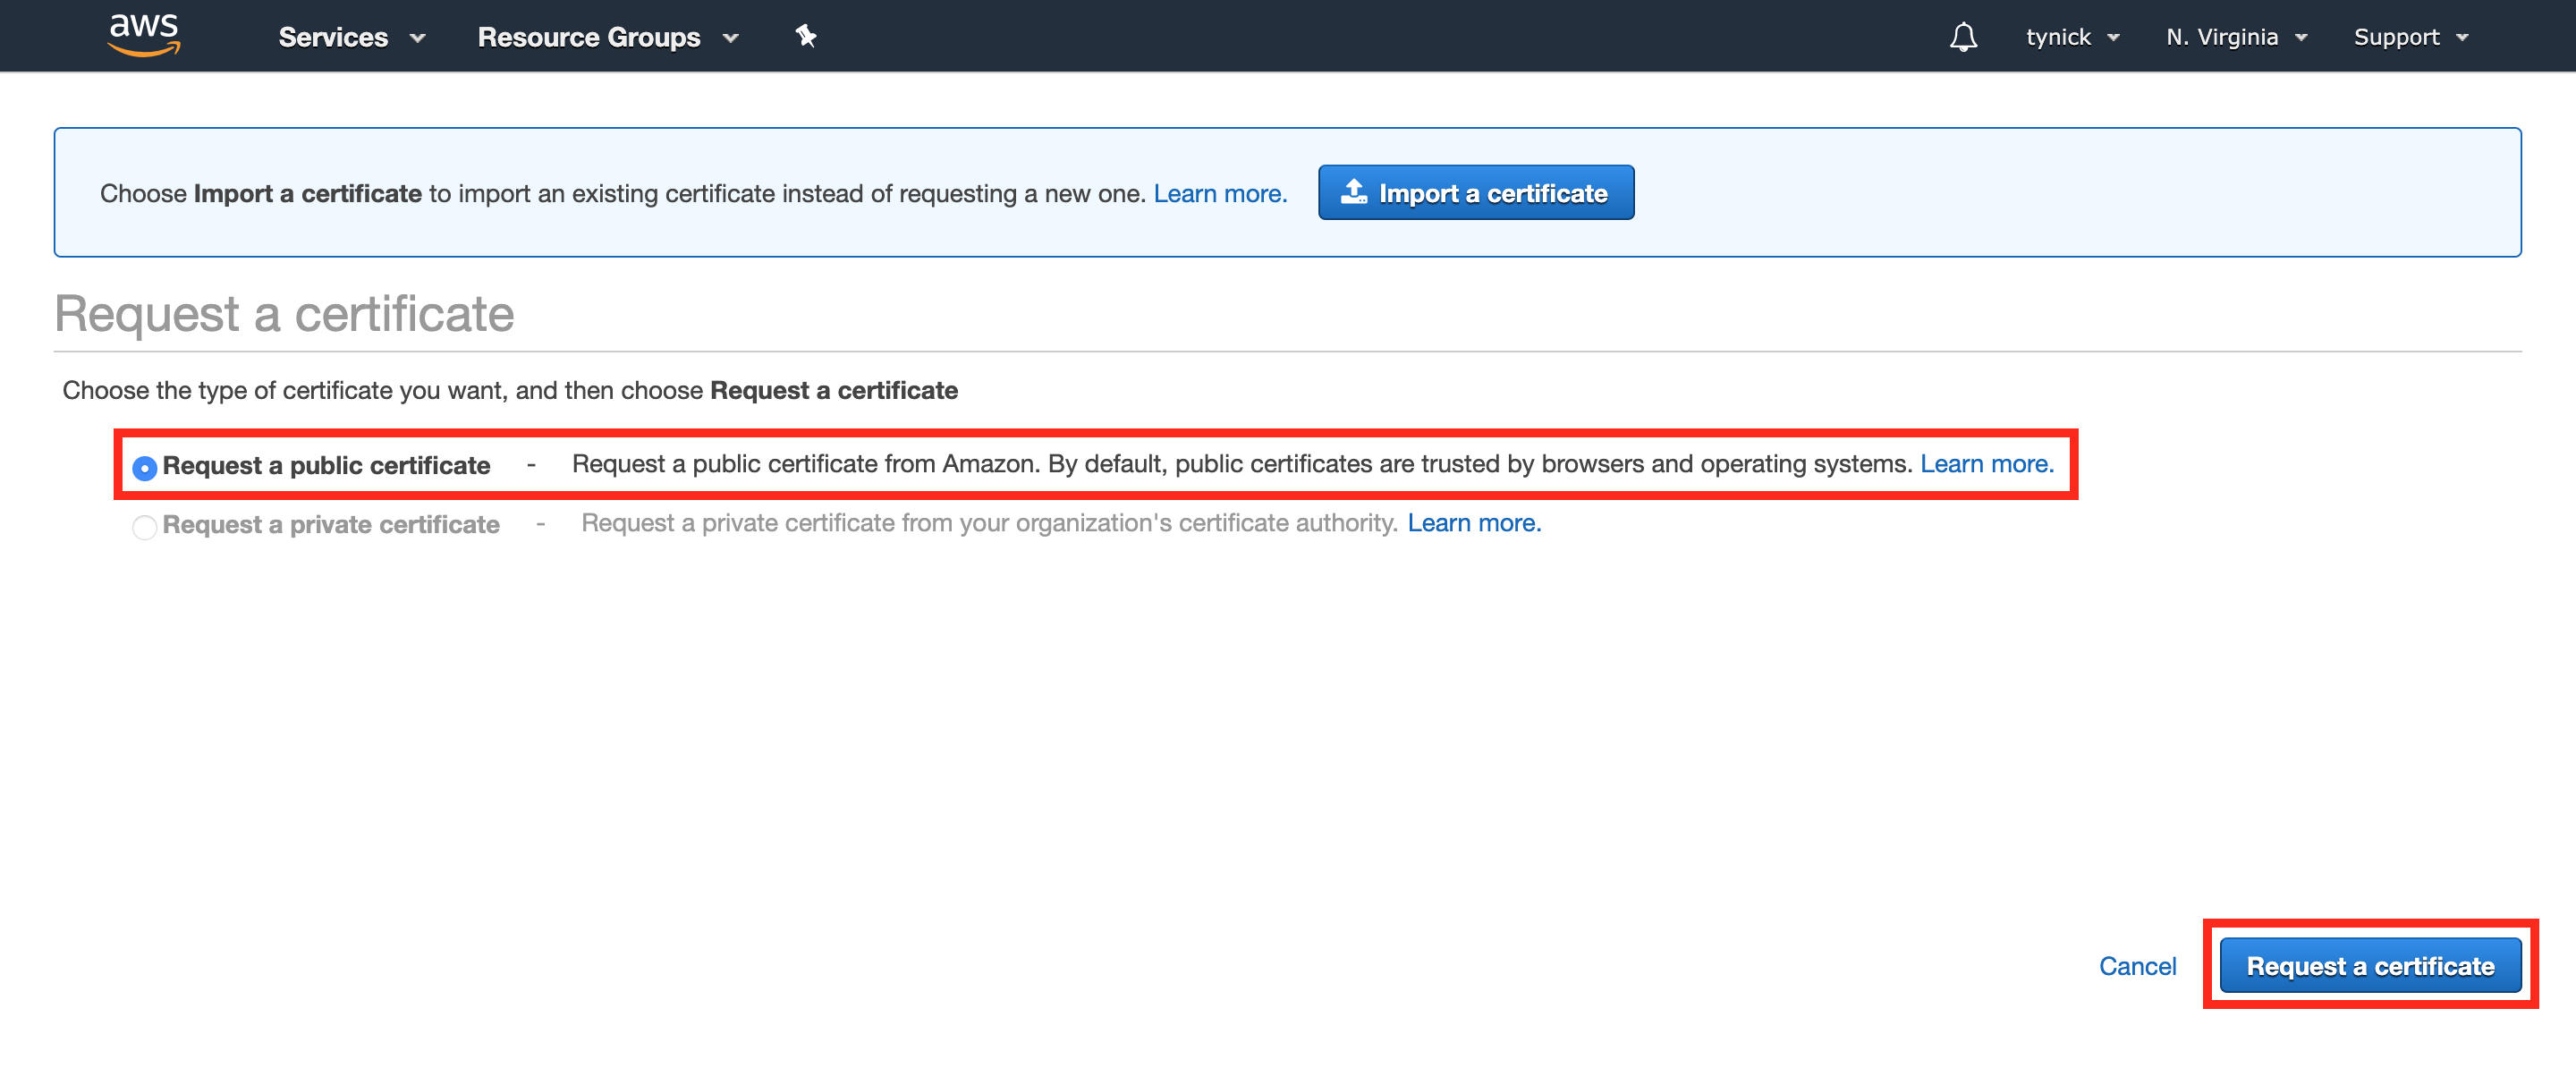
Once you are in the Certificate Manager service and have verified you are in the US East (N. Virginia) region, click “Request a certificate”.
Now verify that the “Request a public certificate” radio button is checked and then click “Request a certificate” again.
Now we need to decide what address will be used to access this site. The certificate for tynick.com covers tynick.com as well as www.tynick.com. Certificate Manager needs to know about all of the FQDNs(Fully Qualified Domain Name) that you plan to secure with the public certificate you are requesting.
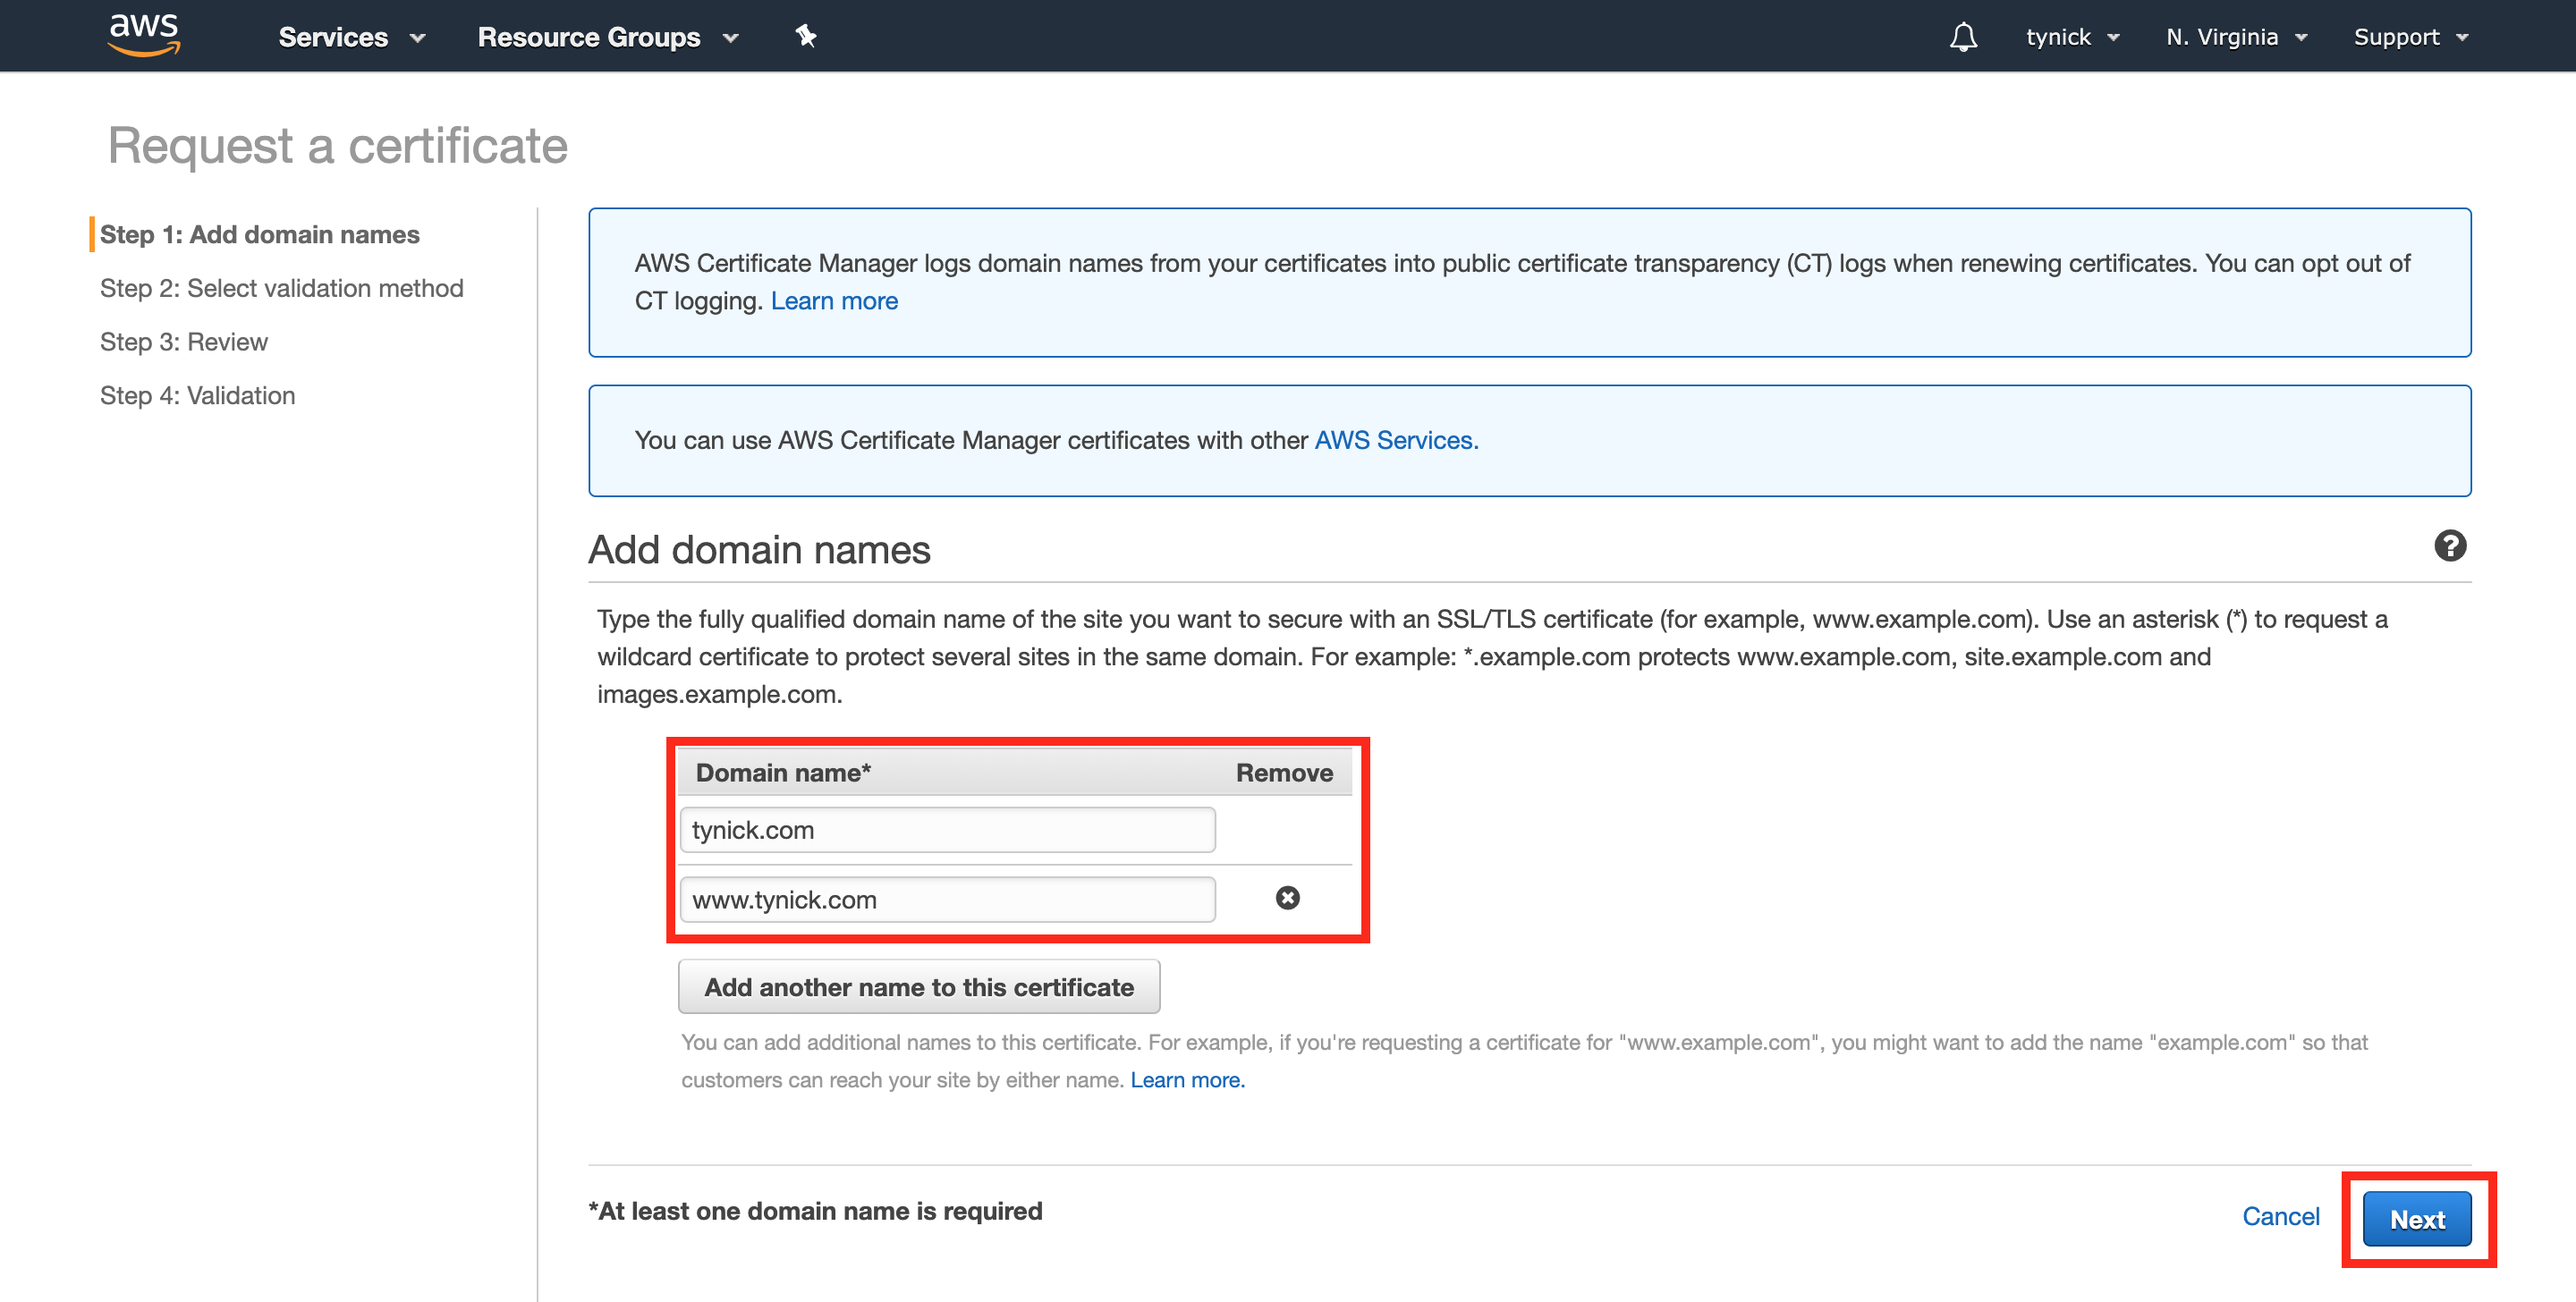
Click “Next” after you are finished adding all FQDNs to the public certificate request.
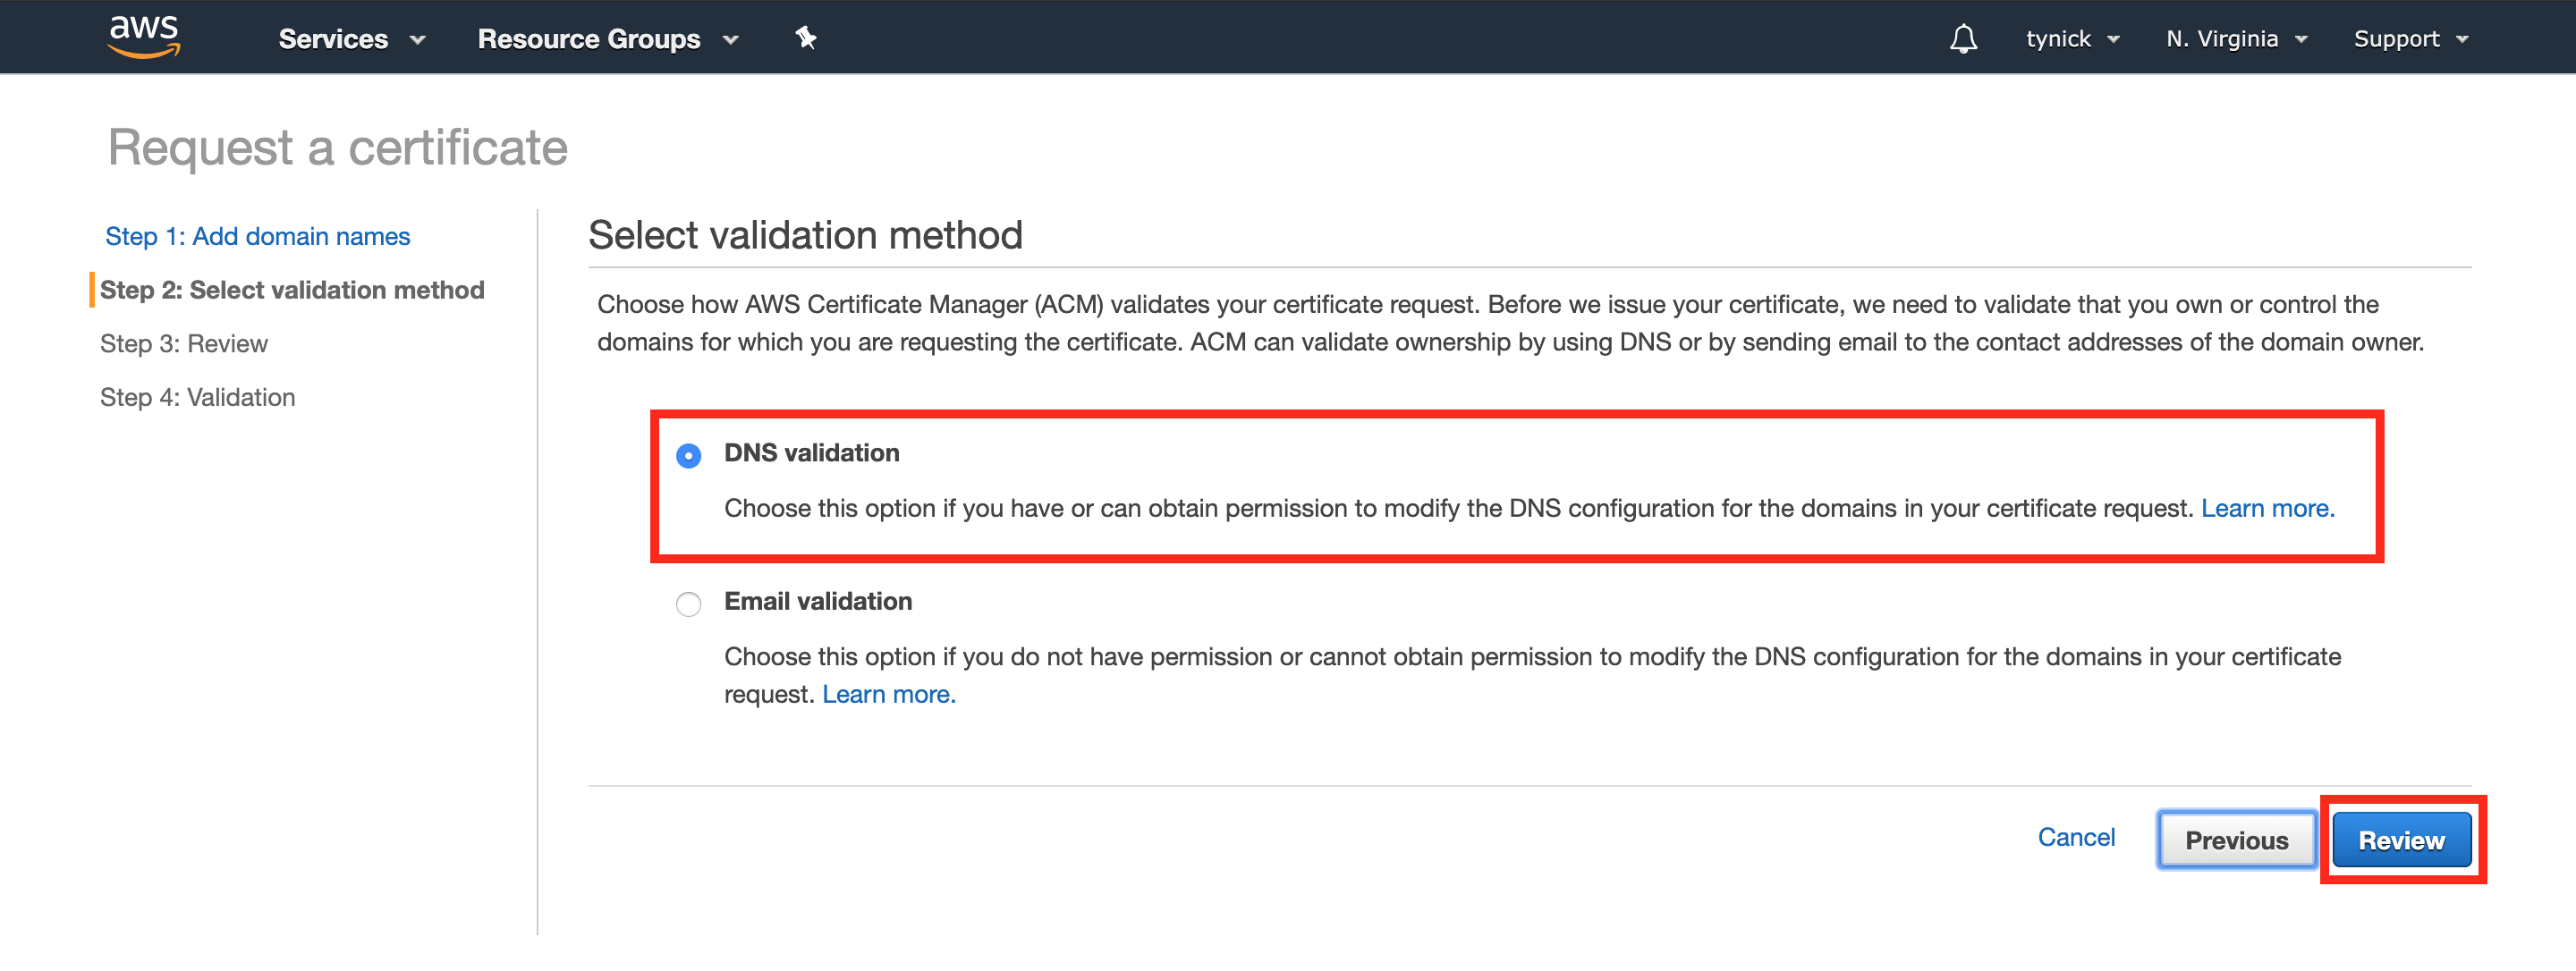
You will be asked to select a validation method. This is just Amazon confirming that you own or control the domain name that you are requesting a certificate for.
Your options are “DNS Validation” and “Email Validation”. We are going to select “DNS Validation” because it will be very easy to confirm. Click “Review” when complete.
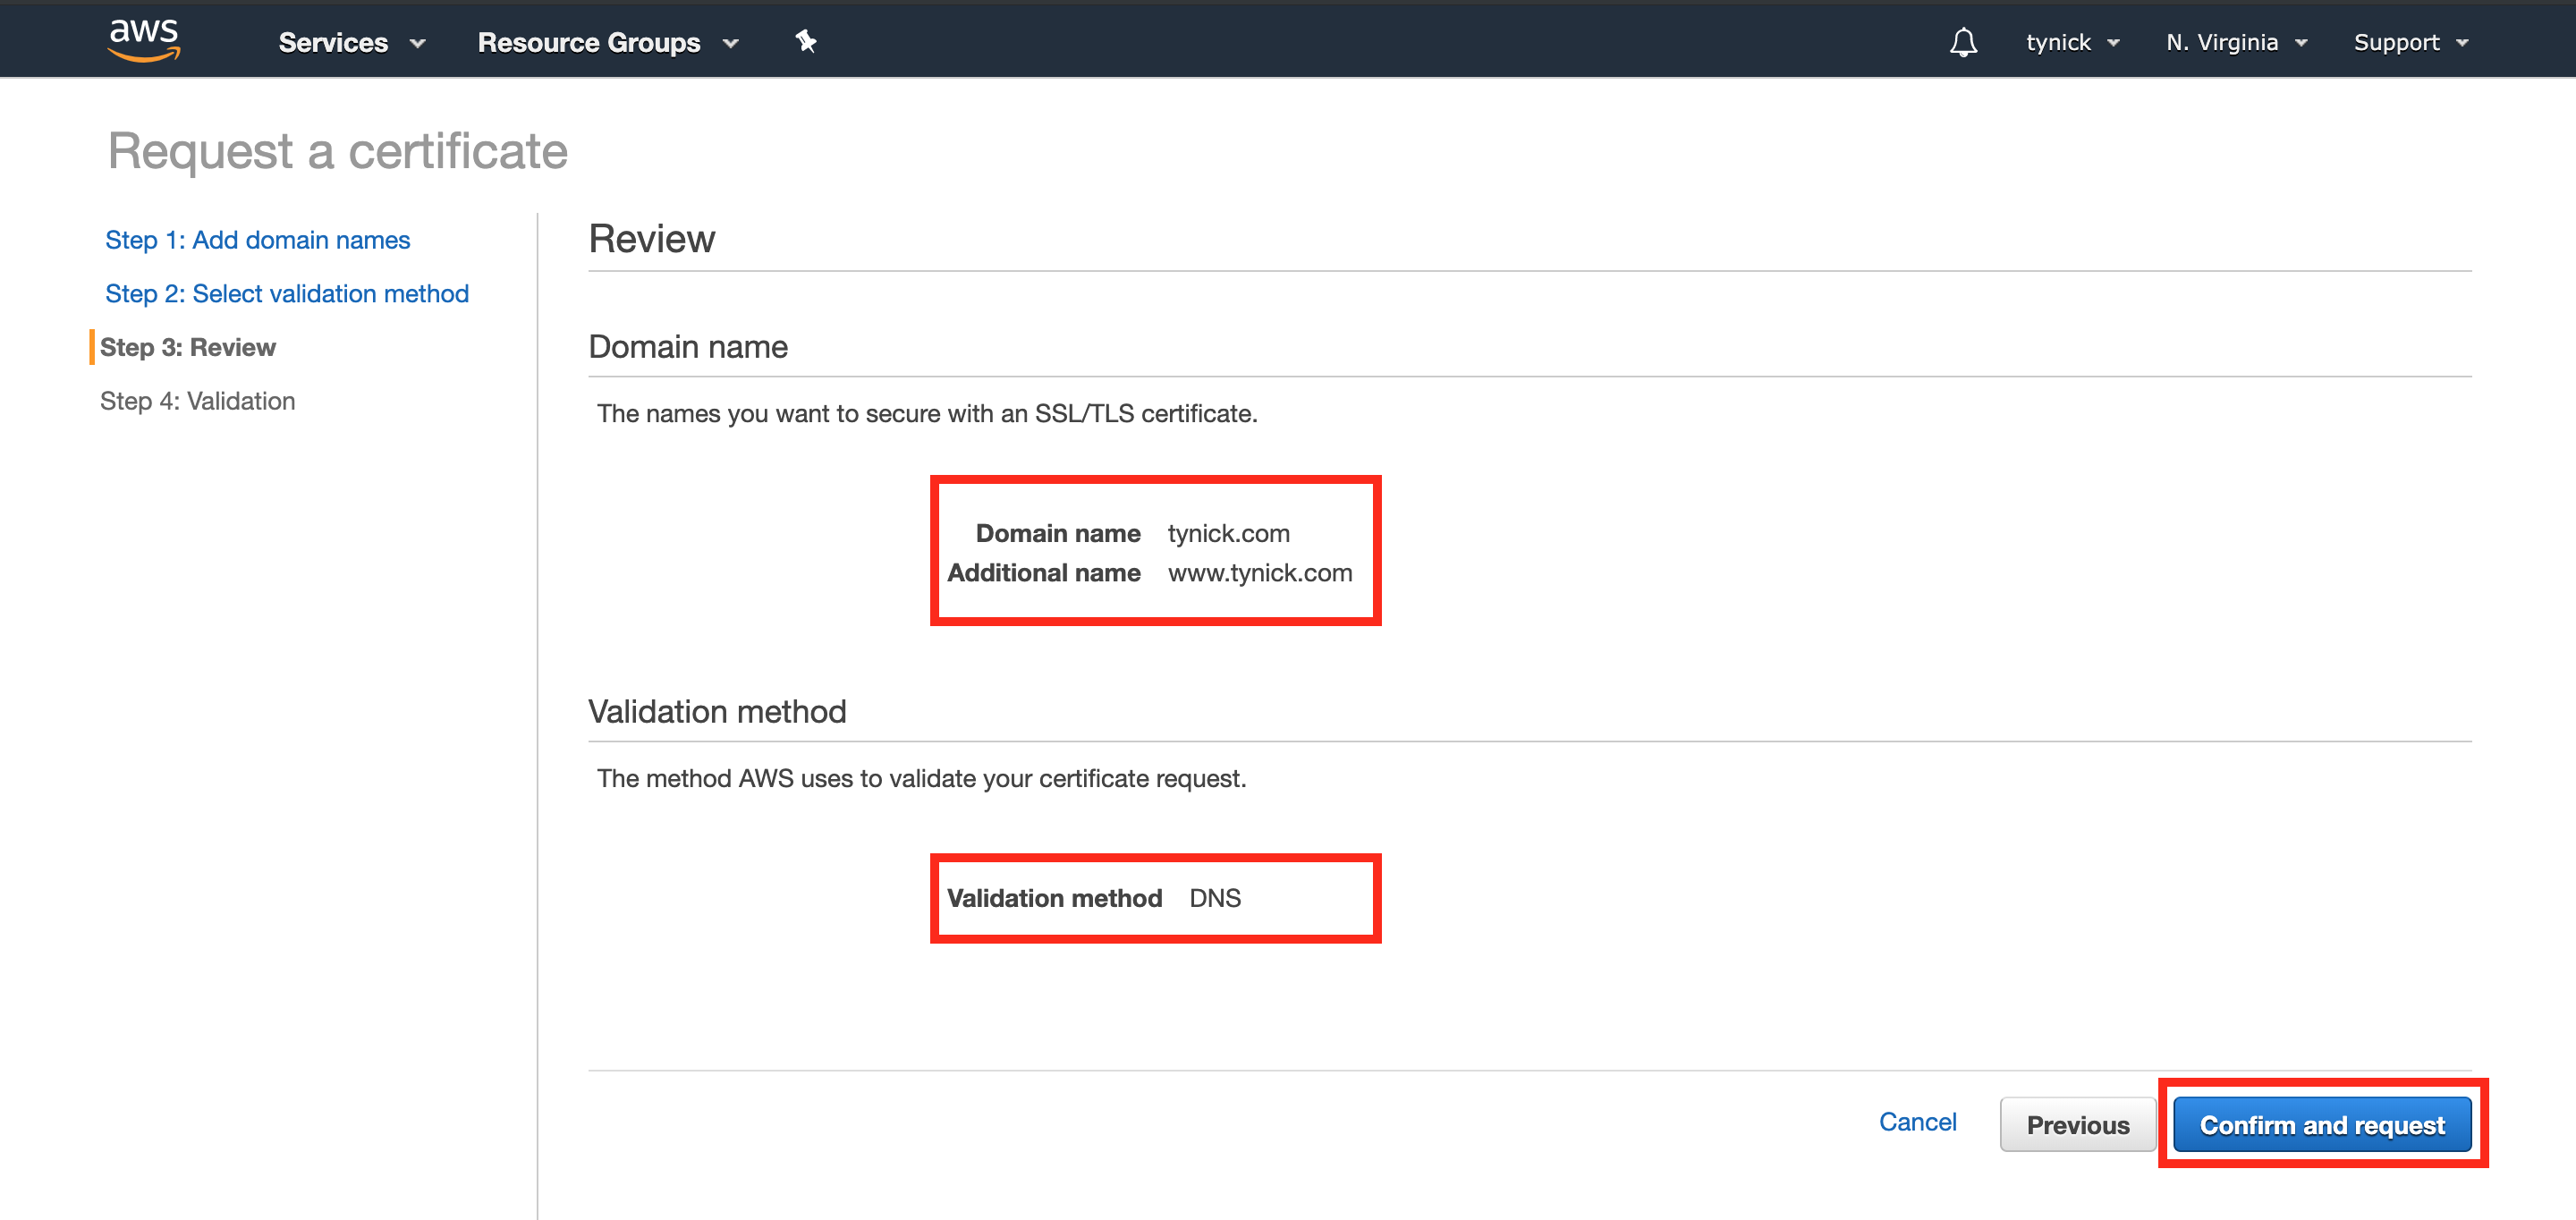
Verify that the information outlined below in red is correct and then click “Confirm and Request”.
The next screen shows you that there is now a certificate request in progress and what domains they still need to validate ownership of. Click both of the little arrows pointing right to expand.
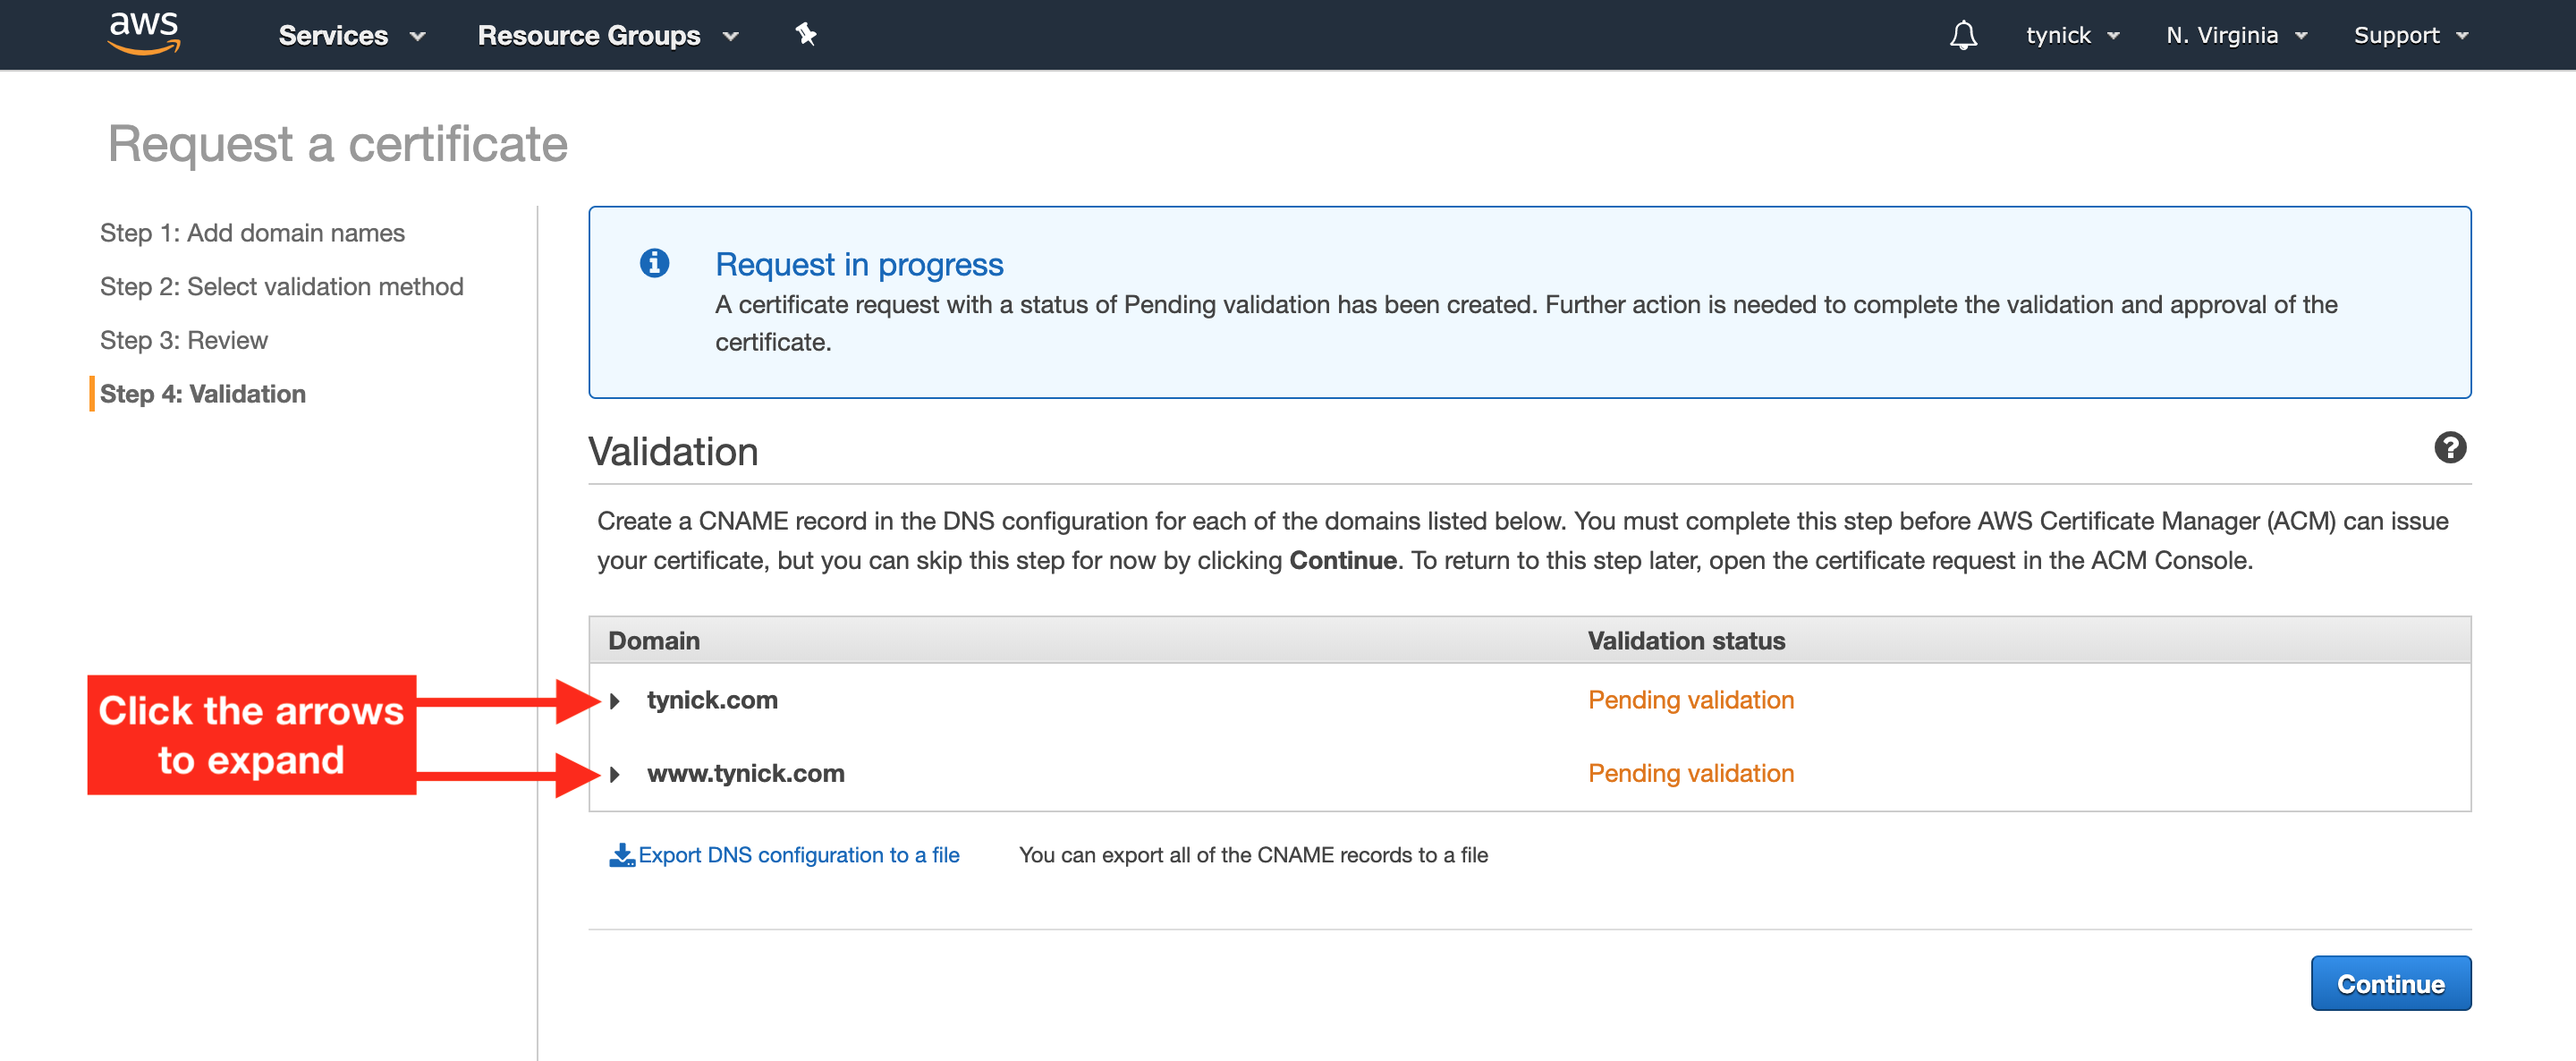
Now that you’ve expanded both domains, you should see a button in each that says “Create record in Route 53”. Click that button for both domains.
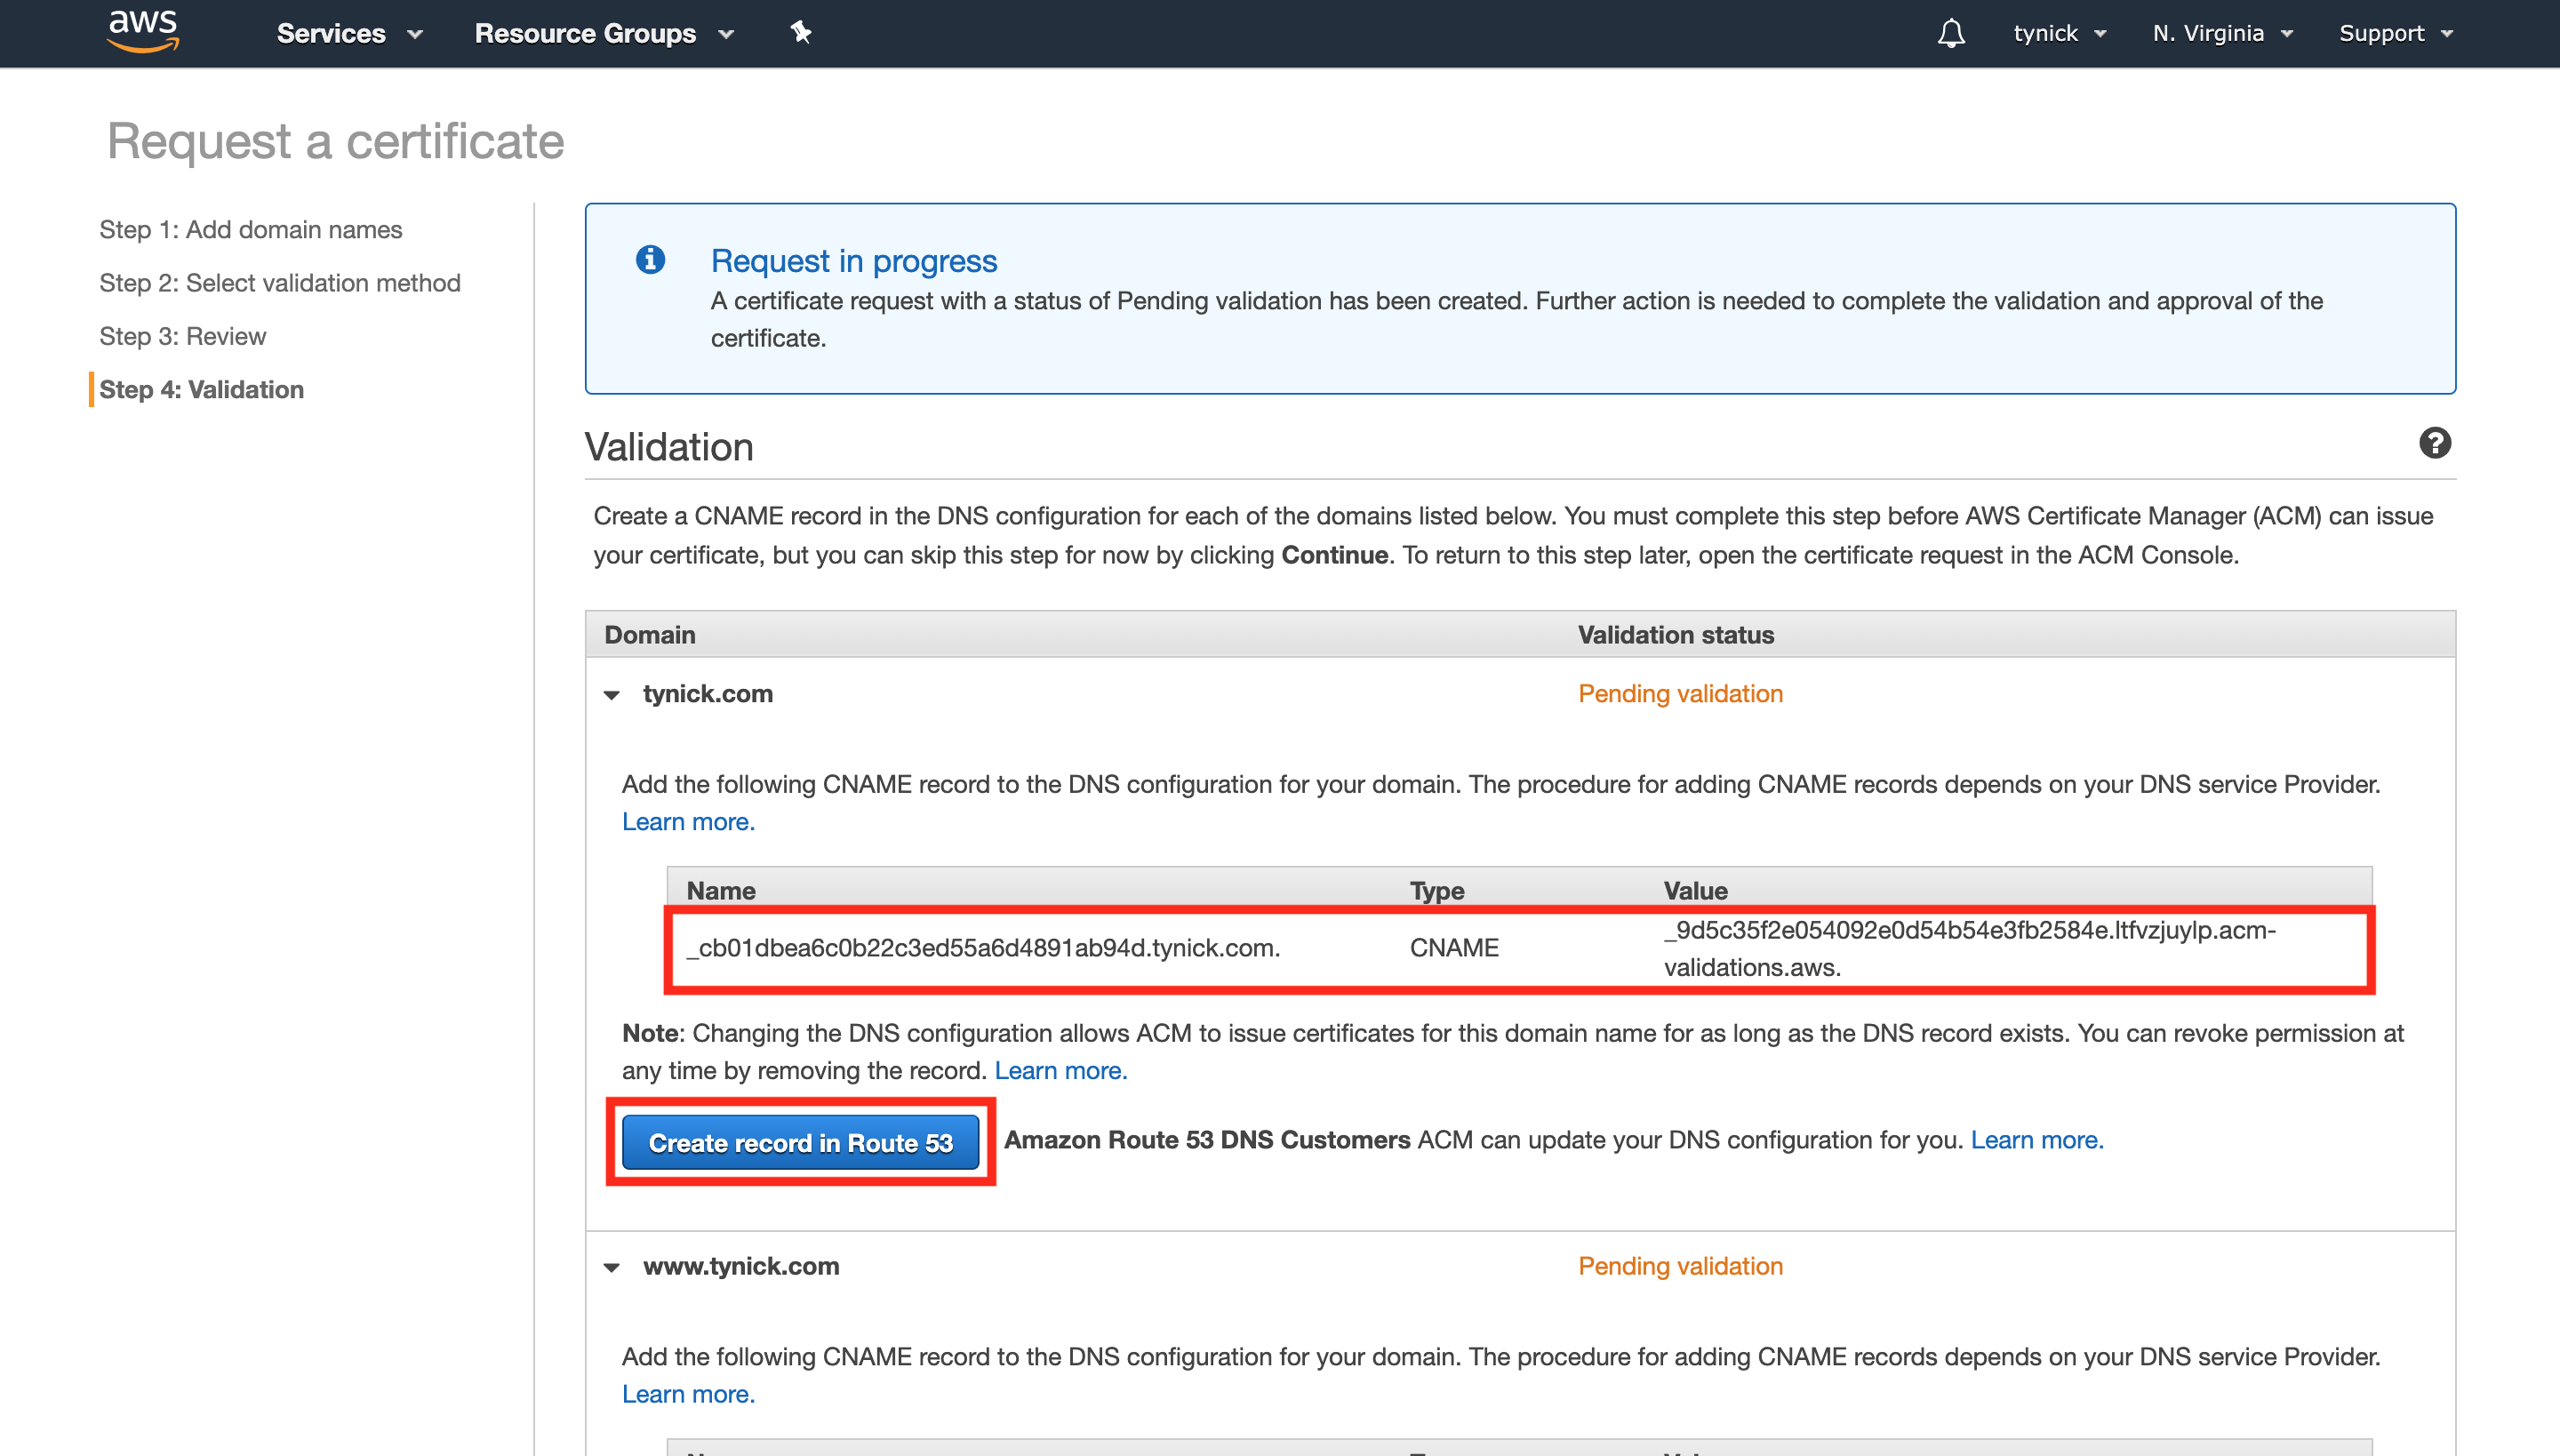
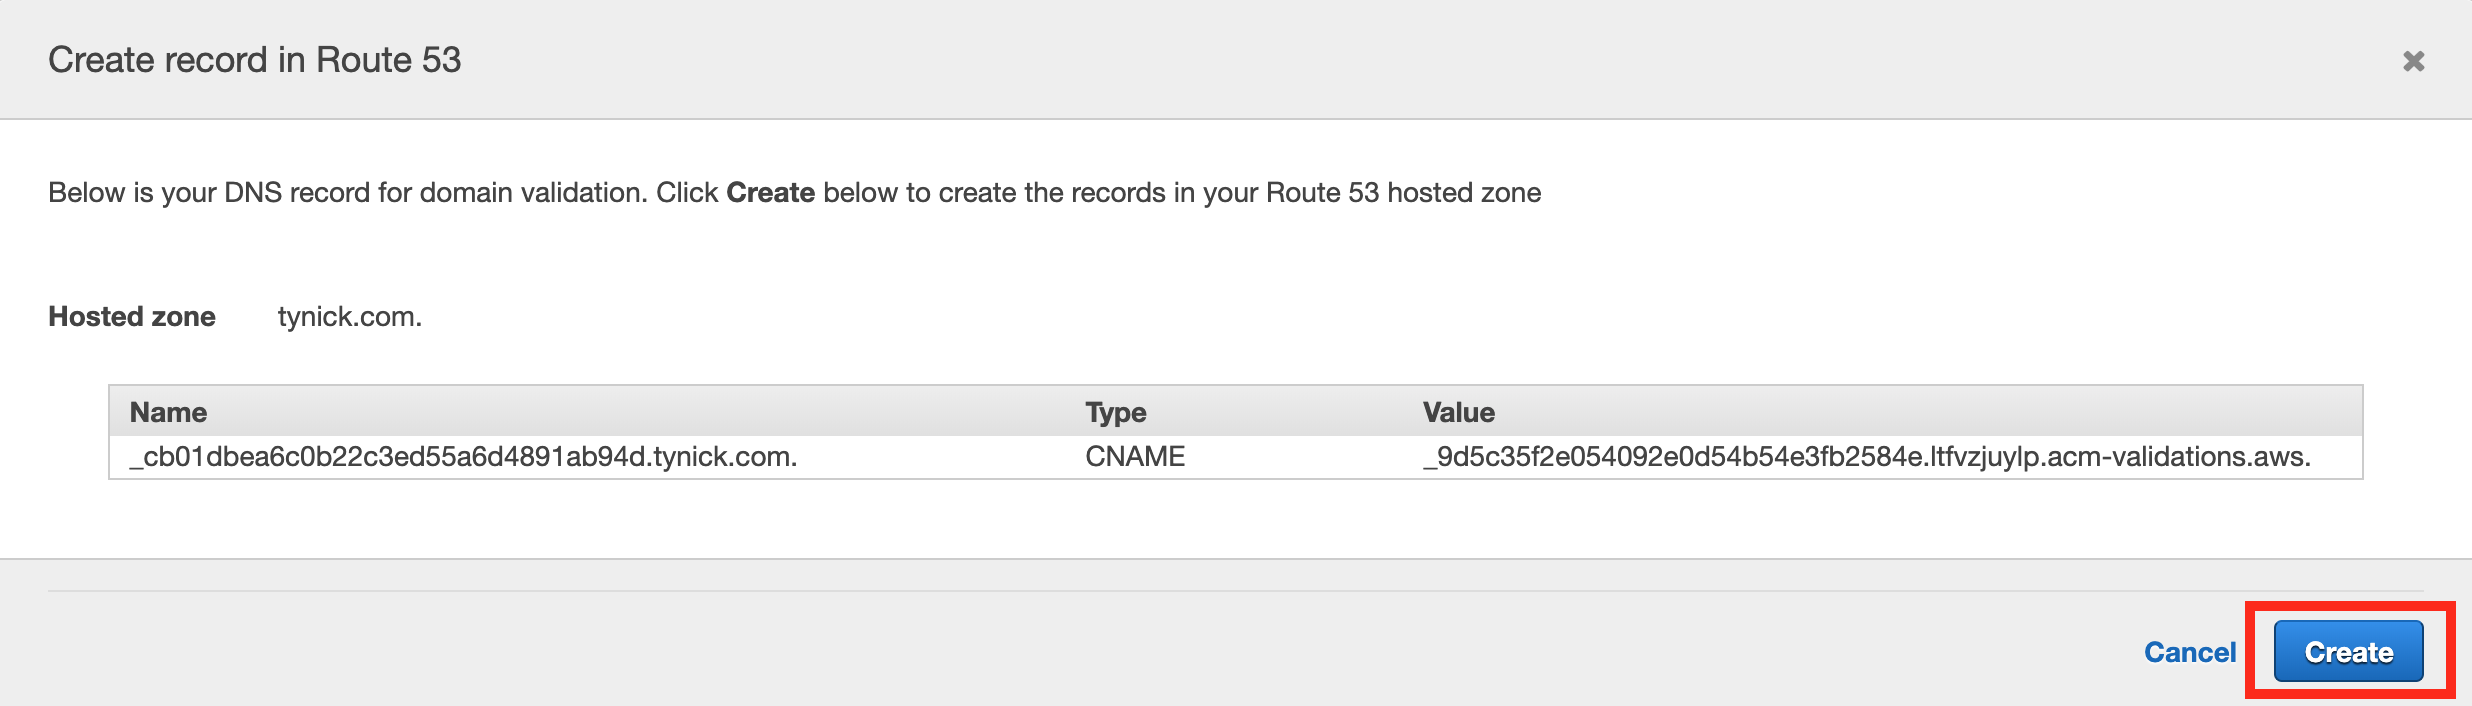
Both times you will receive a popup to confirm that you actually want to create an entry. Once you click “Create”, AWS will automatically create the DNS entry for you since we are using AWS Route 53 as our DNS provider.
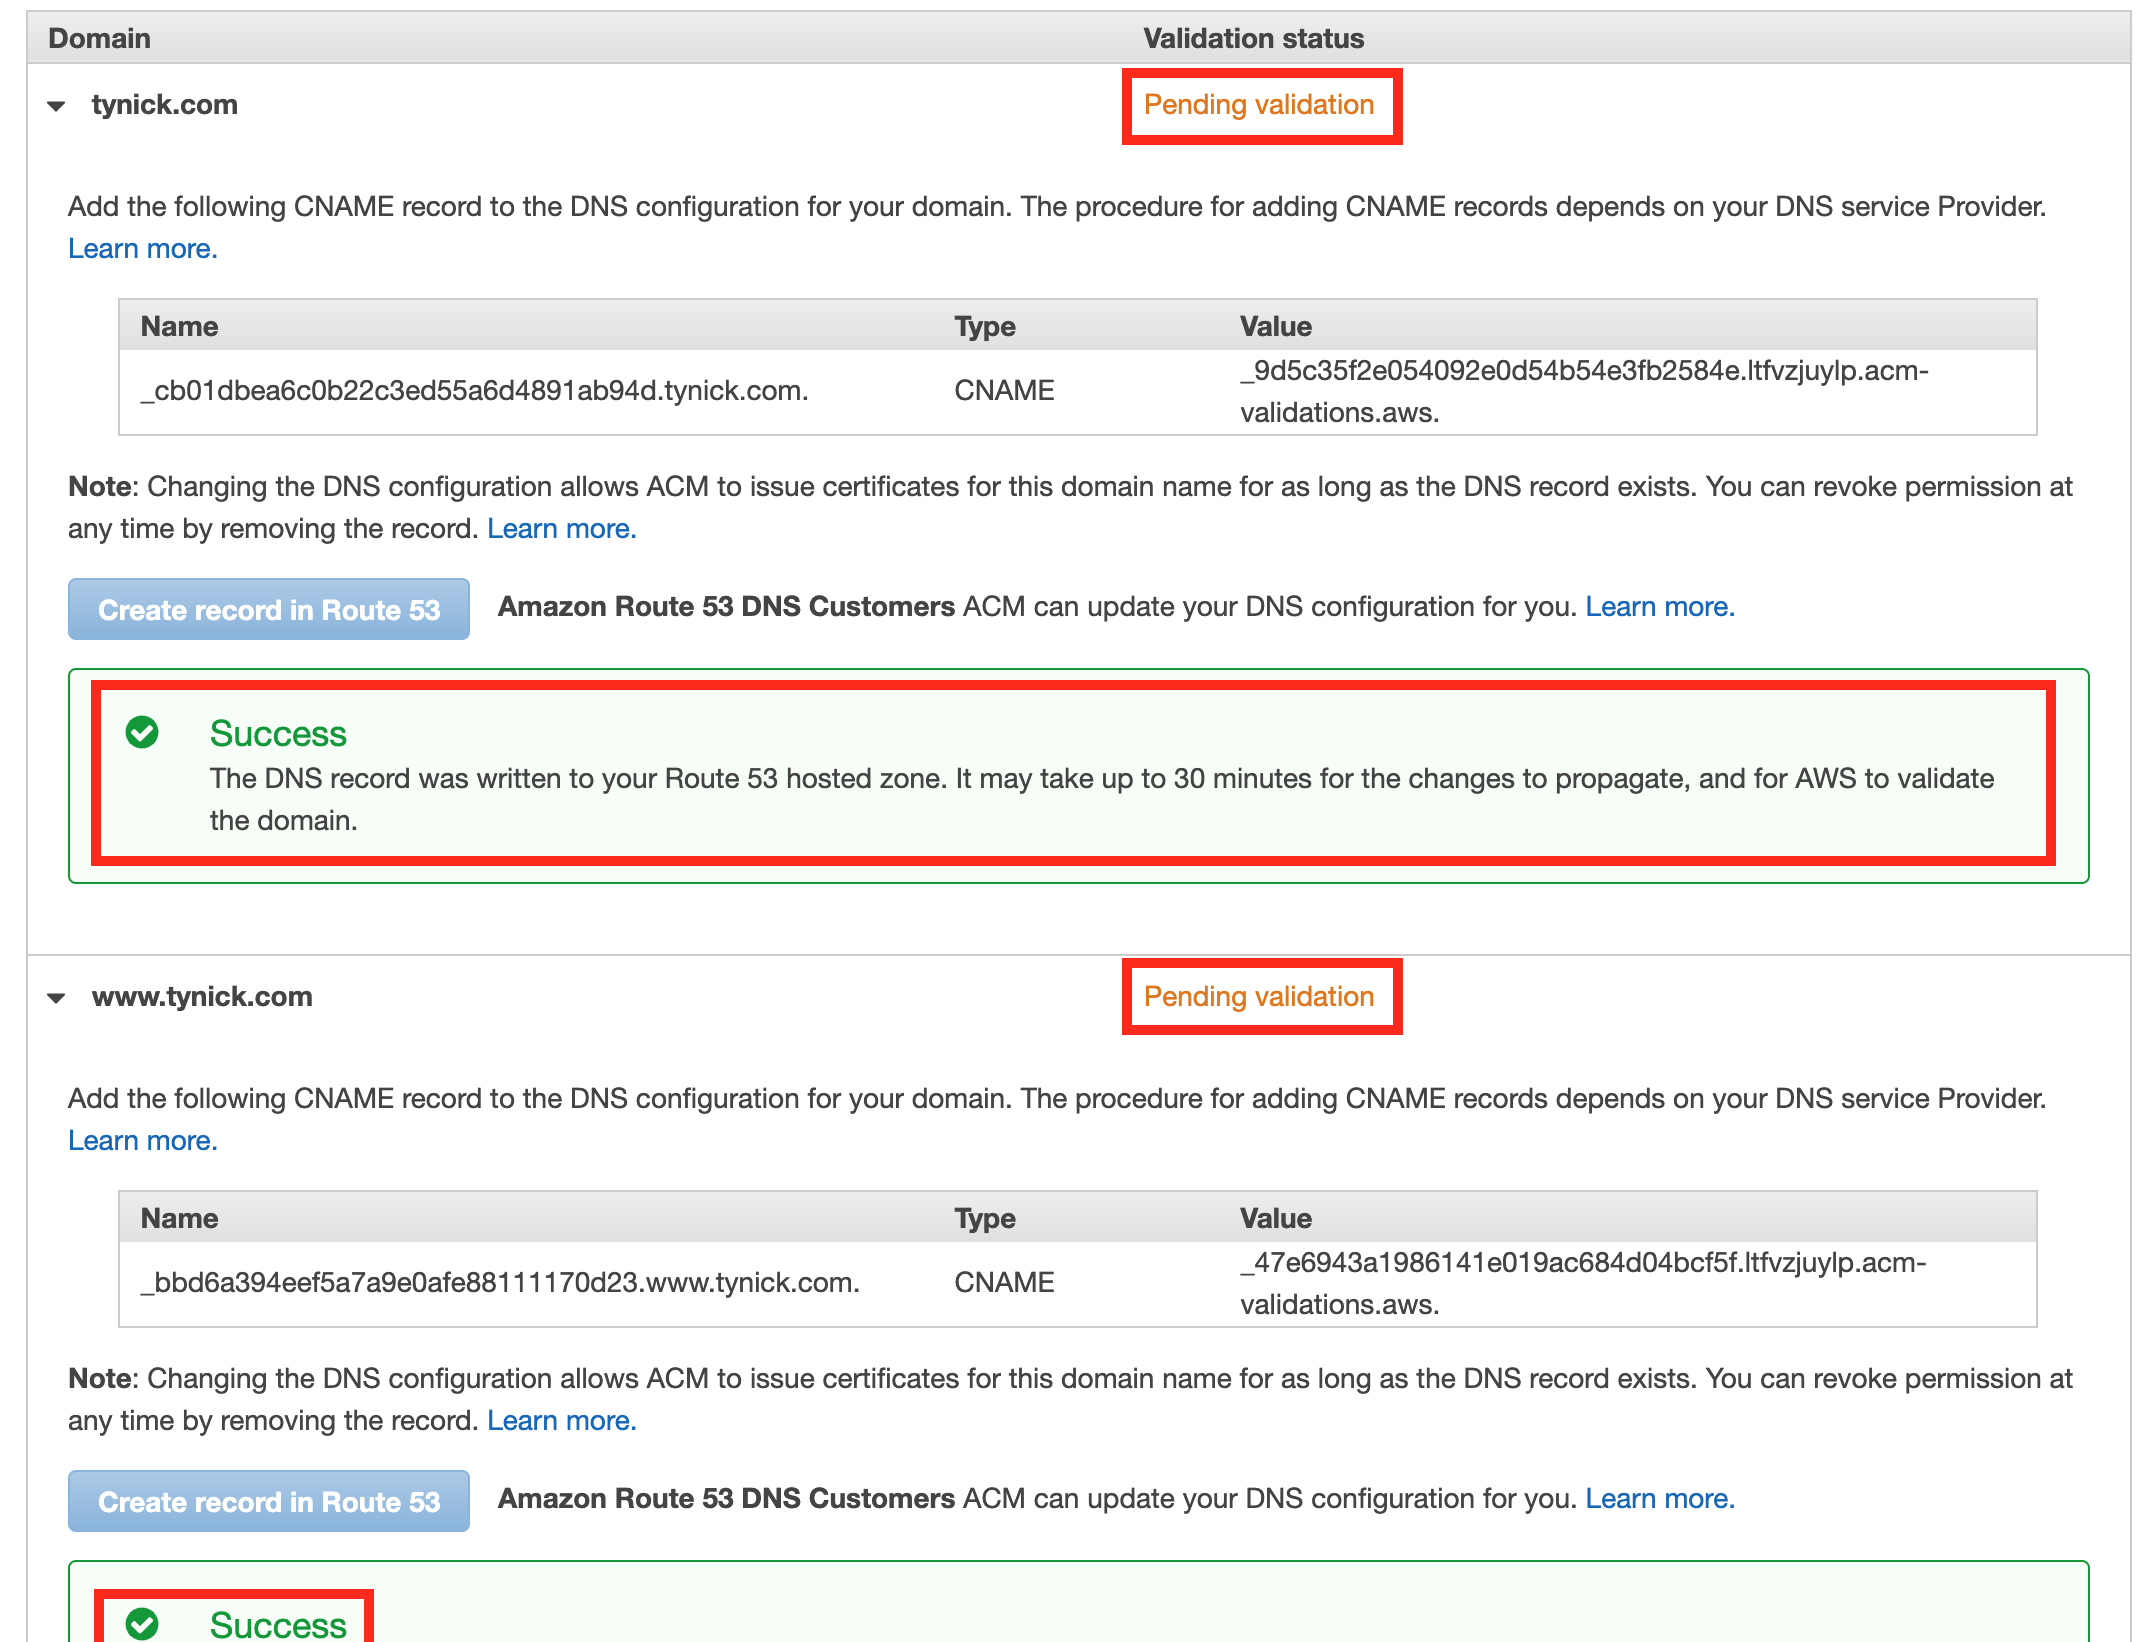
Next you can confirm that adding the DNS entry was a success and the status is now “Pending validation”. If you really wanted to double check, you could go into the hosted zone for your domain and actually view the entries that AWS added. Click “Continue” to advance.
You have been brought back to the main Amazon Certificate Manager screen. We are looking to make sure the DNS validation status is “Success” and the certificate status is “Issued”. Sometimes the DNS validation can take some time. AWS says up to 30 minutes. Click the refresh button inside the AWS Console to see if there are any status changes.
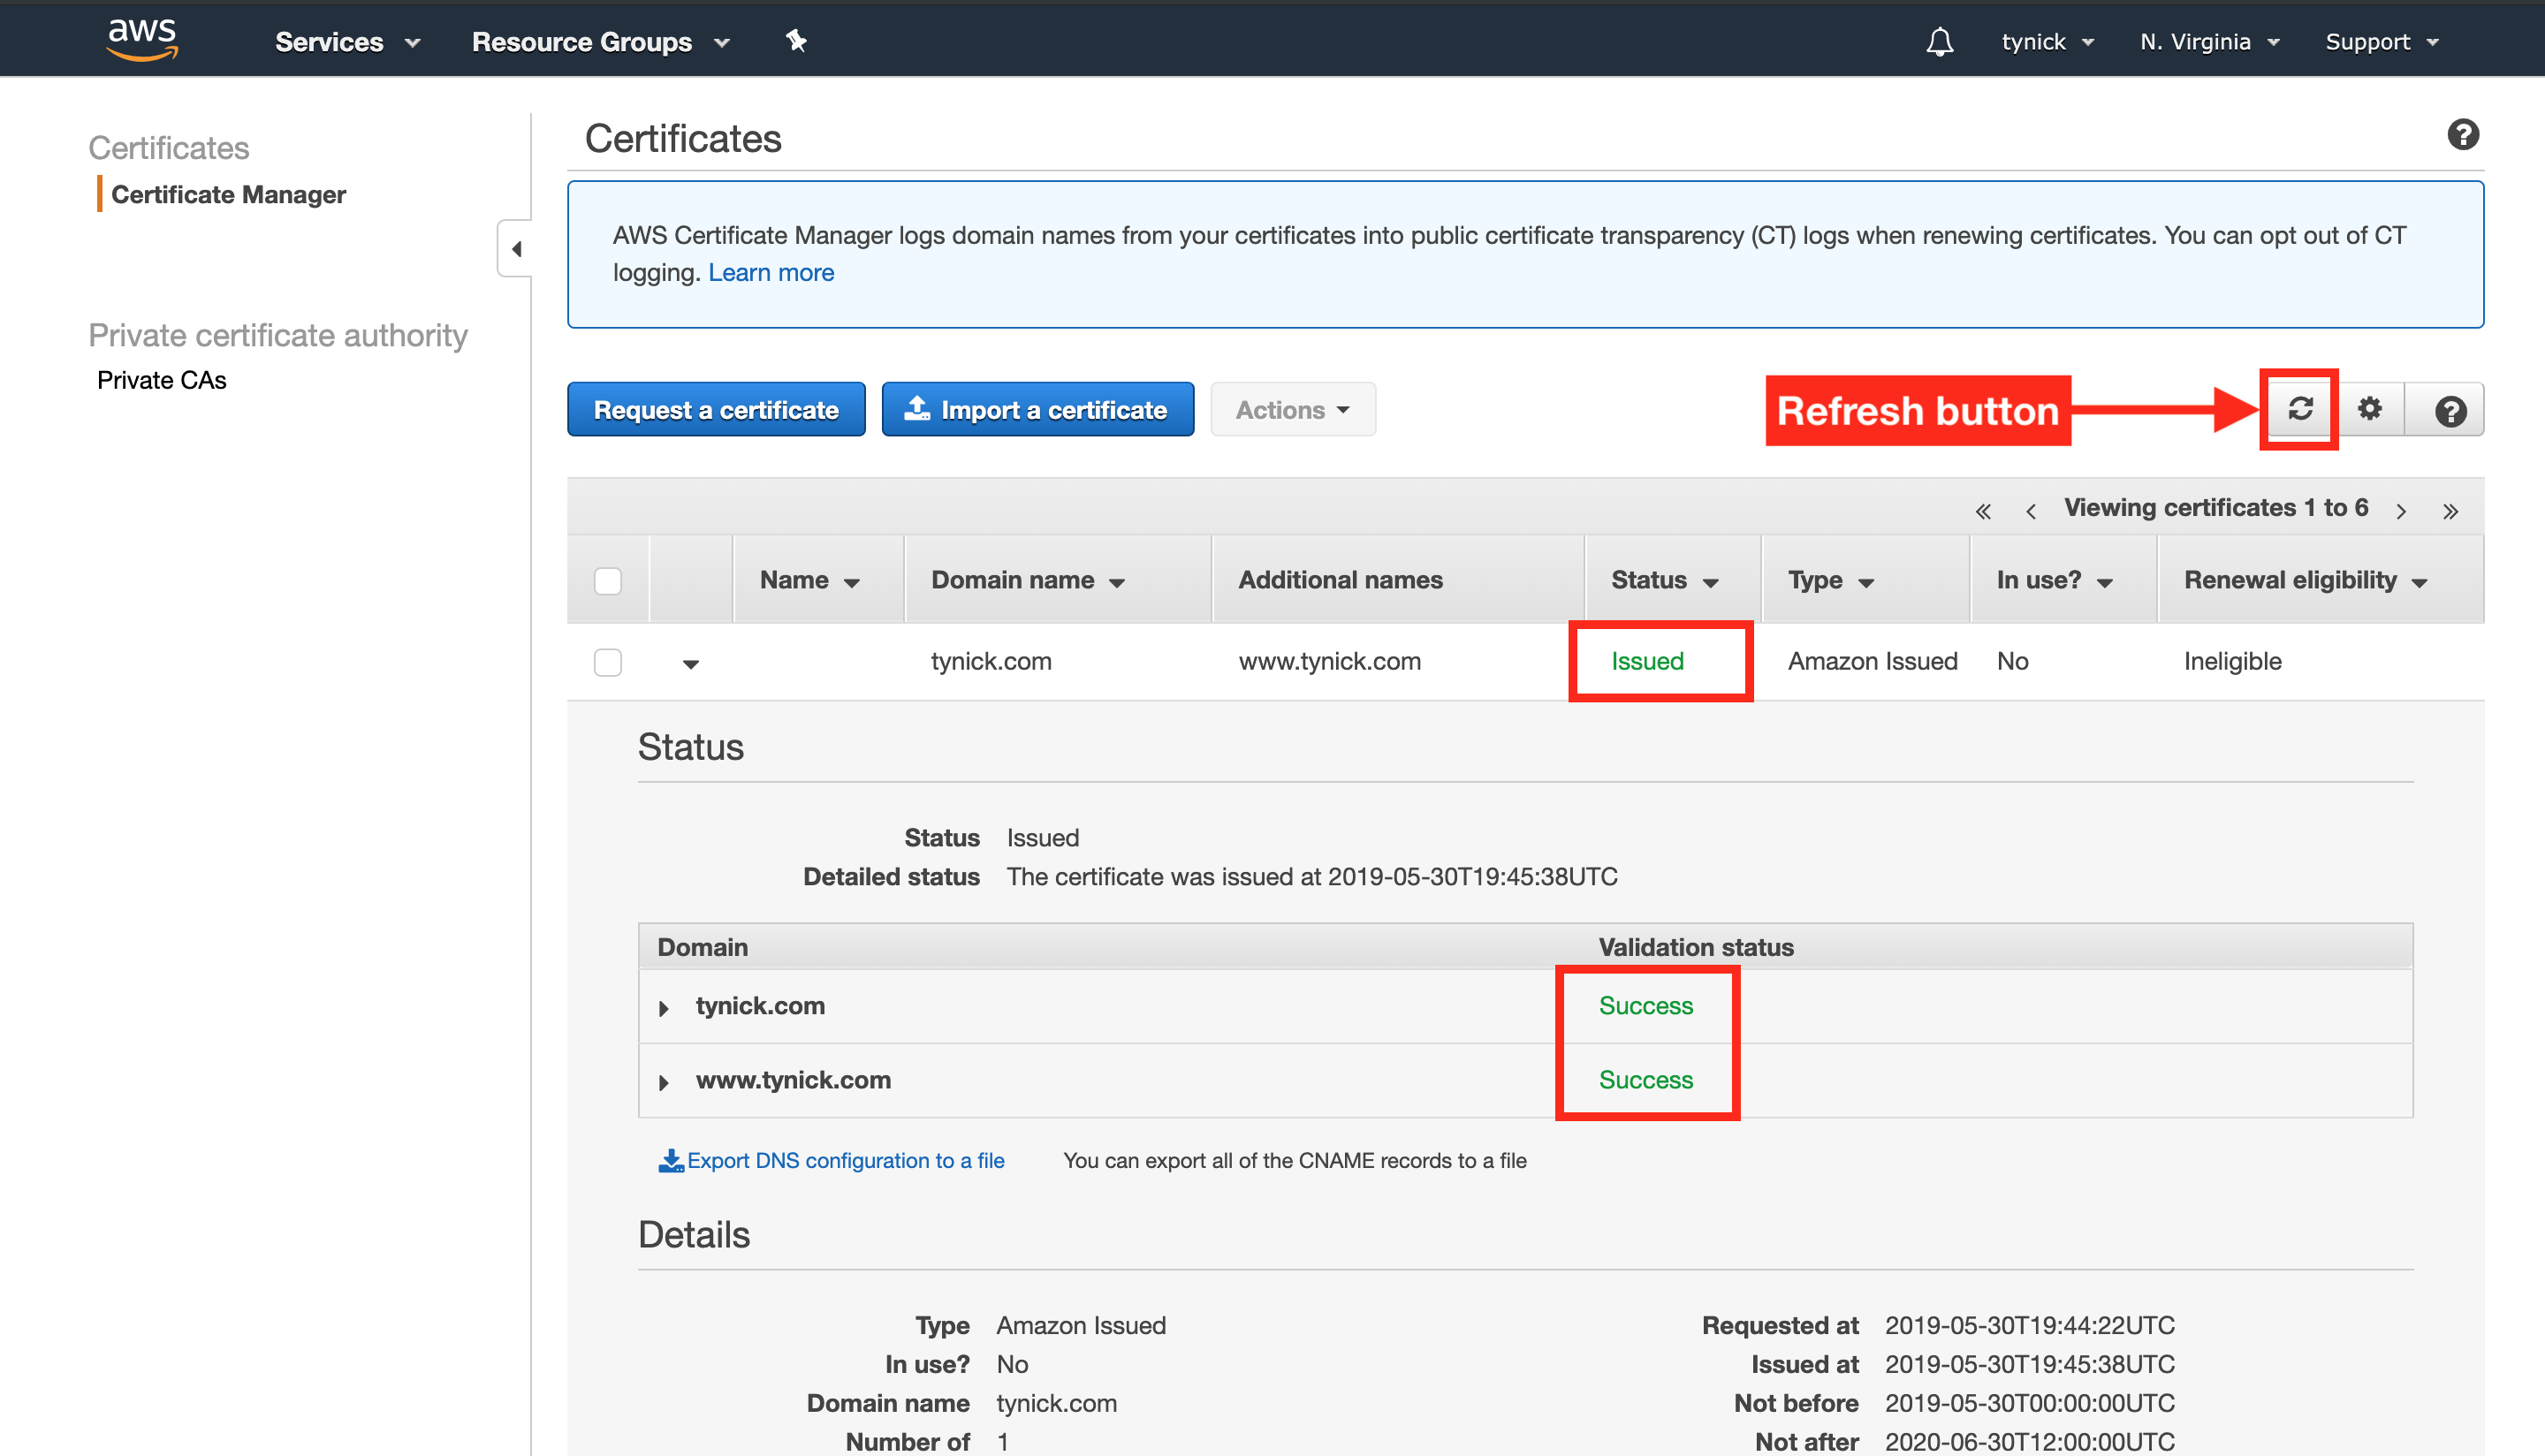
Move on to the next step when DNS validation status is “Success” and certificate status is “Issued”.
#3 Create An S3 Bucket
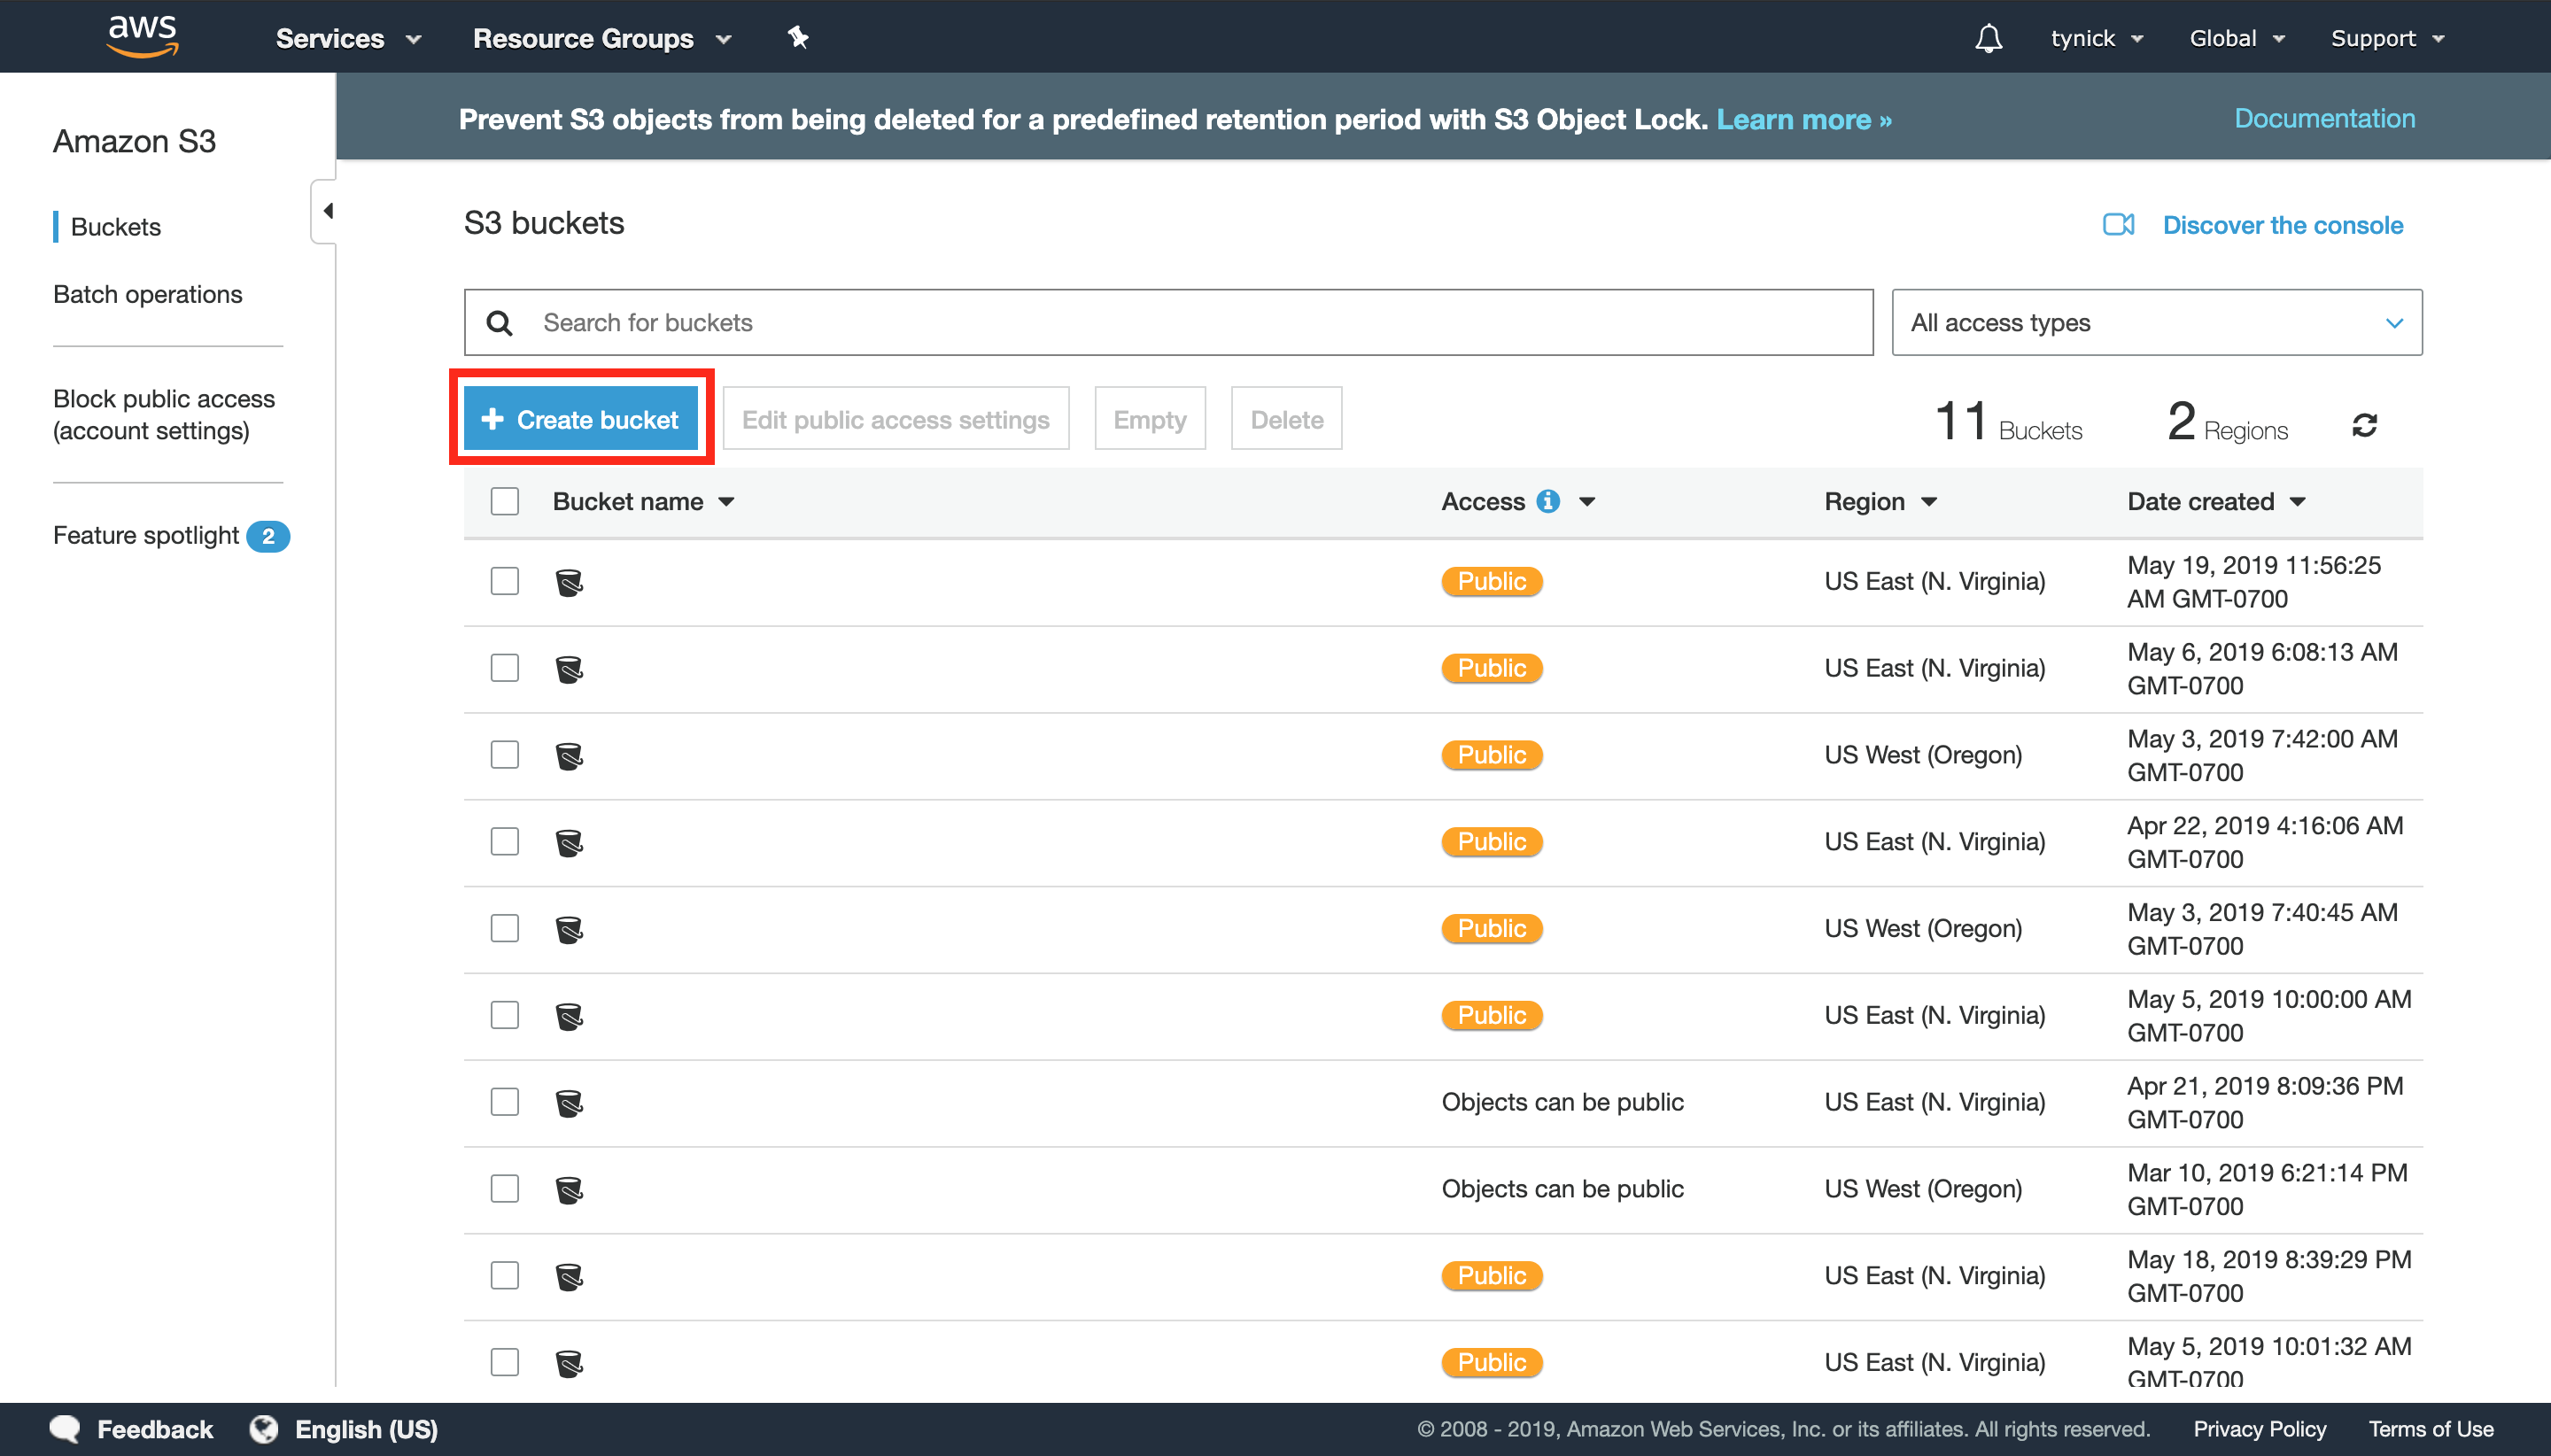
Next we will head over to the AWS S3 service within the AWS Console.
Click “Create bucket” in the S3 service..
This part is very important. The bucket name will be the same as the domain name you purchased in step #1 of this tutorial. If the domain name you bought is tynick.com the S3 bucket name needs to be tynick.com. This will not work if they do not match. Set your region to US East (N. Virginia) and then click “Next”.
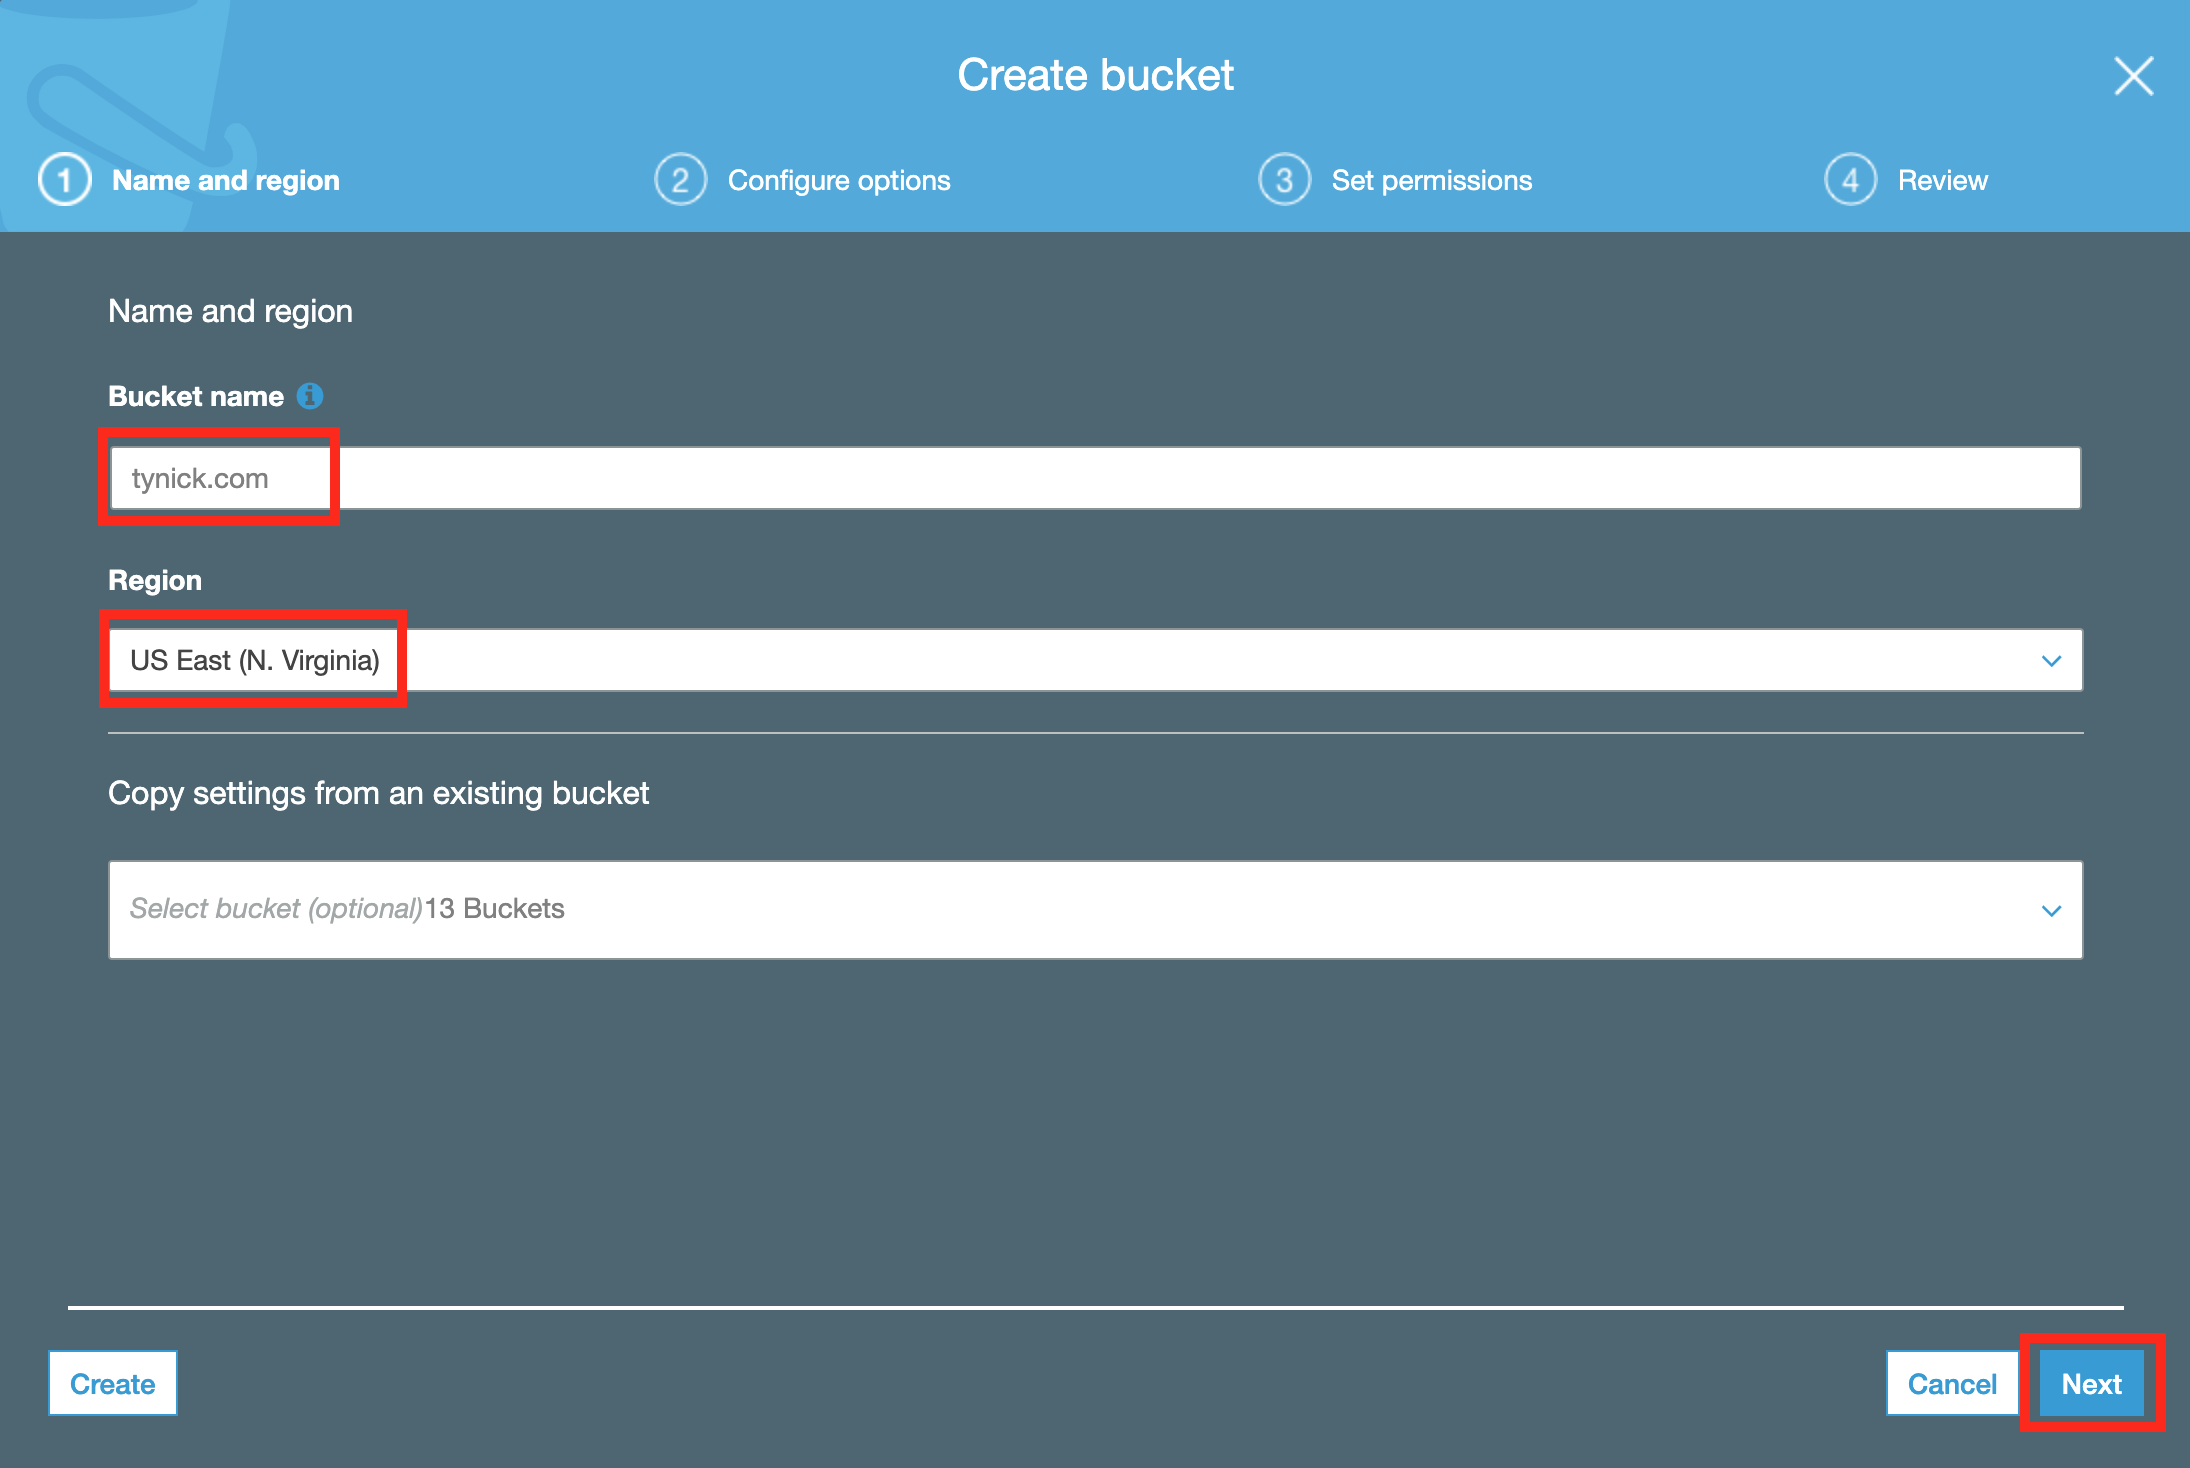
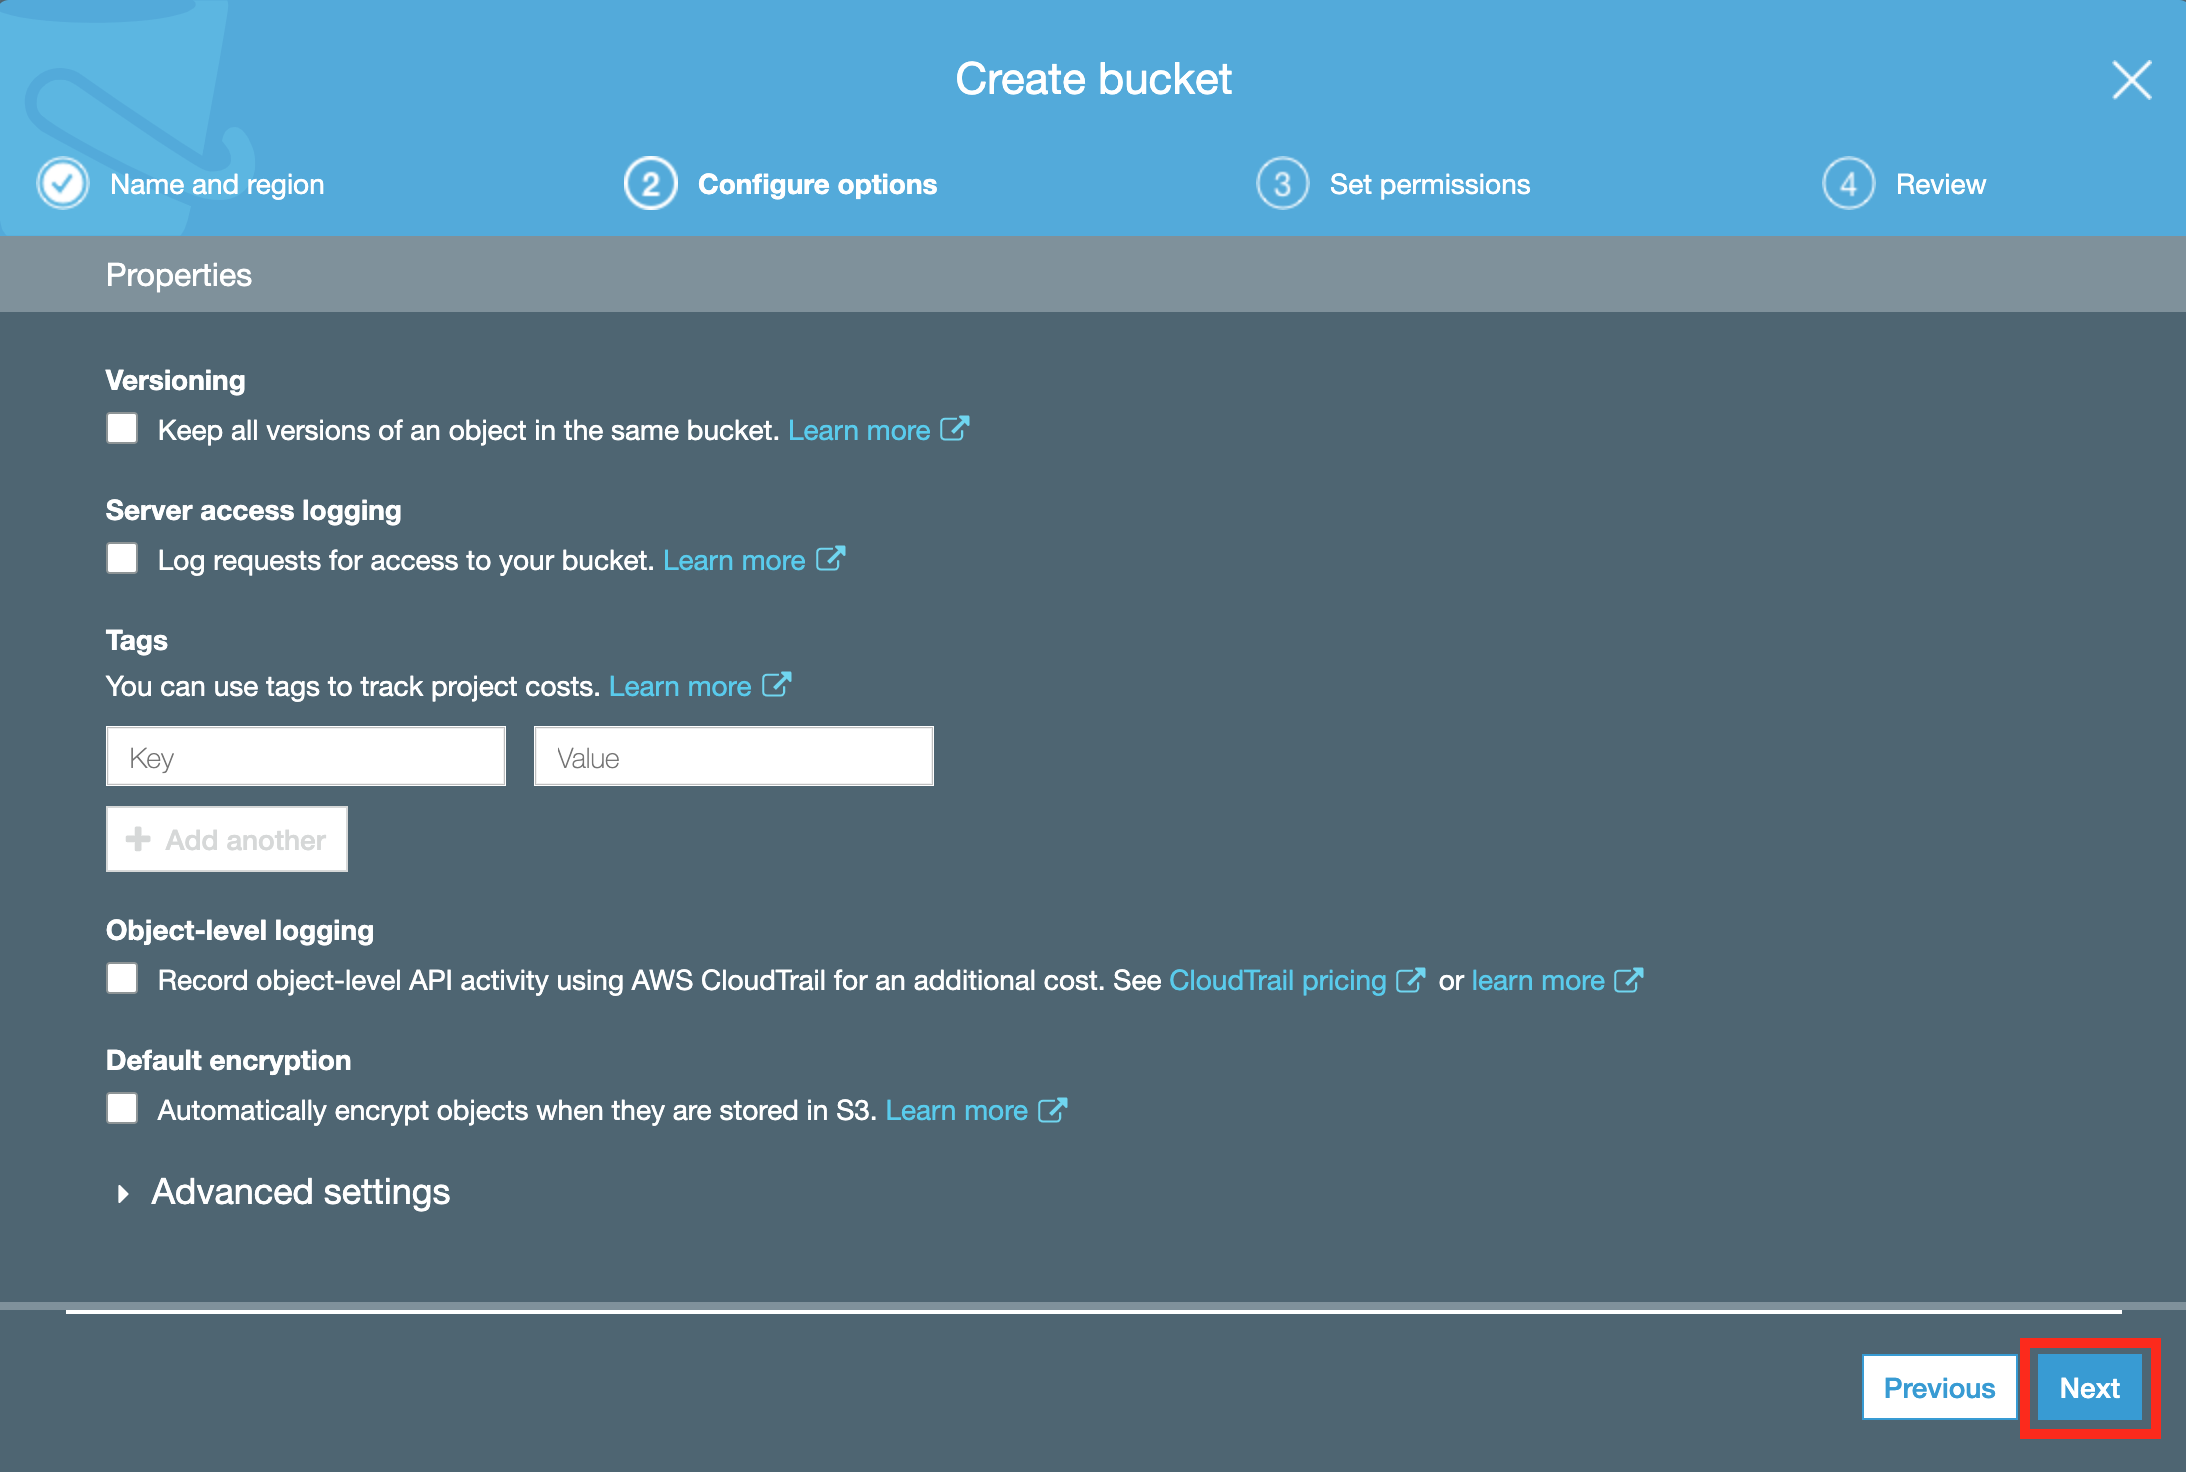
Select “Next” if everything on this screen looks good to you.
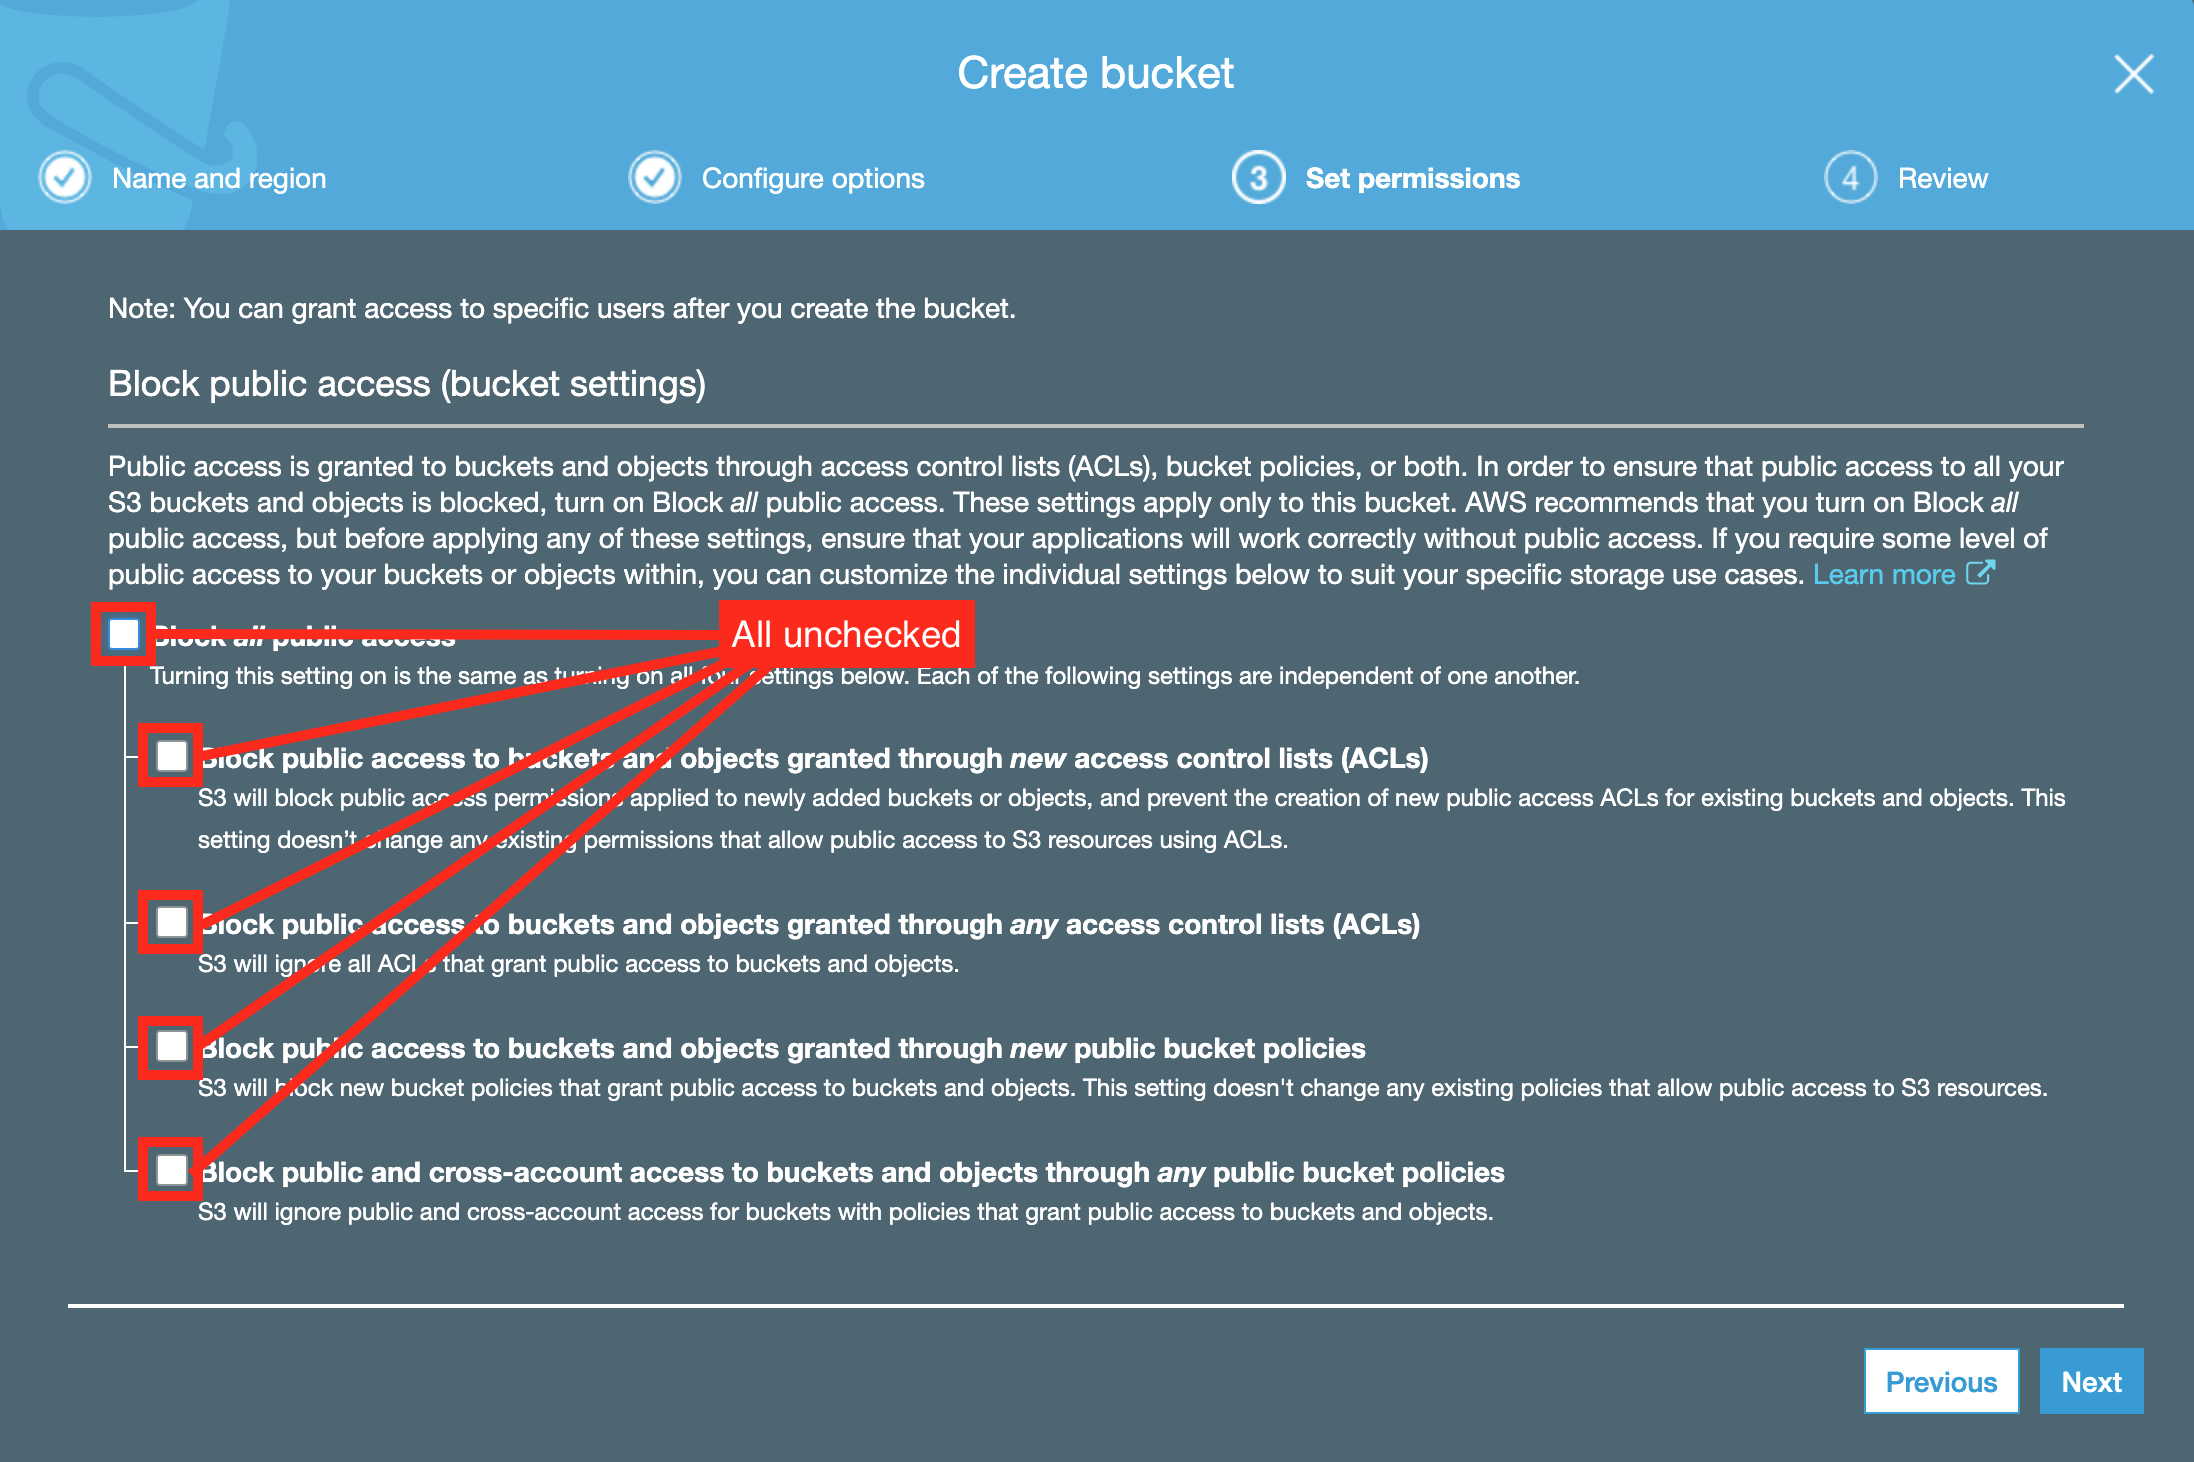
Make sure all of the boxes in the following photo are unchecked. These options would prevent our website from being available to the world. Click “Next”.
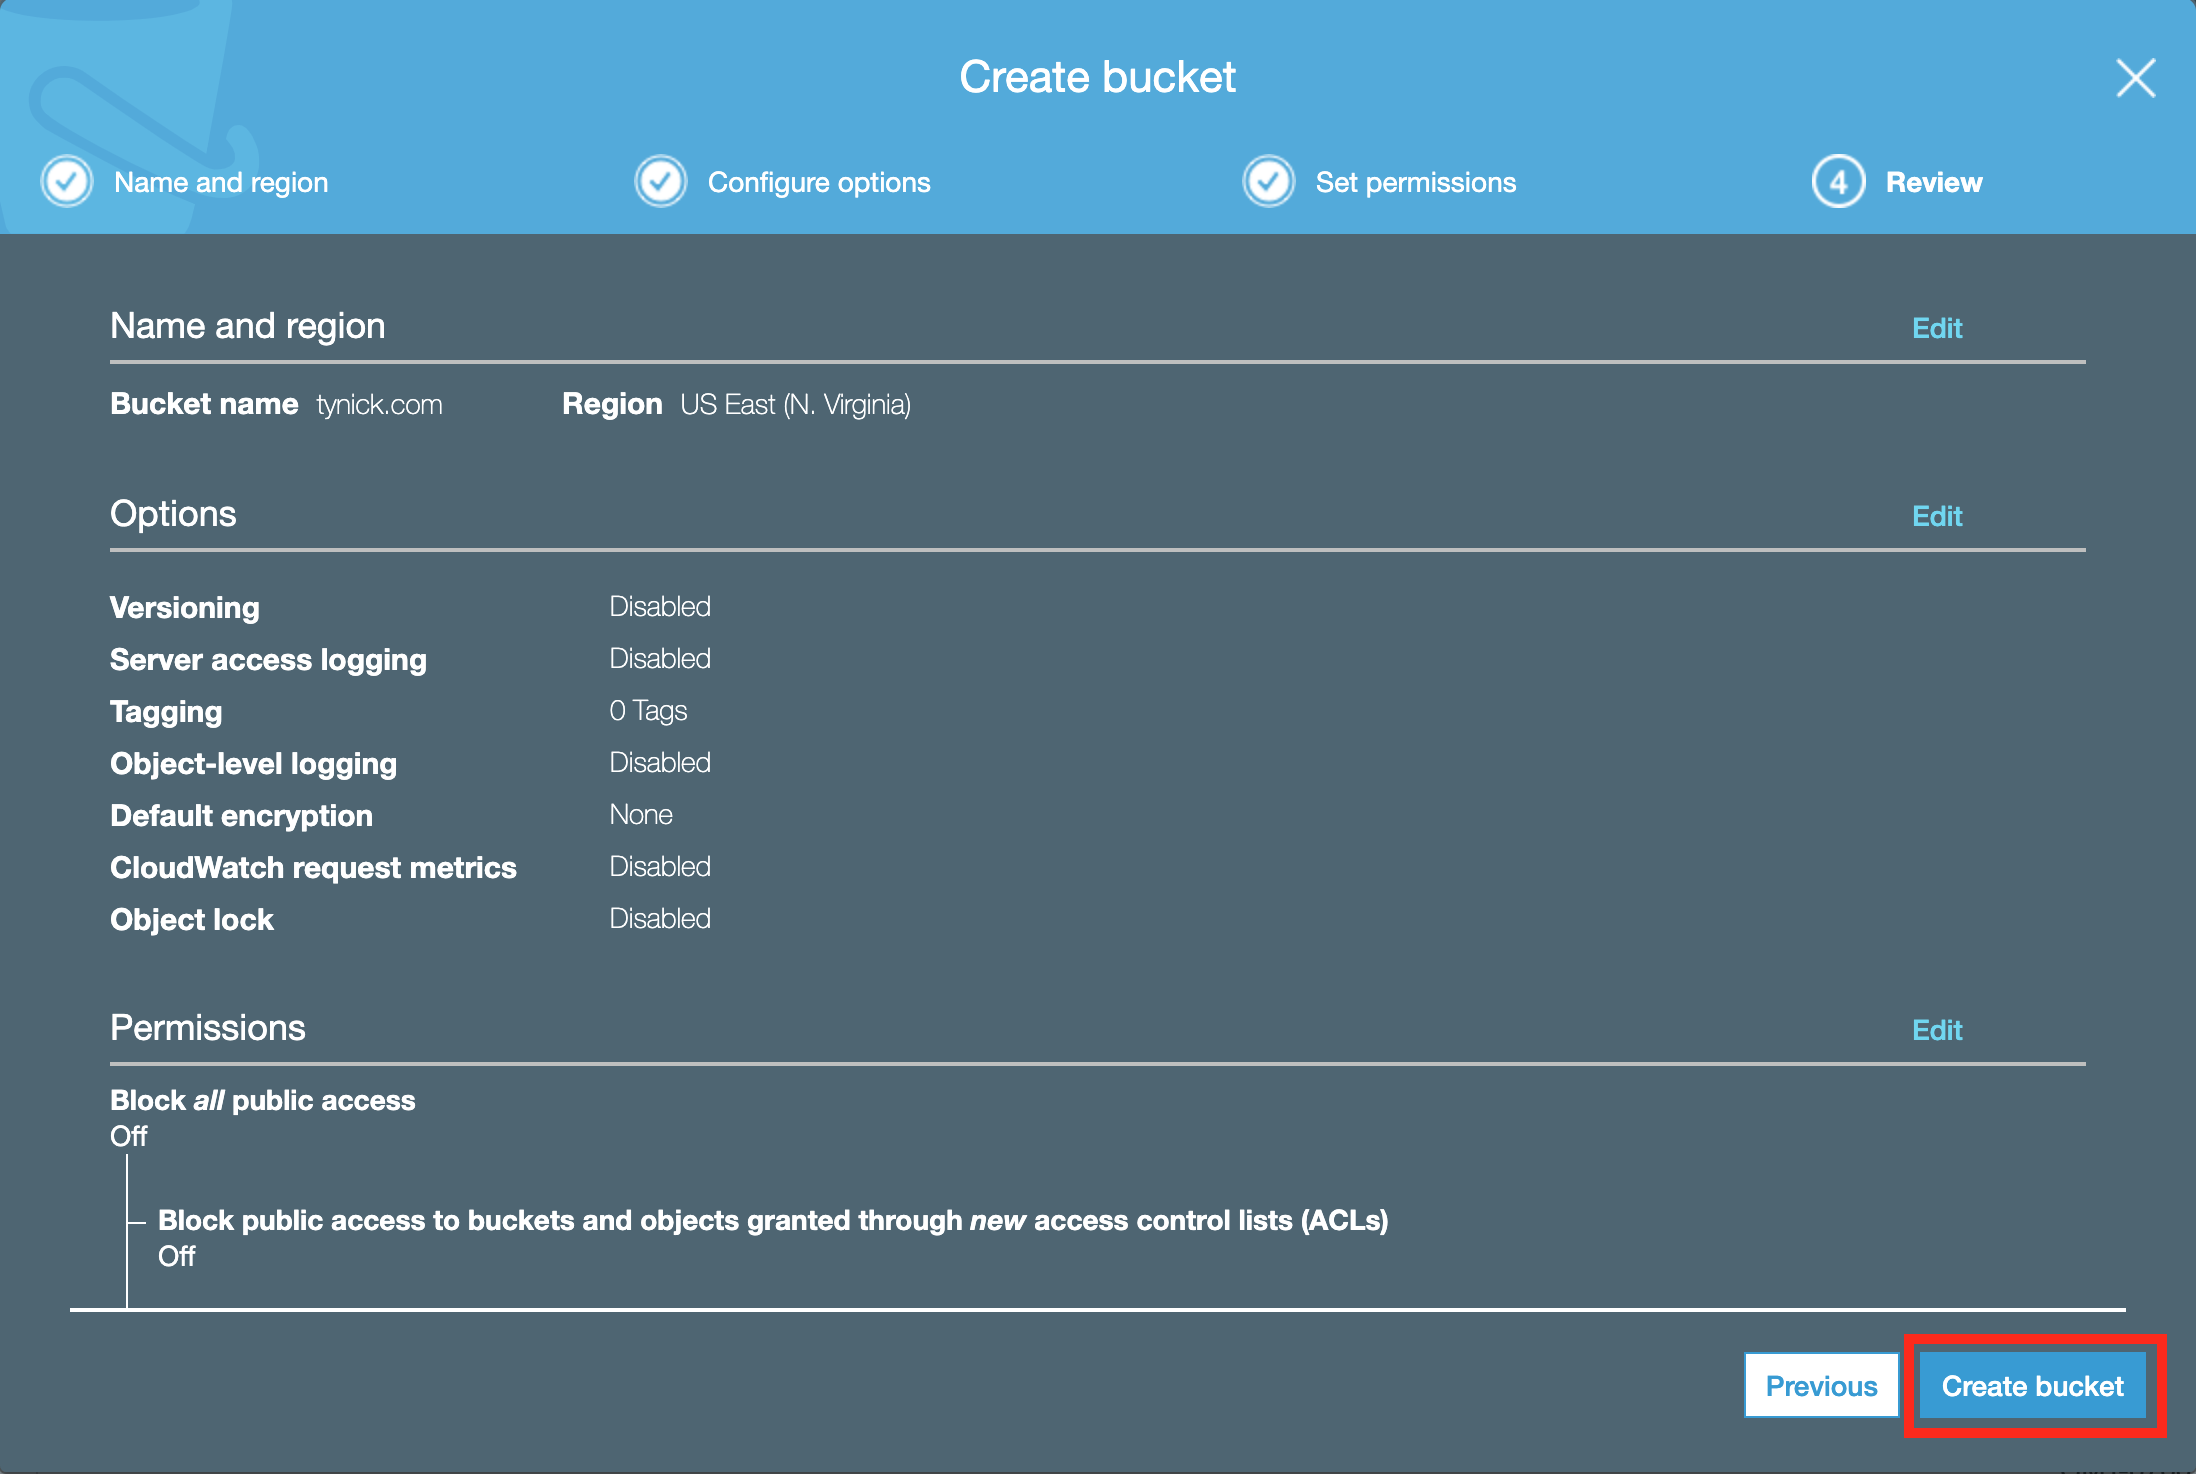
Review all the info and click “Create bucket”.
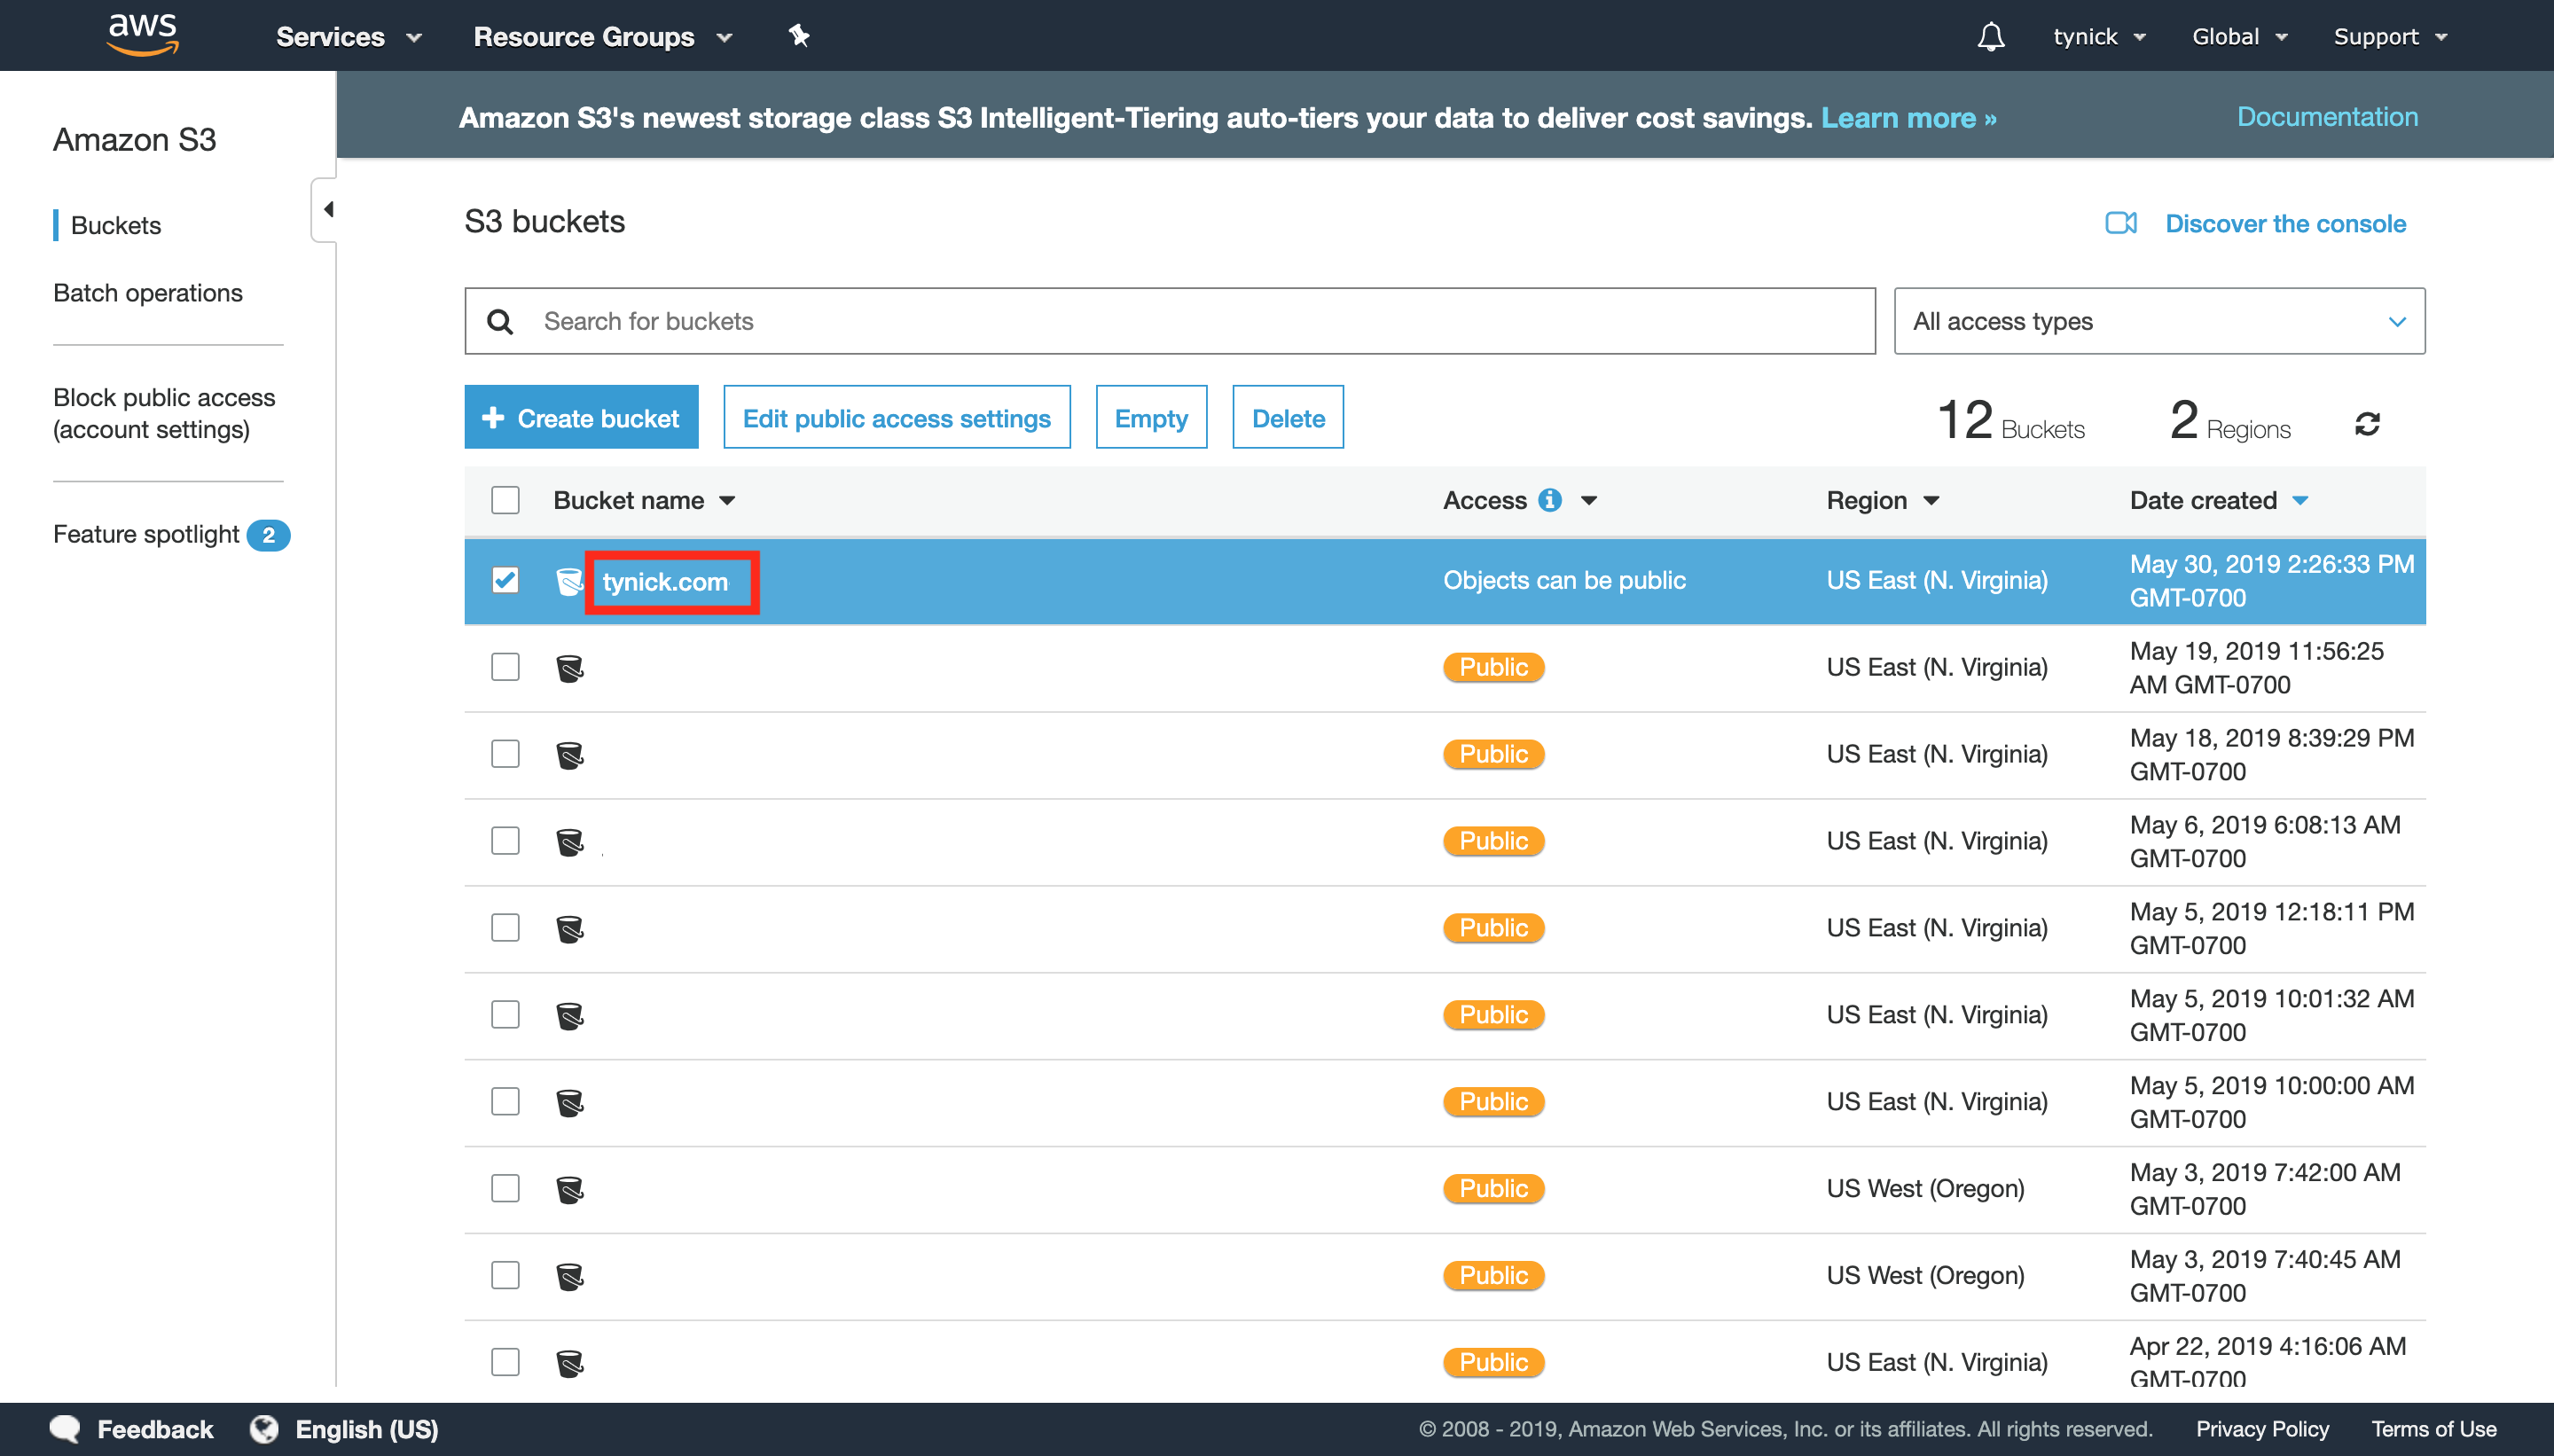
You will be brought back to the S3 console. You should now see the bucket you just made. Click on the name of the bucket so we can configure a few more things.
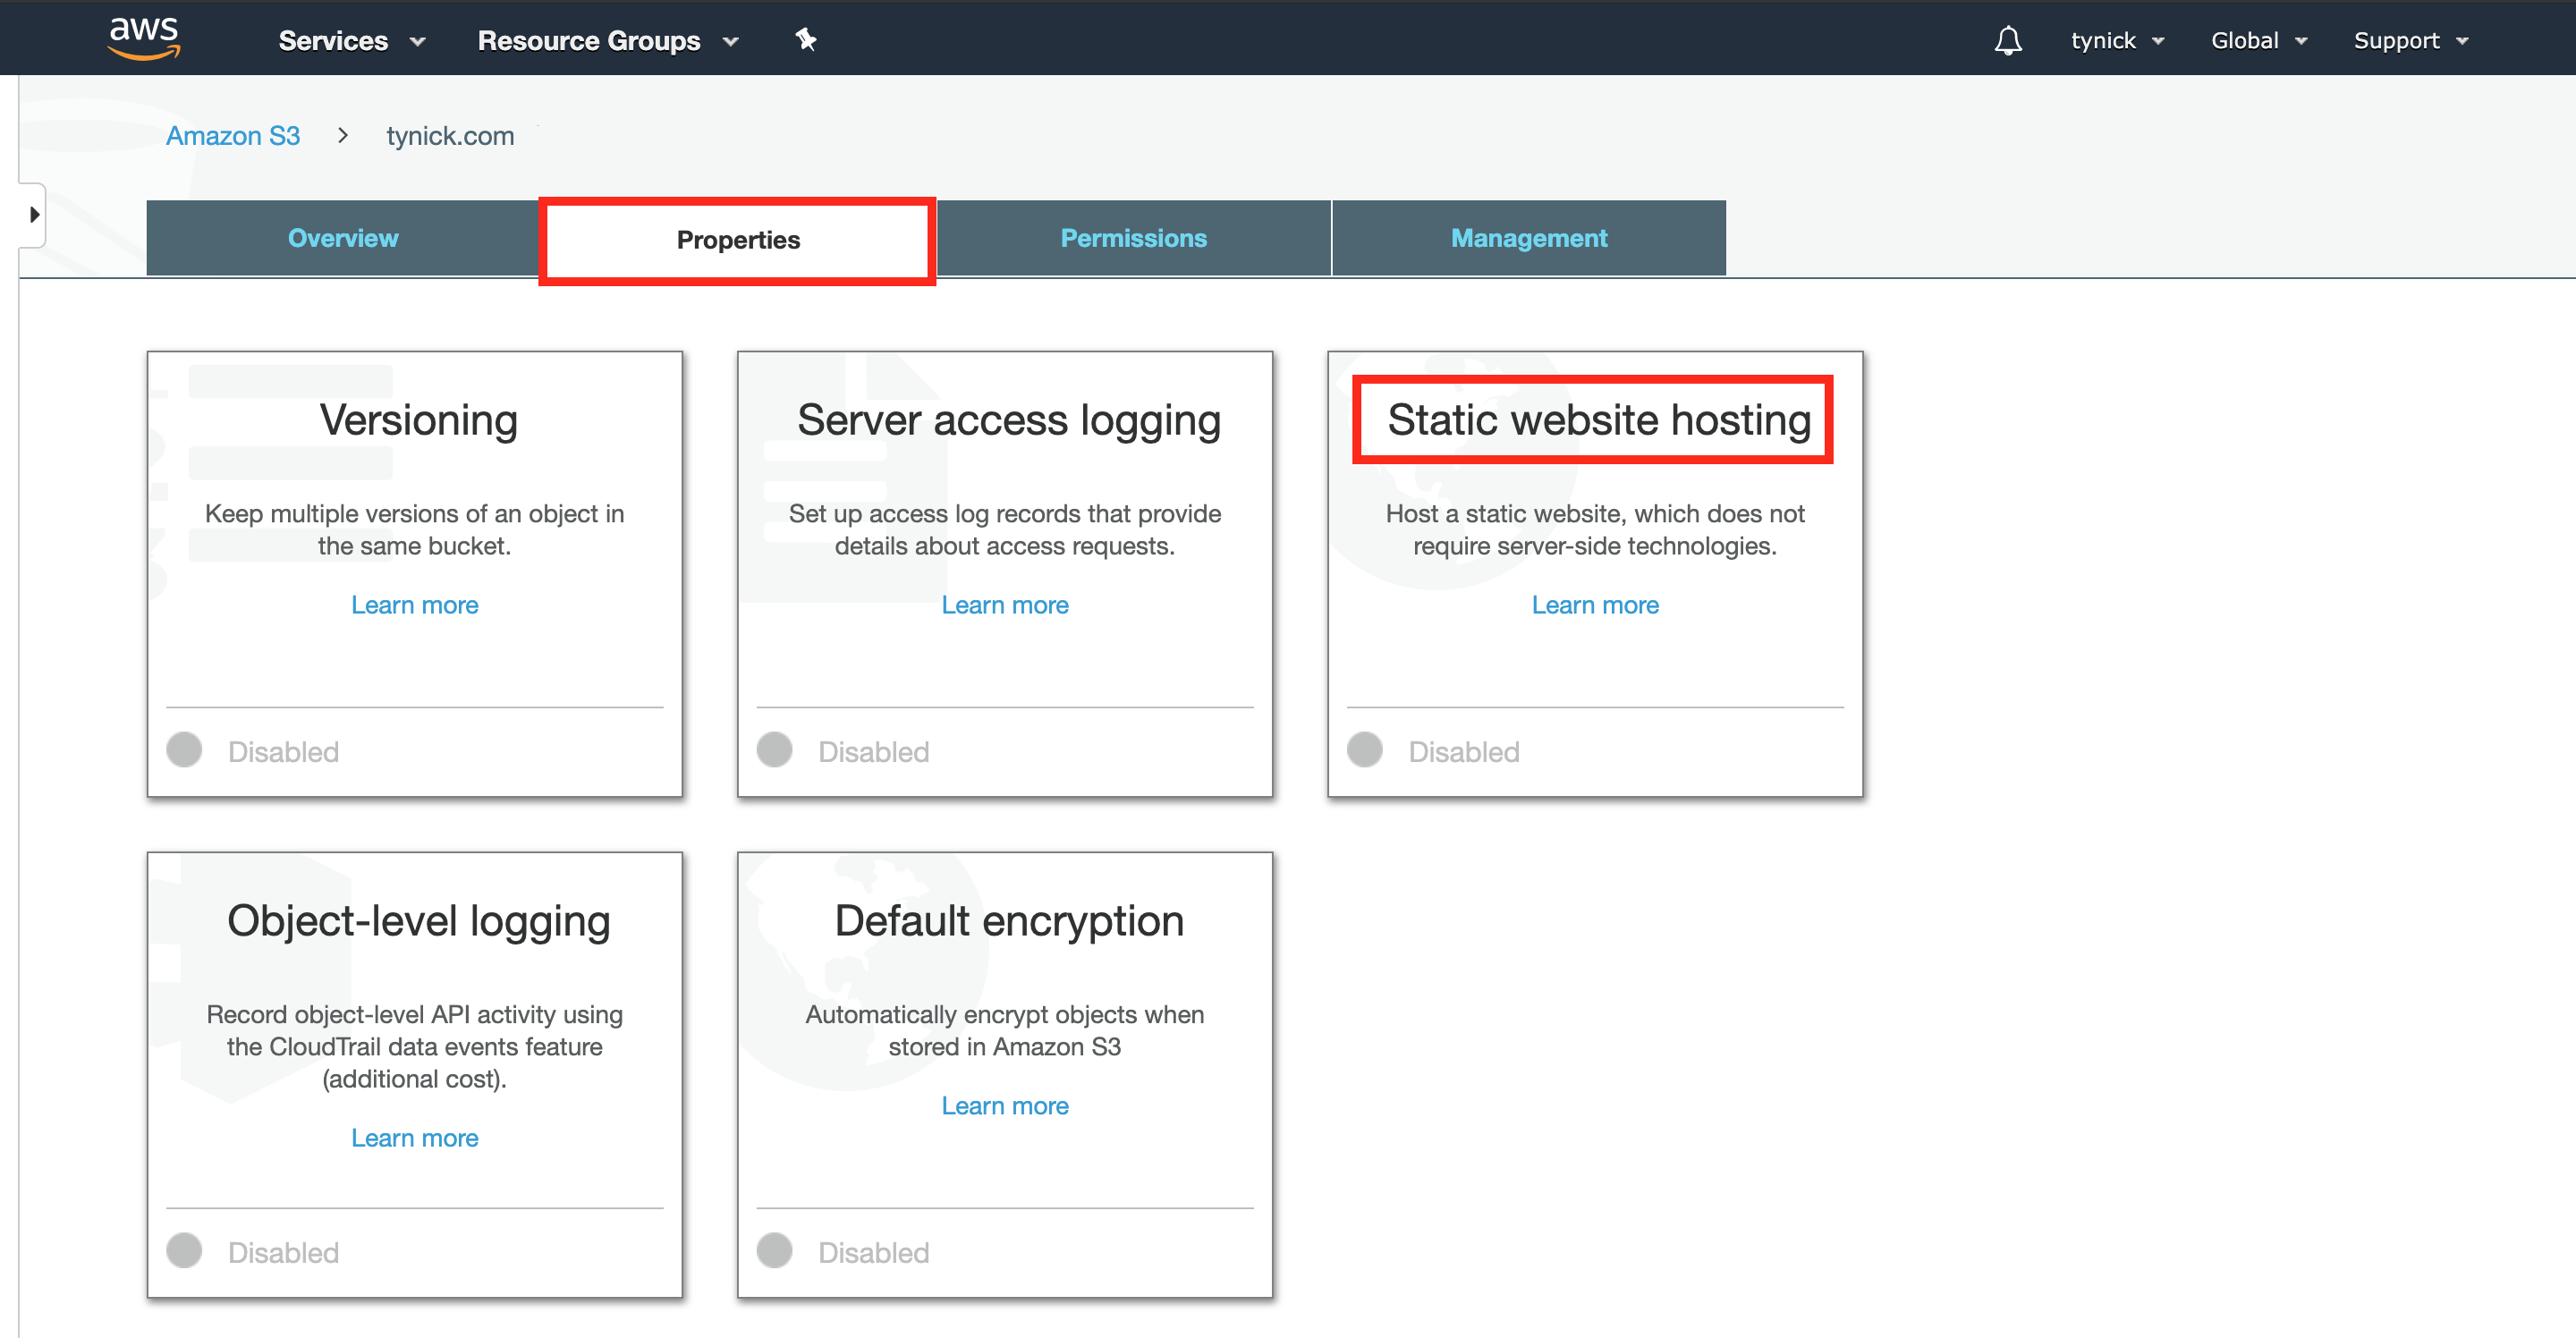
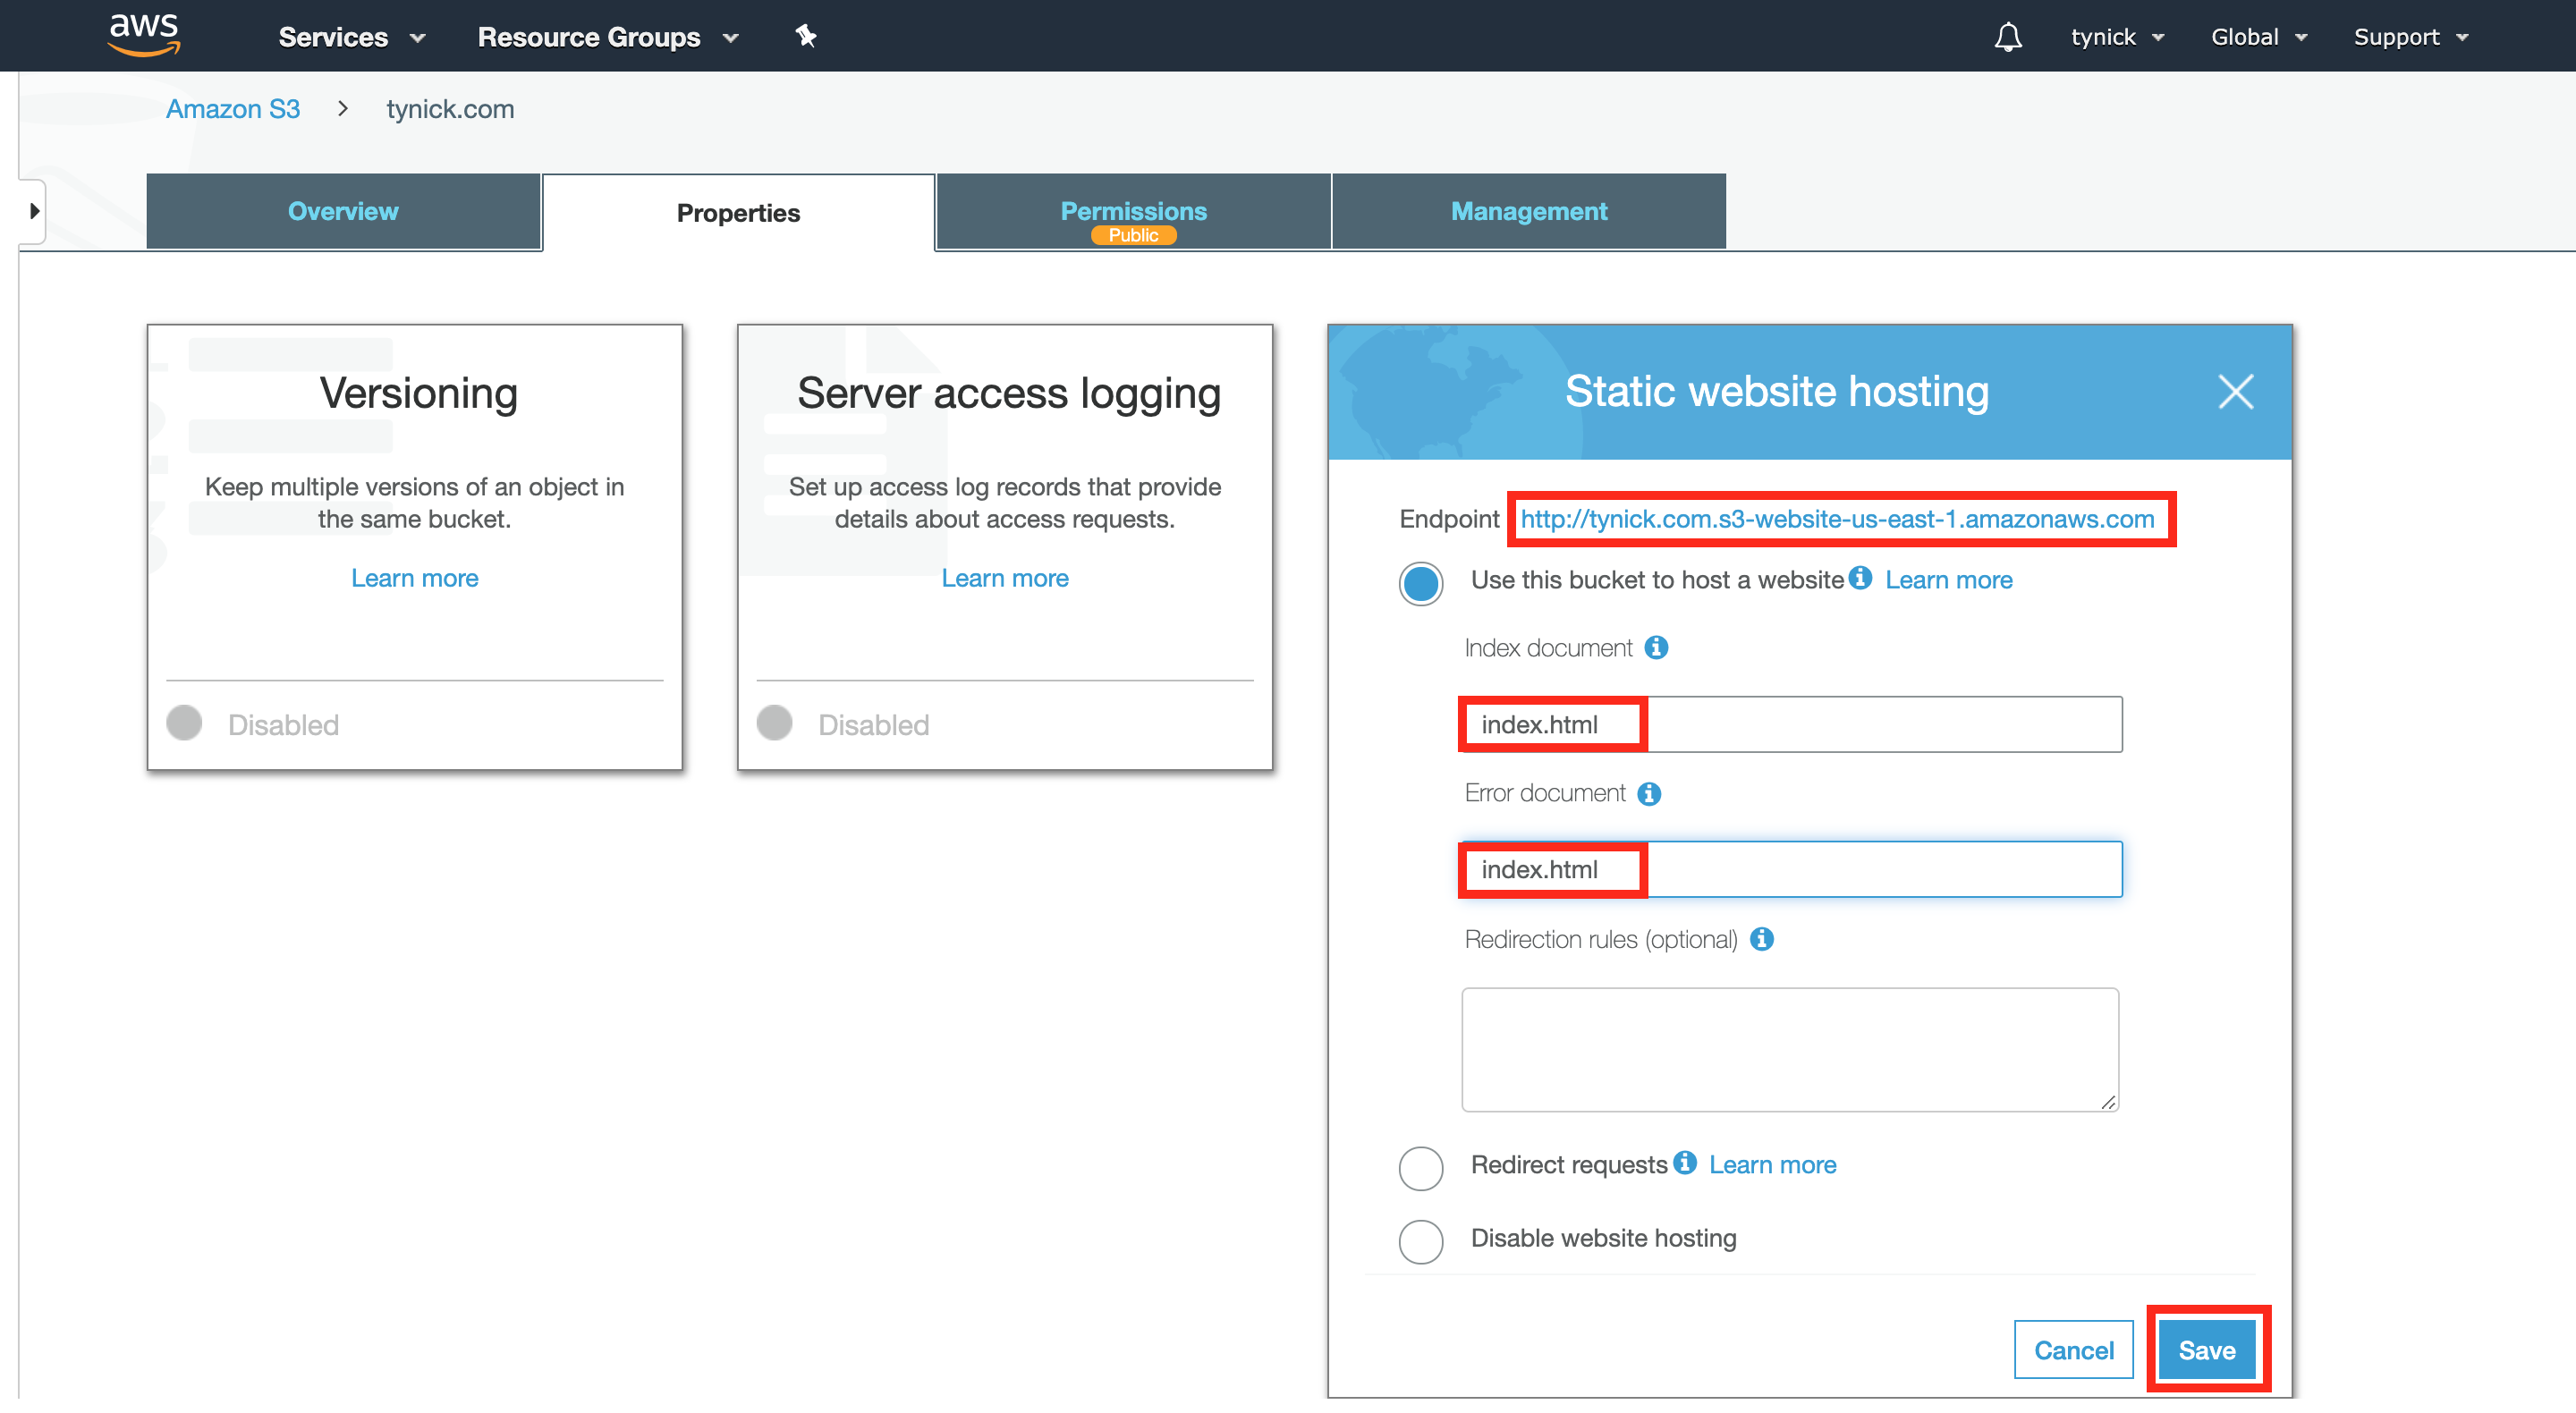
Select the “Properties” tab and then click on “Static Website Hosting”.
Check the radio button that says “Use this bucket to host a website”. Make note of the “Endpoint” http://tynick.com.s3-website-us-east-1.amazonaws.com on the screen below. You will need it later. This is the endpoint that your S3 bucket will serve requests at. We will make it look nicer later on. Configure the name of your index document and error document. Most will be index.html and error.html. I set mine to index.html and index.html. If I were to have an error on my site it would bring the user right back to the home page instead of showing them an error page. This is just a personal preference for this site. Click “Save” when complete.
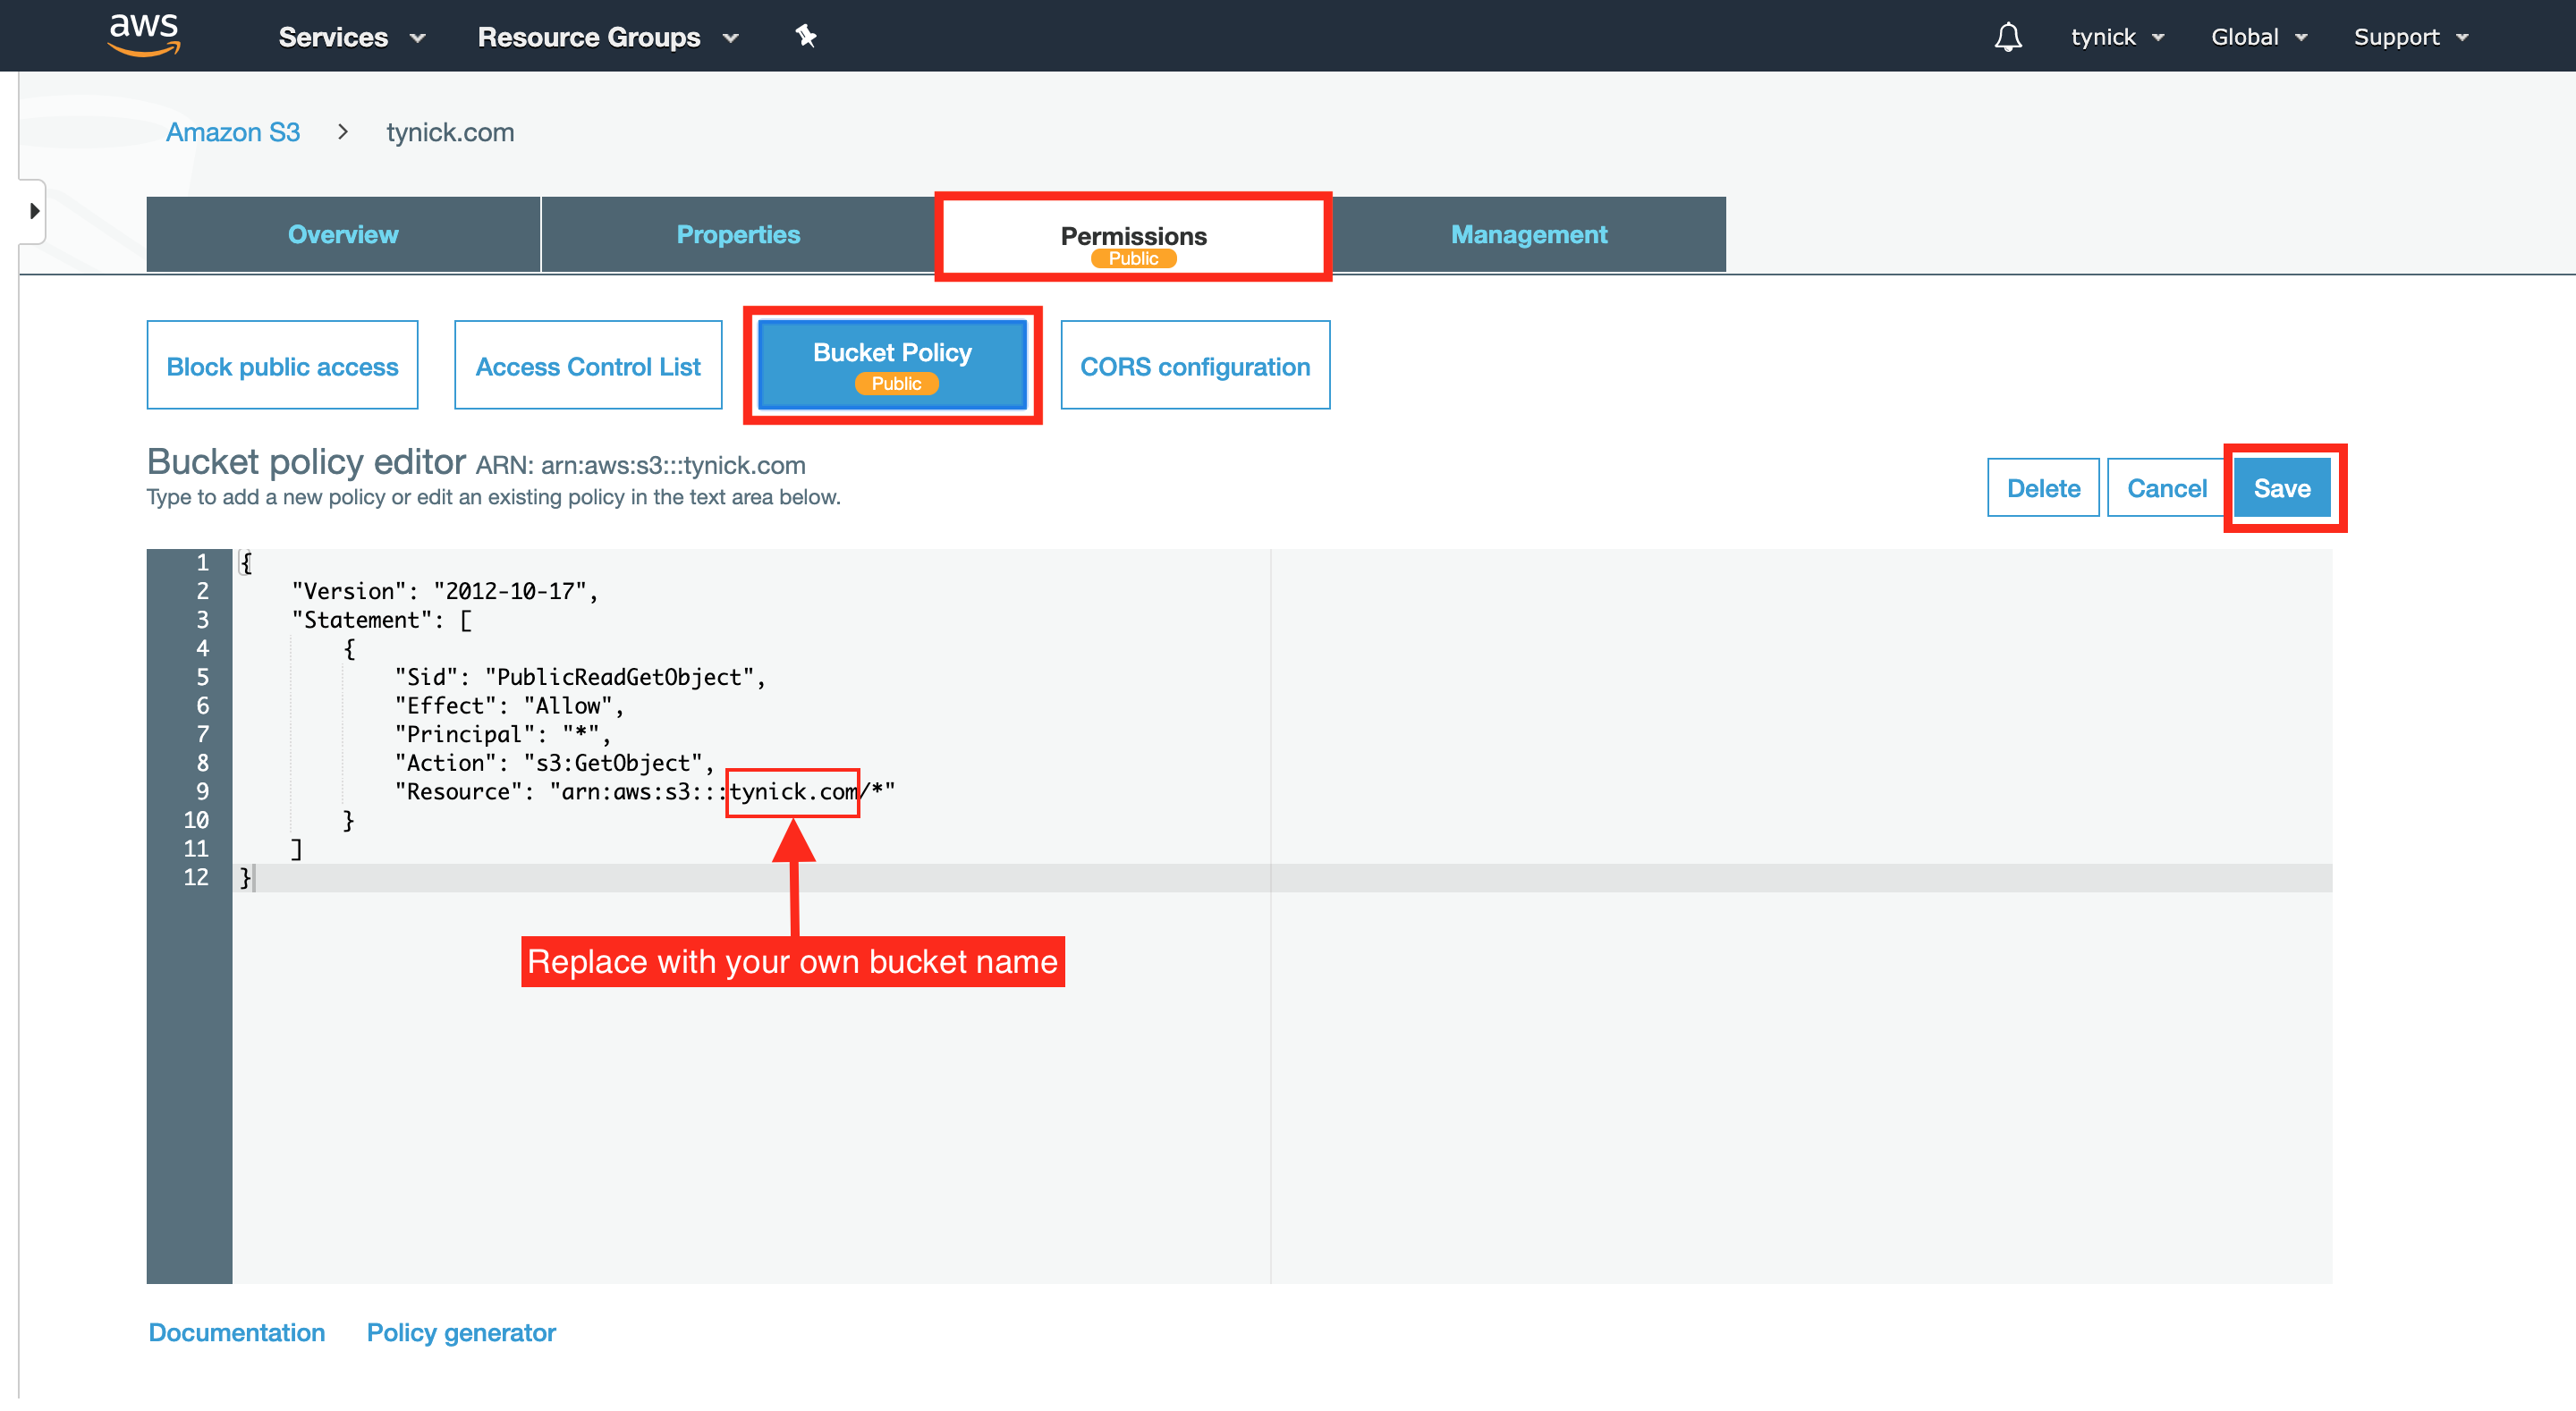
Next we need to add a S3 bucket policy. Select the “Permissions” tab and then click the “Bucket Policy” button.
Copy the following JSON block and paste it into the “Bucket policy editor”. Make sure you change tynick.com to yourbucketname and then click “Save”.
{
    "Version": "2012-10-17",
    "Statement": [
        {
            "Sid": "PublicReadGetObject",
            "Effect": "Allow",
            "Principal": "*",
            "Action": "s3:GetObject",
            "Resource": "arn:aws:s3:::tynick.com/*"
        }
    ]
}
That policy will allow anyone to get any object that is placed in the bucket.
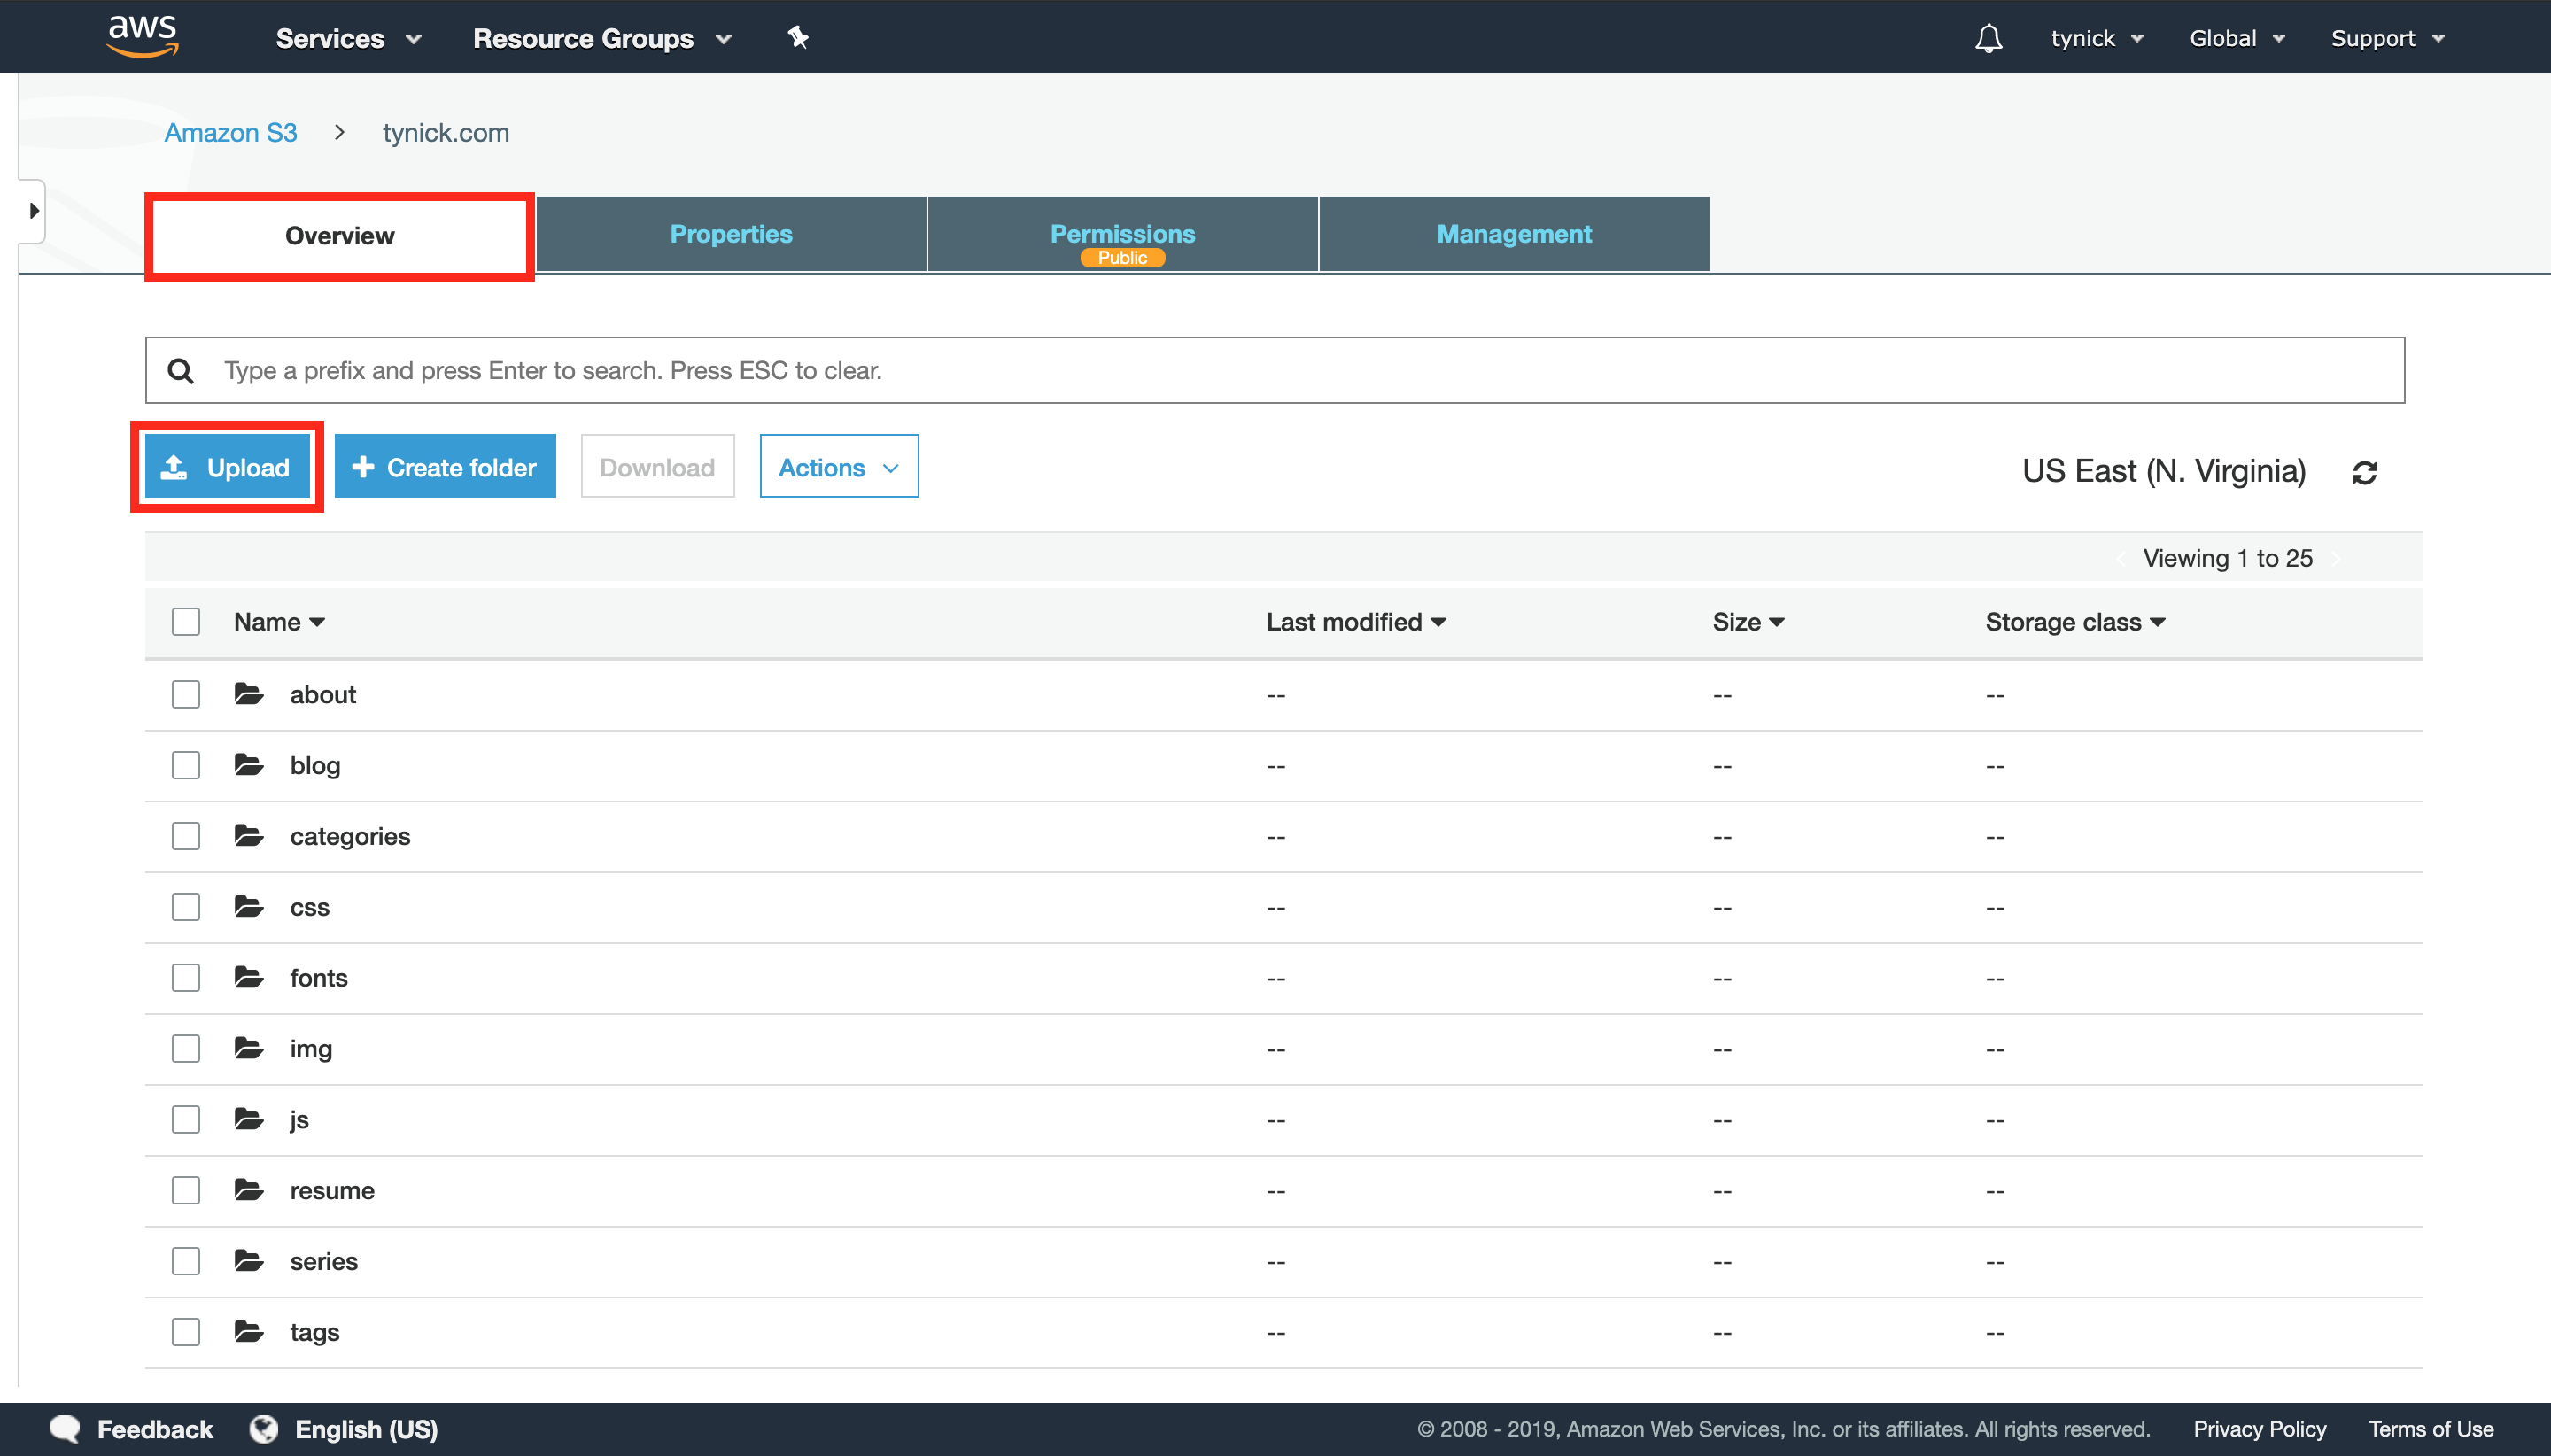
Go back to the “Overview” tab and upload your site. If you don’t have a site yet, just make a new document on your computer and add the text “Welcome to yourdomainname!”. Save the new file as index.html and upload it to your bucket.
Remember that “Endpoint” I told you to hold onto earlier? Mine was http://tynick.com.s3-website-us-east-1.amazonaws.com. You should now be able to go to that address in a browser and view your site.
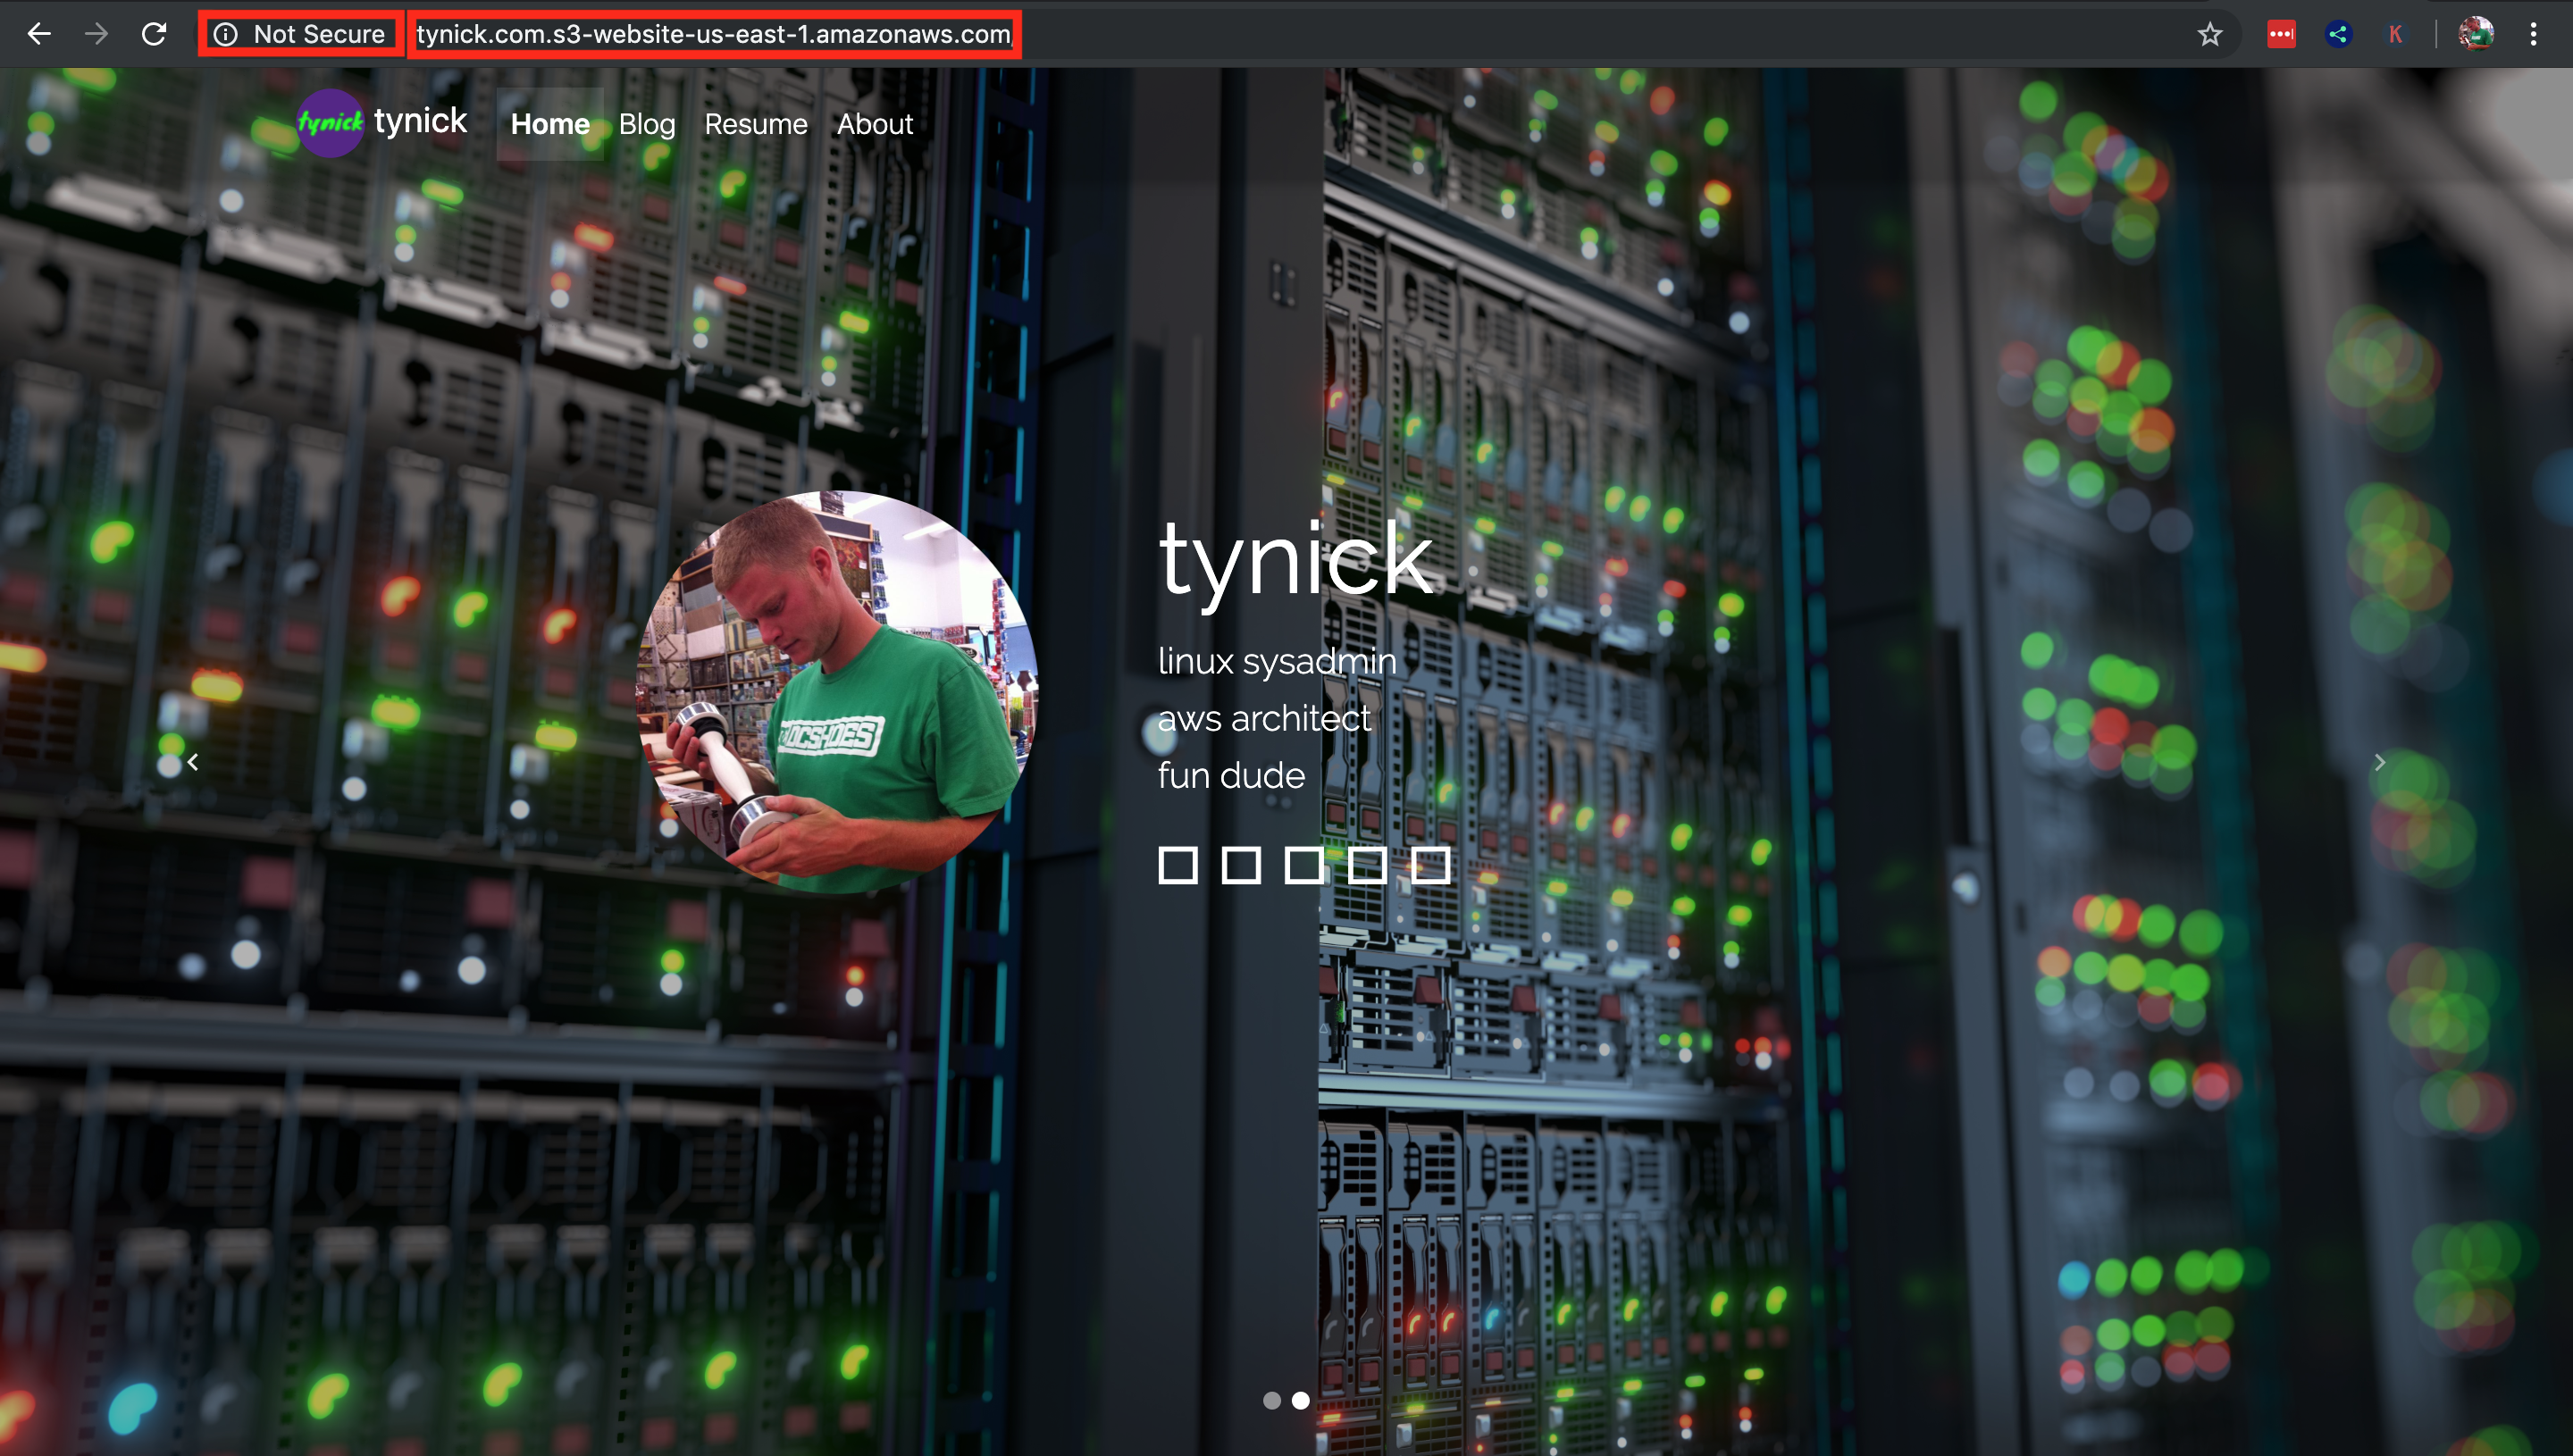
You now have an S3 bucket serving a static website at http://yourbucketnamehere.s3-website-us-east-1.amazonaws.com.
The next 2 steps will cover setting up HTTPS with AWS CloudFront and pointing DNS in Route 53 to the site.
#4 Setup HTTPS and a CDN
We are now going to use AWS CloudFront in the AWS Console to configure HTTPS while also setting up a CDN for our site.
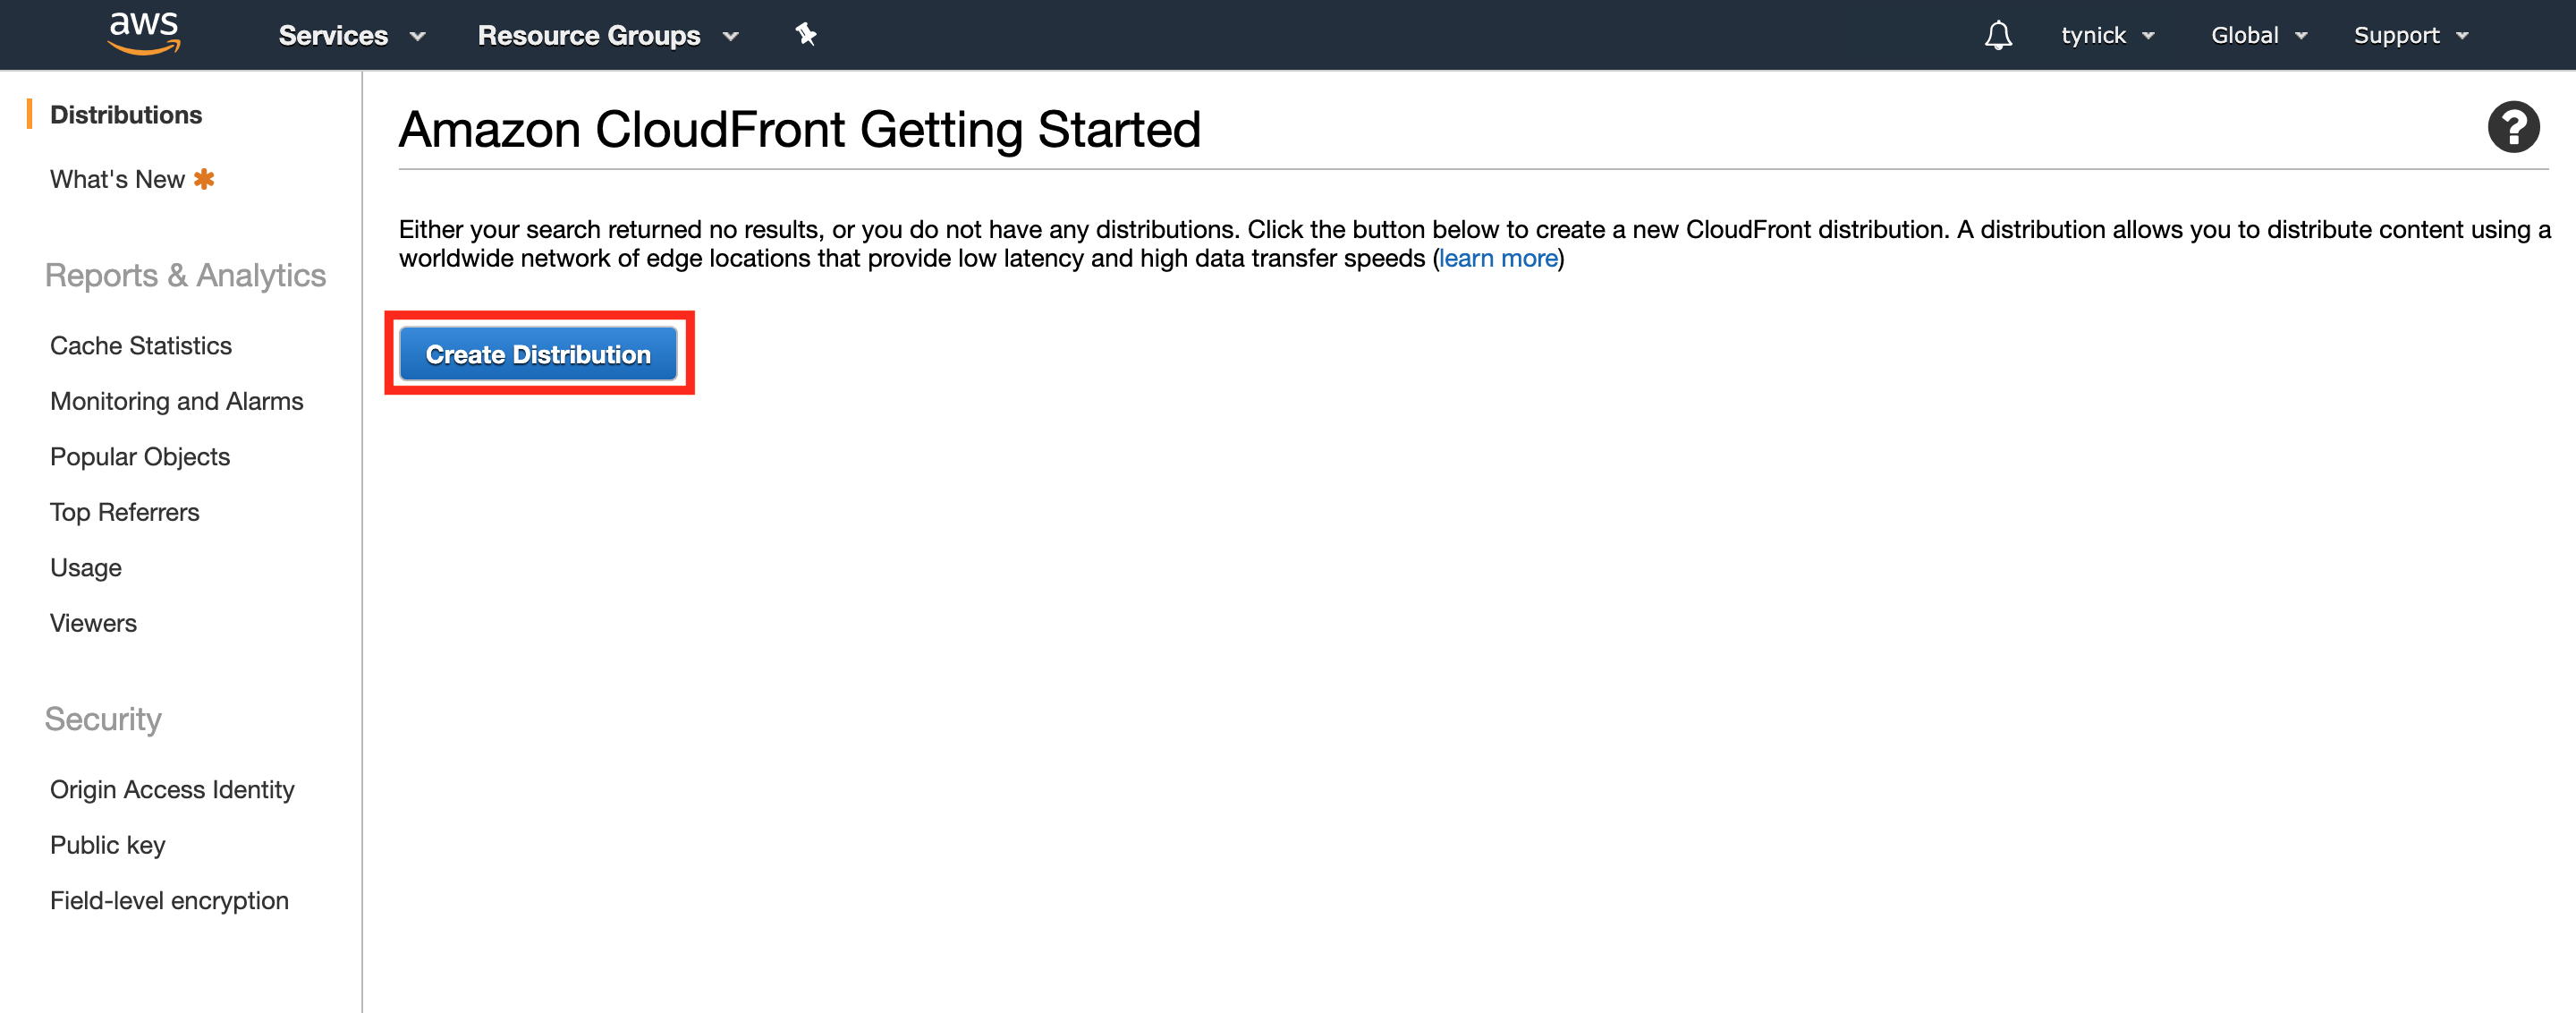
Start out by clicking “Create distribution”.
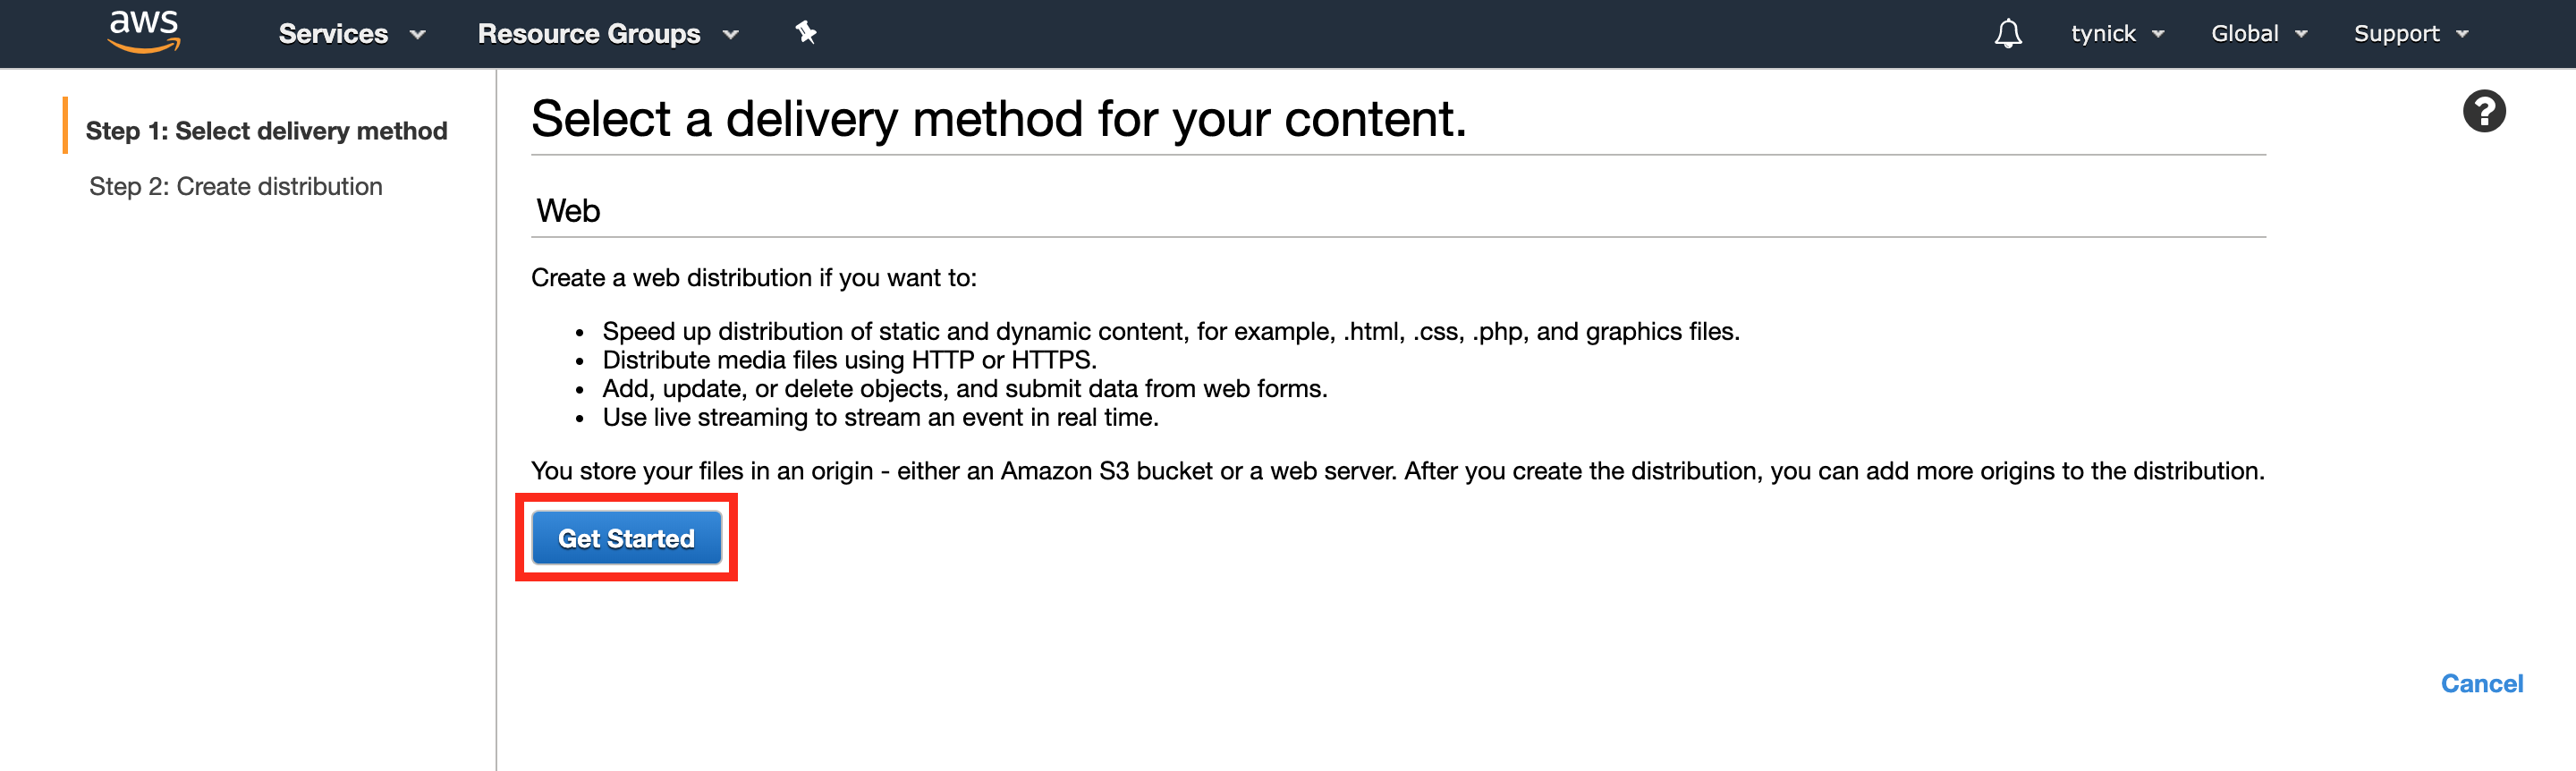
On the next screen we will click “Get started” to create a CloudFront web distribution.
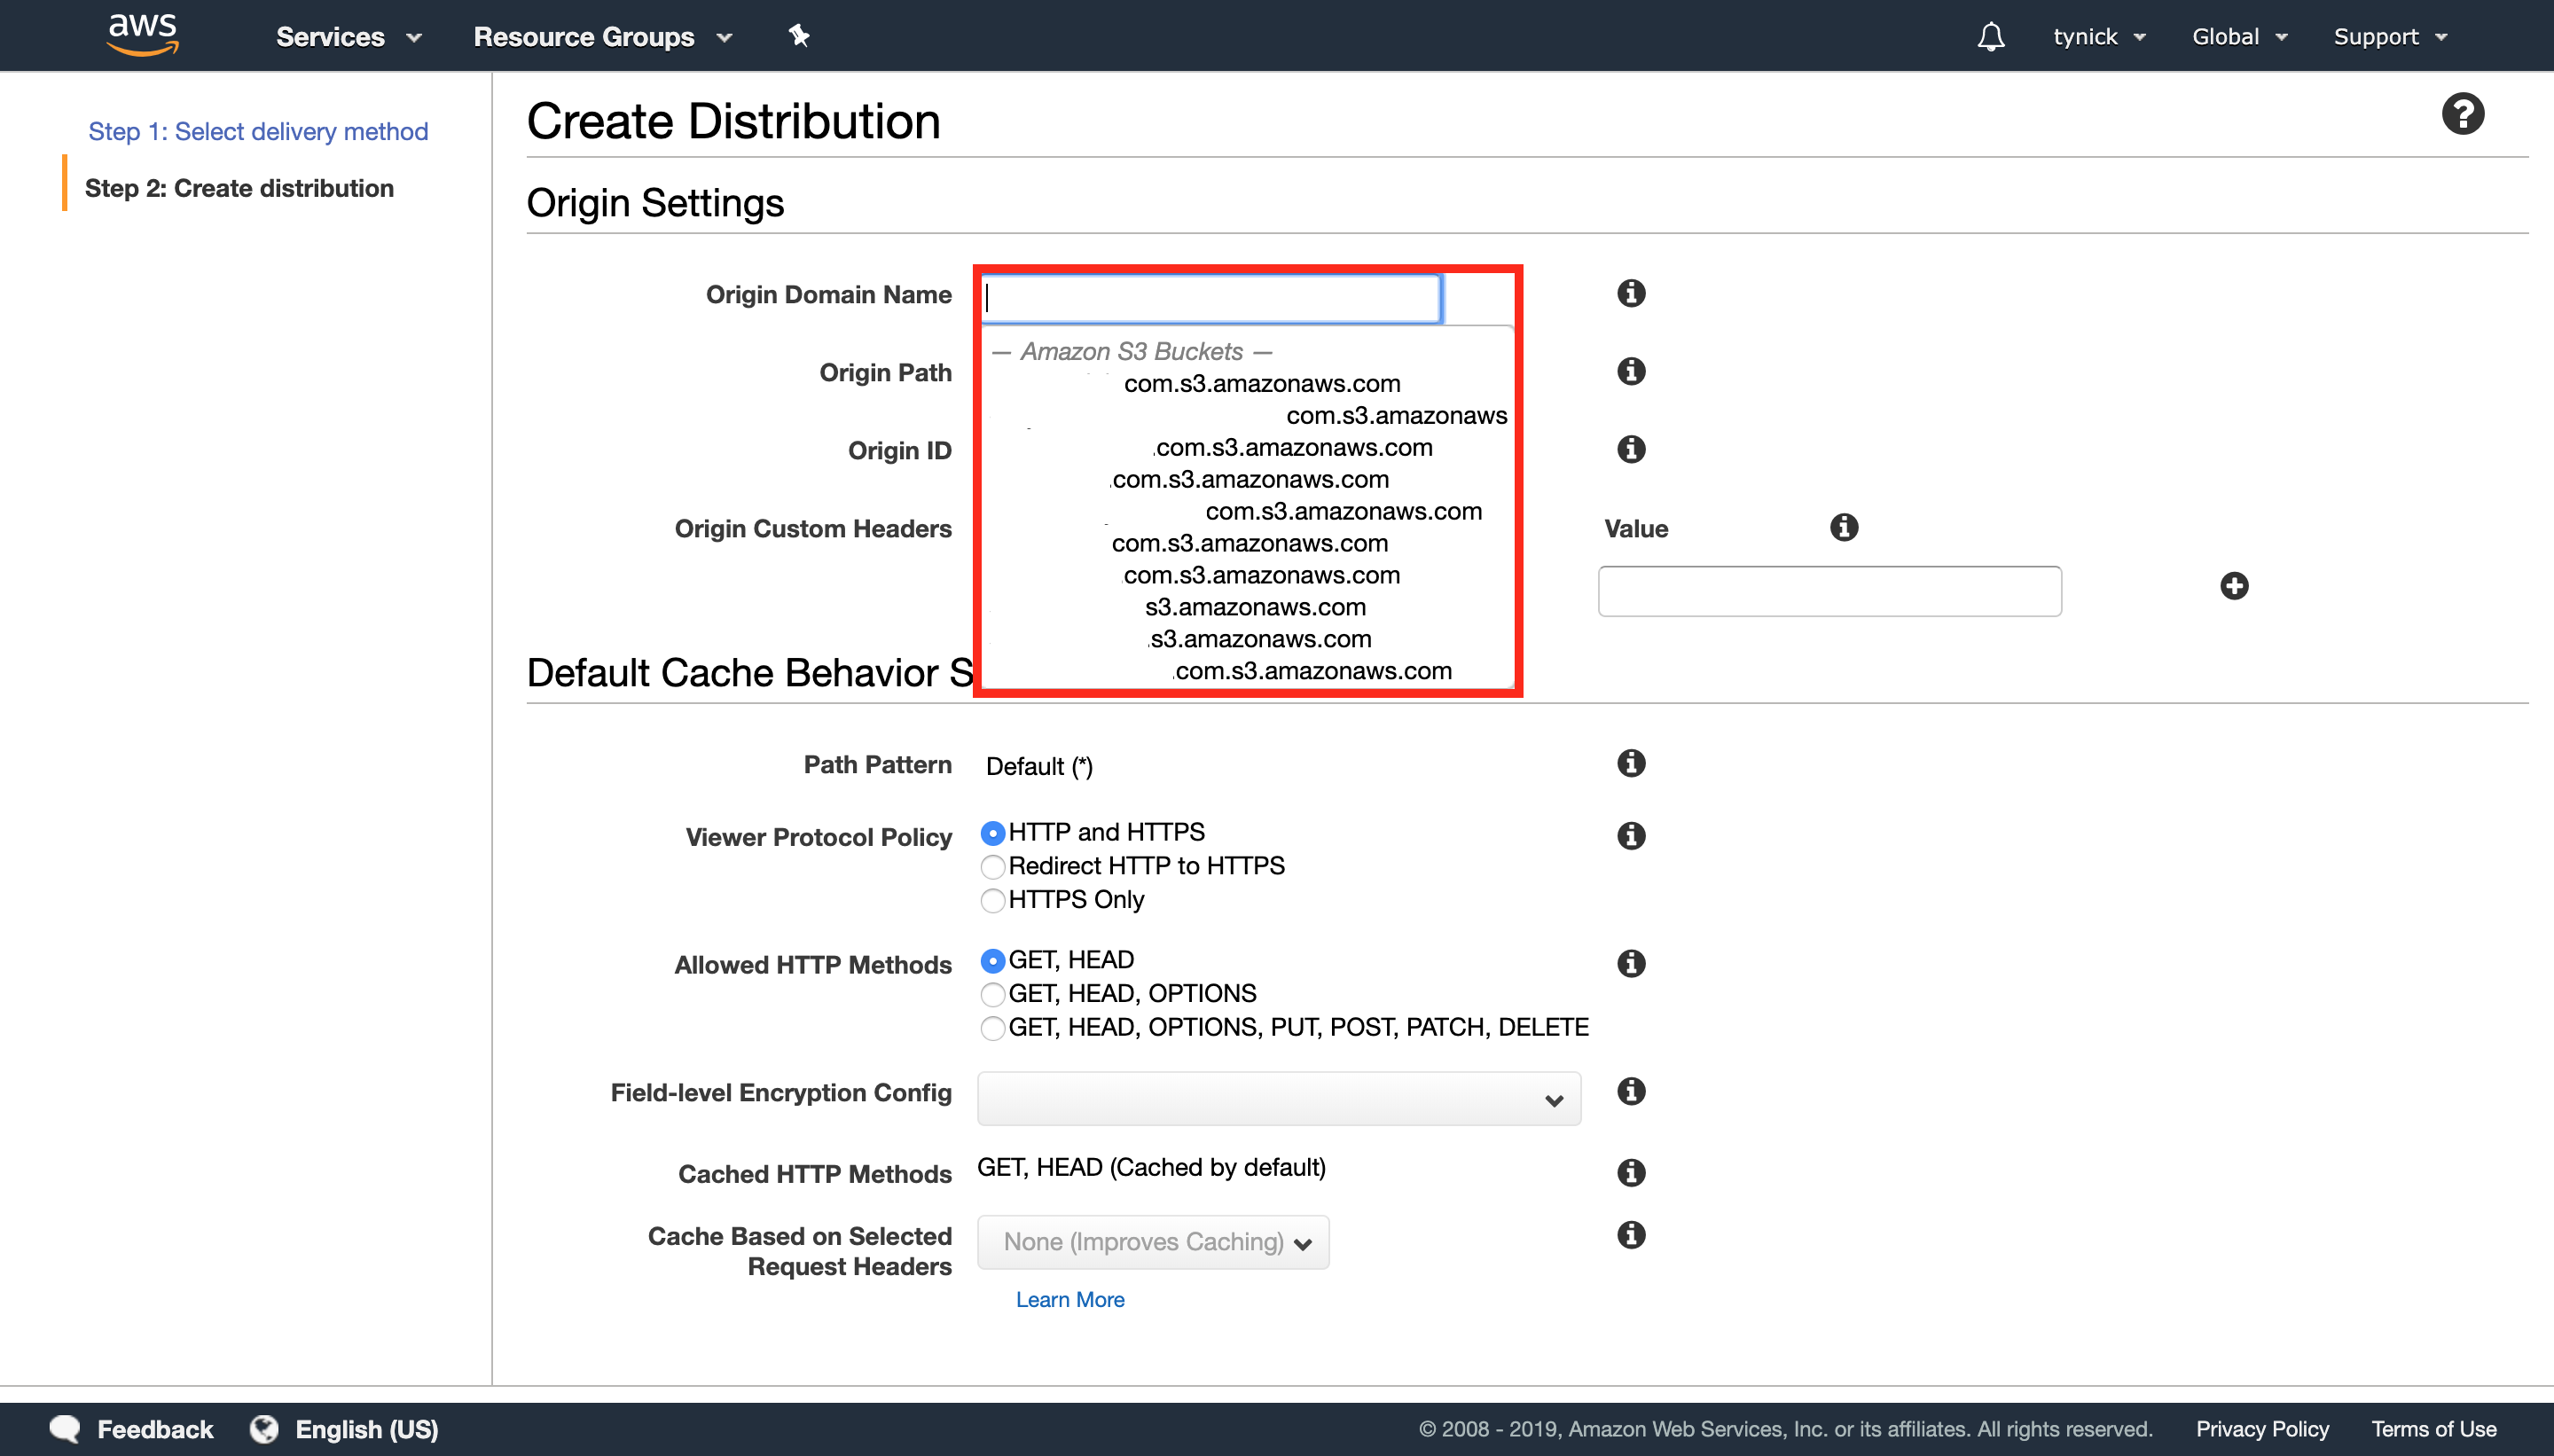
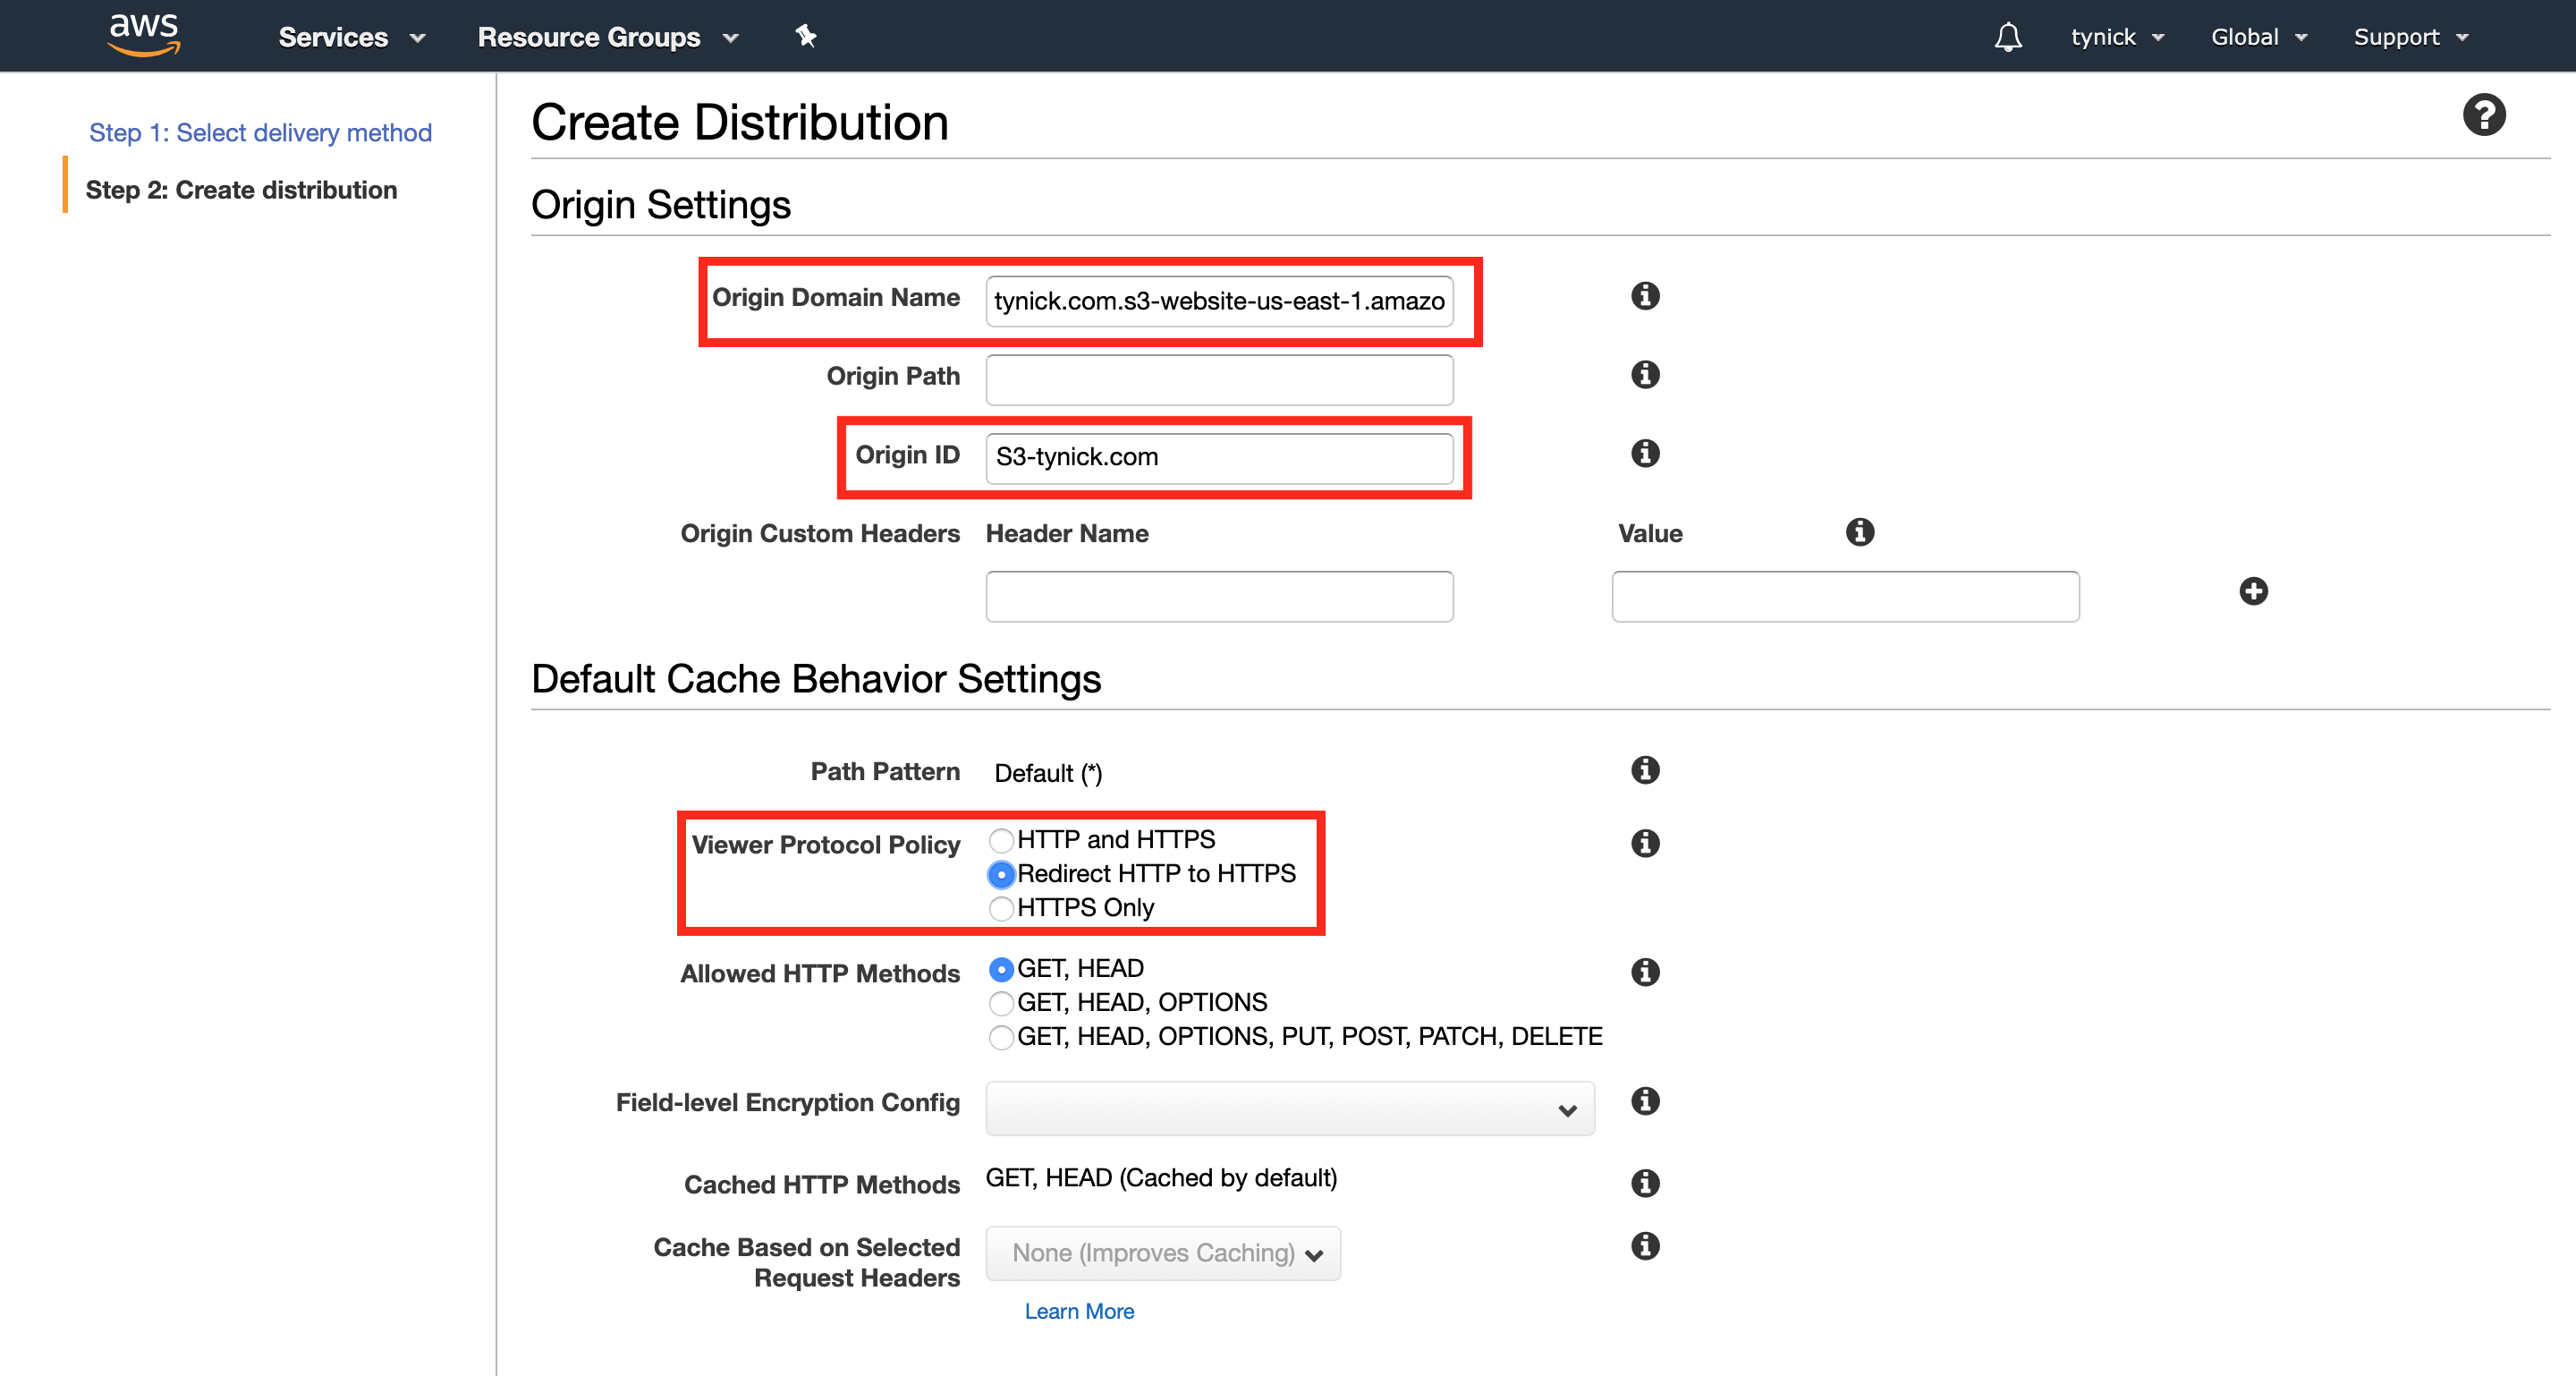
First we will add the S3 endpoint as the CloudFront Origin Domain Name. Make sure you copy and paste. When you click on the text box for Origin Domain Name, you might see an “Amazon S3 Buckets” list. Do not select from that list. You need to paste the http endpoint into that field.
I will outline everything I changed in red. For the purposes of this tutorial we are just trying to get everyone up and running with a basic configuration. Feel free to deviate if you know what you are doing.
The Origin ID is just a name you make up to describe the origin(the S3 bucket that contains the website).
Be sure to redirect HTTP to HTTPS.
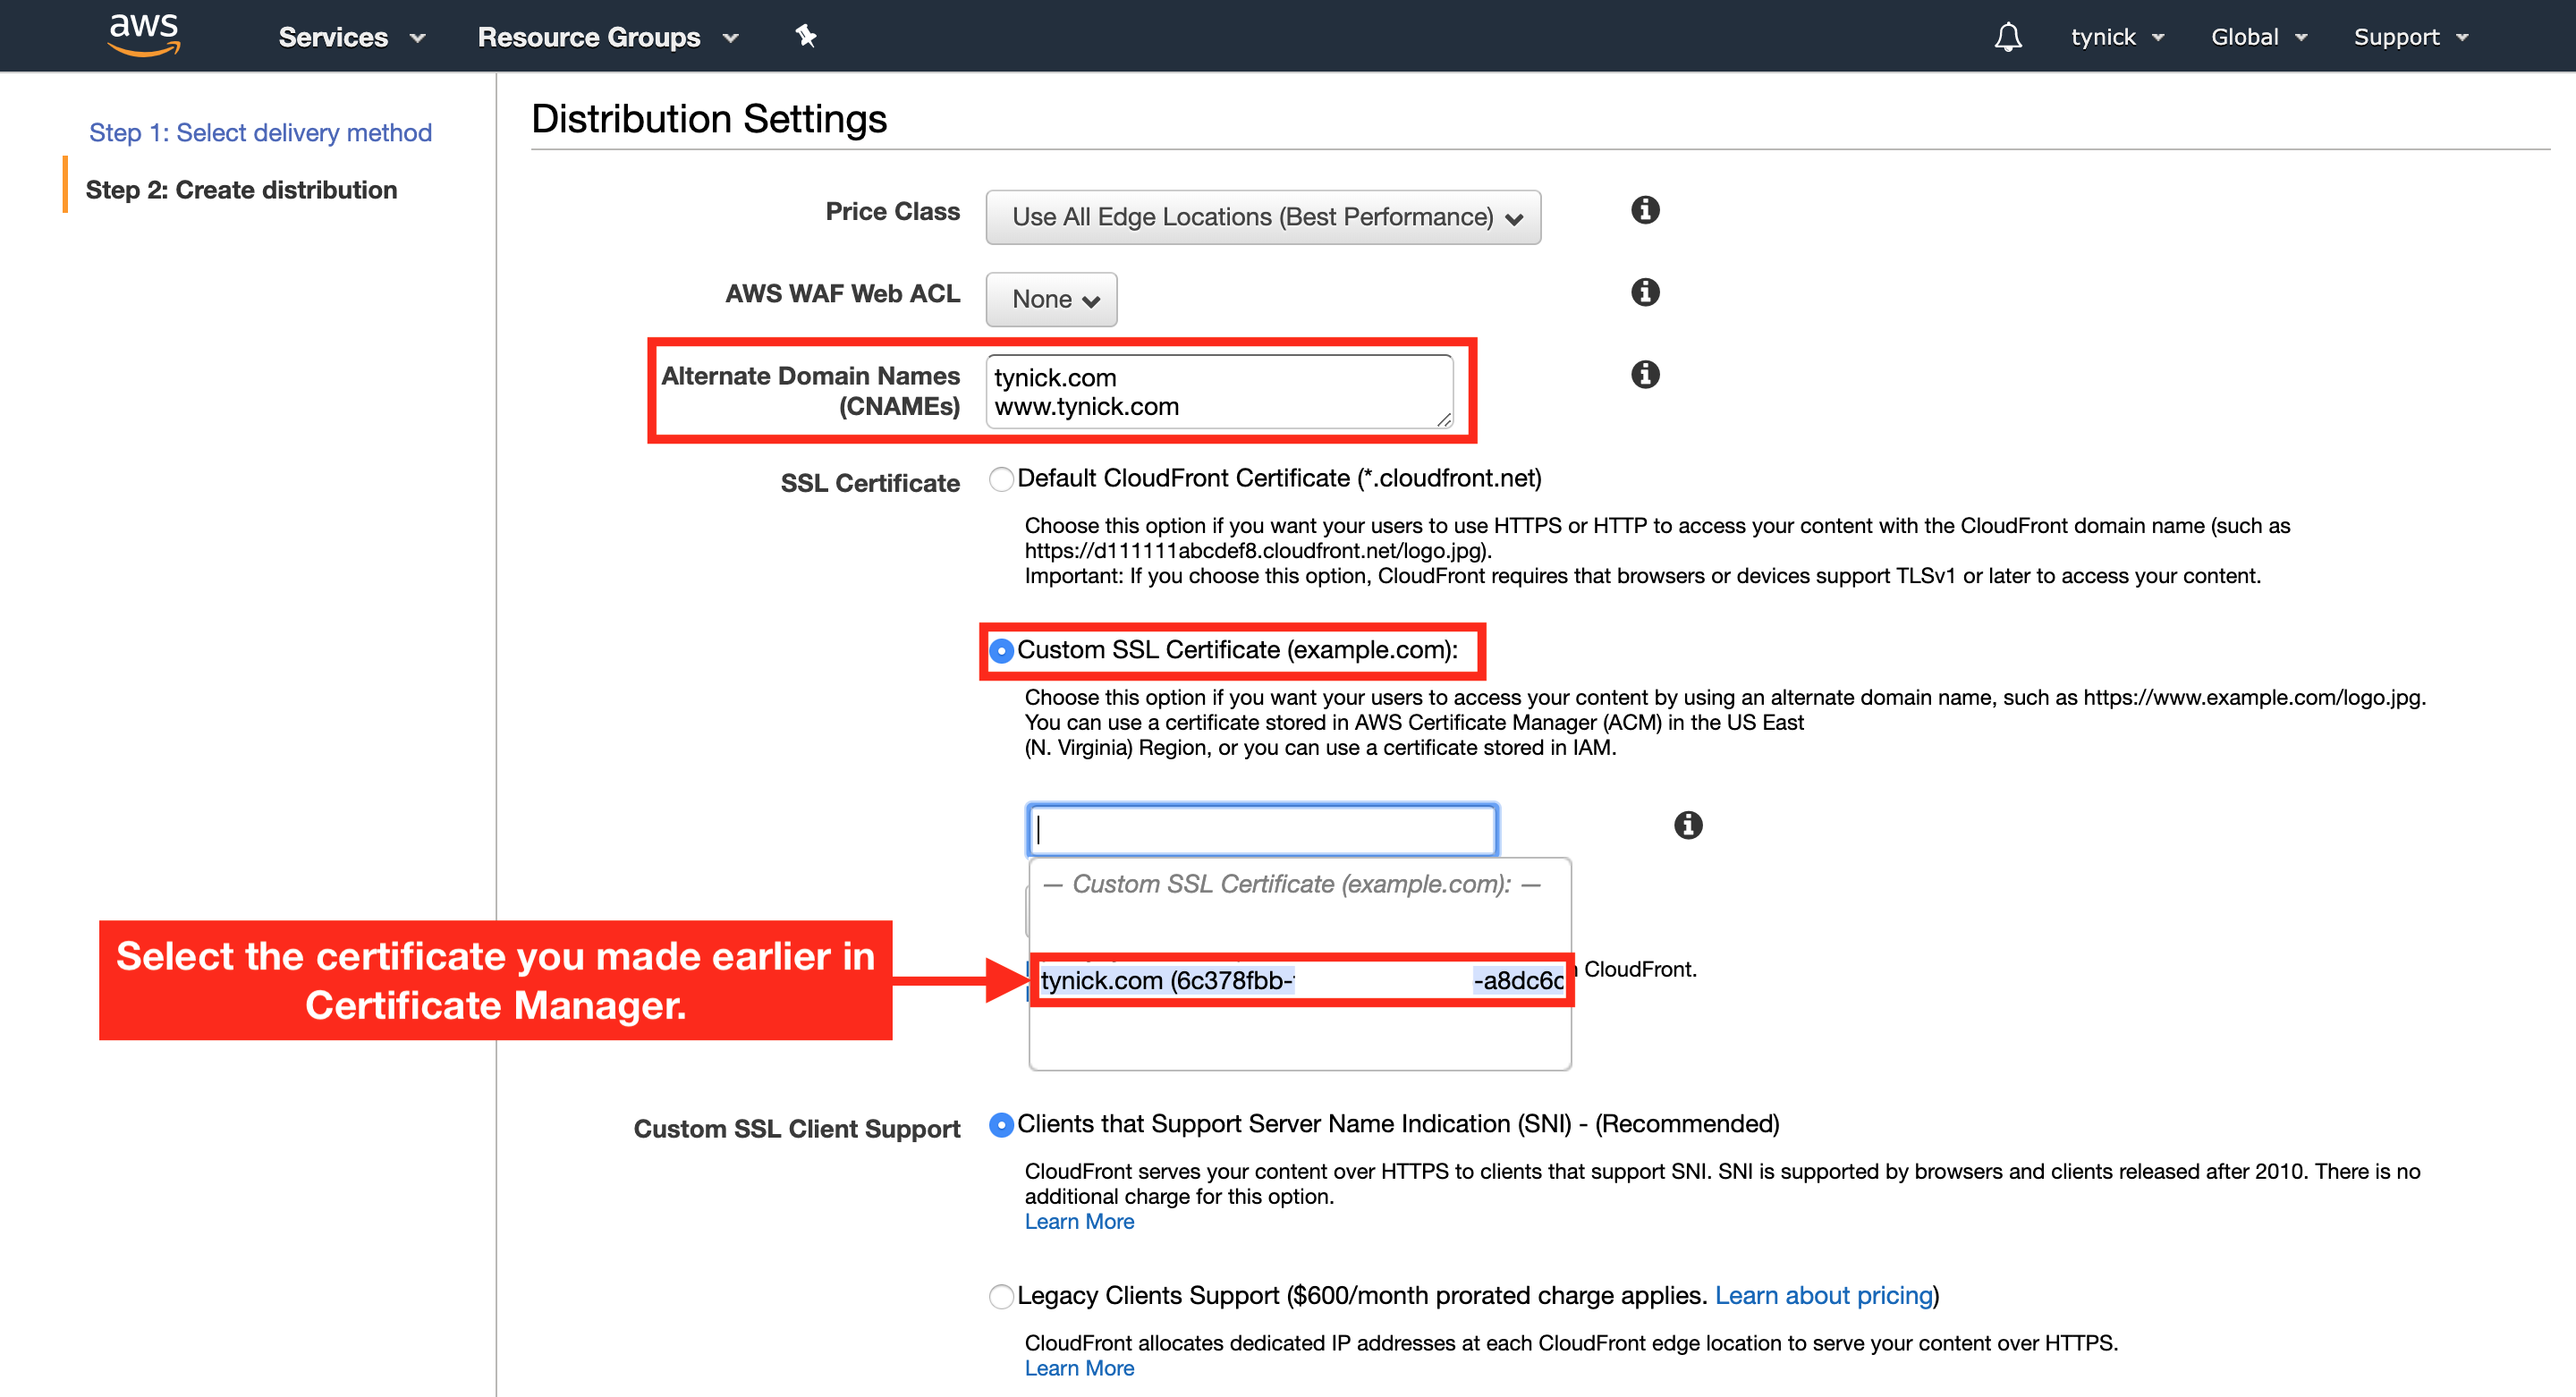
In the “Alternate Domain Names(CNAMEs)” you will enter all of the FQDNs that you added to the ACM public certificate in step 2 of this tutorial. Then select the “Custom SSL Certificate” radio button. Click the text box just below that and it will auto populate a list of certificates that we have available to us through Certificate Manager. Select the ACM public certificate that we requested earlier.
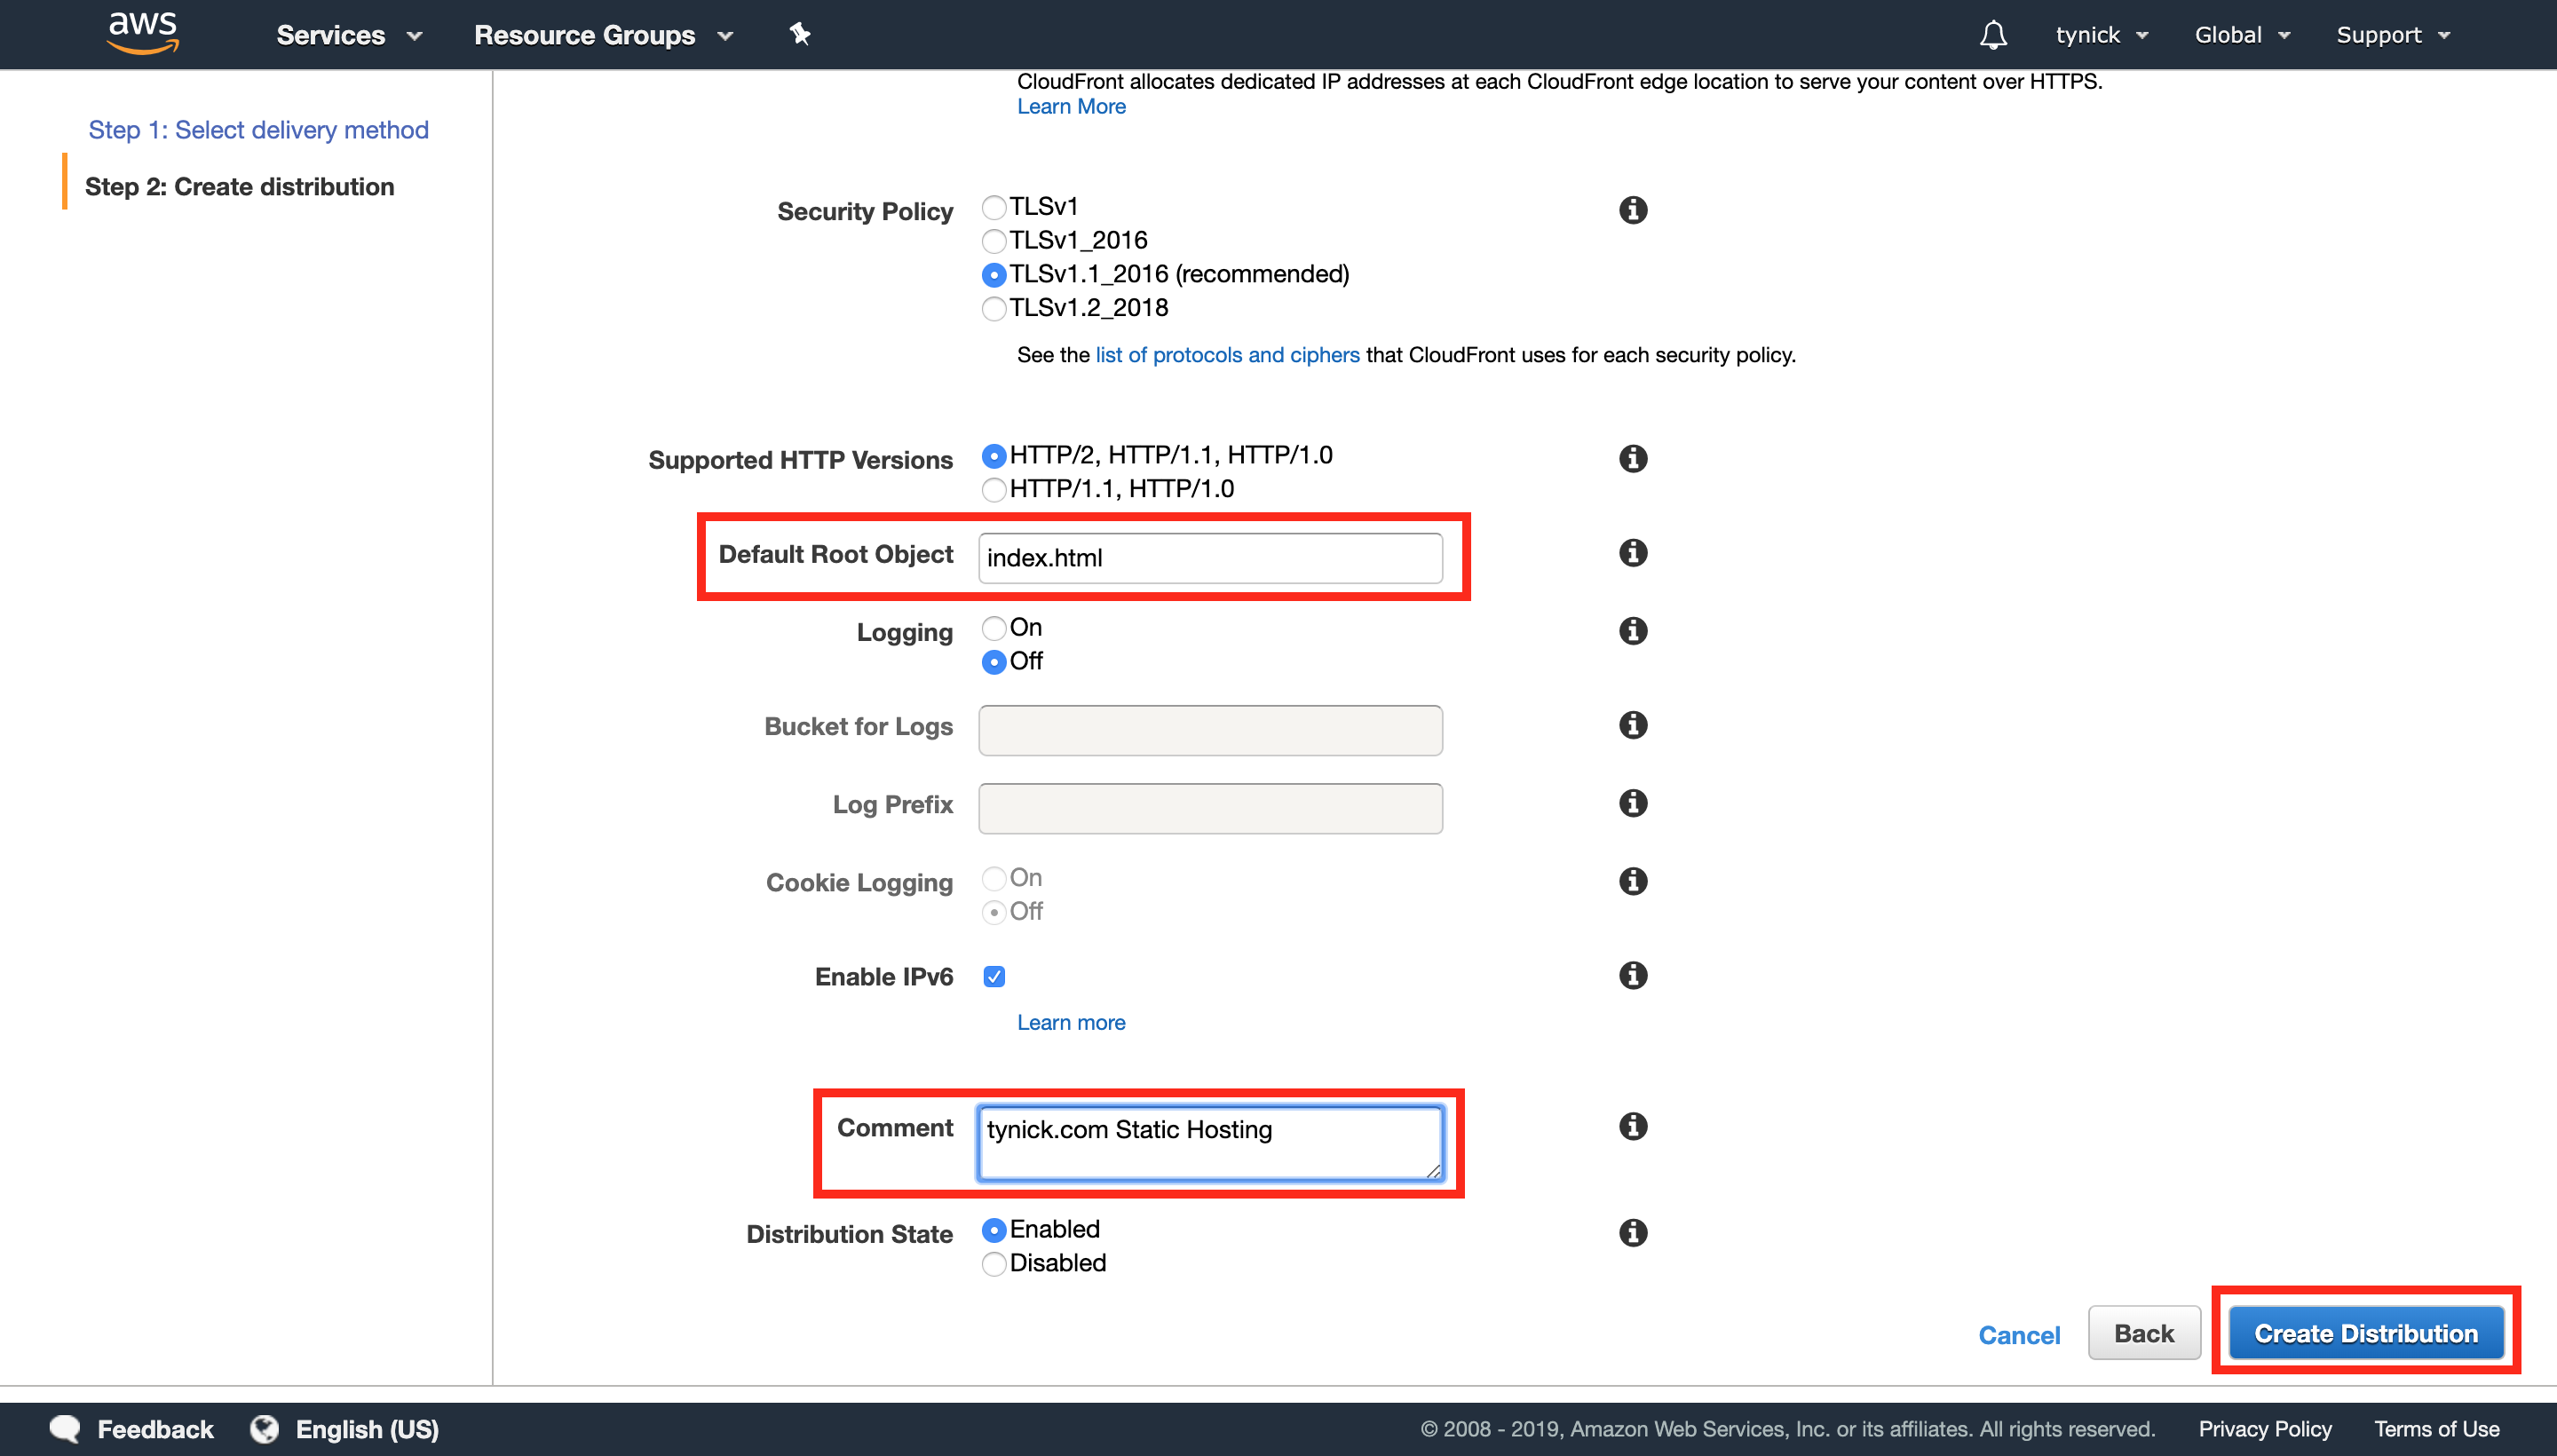
Add your index.html as the “Default Root Object” and then add something in the comment box to remind yourself what this distribution is for. Click “Create Distribution” when complete.
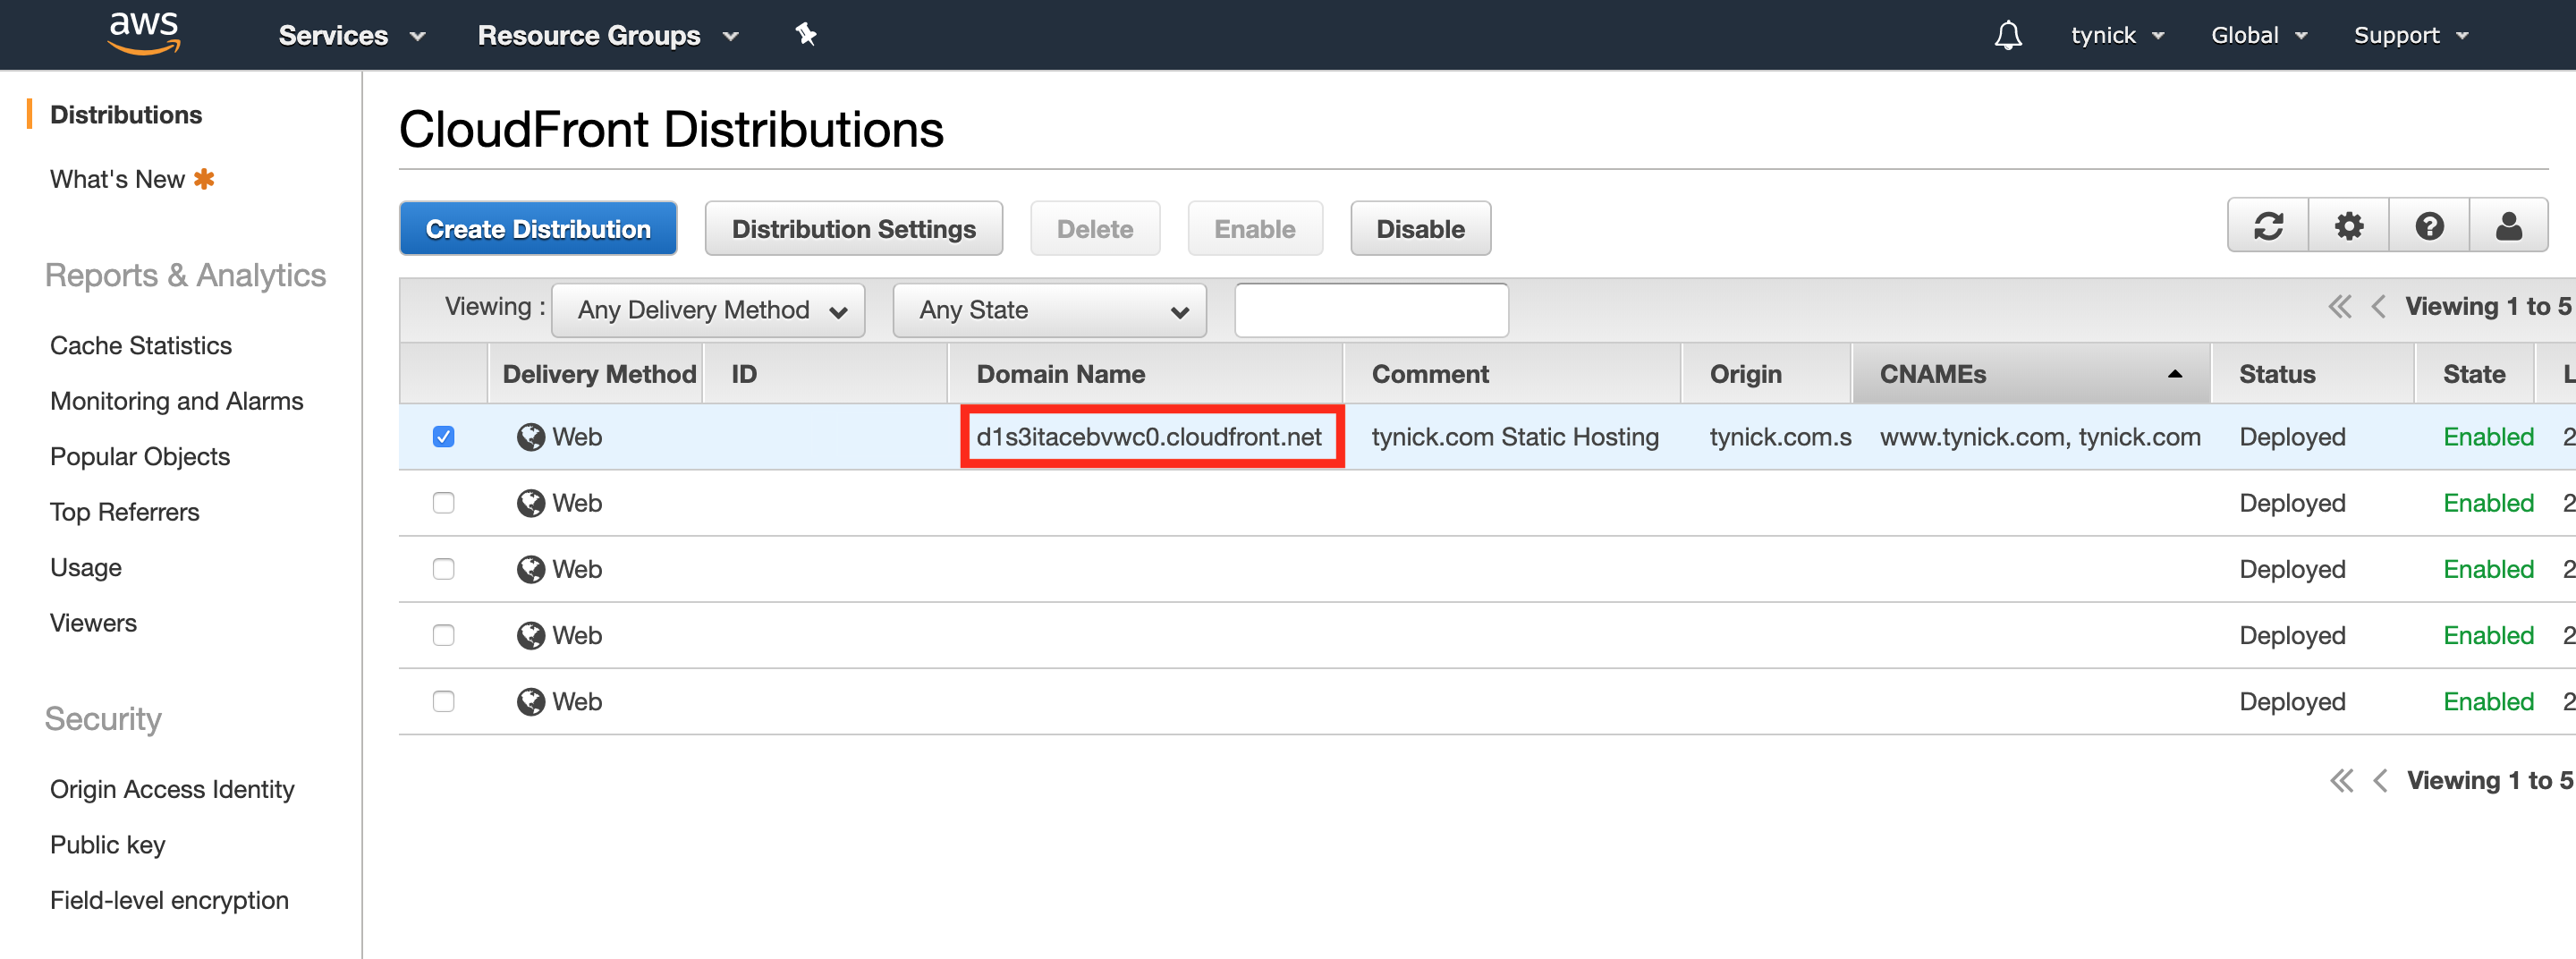
You will be brought back to the Distributions section within CloudFront. You should see your newly created distribution. Your status will probably read In Progress and then eventually move to Deployed. This can take around 30 minutes. We don’t care about that right now though. We need to grab the “Domain Name” that is shown for our distribution. We need it for the last and final step!
#5 Add DNS Records
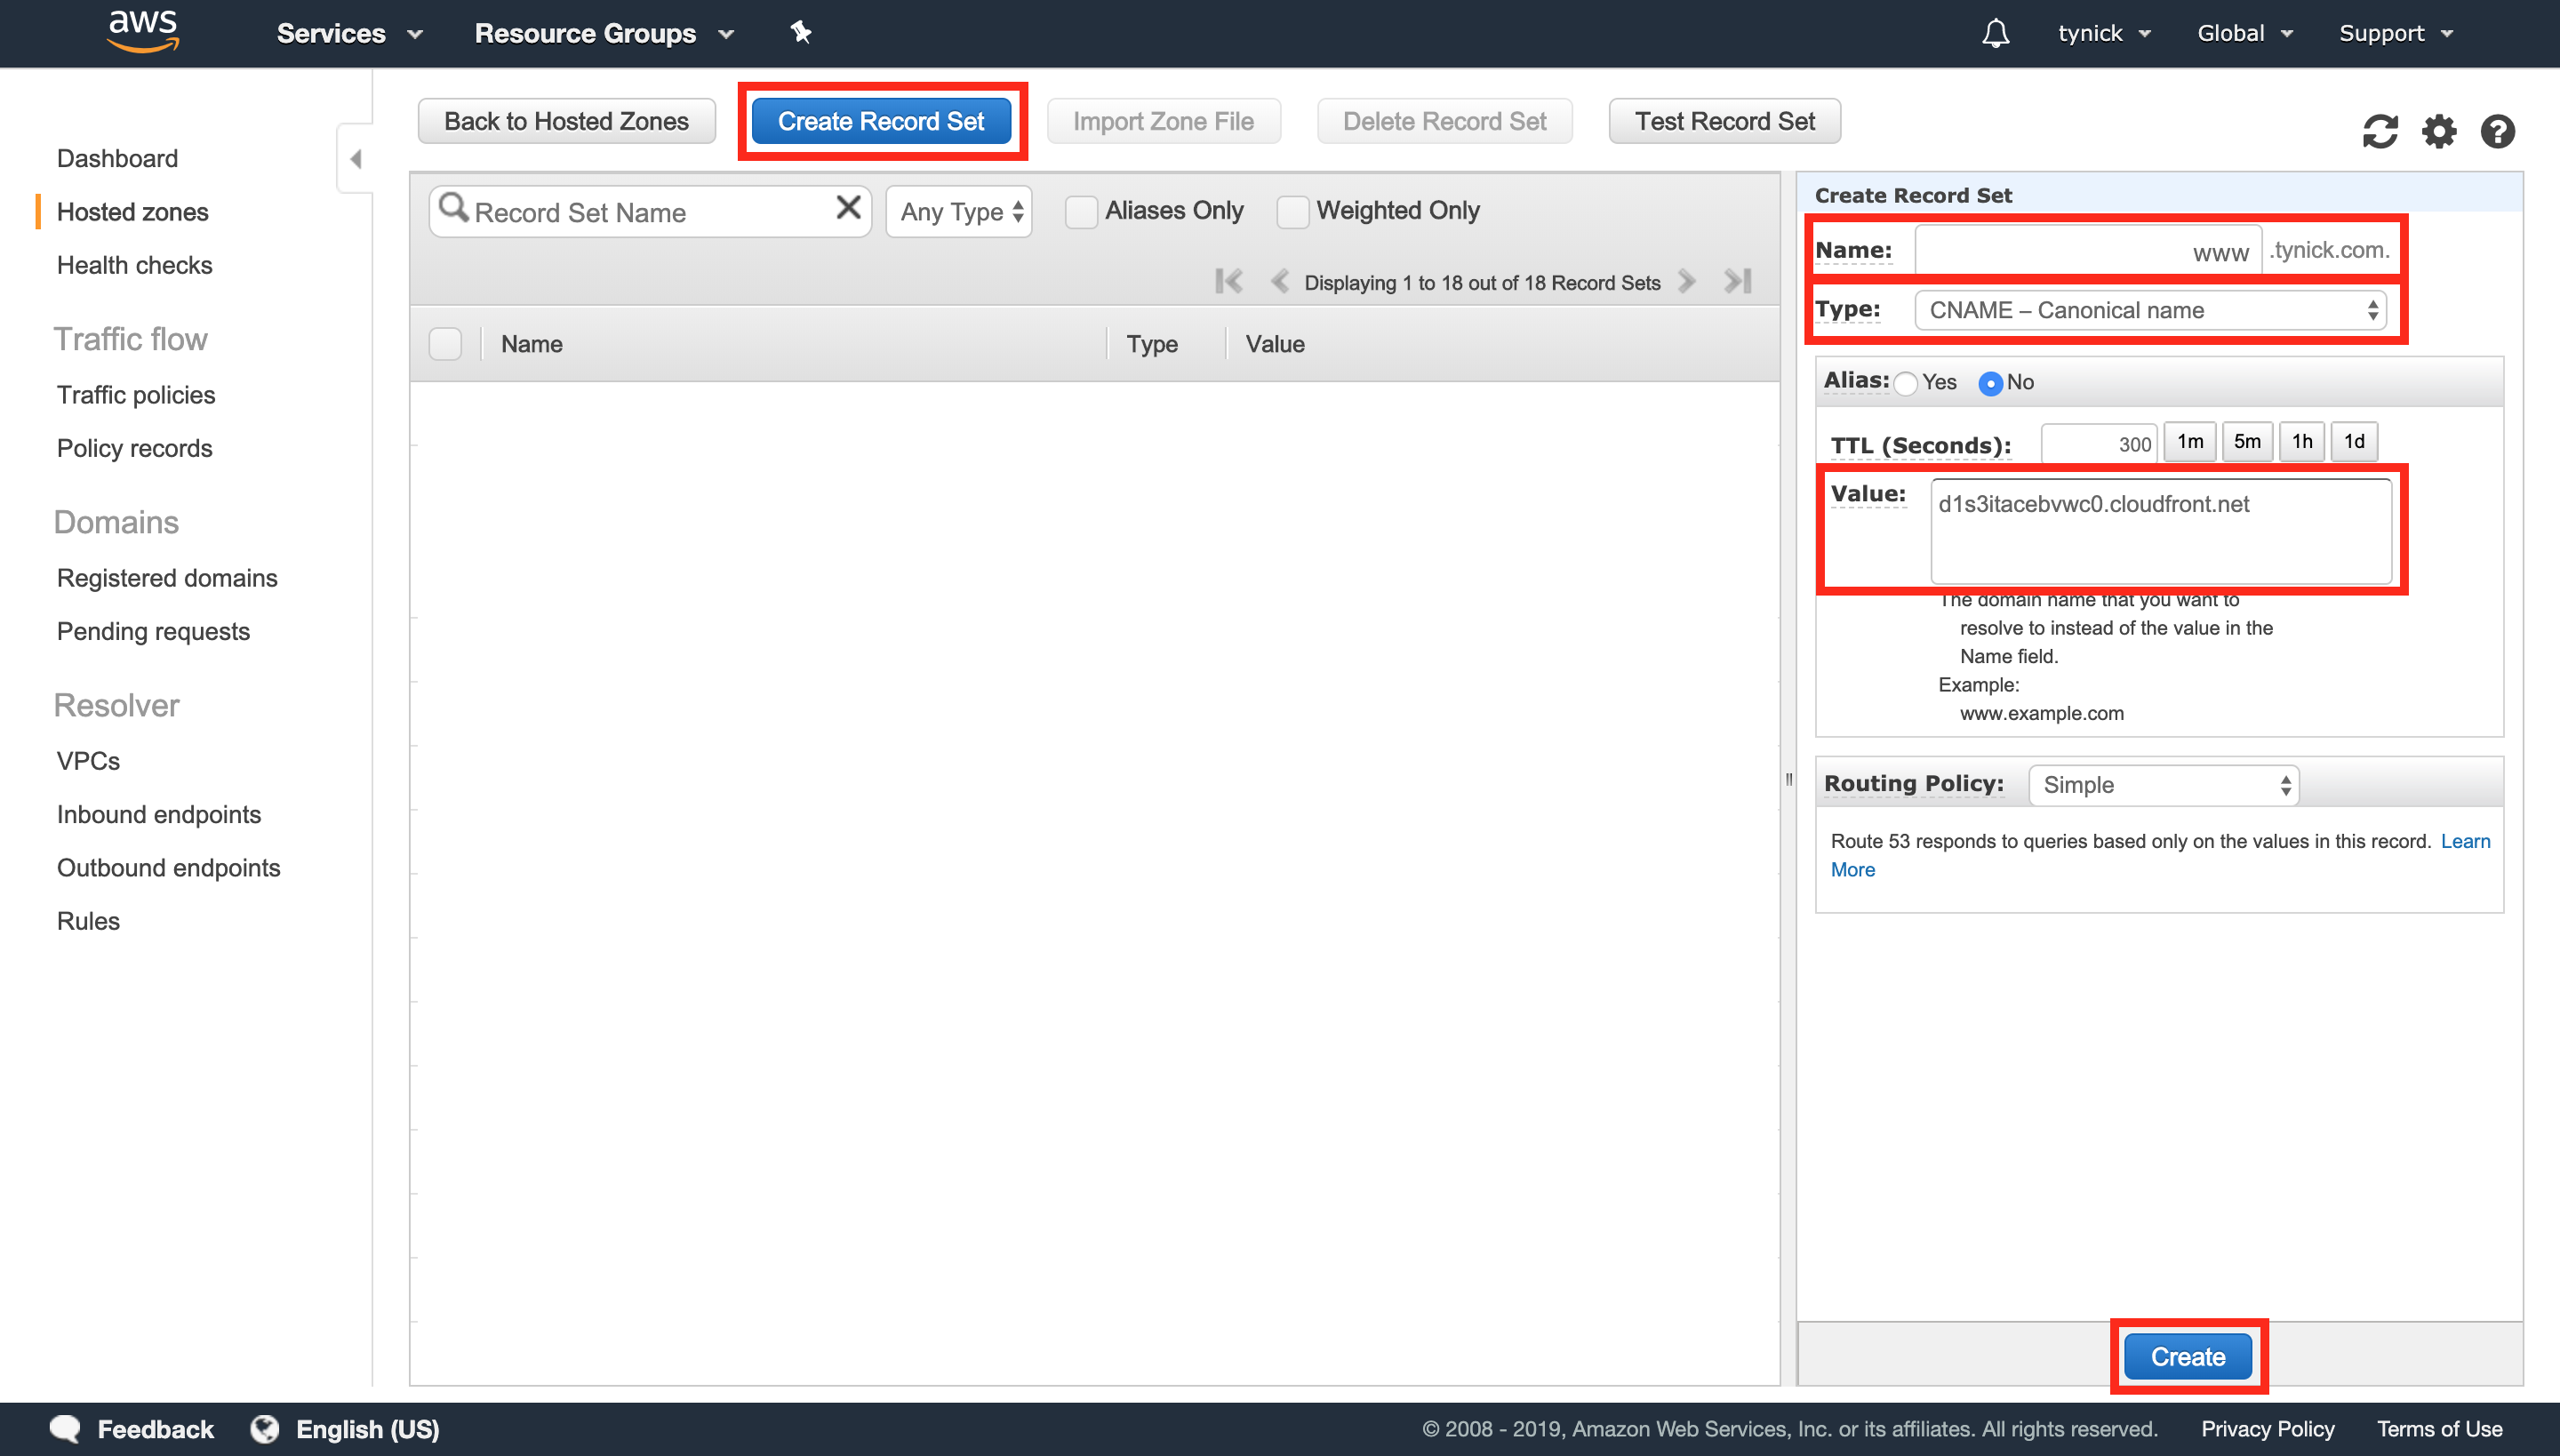
Head over to “Hosted Zones” on the left side menu of Route 53 and click on the zone that was created when you purchased a domain name earlier.
Now click “Create Record Set”. We will now add our www entry. In the “Name” field use “www”. “Type” will be “CNAME and “Value” will be the “Domain Name” you copied from the CloudFront Distribution after we created it.
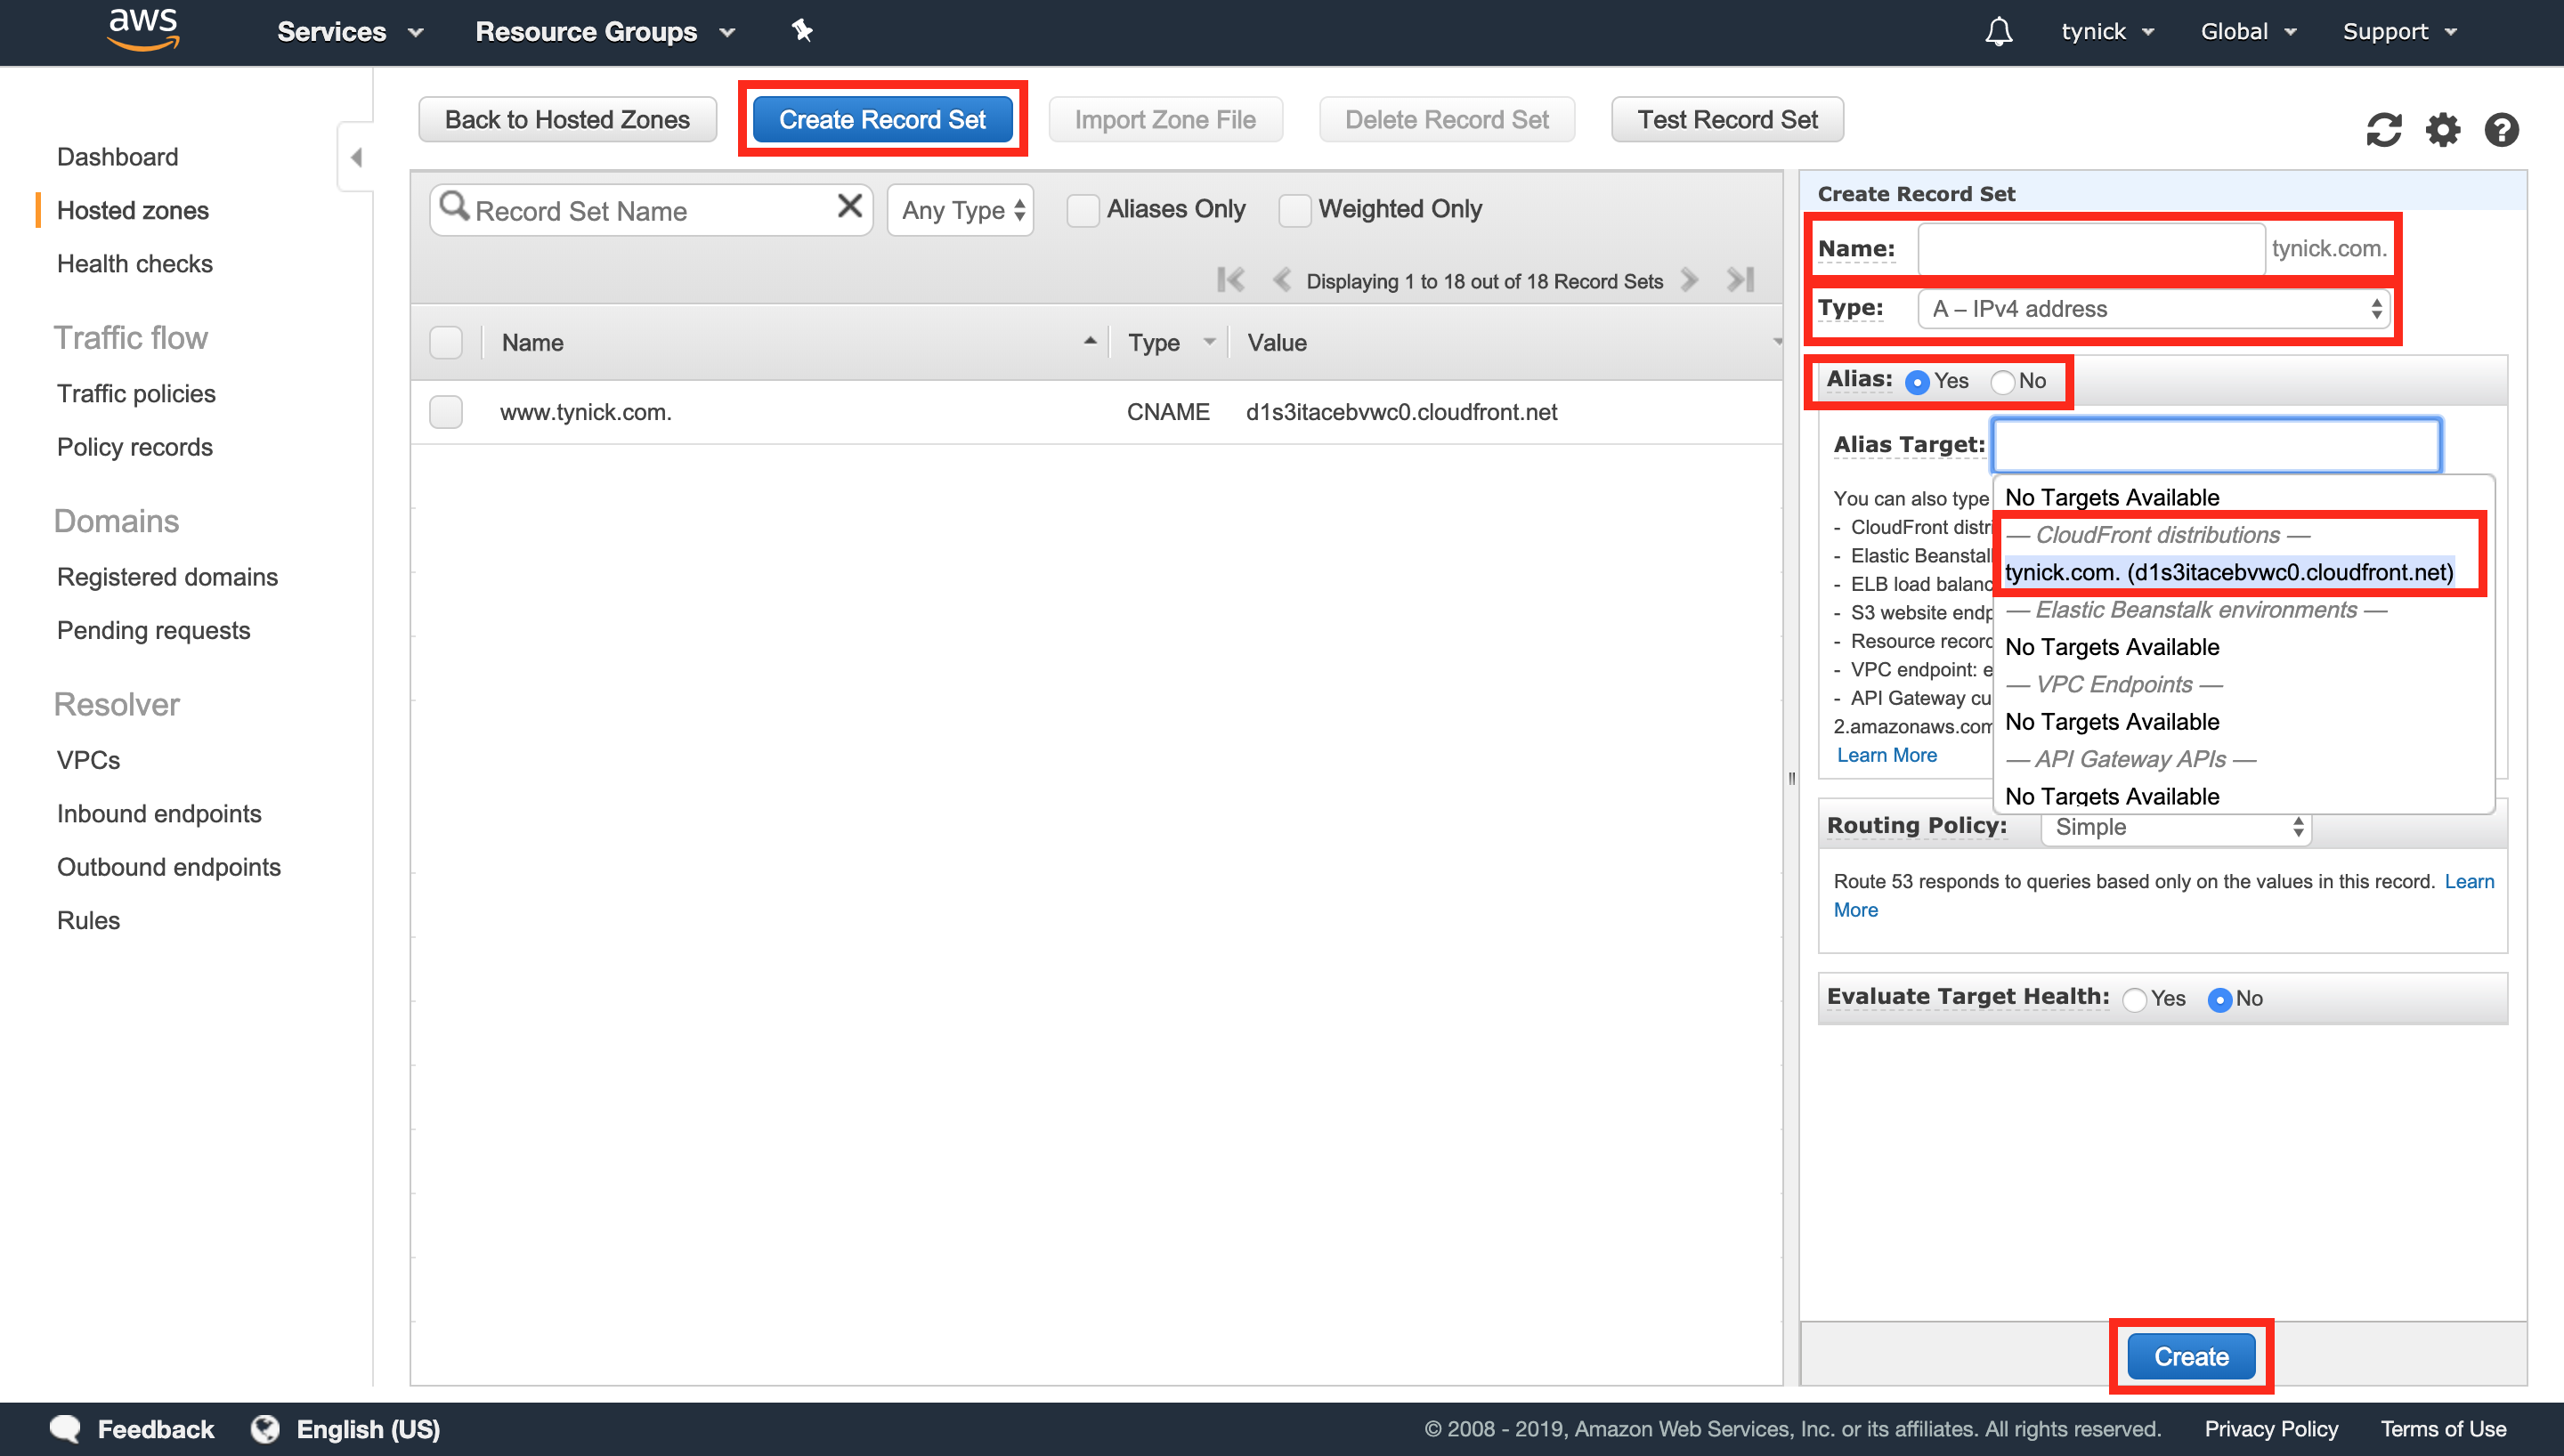
The next entry will be a bit different. Don’t add anything to the name. We want this entry to apply to the root domain. In my case that is tynick.com. “Type” is “A - IPv4 Address”. “Alias” is “Yes”. Now select the “Alias Target” text box. You should get a dropdown menu. Scroll down until you see your newly created CloudFront Distribution. Select it and click “Create”.
You Did It!
Open a browser and type in your domain name, you should see your site load. Notice the address bar. You should have been automatically redirected to use HTTPS.
You now have a place to host your website that uses HTTPS by default and is backed by a large CDN.
This is a very hassle free setup compared to the old fashioned way of running a server, installing an operating system, installing/configuring Apache, buying or creating an SSL cert, configuring DNS and then maintaining and updating that server throughout the life of your website.
With the setup we just built, all you really need to do is work on your site. Just upload your changes to AWS S3 when ready and you are good to go. There is also no need to worry about updating your certificate for HTTPS with our setup. Amazon Certificate Manager will automatically renew a public certificate if it is associated with another AWS service(CloudFront in our case).
Hopefully this was helpful to someone. You can message me on Twitter if you have any questions or comments.