
My Raspberry Pis Don't Have Drives Anymore (Network Booting a Pi 4 and Pi 5)
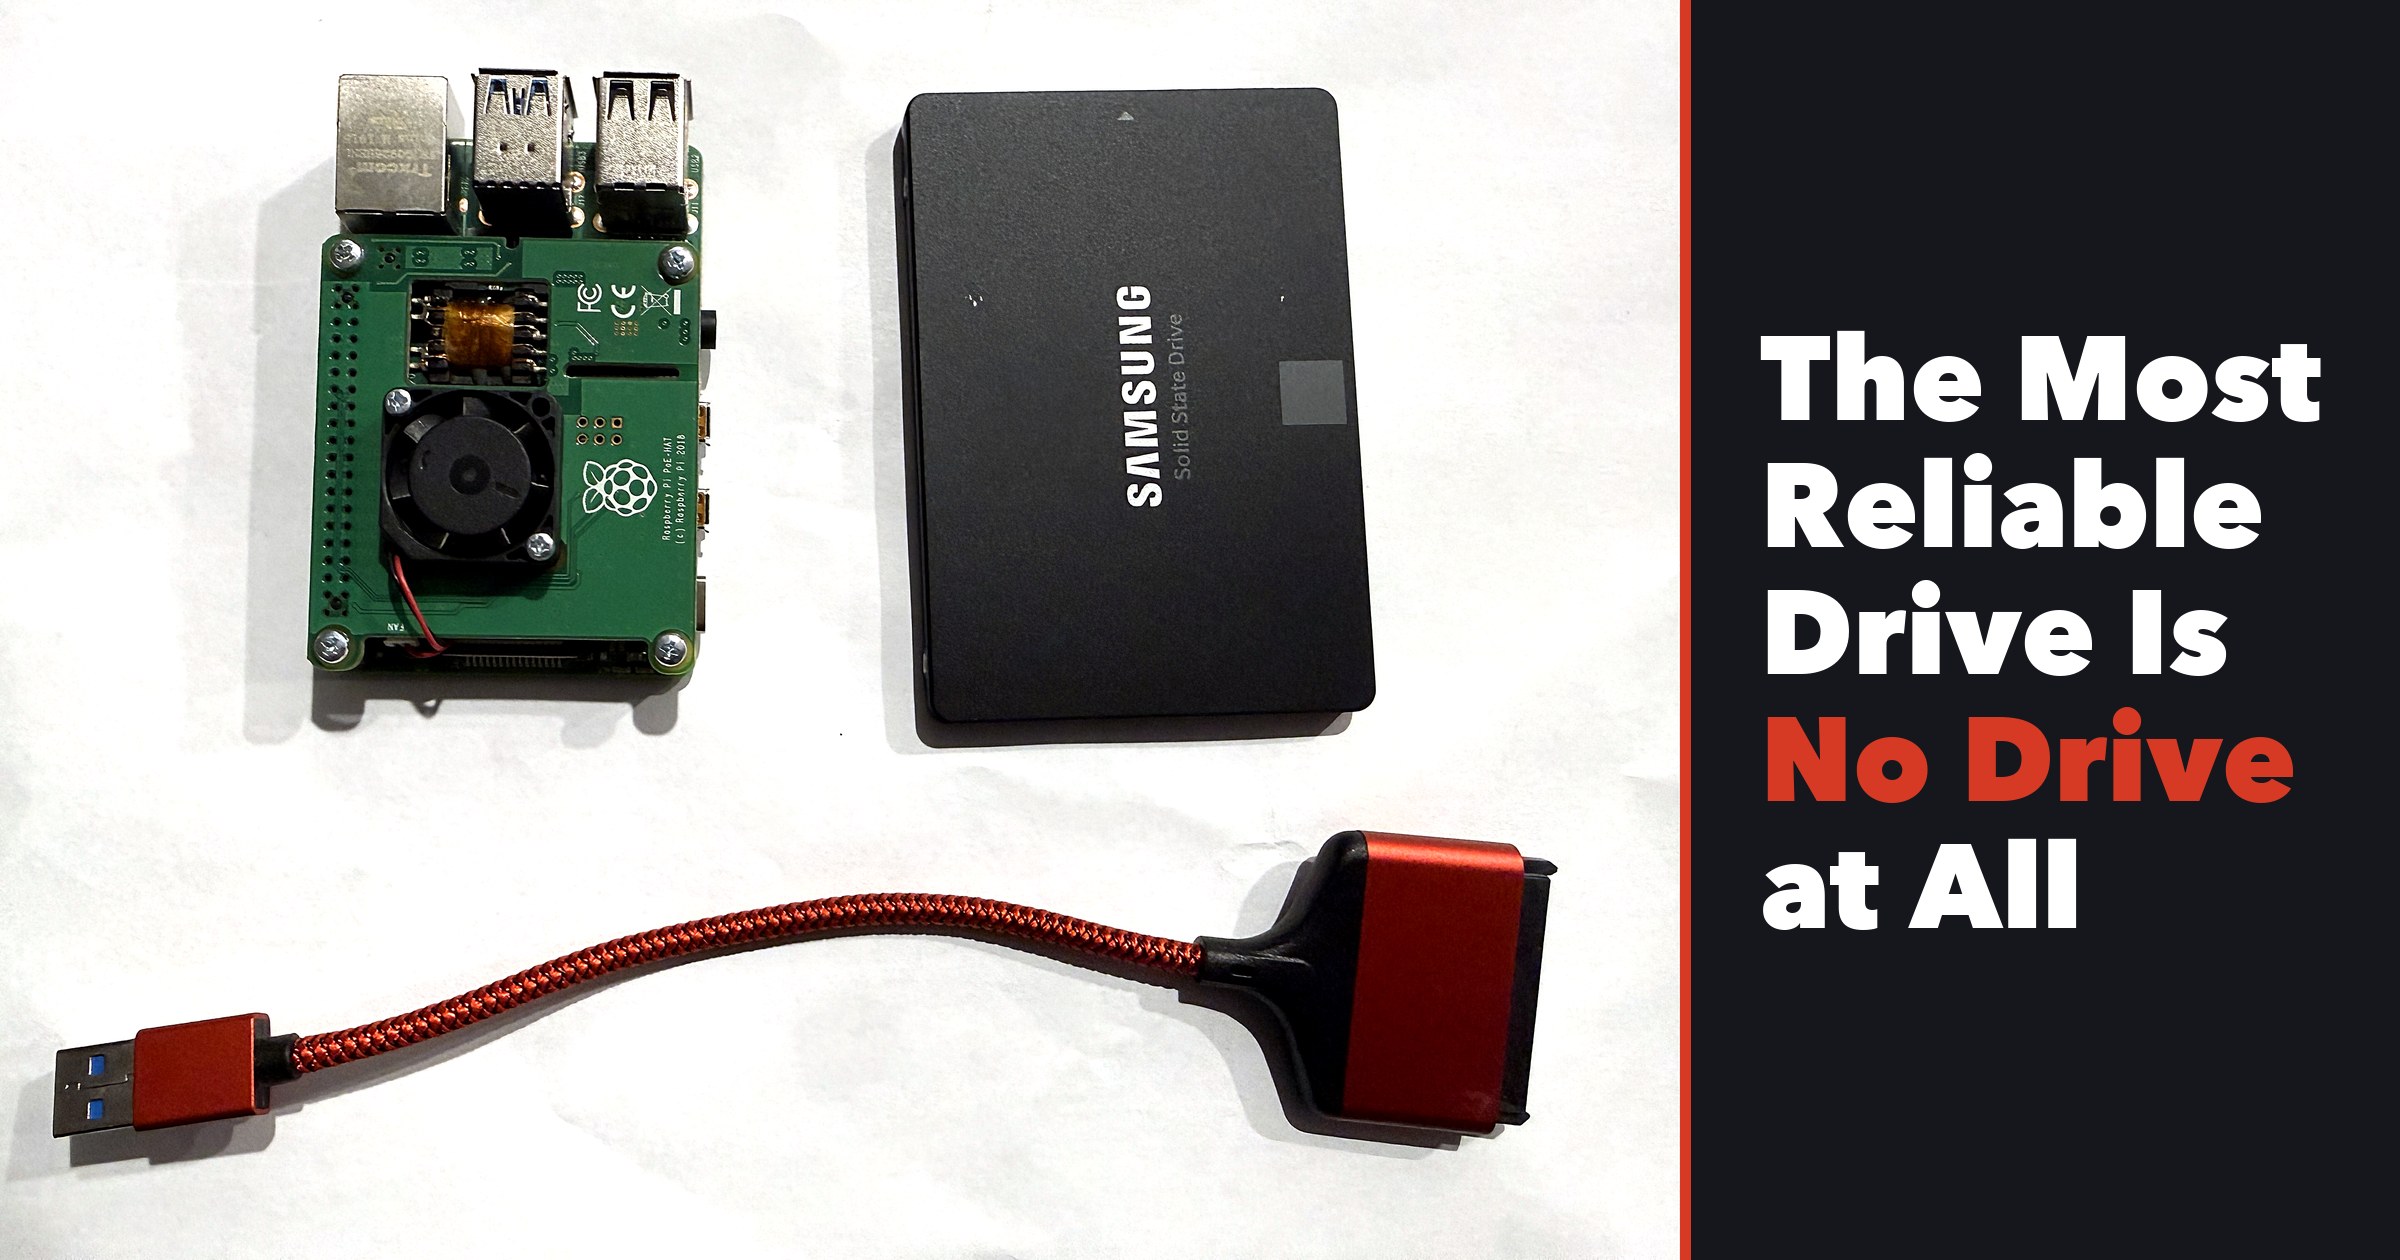
My Raspberry Pis Don’t Have Drives Anymore
Back in 2020 I wrote about booting a Raspberry Pi 4 from USB and then designed a 3D printed case for a Pi with an SSD. In that post I called SSD boot “production ready” and said this…
I can tinker with my Raspberry Pi 4 knowing that if something breaks, it’s most likely because of something dumb I did rather than a part failing.
I was very confident.
So in January 2021 I bought ten Samsung 870 EVO 250GB SSDs in one go, slapped them on USB adapters, and moved my Pis off SD cards. Problem solved. Forever.
Cue the narrator. It was not solved forever.
Nine out of ten
A few days ago I started checking drive health on my Pis and it flagged bad sectors on a few of them right away. So I sat down and checked every drive from that batch.
Nine of the ten were going bad.
Here’s the worst one. This is the SSD that was running a shairport-sync server for my back patio speakers…
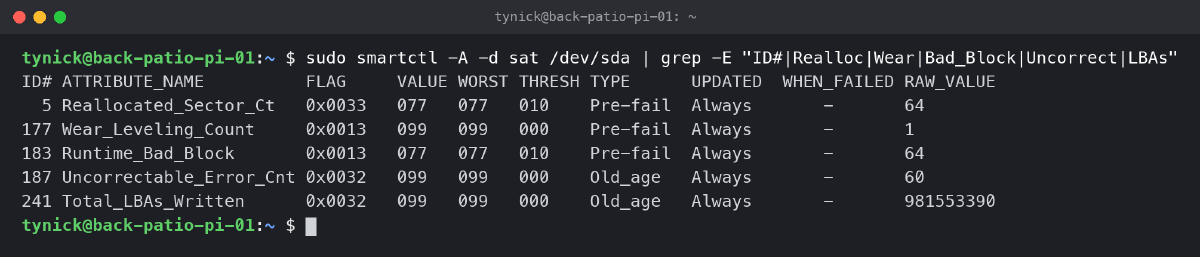
If you’ve never looked at this stuff before, here’s how to read it. SSDs keep a little report card on themselves called SMART. The number that matters is in the last column, RAW_VALUE.
- Reallocated_Sector_Ct is 64. The drive found 64 bad spots and moved the data somewhere else. A new drive should say 0.
- Uncorrectable_Error_Cnt is 60. Sixty times, it read something back and couldn’t fix the errors in it.
- Total_LBAs_Written is 981553390. That’s how much it has ever written, in 512 byte chunks. Do the math and it’s about 0.5 TB.
That last one is the part that bugs me. These drives are rated for 150 TB of writes. This one used about 0.3% of that and it’s already falling apart. That’s not wear. That’s a bad drive.
Across all ten drives…
- Nine of ten had reallocated sectors. Six on the best one, 64 on the worst.
- Four had uncorrectable errors.
- Two failed a full self-test with read errors.
- The patio drive was still getting worse. It went from 58 bad sectors to 64 in four days.
All ten were bought the same day and all ten run the original firmware, SVT01B6Q. If you search around, you’ll find plenty of other people reporting the same thing with 870 EVOs from around that time.
The one 860 EVO (the model before the 870) that I pulled from the same rack? Zero bad sectors. Go figure.
The warranty is five years. I bought them January 30, 2021. You can do that math. I asked Samsung nicely anyway. They said no, and that Samsung doesn’t do goodwill replacements. Not even for nine drives from the same batch.
Want to check your own drives? Install the tools and run the same command on your Pi.
sudo apt install smartmontools
sudo smartctl -A -d sat /dev/sda
smartmontools is the package that reads SMART data. -A means “show me the attributes”. -d sat tells it the drive is behind a USB to SATA adapter, which most Pi 4 SSD setups probably are. Some adapters need that spelled out. /dev/sda is the first USB drive. If you’re on an SD card instead, SD cards don’t give you SMART data like this, which is a whole other reason to keep reading.
So just buy new SSDs, right?
That was the plan. Then I looked at prices.
If you haven’t shopped for storage lately, prices went straight up in 2026. AI data centers are buying up flash. Crucial even shut down its consumer drive business so Micron could sell everything to the big guys. Replacing ten drives was going to cost a lot more than ten drives should.
Then I actually thought about what these Pis do. They play AirPlay audio and show a status page on a screen. They need about 5GB each and they barely write anything.
Why do they need drives at all?
What network booting actually is
Normally a Pi boots like this. The bootloader (a tiny chip on the board, not on your SD card) loads the boot files off the SD card or USB drive, starts Linux, and Linux runs off that same drive.
With network booting, the Pi doesn’t need a drive at all. Here’s what happens instead.
- The bootloader asks your router for an IP address, same as always.
- It downloads its boot files (kernel, config, all of it) from a server using TFTP. That stands for Trivial File Transfer Protocol. It’s very old and very simple, which is exactly why a tiny bootloader chip can speak it.
- Linux starts, and instead of mounting a disk, it mounts its whole root filesystem from that server over NFS (Network File System). Think of it like a network share, except the Pi’s entire operating system lives in it.
- From there it’s just a normal Pi. SSH works. Updates work. It has no idea it doesn’t own a disk.
The server keeps a folder for each Pi. If a Pi dies, you plug in a spare, point it at the same folder, and it boots up as the exact same machine. That part is pretty awesome.
What you need
| Part | Description |
|---|---|
| A Linux server | Anything that stays on. I used a small VM on my Proxmox host (2 cores, 2GB RAM, Ubuntu 24.04). Each Pi uses about 4 to 7GB of disk on it. An old PC or another Pi with a good drive should work too. |
| A Raspberry Pi 4 or Pi 5 | Both can network boot. This post covers both. My audio Pis are a Raspberry Pi 4 and my status screen is a Raspberry Pi 5. |
| Wired Ethernet | Wi-Fi won’t work for this. If you run PoE like me, it’s one cable for power and network. |
| The Pi’s current SD card or SSD | We’ll copy the system off of it. After that you can pull it out. |
Getting Started
This tutorial is going to assume you already have Raspberry Pi OS running on your Pi, a Linux server sitting next to it, and that you can SSH into both and edit files with your editor of choice.
I’m not going to walk you through any of that. There are probably 37,382 tutorials for it already and most of them are better than the one I would write.
Throughout this post, my server is 192.168.1.50 and my Pi is back-patio-pi-01. Swap in your own.
Not sure what your server’s IP is? Run this on it.
hostname -I
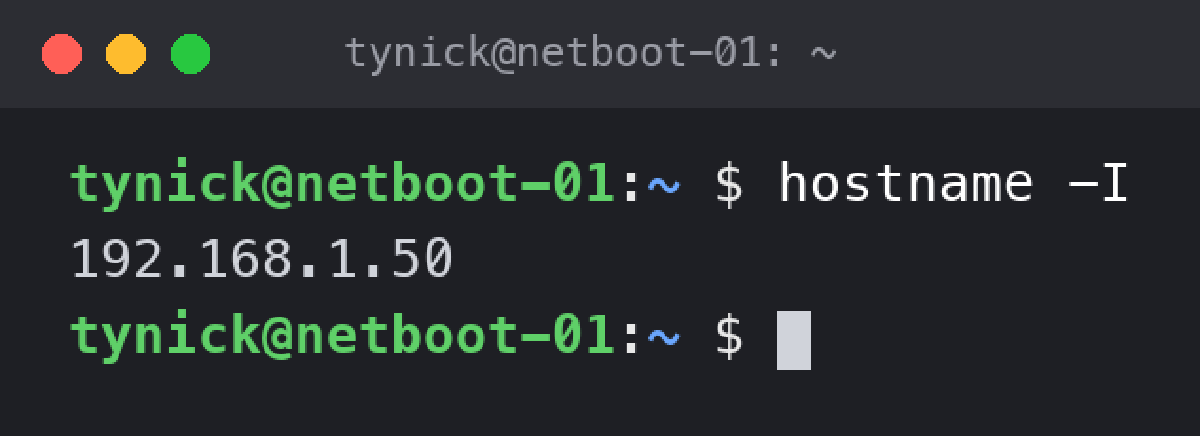
The first address is usually the one you want.
Step 1. Set Up The Server
Everything in this step runs on the server.
Install the two things we need. dnsmasq will serve the boot files over TFTP and nfs-kernel-server will share each Pi’s system folder.
sudo apt update
sudo apt install dnsmasq nfs-kernel-server rsync
Then make the folders everything will live in.
sudo mkdir -p /srv/netboot/tftp /srv/netboot/nfs
/srv/netboot/tftp is where boot files get served from. /srv/netboot/nfs is where each Pi’s whole system lives, one folder per Pi. The -p just means “make the parent folders too, and don’t complain if they already exist”.
TFTP
dnsmasq can do three jobs. DNS, DHCP and TFTP. I only want TFTP. My router already handles DHCP (handing out IP addresses) and I am not about to start a fight between two DHCP servers on my network because nobody wins that fight.
Create /etc/dnsmasq.d/netboot.conf with this in it.
port=0
enable-tftp
tftp-root=/srv/netboot/tftp
log-facility=-
Here’s what each line does…
port=0turns off DNS completely.enable-tftpturns on the file server.tftp-rootis the folder it serves files from.log-facility=-sends its logs straight to the system journal.
There’s no dhcp-range line, so it will never hand out IP addresses. It just serves files. Save it, then restart dnsmasq.
sudo systemctl restart dnsmasq
NFS
Now we tell the NFS server which folders to share and who’s allowed to use them. Add one line per Pi to /etc/exports. This one is for my patio Pi.
/srv/netboot/nfs/back-patio-pi-01 192.168.1.0/24(rw,sync,no_subtree_check,no_root_squash)
Replace 192.168.1.0/24 with your own network and back-patio-pi-01 with whatever you want to call your Pi’s folder.
That looks like a lot. Here’s what each piece means…
/srv/netboot/nfs/back-patio-pi-01is the folder being shared.192.168.1.0/24is who’s allowed to connect. That means anything with an address from192.168.1.1to192.168.1.254. More on why you might want to tighten this later.rwmeans read and write. The Pi needs to change its own files.syncmakes the server confirm a write is actually on its disk before telling the Pi “done”. Safer.no_subtree_checkturns off an extra check you don’t need here.no_root_squashlets root on the Pi be root on its own files. Normally that’s a bad idea. Here it’s required, because this is a whole operating system and root owns a lot of it.
Make the Pi’s folder, then tell NFS to reload.
sudo mkdir -p /srv/netboot/nfs/back-patio-pi-01
sudo exportfs -ra
Use the same folder name you put in /etc/exports.
You can check that it worked with sudo exportfs -v. Here’s what mine looks like with all four of my Pis set up.
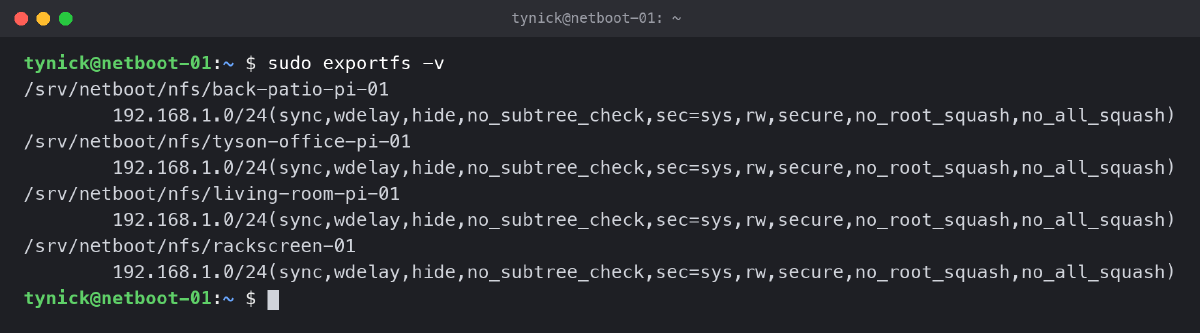
You’ll see a bunch of extra options in there like wdelay and secure. Those are defaults NFS fills in on its own. As long as you see your folder, rw, and no_root_squash, you’re good.
Step 2. Copy The Pi’s System To The Server
Everything in this step runs on the Pi you’re moving.
You can build a brand new system for each Pi, but the easiest way to move a Pi that already works is to copy it.
First install the NFS client and rsync.
sudo apt install nfs-common rsync
Then mount the Pi’s new home on the server. This makes the server’s folder show up on the Pi at /mnt/netroot, like plugging in a network drive.
sudo mkdir -p /mnt/netroot
sudo mount -t nfs -o vers=4.1 192.168.1.50:/srv/netboot/nfs/back-patio-pi-01 /mnt/netroot
Replace 192.168.1.50 with your server’s IP and back-patio-pi-01 with your Pi’s folder name.
-t nfs says it’s an NFS share. -o vers=4.1 picks the NFS version. The rest is “this folder on that server, show it here”.
Before you copy anything, look at what’s on the Pi. One of my Pis used to be a TV station. It had 51GB of old That 70s Show episodes sitting in /opt that I’d completely forgotten about. This shows you the biggest folders.
sudo du -xh --max-depth=2 / | sort -rh | head
If anything huge in there isn’t needed, delete it or skip it with --exclude in the next command.
Now copy the whole system.
sudo rsync -aAXHx --numeric-ids / /mnt/netroot/
That’s a lot of letters. Here’s what they do…
-acopies everything and keeps permissions, owners and timestamps.-Akeeps ACLs (extra permission rules).-Xkeeps extended attributes.-Hkeeps hard links as hard links instead of making copies.-xstays on this one filesystem. That stops it from wandering into/proc,/sysand the NFS mount we just made, which would be very bad.--numeric-idskeeps user and group IDs exactly as numbers, so the files are owned by the right users when the Pi boots from them.
Then copy the boot partition into the copy.
sudo mkdir -p /mnt/netroot/boot/firmware
sudo rsync -rtH /boot/firmware/ /mnt/netroot/boot/firmware/
On an SD card or SSD the boot files are on their own little partition. On the server they’re just a folder inside the Pi’s system.
This copy can be slow. That sync option makes the server confirm every file, and a Pi has a lot of little files. Mine copied about 400MB in the first 10 minutes. The trick is to change sync to async in /etc/exports on the server just while you copy, run sudo exportfs -ra, and put it back to sync when you’re done. Mine went from crawling to about 4MB/s.
When it’s finished, unmount it.
sudo umount /mnt/netroot
Step 3. Tell The Copy It Lives On The Network Now
These edits happen on the server, to the files inside the Pi’s folder. Be careful here. The Pi’s copy of /etc/fstab lives at /srv/netboot/nfs/back-patio-pi-01/etc/fstab. Plain /etc/fstab is your server’s own, and you don’t want to mess with that one by accident.
Make a backup of each file before you change it, like this.
sudo cp /srv/netboot/nfs/back-patio-pi-01/boot/firmware/cmdline.txt /srv/netboot/nfs/back-patio-pi-01/boot/firmware/cmdline.txt.backup
Swap back-patio-pi-01 for your Pi’s folder here and in every path in this step.
cmdline.txt
/srv/netboot/nfs/back-patio-pi-01/boot/firmware/cmdline.txt tells the Linux kernel where to find its root filesystem. Right now it points at the SD card or SSD. Replace everything in it with this one line.
console=serial0,115200 console=tty1 root=/dev/nfs nfsroot=192.168.1.50:/srv/netboot/nfs/back-patio-pi-01,vers=4.1,proto=tcp rw ip=dhcp rootwait
Replace 192.168.1.50 with your server’s IP and back-patio-pi-01 with your Pi’s folder.
It has to be one single line. No line breaks. The important parts.
root=/dev/nfsmeans “your root filesystem is on the network”.nfsroot=is exactly where. Your server’s IP, then the Pi’s folder.ip=dhcpmakes the kernel get an IP address by itself before it tries to mount anything. Without it, it has no network yet.rwmounts it writable.
config.txt
This is the one that got me. In /srv/netboot/nfs/back-patio-pi-01/boot/firmware/config.txt, find this line.
auto_initramfs=1
and change it to.
auto_initramfs=0
Here’s why. Raspberry Pi OS loads an initramfs at boot. It’s a tiny temporary system that runs before your real one, and its main job is to find your disk and mount it. Over the network there is no disk, so the Pi never finishes booting.
The really confusing part is what that looks like from the outside. My Pi answered ping (the kernel had already set up the network) but refused SSH, and I couldn’t see a single packet from it reaching the NFS server. I stared at that for longer than I’d like to admit.
The server logs gave it away. Here’s the patio Pi’s first boot attempt. Look at the fourth line.
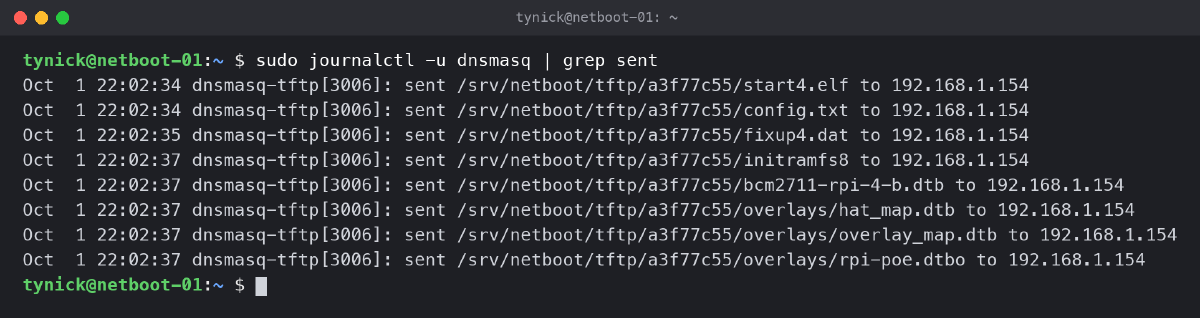
There it is. initramfs8. The Pi happily downloaded it, ran it, and then looked for a disk that was never coming. Turning it off fixed everything instantly. The kernel already knows how to mount an NFS root by itself. It doesn’t need the help.
fstab
/srv/netboot/nfs/back-patio-pi-01/etc/fstab is the Pi’s list of drives to mount at boot, and it still lists the old disk. Delete the lines for / and /boot/firmware. They usually start with PARTUUID=. Leave the proc line alone.
Turn off the swap file
You don’t want a swap file over the network. It would be slow and pointless. How you turn it off depends on your version of Raspberry Pi OS. You can check with cat /srv/netboot/nfs/back-patio-pi-01/etc/os-release.
On Bookworm (Debian 12), remove the swap service and file.
sudo rm /srv/netboot/nfs/back-patio-pi-01/etc/systemd/system/multi-user.target.wants/dphys-swapfile.service
sudo rm -f /srv/netboot/nfs/back-patio-pi-01/var/swap
On Trixie (Debian 13), open /srv/netboot/nfs/back-patio-pi-01/etc/rpi/swap.conf and add Mechanism=zram under the [Main] line, then delete the old swap file.
sudo rm -f /srv/netboot/nfs/back-patio-pi-01/var/swap
That keeps swap in compressed RAM (that’s what zram is) and never touches a file.
Step 4. Serve The Boot Files
When a Pi network boots, it asks for its files in a folder named after its serial number. On a Pi 4, you can find it like this (run this one on the Pi).
vcgencmd otp_dump | grep ^28:
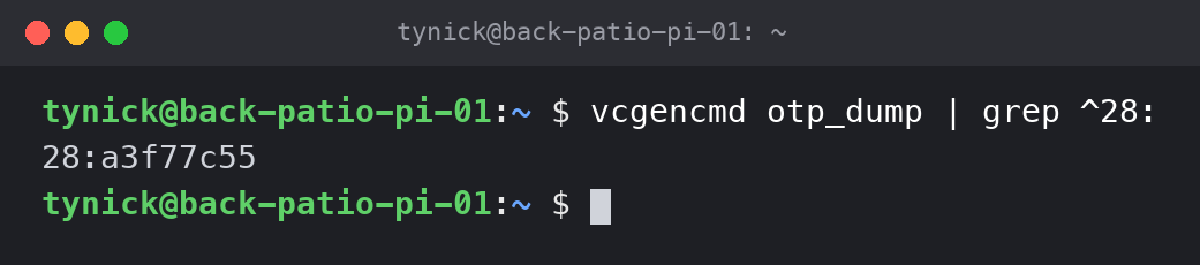
Ignore the 28: at the front. My Pi’s serial is a3f77c55.
The Pi 5 is a little different. Its serial is 16 characters long, but it only asks for the last 8. Honestly, the easiest way to find it on any Pi is to let it try to boot and read the server’s logs. dnsmasq logs every file a Pi asks for that doesn’t exist, folder name included.
sudo journalctl -u dnsmasq | grep "not found"

That’s my Pi 5 asking for a55ce506/config.txt. Free serial number.
Now point that folder at the Pi’s boot files. Back on the server.
sudo mkdir -p /srv/netboot/tftp/a3f77c55
sudo mount --bind /srv/netboot/nfs/back-patio-pi-01/boot/firmware /srv/netboot/tftp/a3f77c55
Replace a3f77c55 with your Pi’s serial number and back-patio-pi-01 with your Pi’s folder.
A bind mount makes the same folder show up in two places. The TFTP folder doesn’t hold a copy of the boot files. It is the Pi’s boot folder. That means when the Pi installs a kernel update, it writes to its own /boot/firmware, which is the exact same files TFTP serves on the next boot. Updates just work.
To make that survive a server reboot, add it to the server’s /etc/fstab.
/srv/netboot/nfs/back-patio-pi-01/boot/firmware /srv/netboot/tftp/a3f77c55 none bind 0 0
Same swaps here. Your Pi’s folder and your Pi’s serial number.
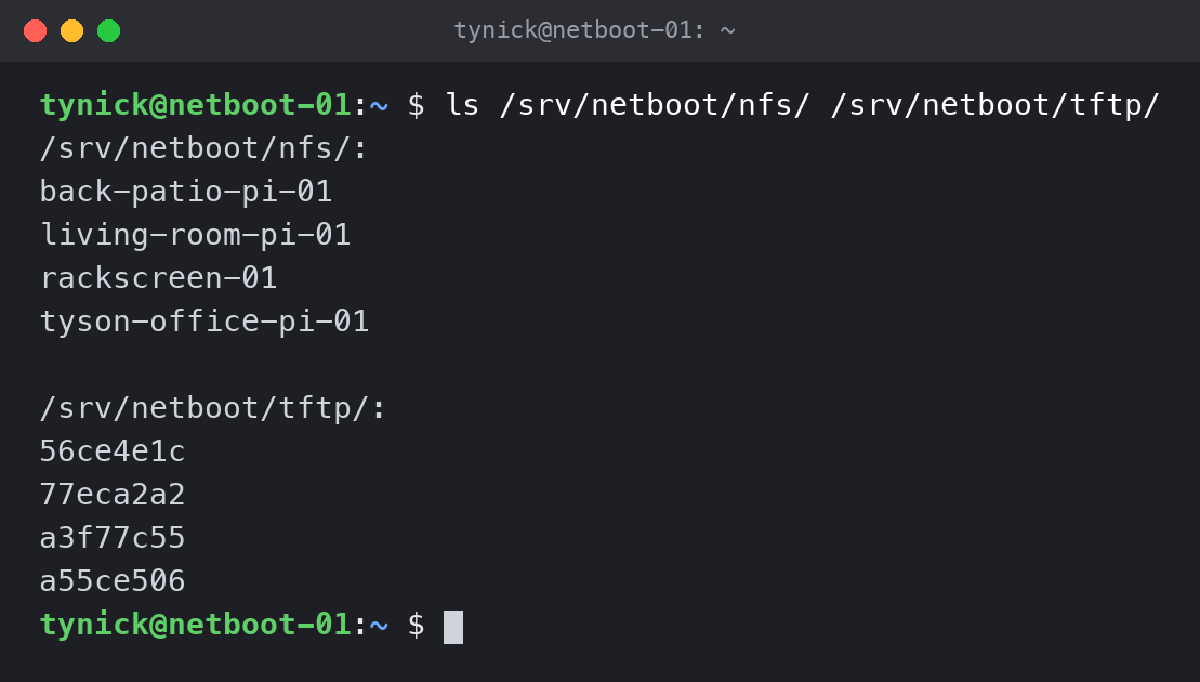
With all four of my Pis set up, the server looks like this. One system folder per Pi, one serial number folder per Pi.
Step 5. Change The Bootloader
Last step, on the Pi itself. We need to tell its bootloader to try the network first.
First, save the current bootloader config to a file.
sudo rpi-eeprom-config > boot.conf
In boot.conf, set these two lines. If BOOT_ORDER is already there, change it. If TFTP_IP isn’t there, add it at the bottom.
BOOT_ORDER=0xf42
TFTP_IP=192.168.1.50
Replace 192.168.1.50 with your server’s IP.
BOOT_ORDER is read right to left, one digit at a time. On a Pi 4.
2means network4means USB drivefmeans start over and try again
So 0xf42 means “try the network, then the USB drive, then start over”. If the server doesn’t answer, the Pi falls back to its USB drive. That’s a really nice safety net while you’re testing.
The Pi 5 numbers things a little differently. On the Pi 5, 1 is the SD card, so I used 0xf12 (network, then SD card).
TFTP_IP tells the Pi exactly where the server is, so you don’t have to set anything up on your router.
Now apply it and reboot.
sudo rpi-eeprom-config --apply boot.conf
sudo reboot
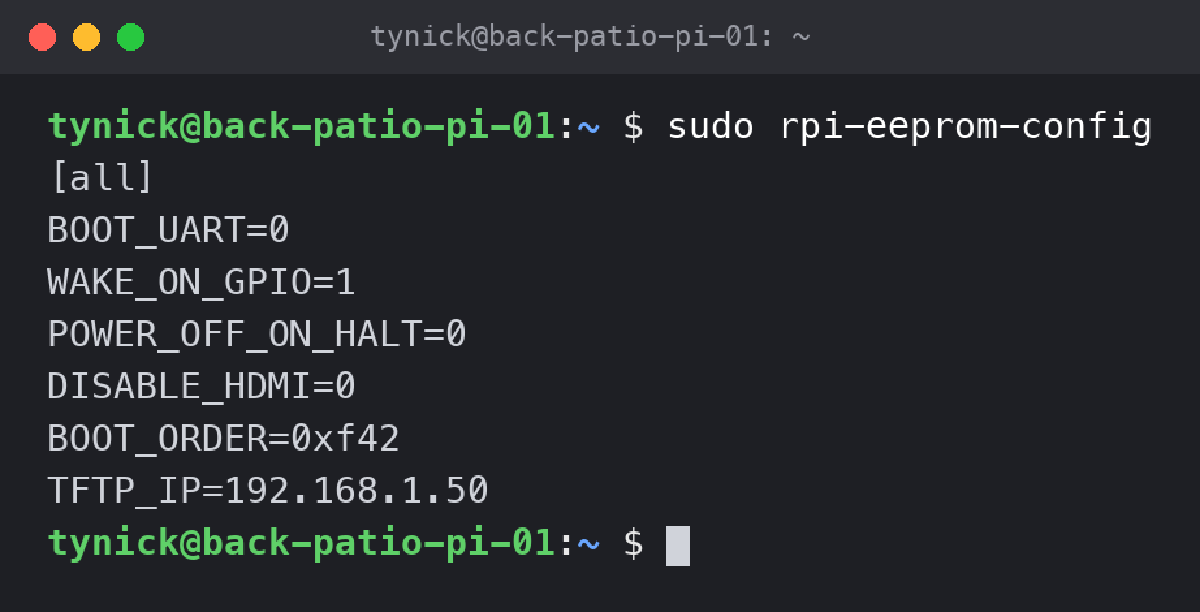
The new bootloader settings get written during that reboot. You can check them afterwards with sudo rpi-eeprom-config.
Did it work?
Once the Pi is back up, SSH in and run.
findmnt -o TARGET,SOURCE,FSTYPE /
findmnt shows you where a folder is mounted from. / is the root of the whole system.
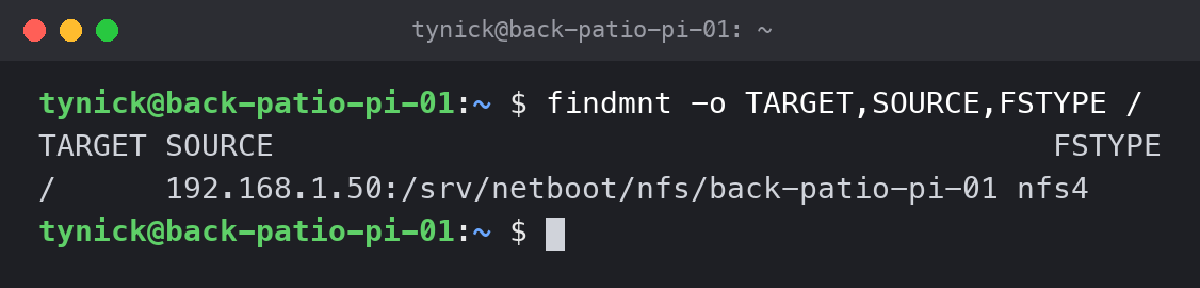
If SOURCE is your server and FSTYPE is nfs4, congratulations. Your Pi is running entirely off the network. Go ahead and pull that drive. Mine went into a pile.
If it says /dev/sda2 or /dev/mmcblk0p2, the Pi fell back to its own drive. Check the server’s dnsmasq log (sudo journalctl -u dnsmasq) to see what the Pi asked for and what it couldn’t find.
The traps I stepped in so you don’t have to
Updates can quietly break it
I don’t know that this will ever happen, but it worried me. If an update ever put config.txt or cmdline.txt back to the defaults, nothing would break right away. The Pi would just fail to boot the next time it restarted.
So I have a little script on the server that checks those two files every few minutes and puts my changes back if anything touched them. If you only have one or two Pis, just keep it in the back of your head after big updates.
initramfs-tools will jam apt
This one was sneaky. Even with the initramfs turned off, Raspberry Pi OS still builds a new one every time the kernel or firmware updates. On my Pi 5, that build failed.
update-initramfs: Generating /boot/initrd.img-6.18.50+rpt-rpi-v8
mkinitramfs: failed to determine device for /
mkinitramfs: workaround is MODULES=most, check:
grep -r MODULES /etc/initramfs-tools
That leaves apt half finished, and it keeps failing until you fix it. Automatic updates included. The nice thing is the error message tells you the fix. On the Pi, create /etc/initramfs-tools/conf.d/netboot with one line in it.
MODULES=most
Then finish the update that broke.
sudo dpkg --configure -a
I only caught this because my Pi 5 hit it on its very first update. My other three probably would have jammed on their next kernel update. I’d do this one on every network booted Pi.
Installing packages is slow
Normal use is fine, but big installs crawl. Setting up Chromium on my Pi 5 took over 20 minutes.
The installer forces every file it unpacks onto the disk before moving to the next one, so a power outage can’t leave you with half of a system file. Over the network, each of those is a round trip to the server, and Chromium pulled in almost 180 packages. Since that mostly happens during 4am updates, I don’t really care.
The Pi 5 needs real power
A Pi 5 wants more power than a Pi 4. If you’re running it on PoE like me, I’d use a PoE HAT made for the Pi 5 on a PoE+ switch port. Otherwise use a proper 27W USB-C supply.
The downsides (because there are some)
One server runs everything. If that server goes down, every network booted Pi freezes. They should pick back up when it comes back. My drives went bad one at a time. This fails all at once. For me that’s fine, because if that server is down I have bigger problems.
NFS has no password. Anything that can reach the share can read or change those systems, as root. In the export line above I allowed the whole 192.168.1.0/24 network. You can lock it down to just the Pi’s own IP instead, like 192.168.1.154(rw,sync,no_subtree_check,no_root_squash). Either way, keep the server off any network your guests or IoT junk can reach.
Disk-heavy stuff doesn’t belong here. Databases, anything that writes constantly, or anything you need to keep working when the server is down should stay on local storage. My Home Assistant dashboard Pis have healthy drives, so they’re staying exactly how they are.
Where I ended up
Three audio Pis and a Pi 5 that runs a status screen all boot from one little VM now. None of them use a drive. The bad SSDs are in a pile. Samsung doesn’t want them either.
I also have a stack of spare Pi 4s with bad SSDs. They don’t need the SSDs anymore, so each one is a working Pi waiting for a job.
It took some trial and error to get here (see initramfs). But the next Pi I move should take about 20 minutes and one reboot.
This isn’t a great idea if you only have one or two Pis. A new SSD or a good SD card is less work, and you won’t have a server to babysit. It made sense for me because I had a stack of Pis with dying drives and a Proxmox host that’s already running all the time.
Turns out the most reliable drive is no drive at all. At least for now. I’ll be sure to post an update when I find out why this was all a terrible idea.